刚入职一个星期,现在才有时间开始这个框架的博客,我自己接的项目,第一次拿商业项目开源,大神们可能看着会觉得这不怎么样吧,其实我上线的项目是PHP写的,我只是在这个项目的基础上,改为了SSM框架。首先构建一个Maven工程,然后配置好项目的文件夹和pom属性,其中文件夹设置流程如下:
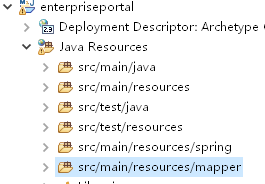
新建的工程默认有src/main/java 、src/main/resources、src/test/java这三个文件夹,为了完整性我们加入一个test的资源文件夹:

添加好这个资源文件夹后,还要设置好该文件夹输出的目录,对项目右键--->属性(Properties)

然后打开新建的文件夹,粘贴目标路径

接下来,我们新建好我们项目需要用的包,也就是配置好包名

添加spring和mapper文件夹用于加入xml文件
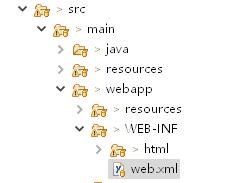
接下来我们配置一个个很重要的xml文件,这将让我们引入spring和mapper来管理整个工程首先是如何引入spring,我们配置一下在src/main/webapp/WEB-INF文件夹下的web.xml文件
配置内容如下:
<web-app xmlns="http://xmlns.jcp.org/xml/ns/javaee" xmlns:xsi="http://www.w3.org/2001/XMLSchema-instance"
    xsi:schemaLocation="http://xmlns.jcp.org/xml/ns/javaee
                      http://xmlns.jcp.org/xml/ns/javaee/web-app_3_1.xsd"
    version="3.1" metadata-complete="true">
    <display-name>Archetype Created Web Application</display-name>
    <welcome-file-list>
        <welcome-file>index.jsp</welcome-file>
    </welcome-file-list>
    <servlet-mapping>
        <servlet-name>Kaptcha</servlet-name>
        <url-pattern>/Kaptcha</url-pattern>
    </servlet-mapping>
    <servlet>
        <servlet-name>spring-dispatcher</servlet-name>
        <servlet-class>org.springframework.web.servlet.DispatcherServlet</servlet-class>
        <init-param>
            <param-name>contextConfigLocation</param-name>
            <param-value>classpath:spring/spring-*.xml</param-value>
        </init-param>
    </servlet>
    <servlet-mapping>
        <servlet-name>spring-dispatcher</servlet-name>
        <!-- 默认匹配所有的请求 -->
        <url-pattern>/</url-pattern>
    </servlet-mapping>
</web-app>
其中spring-dispatcher这个标签,定义的意思就是扫描classpath下spring文件夹下的spring-XXX.xml 命名的所有文件
接下来我们配置spring下的所有spring-XXX.xml文件
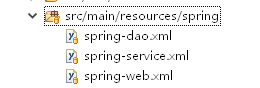
spring-dao.xml
<?xml version="1.0" encoding="UTF-8"?>
<beans xmlns="http://www.springframework.org/schema/beans"
	xmlns:xsi="http://www.w3.org/2001/XMLSchema-instance" xmlns:context="http://www.springframework.org/schema/context"
	xsi:schemaLocation="http://www.springframework.org/schema/beans
    http://www.springframework.org/schema/beans/spring-beans.xsd
    http://www.springframework.org/schema/context
    http://www.springframework.org/schema/context/spring-context.xsd">
	<!-- 配置整合mybatis过程 -->
	<!-- 1.配置数据库相关参数properties的属性:${url} -->
	<context:property-placeholder location="classpath:jdbc.properties"/>
	<!-- 2.数据库连接池 -->
	<bean id="dataSource" class="com.mchange.v2.c3p0.ComboPooledDataSource">

		<!-- 配置连接池属性 -->
		<property name="driverClass" value="${jdbc.driver}" />
		<property name="jdbcUrl" value="${jdbc.url}" />
		<property name="user" value="${jdbc.username}" />
		<property name="password" value="${jdbc.password}" />

		<!--  c3p0连接池的私有属性 -->
		<property name="maxPoolSize" value="30"/>
		<property name="minPoolSize" value="10"/>
		<!--  关闭连接后不自动commit -->
		<property name="autoCommitOnClose" value="false"/>
		<!-- 获取连接超时时间 -->
		<property name="checkoutTimeout" value="10000"/>
		<!-- 获取连接失败重试次数 -->
		<property name="acquireRetryAttempts" value="2"/>
	</bean>
	<!-- 3.配置SqlSessionFactory对象 -->
	<bean id="sqlSessionFactory" class="org.mybatis.spring.SqlSessionFactoryBean">
		<!-- 注入数据库连接池 -->
		<property name="dataSource" ref="dataSource" />
		<!-- 配置MyBaties全局配置文件:mybatis-config.xml -->
		<property name="configLocation" value="classpath:mybatis-config.xml" />
		<!-- 扫描entity包 使用别名 -->
		<property name="typeAliasesPackage" value="com.caeser.enterpriceportal.entity" />
		<!-- 扫描sql配置文件:mapper需要的xml文件 -->
		<property name="mapperLocations" value="classpath:mapper/*.xml" />
	</bean>
	<!-- 4.配置扫描Dao接口包,动态实现Dao接口,注入到spring容器中 -->
	<bean class="org.mybatis.spring.mapper.MapperScannerConfigurer">
		<!-- 注入sqlSessionFactory -->
		<property name="sqlSessionFactoryBeanName" value="sqlSessionFactory" />
		<!-- 给出需要扫描Dao接口包 -->
		<property name="basePackage" value="com.caeser.enterpriceportal.dao" />
	</bean>
</beans>
spring-service.xml
<?xml version="1.0" encoding="UTF-8"?>
<beans xmlns="http://www.springframework.org/schema/beans"
    xmlns:xsi="http://www.w3.org/2001/XMLSchema-instance"
    xmlns:context="http://www.springframework.org/schema/context"
    xmlns:tx="http://www.springframework.org/schema/tx"
    xsi:schemaLocation="http://www.springframework.org/schema/beans
    http://www.springframework.org/schema/beans/spring-beans.xsd
    http://www.springframework.org/schema/context
    http://www.springframework.org/schema/context/spring-context.xsd
    http://www.springframework.org/schema/tx
    http://www.springframework.org/schema/tx/spring-tx.xsd">
    <!-- 扫描service包下所有使用注解的类型 -->
    <context:component-scan base-package="com.caeser.enterpriceportal.service" />
    <!-- 配置事务管理器 -->
    <bean id="transactionManager"
        class="org.springframework.jdbc.datasource.DataSourceTransactionManager">
        <!-- 注入数据库连接池 -->
        <property name="dataSource" ref="dataSource" />
    </bean>

    <!-- 配置基于注解的声明式事务 -->
    <tx:annotation-driven transaction-manager="transactionManager" />
</beans>
spring-web.xml
<?xml version="1.0" encoding="UTF-8"?>
<beans xmlns="http://www.springframework.org/schema/beans"
    xmlns:xsi="http://www.w3.org/2001/XMLSchema-instance" xmlns:context="http://www.springframework.org/schema/context"
    xmlns:mvc="http://www.springframework.org/schema/mvc"
    xsi:schemaLocation="http://www.springframework.org/schema/beans
    http://www.springframework.org/schema/beans/spring-beans.xsd
    http://www.springframework.org/schema/context
    http://www.springframework.org/schema/context/spring-context.xsd
    http://www.springframework.org/schema/mvc
    http://www.springframework.org/schema/mvc/spring-mvc-3.2.xsd">
    <!-- 配置SpringMVC -->
    <!-- 1.开启SpringMVC注解模式 -->
    <mvc:annotation-driven />

    <!-- 2.静态资源默认servlet配置 (1)加入对静态资源的处理:js,gif,png (2)允许使用"/"做整体映射 -->
    <mvc:resources mapping="/resources/**" location="/resources/" />
    <mvc:default-servlet-handler />

    <!-- 3.定义视图解析器 -->
    <bean id="viewResolver"
        class="org.springframework.web.servlet.view.InternalResourceViewResolver">
        <property name="prefix" value="/WEB-INF/html/"></property>
        <property name="suffix" value=".html"></property>
    </bean>
    <!-- 文件上传解析器 -->
    <bean id="multipartResolver"
        class="org.springframework.web.multipart.commons.CommonsMultipartResolver">
        <property name="defaultEncoding" value="utf-8"></property>
        <!-- 1024 * 1024 * 20 = 20M -->
        <property name="maxUploadSize" value="20971520"></property>
        <property name="maxInMemorySize" value="20971520"></property>
    </bean>

    <!-- 4.扫描web相关的bean -->
    <context:component-scan base-package="com.caeser.enterpriceportal.web" />
</beans>
配置好这三个文件后,还差两个资源文件,因为spring-dao.xml里面有定义一个参数是classpath:jdbc.properties,定义的是一个文件,我们要在src/main/resources文件夹下定义一个文件jdbc.propertied ,还有一个文件是也是spring-dao.xml里定义的classpath:mybatis-config.xml ,定义mybatis属性
jdbc.driver=com.mysql.jdbc.Driver
jdbc.url=jdbc:mysql://localhost:3306/database?userUnicode=true&characterEncoding=utf8
jdbc.username=root
jdbc.password=password
mybatis-config.xml
<?xml version="1.0" encoding="UTF-8"?>
<!DOCTYPE configuration
  PUBLIC "-//mybatis.org//DTD Config 3.0//EN"
  "http://mybatis.org/dtd/mybatis-3-config.dtd">
<configuration>
	<!-- 配置全局属性 -->
	<settings>
		<!-- 使用jdbc的getGeneratedKeys获取数据库自增主键值 -->
		<setting name="useGeneratedKeys" value="true" />

		<!-- 使用列标签替换列别名 默认:true -->
		<setting name="useColumnLabel" value="true" />

		<!-- 开启驼峰命名转换:Table{create_time} -> Entity{createTime} -->
		<setting name="mapUnderscoreToCamelCase" value="true" />
	</settings>
</configuration>
到这里,我们配置好了SSM框架的基本内容,就好像画素描一样,我们先画好一个模子,明暗线条后面再添加,基本框架已经搭建好了,后面我们开始填充内容,自下而上的构建这个门户网站。毕业后的第一份正式工作,我自己也是很慌,做的实施,可能我技术确实不过关吧,不过我个人语言表达还是凑合的,做实施也算有优势。
下面一篇,我将讲解对应表来创建实体类。