在图像处理中经常需要对连通区域进行操作,而连通区域的提取一般有两步法和种子填充法,方法不再介绍,比较简单,下面是自己实现的过程,特此记录!
#include<iostream>
#include<algorithm>
#include<opencv2/opencv.hpp>
#include<map>
using namespace std;
using namespace cv;
int label = 0;// 联通域的标记
int area = 0;//连通区域
vector<Point2d>p;//保存标号
Point2d seed;
map<int, Point3d>dic;//里面保存每个联通域的随机颜色
map<int, int>label_area; //联通域面积
map<int, Rect> rect;//外接矩形
Rect l;
int row_min = 0;
int row_max = 0;
int col_min = 0;
int col_max = 0;
RNG png;
void color(Mat imm);
void seedfill(Mat im)
{
for (int i = 0; i < im.rows; i++)
{
uchar *data = im.ptr<uchar>(i);
for (int j = 0; j < im.cols; j++)
{
if (data[j] == 255)
{
area = 0;
++label;
++area;
dic[label] = Point3d(png.uniform(0, 255), png.uniform(0, 255), png.uniform(0, 255));//字典将颜色和label对应起来
data[j] = label;//开始标号
p.push_back(Point2d(i, j));
seed = Point2d(i, j);
col_min = j;
col_max = j;
row_min = i;
row_max = i;//定义label的外接矩形
while (!p.empty())
{
if (im.at<uchar>(seed.x, seed.y + 1) == 255)
{
im.at<uchar>(seed.x, seed.y + 1) = label;
p.push_back(Point2d(seed.x, seed.y + 1));
++area;
if (col_max < seed.y + 1)
{
col_max = seed.y + 1;
}
}
if (im.at<uchar>(seed.x+1, seed.y ) == 255)
{
im.at<uchar>(seed.x+1,seed.y ) = label;
p.push_back(Point2d(seed.x+1, seed.y));
++area;
if (row_max < seed.x + 1)
{
row_max = seed.x + 1;
}
}
if (im.at<uchar>(seed.x, seed.y -1) == 255)
{
im.at<uchar>(seed.x, seed.y - 1) = label;
p.push_back(Point2d(seed.x, seed.y - 1));
++area;
if (col_min > seed.y- 1)
{
col_min = seed.y - 1;
}
}
if (im.at<uchar>(seed.x-1, seed.y ) == 255)
{
im.at<uchar>(seed.x-1, seed.y) = label;
p.push_back(Point2d(seed.x-1, seed.y));
++area;
if (row_min > seed.x - 1)
{
row_min = seed.x - 1;
}
}
seed = p.at(p.size() - 1);//
p.pop_back();//删除最后一个元素
}
label_area[label] = area;//将联通域的面积保存起来
//Rect l = Rect( row_min,col_min,(row_max-row_min),(col_max-col_min ));
Rect l = Rect(col_min, row_min, (col_max - col_min), (row_max - row_min));
rect[label] = l;
}
}
}
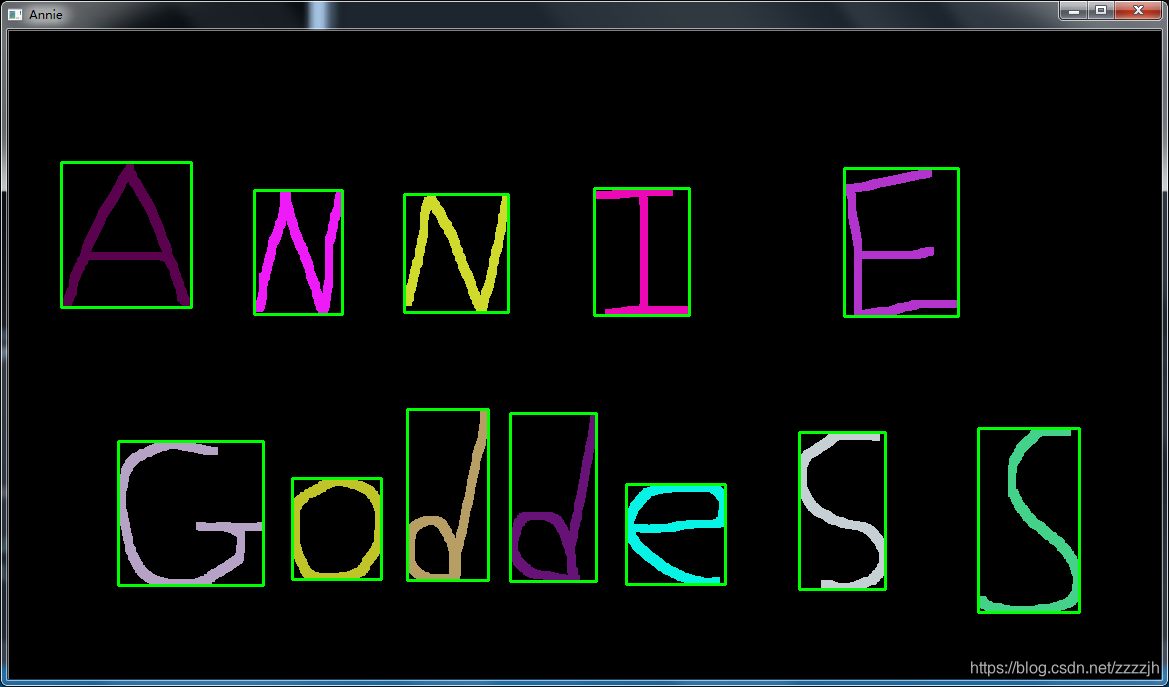
cout << "共有" << label << "个连通区域" << endl;
auto s= label_area.begin();
while (s != label_area.end())
{
cout << "第" << s->first << "个联通区域的面积=" << s->second << endl;
++s;
}
color(im);
}
//对图像进行染色
void color(Mat imm)
{
Mat image(imm.rows, imm.cols, CV_8UC3, Scalar(0,0, 0));
for (int i = 0; i < imm.rows; i++)
{
for (int j = 0; j < imm.cols; j++)
{
int d = imm.at<uchar>(i, j);
if (d != 0)
{
image.at<Vec3b>(i, j)[0] = dic[d].x;
image.at<Vec3b>(i, j)[1] = dic[d].y;
image.at<Vec3b>(i, j)[2] = dic[d].z;
}
}
}
auto ss = rect.begin();
while (ss != rect.end())
{
rectangle(image,ss->second ,Scalar(0,255,0),2);
++ss;
}
imshow("2", image);
waitKey(0);
}
void main()
{
Mat im = imread("c:\\users\\x\\desktop\\test.jpg");
Mat dst, gray;
cvtColor(im, gray, COLOR_BGR2GRAY);
threshold(gray, dst, 50, 255, THRESH_BINARY);
seedfill(dst);
}

Python实现
"""
Author Zjh
2019/1/5
by-Xaut
"""
import cv2
import numpy as np
import matplotlib.pyplot as plt
l=[]
dic={}
rect={}
label=0
""" 种子填充法进行填充 """
def fill(im):
global label
row,col=im.shape[:2]
for i in range(row):
for j in range(col):
if im[i,j]==255:
l.append([i,j])
seed=(i,j)
label=label+1
row_min=i
row_max=i
col_min=j
col_max=j
dic[label]=np.random.randint(0,255,(1,3))#产生随机的颜色,对不同的连通区域进行标记
im[i,j]=label #标记
while(len(l)!=0):
"""遍历四个邻域"""
if im[seed[0],seed[1]+1]==255:
im[seed[0],seed[1]+1]=label
l.append([seed[0],seed[1]+1])
if col_max<seed[1]+1:
col_max=seed[1]+1
if im[seed[0]+1,seed[1]]==255:
im[seed[0]+1,seed[1]]=label
l.append([seed[0]+1,seed[1]])
if row_max<seed[0]+1:
row_max=seed[0]+1
if im[seed[0],seed[1]-1]==255:
im[seed[0],seed[1]-1]=label
l.append([seed[0],seed[1]-1])
if col_min>seed[1]-1:
col_min=seed[1]-1
if im[seed[0]-1,seed[1]]==255:
im[seed[0]-1,seed[1]]=label
l.append([seed[0]-1,seed[1]])
if row_min>seed[0]-1:
row_min=seed[0]-1
seed=l[-1]
l.pop()#相当于堆栈出栈的过程
rect[label]=[col_min,row_min,col_max,row_max]
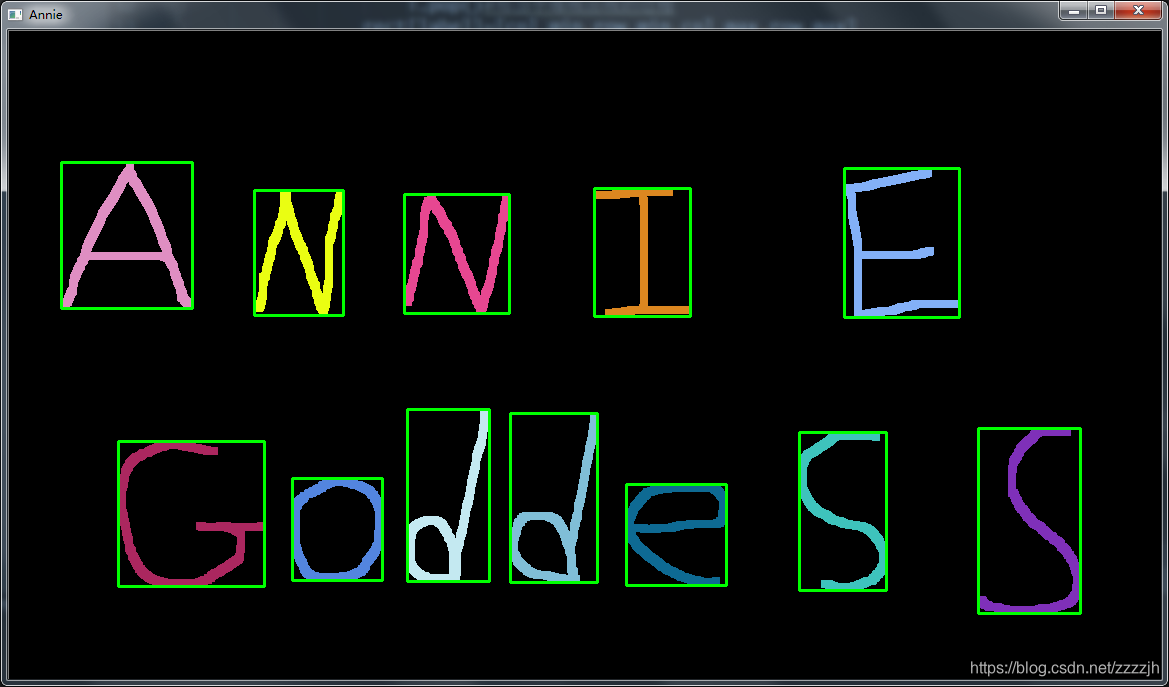
color(im)
""" 绘制矩形框 """
def color(img):
row,col=img.shape
out=np.zeros((row,col,3),np.uint8)
for i in range(row):
for j in range(col):
d=img[i,j]
if d!=0:
out[i,j]=dic[d]
for x in rect.keys():
cv2.rectangle(out,(rect[x][0],rect[x][1]),(rect[x][2],rect[x][3]),(0,255,0),2)
cv2.imshow("Annie",out)
cv2.waitKey(0)
img=cv2.imread("c:\\users\\x\\desktop\\god.png",0)
im=cv2.threshold(img,50,255,cv2.THRESH_BINARY)[1]
fill(im)
小结:种子填充法主要还是堆栈出栈的一个过程。通过这个小例子发现语言其实无关紧要,算法逻辑才是核心,以后还是要多学习别人程序里优秀的思想,这样才能进步的更快 ——2019/1/5 于学科二楼!