文章目录
- 概述
- Spring Cloud Config介绍
- 搭建Config Server的后端存储
- 搭建Config Server
- Step1. 新建工程microservice-config-server
- Step2. 添加依赖
- Step3. 添加@EnableConfigServer注解
- Step4. application.yml配置文件
- Step5. Config Server的端点映射规则
- Step6. 测试
- 搭建Config Client
- Step1. 新建工程
- Step2. 添加依赖
- Step3. 配置文件 application.yml
- Step4. 配置文件 bootstrap.yml
- Step5. 通过Config Client 获取 Config Server端的信息
- Step6. 测试
- 代码
概述
通常情况下,在微服务的架构中,配置管理的要求如下:
- 集中管理配置:全部微服务配置统一管理
- 区分环境,不同环境不同配置:区分生产、测试、预生产、开发环境等
- 运行期可以动态调整:可以根据负载,在不停服的情况下动态调整参数
- 修改配置后可自动更新:配置内容发生改变,微服务能够实现自动更新配置
Spring Cloud Config介绍
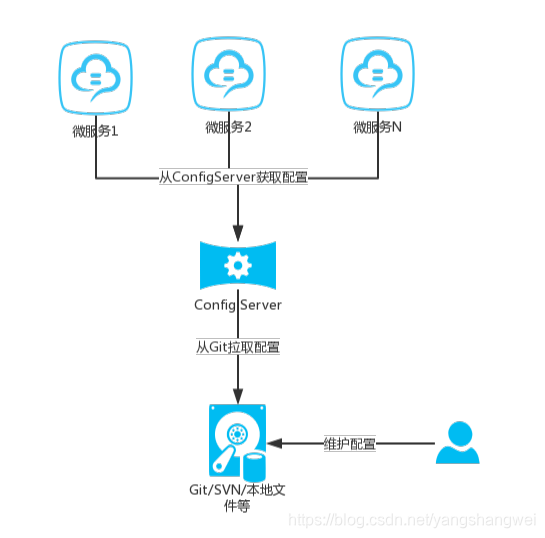
Spring Cloud Config 为分布式系统外部化配置提供了服务端和客户端的支持,包括Config Server和Config Client两部分。
Config Server是一个可以横向扩展、集中式的配置服务器,用于集中管理用用程序各个环境的配置,默认使用Git存储,当然也可以使用SVN、本地文件等。
Config Client 是Config Server的客户端,用于操作存储在Config Server中的属性配置。 Config Client在启动的时候会请求Config Server获取所需要的配置信息,然后缓存到自身以便提高性能。
关系图如下:
搭建Config Server的后端存储
这里我们选择Github作为存储中心。
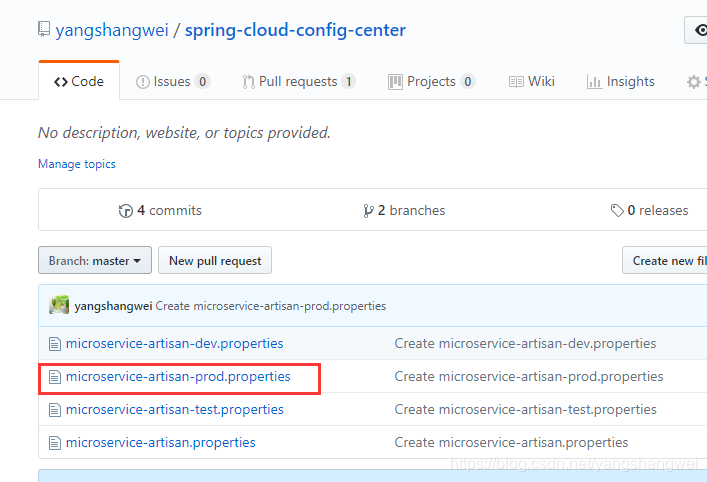
在Github上新建项目 spring-cloud-config-center
https://github.com/yangshangwei/spring-cloud-config-center
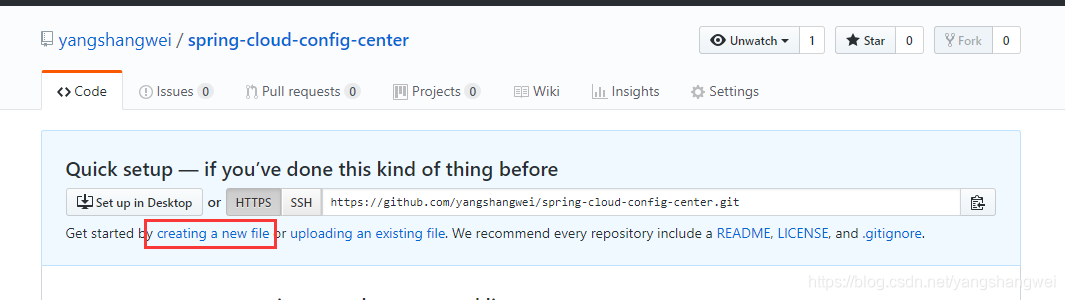

新建文件如下:
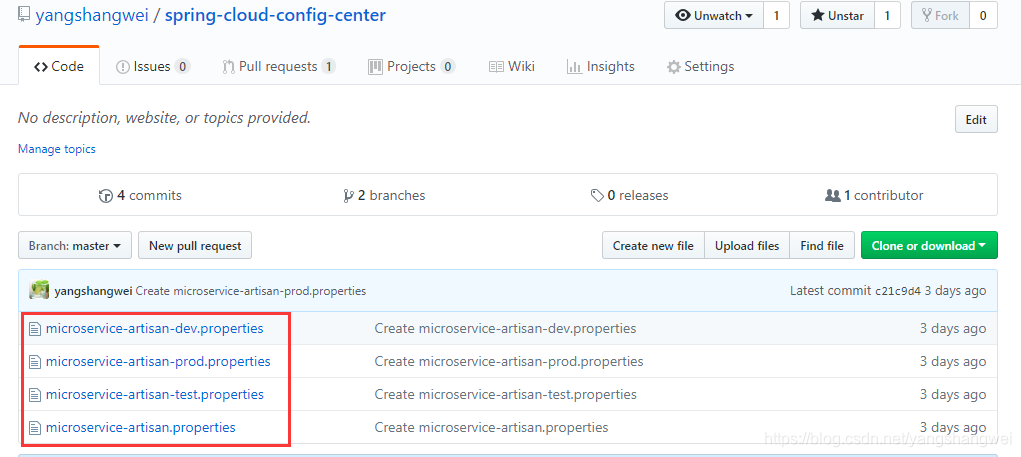
microservice-artisan.properties 内容如下
name=artisan-default
profile=default-1.0
microservice-artisan-dev.properties内容如下
name=artisan-dev
profile=dev-1.0
microservice-artisan-test.properties内容如下
name=artisan-test
profile=test-1.0
microservice-artisan-prod.properties内容如下
name=artisan-prod
profile=prod-1.0
同时,新建个config-v2分支,测试线版本控制
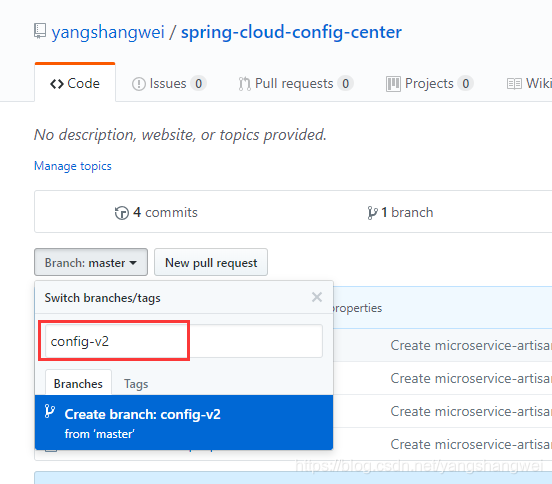
内容如下:

文件中的内容,为了与master分支区分,做了些改动。
搭建Config Server
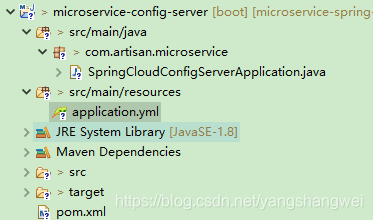
Step1. 新建工程microservice-config-server
我们在父工程上右键 选择子module, 创建spring cloud config server 工程 microservice-config-server
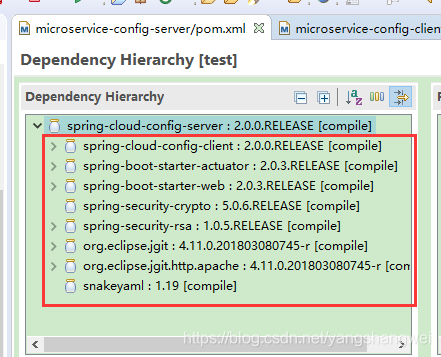
Step2. 添加依赖
主要是spring-cloud-config-server这个依赖
<?xml version="1.0"?>
<project
	xsi:schemaLocation="http://maven.apache.org/POM/4.0.0 http://maven.apache.org/xsd/maven-4.0.0.xsd"
	xmlns="http://maven.apache.org/POM/4.0.0"
	xmlns:xsi="http://www.w3.org/2001/XMLSchema-instance">
	<modelVersion>4.0.0</modelVersion>
	<parent>
		<groupId>com.artisan</groupId>
		<artifactId>microservice-spring-cloud</artifactId>
		<version>0.0.1-SNAPSHOT</version>
	</parent>
	<artifactId>microservice-config-server</artifactId>
	<name>microservice-config-server</name>
	<url>http://maven.apache.org</url>
	<properties>
		<project.build.sourceEncoding>UTF-8</project.build.sourceEncoding>
	</properties>
	<dependencies>
		<dependency>
			<groupId>org.springframework.cloud</groupId>
			<artifactId>spring-cloud-config-server</artifactId>
		</dependency>
	</dependencies>
</project>
该依赖会自动引入相关依赖,如下
Step3. 添加@EnableConfigServer注解
我们在启动类上增加@EnableConfigServer注解
package com.artisan.microservice;

import org.springframework.boot.SpringApplication;
import org.springframework.boot.autoconfigure.SpringBootApplication;
import org.springframework.cloud.config.server.EnableConfigServer;

@EnableConfigServer
@SpringBootApplication
public class SpringCloudConfigServerApplication {

	public static void main(String args[]) {
		SpringApplication.run(SpringCloudConfigServerApplication.class, args);
	}

}
Step4. application.yml配置文件
#port
server:
  port: 9764

# application name
spring:
  application:
    name: microservice-config-server
  # cloud
  cloud:
    config:
      server:
        git:
          # git 仓库地址
          uri: https://github.com/yangshangwei/spring-cloud-config-center
          # 用户名
          username:
          # 密码
          password:
是的,到此一个简单的config server就搭建完了。
Step5. Config Server的端点映射规则
我们来看下官网上的指导文档: https://cloud.spring.io/spring-cloud-static/Finchley.SR2/single/spring-cloud.html#_quick_start
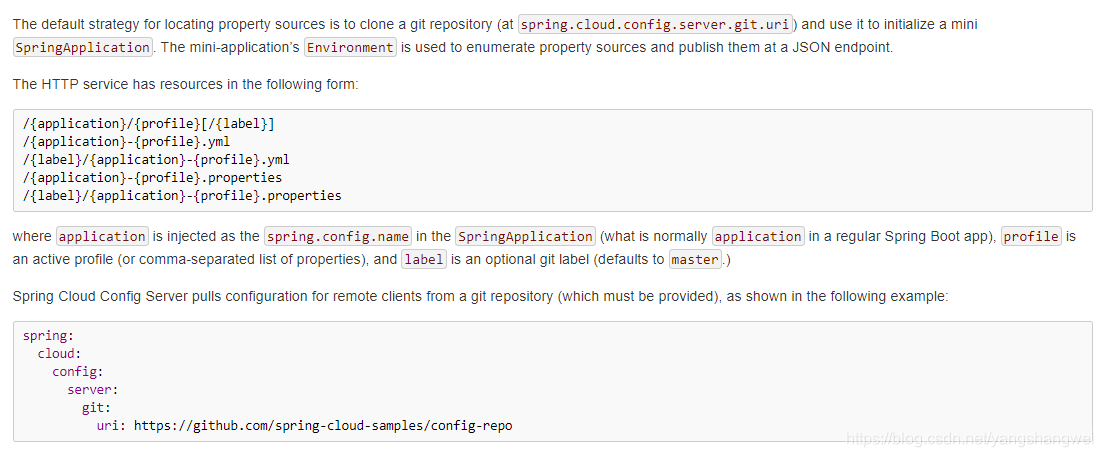
从文档可知,端点和文档的映射规则如下:
/{application}/{profile}[/{label}]
/{application}-{profile}.yml
/{label}/{application}-{profile}.yml
/{application}-{profile}.properties
/{label}/{application}-{profile}.properties
上述的规则都可以映射到{appplication}-{profile}.properties .
- {appplication} : 微服务的名称
- {profile} : 各种标识,这里是用来区分不同的环境
- {label} : 分支,对于Git来说,默认是master
Step6. 测试
按照上面的映射规则,我们想访问 spring-cloud-config-center的master分支的 microservice-artisan-prod.properties,该如何访问呢?
/{application}/{profile}[/{label}]:
http://localhost:9764/microservice-artisan/prod

http://localhost:9764/microservice-artisan/prod/master

/{application}-{profile}.yml:
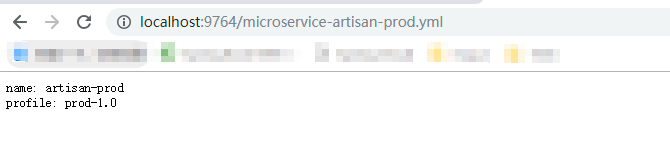
http://localhost:9764/microservice-artisan-prod.yml
/{label}/{application}-{profile}.yml
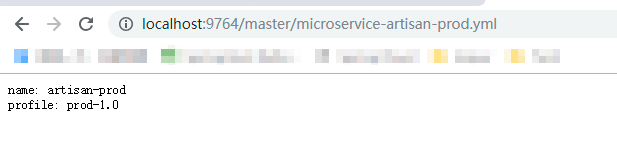
http://localhost:9764/master/microservice-artisan-prod.yml
/{application}-{profile}.properties
http://localhost:9764/microservice-artisan-prod.properties

/{label}/{application}-{profile}.properties
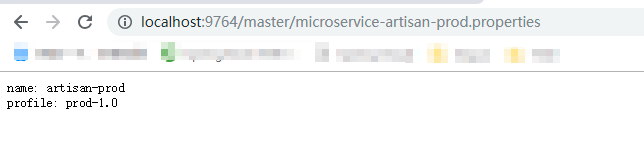
http://localhost:9764/master/microservice-artisan-prod.properties
顺带着访问下config-v2这个分支的数据吧
http://localhost:9764/config-v2/microservice-artisan-prod.properties
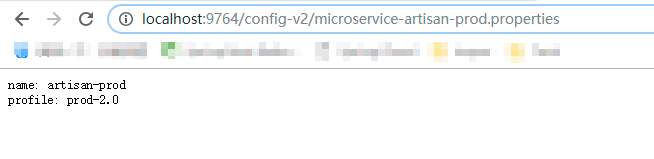
如上测试结果,说明我们已经成功的搭建config server,并通过Url获取到了Git仓库中的信息 .
接下来搭建Config Client吧
搭建Config Client
按照惯例,看下官方指导:
https://cloud.spring.io/spring-cloud-static/Finchley.SR2/single/spring-cloud.html#_client_side_usage

如上所说最方便的还是加入 org.springframework.cloud:spring-cloud-starter-config ,
依赖关系
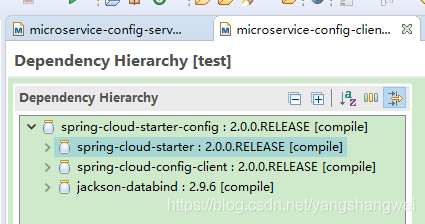
当然了别忘了加 spring-boot-starter-web,否则启动不起来
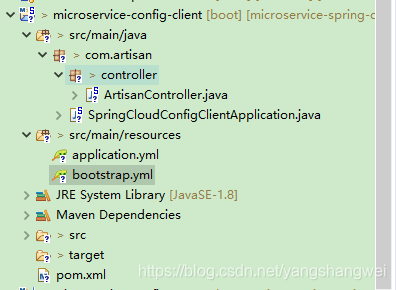
Step1. 新建工程
我们在父工程上右键 选择子module, 创建spring cloud config client工程 microservice-config-client
Step2. 添加依赖
<?xml version="1.0"?>
<project
	xsi:schemaLocation="http://maven.apache.org/POM/4.0.0 http://maven.apache.org/xsd/maven-4.0.0.xsd"
	xmlns="http://maven.apache.org/POM/4.0.0"
	xmlns:xsi="http://www.w3.org/2001/XMLSchema-instance">
	<modelVersion>4.0.0</modelVersion>
	<parent>
		<groupId>com.artisan</groupId>
		<artifactId>microservice-spring-cloud</artifactId>
		<version>0.0.1-SNAPSHOT</version>
	</parent>
	<artifactId>microservice-config-client</artifactId>
	<properties>
		<project.build.sourceEncoding>UTF-8</project.build.sourceEncoding>
	</properties>
	<dependencies>

		<dependency>
			<groupId>org.springframework.boot</groupId>
			<artifactId>spring-boot-starter-web</artifactId>
		</dependency>

		<dependency>
			<groupId>org.springframework.cloud</groupId>
			<artifactId>spring-cloud-starter-config</artifactId>
		</dependency>


	</dependencies>
</project>
Step3. 配置文件 application.yml
#port
server:
  port: 9765
Step4. 配置文件 bootstrap.yml

# application name
spring:
  application:
    # 对应 config server所获取的配置文件的{application}
    name: microservice-artisan
  # cloud
  cloud:
    config:
      uri: http://localhost:9764/
      # profile 对应的config server所获取的配置文件中的{profile}
      profile: prod
      # 指定git仓库的分支,对应config server说获取的配置文件的{lable}
      label: master
- spring.application.name 对应 config server所获取的配置文件的{application}
- spring.cloud.config.uri 对应config server的地址,默认为http://localhost:8888
- spring.cloud.config.profile 对应的config server所获取的配置文件中的{profile}
- spring.cloud.config.lable指定git仓库的分支,对应config server说获取的配置文件的{lable}
上述配置信息一定要写到bootstrap.yml中。 如果配到了application.yml中,spring.cloud.config.uri 就会访问默认的8888端口,而非配置的端口了。
bootstrap.yml 是被一个父级的 Spring ApplicationContext 加载的,在加载application.yml 的 ApplicationContext之前。配置在 bootstrap.yml 中的属性优先级更高,默认情况下不能被本地配置覆盖。
Step5. 通过Config Client 获取 Config Server端的信息
先来写个Controller
package com.artisan.controller;

import org.springframework.beans.factory.annotation.Value;
import org.springframework.web.bind.annotation.GetMapping;
import org.springframework.web.bind.annotation.RestController;

@RestController
public class ArtisanController {

	//config server存储中心对应的 配置文件中得属性名
	@Value("${name}")
	private String name;

	//config server存储中心对应的 配置文件中得属性名
	@Value("${profile}")
	private String profile;

	@GetMapping("/getVauleFromConfigServer")
	public String getValue() {
		return "config server中的内容:name=" + name + ",profile=" + profile;
	}

}
Step6. 测试
- 启动microservice-config-server
- 启动microservice-config-client
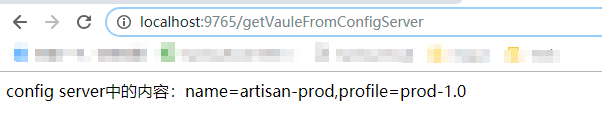
- 访问client的控制层 : http://localhost:9765/getVauleFromConfigServer
我们来修改下bootstrap.yml的配置
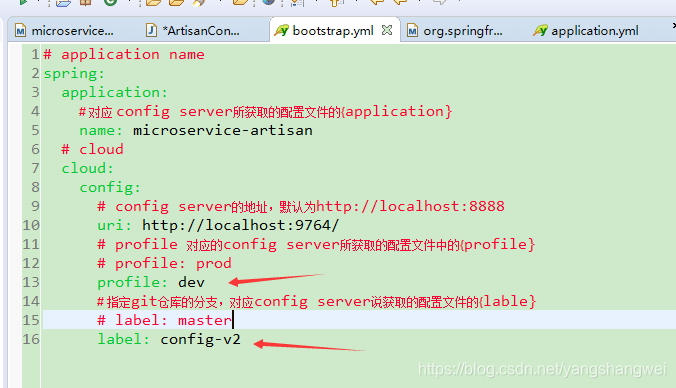
获取 config-v2分支的dev配置文件中的属性
先看下文件中的内容 
重启config client ,再次访问 http://localhost:9765/getVauleFromConfigServer

获取成功,可以从config client 获取 config server中配置的配置中心的配置数据。
代码
https://github.com/yangshangwei/SpringCloudMaster/tree/master/microservice-config-server
https://github.com/yangshangwei/SpringCloudMaster/tree/master/microservice-config-client