MySQL安装部署
系统:Centos6.5
JAVA:jdk-8u45-linux-x64.gz
MySQL:sql-5.6.23-linux-glibc2.5-x86_64.tar.gz
一、Java安装
1、切换至root用户
mv jdk-8u45-linux-x64.gz
cd /usr/java
chown -R root:root jdk1.8.0_45/  #填坑  重要
2、配置系统环境变量
vi /etc/profile
	# 环境变量
	export JAVA_HOME=/usr/java/jdk1.8.0_45
	export PATH=$JAVA_HOME/bin:$RZDATA_HOME/bin:$PATH
source /etc/profile     # 激活环境变量配置
java -version   #验证java版本
二、MySQL安装
1、检查是否安装过MySQL / check isnot install
[root@alter local]# ps -ef|grep mysqld
root      2493  2423  0 19:48 pts/3    00:00:00 grep mysqld
[root@alter local]# rpm -qa |grep -i mysql
2、创建并重命名 / tar and mv
[root@alter local]# tar xzvf mysql-5.6.23-linux-glibc2.5-x86_64.tar.gz              #解压
[root@alter local]# mv mysql-5.6.23-linux-glibc2.5-x86_64 mysql
3、创建组和用户 / create group and user
[root@alter local]# groupadd -g 101 dba
[root@alter local]# useradd -u 514 -g dba -G root -d /usr/local/mysql mysqladmin
[root@alter local]# id mysqladmin
uid=514(mysqladmin) gid=101(dba) groups=101(dba),0(root)
如果出现以下问题:
if user mysqladmin is existing,please execute the following command of usermod.
[root@sht-sgmhadoopnn-01 local]# usermod -u 514 -g dba -G root -d /usr/local/mysql mysqladmin
————————————————————分隔线——————————————————————
copy 环境变量配置文件至mysqladmin用户的home目录中,为了以下步骤配置个人环境变量
[root@alter local]# cp /etc/skel/.* /usr/local/mysql
cp: omitting directory `/etc/skel/.'
cp: omitting directory `/etc/skel/..'
cp: omitting directory `/etc/skel/.mozilla'
4、创建MySQL配置文件
默认配置文件查找顺序
defualt start: /etc/my.cnf->/etc/mysql/my.cnf->SYSCONFDIR/my.cnf->$MYSQL_HOME/my.cnf-> --defaults-extra-file->~/my.cnf
[root@alter mysql]# cd /etc/
[root@alter etc]# touch my.cnf
[root@alter etc]# vi my.cnf
创建好的my.cnf内会自动生成内容,先把里面内容清空
[client]
port            = 3306
socket          = /usr/local/mysql/data/mysql.sock

[mysqld]
port            = 3306
socket          = /usr/local/mysql/data/mysql.sock

skip-external-locking
key_buffer_size = 256M
sort_buffer_size = 2M
read_buffer_size = 2M
read_rnd_buffer_size = 4M
query_cache_size= 32M
max_allowed_packet = 16M
myisam_sort_buffer_size=128M
tmp_table_size=32M

table_open_cache = 512
thread_cache_size = 8
wait_timeout = 86400
interactive_timeout = 86400
max_connections = 600

# Try number of CPU's*2 for thread_concurrency
thread_concurrency = 32

#isolation level and default engine
default-storage-engine = INNODB
transaction-isolation = READ-COMMITTED

server-id  = 1
basedir     = /usr/local/mysql
datadir     = /usr/local/mysql/data
pid-file     = /usr/local/mysql/data/hostname.pid

#open performance schema
log-warnings
sysdate-is-now

binlog_format = MIXED
log_bin_trust_function_creators=1
log-error  = /usr/local/mysql/data/hostname.err
log-bin=/usr/local/mysql/arch/mysql-bin
#other logs
#general_log =1
#general_log_file  = /usr/local/mysql/data/general_log.err
#slow_query_log=1
#slow_query_log_file=/usr/local/mysql/data/slow_log.err

#for replication slave
#log-slave-updates
#sync_binlog = 1

#for innodb options
innodb_data_home_dir = /usr/local/mysql/data/
innodb_data_file_path = ibdata1:500M:autoextend
innodb_log_group_home_dir = /usr/local/mysql/arch
innodb_log_files_in_group = 2
innodb_log_file_size = 200M

innodb_buffer_pool_size = 1024M      # 默认为2048,因为影响性能问题改为1024
innodb_additional_mem_pool_size = 50M
innodb_log_buffer_size = 16M

innodb_lock_wait_timeout = 100
#innodb_thread_concurrency = 0
innodb_flush_log_at_trx_commit = 1
innodb_locks_unsafe_for_binlog=1

#innodb io features: add for mysql5.5.8
performance_schema
innodb_read_io_threads=4
innodb-write-io-threads=4
innodb-io-capacity=200
#purge threads change default(0) to 1 for purge
innodb_purge_threads=1
innodb_use_native_aio=on

#case-sensitive file names and separate tablespace
innodb_file_per_table = 1
lower_case_table_names=1

[mysqldump]
quick
max_allowed_packet = 16M

[mysql]
no-auto-rehash

[mysqlhotcopy]
interactive-timeout

[myisamchk]
key_buffer_size = 256M
sort_buffer_size = 256M
read_buffer = 2M
write_buffer = 2M
5、第一次安装修改权限 / chown and chmod privileges and try first install
[root@alter local]# chown  mysqladmin:dba /etc/my.cnf
[root@alter local]# chmod  640 /etc/my.cnf
[root@alter etc]# ll my.cnf
-rw-r----- 1 mysqladmin dba 2201 Aug 25 23:09 my.cnf

[root@alter local]# chown -R mysqladmin:dba /usr/local/mysql
[root@alter local]# chmod -R 755 /usr/local/mysql
[root@alter local]# su - mysqladmin
[mysqladmin@alter ~]$ pwd
/usr/local/mysql
# 创建binlog文件
[mysqladmin@alter ~]$ mkdir arch
[mysqladmin@alter ~]$ scripts/mysql_install_db ###import
Installing MySQL system tables..../bin/mysqld: error while loading shared libraries: libaio.so.1: cannot open shared object file: No such file or directory #缺少libaio.so 包
see version
[root@alter local]# cat /proc/version
Linux version 2.6.18-164.11.1.el5 ([email protected]) (gcc version 4.1.2 20080704 (Red Hat 4.1.2-46)) #1 SMP Wed Jan 20 07:32:21 EST 2010

[root@alter local]# rpm -qa |grep gcc
libgcc-4.1.2-46.el5_4.2
libgcc-4.1.2-46.el5_4.2
[root@alter local]# yum -y install libaio
Loaded plugins: fastestmirror
Determining fastest mirrors
base-tn54                                                                                              | 1.1 kB     00:00
tn-appv1                                                                                               |  951 B     00:00
updates-tn54                                                                                           |  951 B     00:00
Setting up Install Process
Resolving Dependencies
--> Running transaction check
---> Package libaio.i386 0:0.3.106-3.2 set to be updated
---> Package libaio.x86_64 0:0.3.106-3.2 set to be updated
--> Finished Dependency Resolution

Dependencies Resolved

==============================================================================================================================
 Package                    Arch                       Version                            Repository                     Size
==============================================================================================================================
Installing:
 libaio                     i386                       0.3.106-3.2                        base-tn54                      19 k
 libaio                     x86_64                     0.3.106-3.2                        base-tn54                      19 k

Transaction Summary
==============================================================================================================================
Install      2 Package(s)
Update       0 Package(s)
Remove       0 Package(s)

Total download size: 38 k
Downloading Packages:
(1/2): libaio-0.3.106-3.2.i386.rpm                                                                     |  19 kB     00:00
(2/2): libaio-0.3.106-3.2.x86_64.rpm                                                                   |  19 kB     00:00
------------------------------------------------------------------------------------------------------------------------------
Total                                                                                         452 kB/s |  38 kB     00:00
Running rpm_check_debug
Running Transaction Test
Finished Transaction Test
Transaction Test Succeeded
Running Transaction
  Installing     : libaio                                                                                                 1/2
  Installing     : libaio                                                                                                 2/2

Installed:
  libaio.i386 0:0.3.106-3.2                                    libaio.x86_64 0:0.3.106-3.2

Complete!
#Again  install
[mysqladmin@alter ~]$ scripts/mysql_install_db  --user=mysqladmin --basedir=/usr/local/mysql --datadir=/usr/local/mysql/data
6、设置开机自动启动 / Configure mysql service and boot auto start
[root@alter ~]# cd /usr/local/mysql
#将服务文件拷贝到init.d下,并重命名为mysql
[root@alter mysql]# cp support-files/mysql.server /etc/rc.d/init.d/mysql
#赋予可执行权限
[root@alter mysql]# chmod +x /etc/rc.d/init.d/mysql
#删除服务
[root@alter mysql]# chkconfig --del mysql
#添加服务
[root@alter mysql]# chkconfig --add mysql
[root@alter mysql]# chkconfig  mysql on
[root@alter mysql]# vi /etc/rc.local
#!/bin/sh
#
# This script will be executed *after* all the other init scripts.
# You can put your own initialization stuff in here if you don't
# want to do the full Sys V style init stuff.

touch /var/lock/subsys/local

su - mysqladmin -c "/etc/init.d/mysql start --federated"
7、启动MySQL并查看进程 / Start mysql and to view process and listening
[root@alter mysql]# su - mysqladmin
[mysqladmin@alter-01 ~]$ pwd
/usr/local/mysql
[mysqladmin@alter ~]$ rm -rf my.cnf

# 配置MySQL本地环境变量
vi .bash_profile
export MYSQL_HOME=/usr/local/mysql
export PATH=$MYSQL_HOME/bin:$PATH
[mysqladmin@alter ~]$ mysqld_safe &
[1] 11802
[mysqladmin@alter ~]$ 150825 22:53:38 mysqld_safe Logging to '/usr/local/mysql/data/hostname.err'.
150825 22:53:38 mysqld_safe Starting mysqld daemon with databases from /usr/local/mysql/data/
150825 22:53:39 mysqld_safe mysqld from pid file /usr/local/mysql/data/hostname.pid ended
# 按回车 直接后台了

[mysqladmin@alter ~]$


[mysqladmin@alter ~]$ ps -ef|grep mysqld
514       6247  6219  0 17:30 pts/1    00:00:00 /bin/sh /usr/local/mysql/bin/mysqld_safe
514       6902  6247  2 17:30 pts/1    00:00:01 /usr/local/mysql/bin/mysqld --basedir=/usr/local/mysql --datadir=/usr/local/mysql/data --plugin-dir=/usr/local/mysql/lib/plugin --log-error=/usr/local/mysql/data/hostname.err --pid-file=/usr/local/mysql/data/hostname.pid --socket=/usr/local/mysql/data/mysql.sock --port=3306
514       6927  6219  0 17:31 pts/1    00:00:00 grep mysqld

[mysqladmin@alter ~]$ netstat -tulnp | grep mysql
(Not all processes could be identified, non-owned process info
 will not be shown, you would have to be root to see it all.)
tcp        0      0 :::3306                     :::*                        LISTEN      11541/mysqld

[root@alter local]# service mysql status
MySQL running (21507)                                      [  OK  ]
8、登录MySQL / Login MySQL
[mysqladmin@alter ~]$ mysql
Welcome to the MySQL monitor.  Commands end with ; or \g.
Your MySQL connection id is 1
Server version: 5.6.23-log MySQL Community Server (GPL)

Copyright (c) 2000, 2015, Oracle and/or its affiliates. All rights reserved.

Oracle is a registered trademark of Oracle Corporation and/or its
affiliates. Other names may be trademarks of their respective
owners.

Type 'help;' or '\h' for help. Type '\c' to clear the current input statement.

mysql>
9、设置mysql登录账号和密码
刚安装完的时候首次登录是空密码的,另外有可能产生空密码登录后查询不到默认的mysql数据库
mysql> show databases;
+--------------------+
| Database           |
+--------------------+
| information_schema |
| test               |
+--------------------+
2 rows in set (0.00 sec)
先以账号密码方式登录,注意第一次让输入密码直接回车,之后设置完登录密码之后即可解决没有默认mysql数据库的问题
[mysqladmin@192 ~]$ mysql -uroot -p
Enter password:
Welcome to the MySQL monitor.  Commands end with ; or \g.
Your MySQL connection id is 3
Server version: 5.6.23-log MySQL Community Server (GPL)

Copyright (c) 2000, 2015, Oracle and/or its affiliates. All rights reserved.

Oracle is a registered trademark of Oracle Corporation and/or its
affiliates. Other names may be trademarks of their respective
owners.

Type 'help;' or '\h' for help. Type '\c' to clear the current input statement.

mysql> show databases;
+--------------------+
| Database           |
+--------------------+
| information_schema |
| mysql              |
| performance_schema |
| test               |
+--------------------+
4 rows in set (0.00 sec)

mysql> use mysql;
Database changed
mysql> select user,password,host from user;
+------+----------+-----------------+
| user | password | host            |
+------+----------+-----------------+
| root |          | localhost       |
| root |          | 192.168.191.130 |
| root |          | 127.0.0.1       |
| root |          | ::1             |
|      |          | localhost       |
|      |          | 192.168.191.130 |
+------+----------+-----------------+
6 rows in set (0.00 sec)

mysql> update user set password=password('123456') where user='root';
Query OK, 4 rows affected (0.00 sec)
Rows matched: 4  Changed: 4  Warnings: 0

mysql> select host,user,password from user;
+-----------------+------+-------------------------------------------+
| host            | user | password                                  |
+-----------------+------+-------------------------------------------+
| localhost       | root | *6BB4837EB74329105EE4568DDA7DC67ED2CA2AD9 |
| 192.168.191.130 | root | *6BB4837EB74329105EE4568DDA7DC67ED2CA2AD9 |
| 127.0.0.1       | root | *6BB4837EB74329105EE4568DDA7DC67ED2CA2AD9 |
| ::1             | root | *6BB4837EB74329105EE4568DDA7DC67ED2CA2AD9 |
| localhost       |      |                                           |
| 192.168.191.130 |      |                                           |
+-----------------+------+-------------------------------------------+
6 rows in set (0.00 sec)

mysql> delete from user where user='';
Query OK, 2 rows affected (0.00 sec)

mysql> select host,user,password from user;
+-----------------+------+-------------------------------------------+
| host            | user | password                                  |
+-----------------+------+-------------------------------------------+
| localhost       | root | *6BB4837EB74329105EE4568DDA7DC67ED2CA2AD9 |
| 192.168.191.130 | root | *6BB4837EB74329105EE4568DDA7DC67ED2CA2AD9 |
| 127.0.0.1       | root | *6BB4837EB74329105EE4568DDA7DC67ED2CA2AD9 |
| ::1             | root | *6BB4837EB74329105EE4568DDA7DC67ED2CA2AD9 |
+-----------------+------+-------------------------------------------+
4 rows in set (0.00 sec)

mysql> flush privileges;
Query OK, 0 rows affected (0.00 sec)
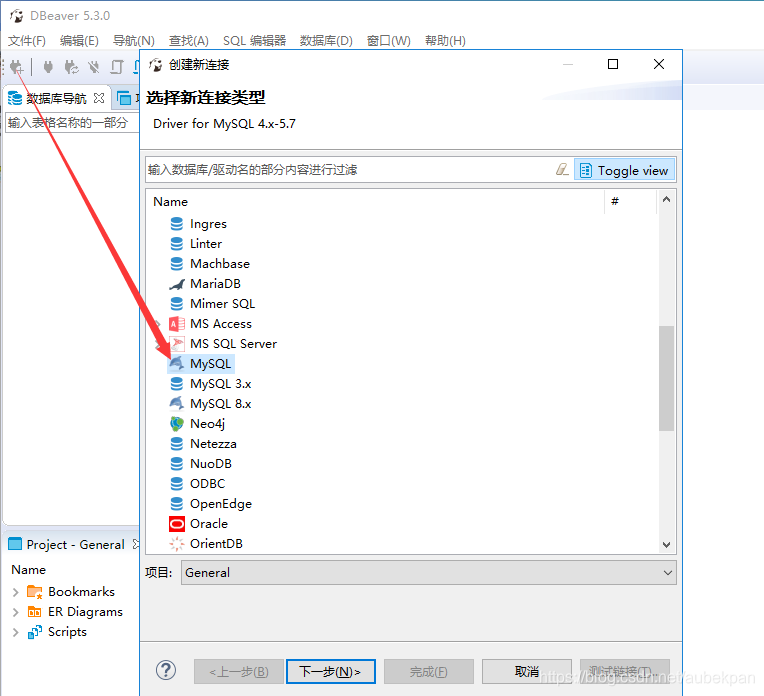
10、使用DBeaver远程连接MySQL设置
create database alterdb;
grant all privileges on alterdb.* to alter@'MySQL端的IP地址' identified by '123456';
flush privileges;
下载DBeaver https://dbeaver.io/download/
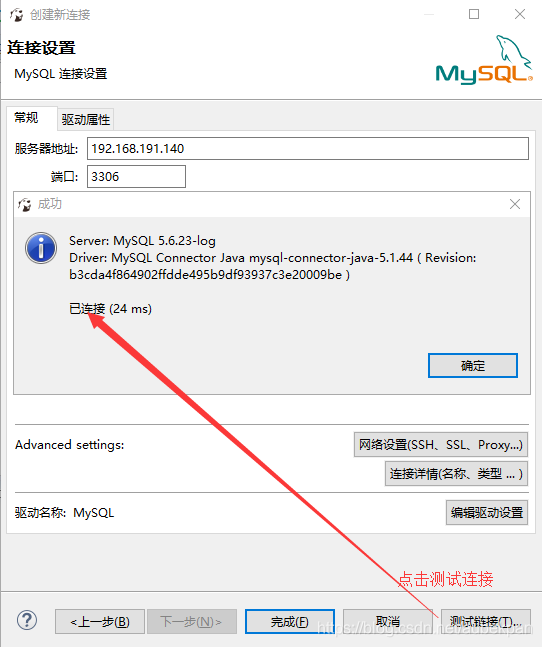
设置连接向导
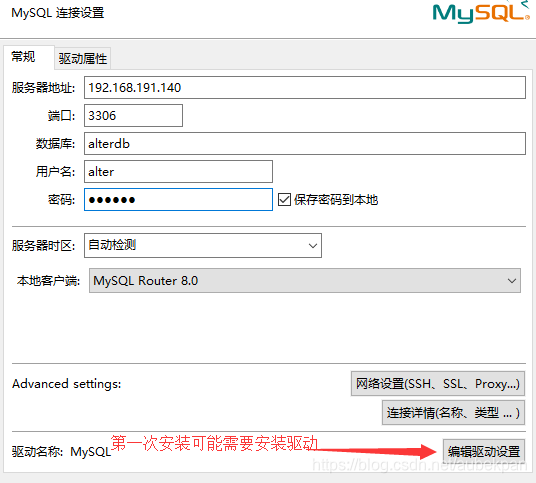
以阿里云服务器为例,如果远程访问注意开放3306端口,默认是关闭状态
远程访问时出现以下问题:
Access denied for user ‘alter’@’%’ to database ‘alterdb’ Access denied for user ‘alter’@’%’ to datab