uboot的命令体系与自定义添加命令
1. uboot命令体系简介
uboot有几十多个命令,在uboot进入bootdelay倒计时后按下回车,就可以进入uboot的shell(命令体系)中。输入help命令,按下回车可以查看uboot的命令集,如下:
x210 # help
? - alias for ‘help’
autoscr - run script from memory
base - print or set address offset
bdinfo - print Board Info structure
boot - boot default, i.e., run ‘bootcmd’
bootd - boot default, i.e., run ‘bootcmd’
bootelf - Boot from an ELF image in memory
bootm - boot application image from memory
bootp - boot image via network using BootP/TFTP protocol
bootvx - Boot vxWorks from an ELF image
cmp - memory compare
coninfo - print console devices and information
cp - memory copy
crc32 - checksum calculation
dcache - enable or disable data cache
dhcp - invoke DHCP client to obtain IP/boot params
dnw - initialize USB device and ready to receive for Windows server (specific)
echo - echo args to console
erase - erase FLASH memory
exit - exit script
ext2format - disk format by ext2
ext2load- load binary file from a Ext2 filesystem
ext2ls - list files in a directory (default /)
ext3format - disk format by ext3
fastboot- use USB Fastboot protocol
fatformat - disk format by FAT32
fatinfo - print information about filesystem
fatload - load binary file from a dos filesystem
fatls - list files in a directory (default /)
fdisk - fdisk for sd/mmc.
flinfo - print FLASH memory information
go - start application at address ‘addr’
help - print online help
icache - enable or disable instruction cache
iminfo - print header information for application image
imls - list all images found in flash
imxtract- extract a part of a multi-image
itest - return true/false on integer compare
loadb - load binary file over serial line (kermit mode)
loads - load S-Record file over serial line
loady - load binary file over serial line (ymodem mode)
loop - infinite loop on address range
md - memory display
mm - memory modify (auto-incrementing)
MMC sub systemprint MMC informationmovi - sd/mmc r/w sub system for SMDK board
mtest - simple RAM test
mw - memory write (fill)
nfs - boot image via network using NFS protocol
nm - memory modify (constant address)
ping - send ICMP ECHO_REQUEST to network host
printenv- print environment variables
protect - enable or disable FLASH write protection
rarpboot- boot image via network using RARP/TFTP protocol
reset - Perform RESET of the CPU
reginfo - print register information
reset - Perform RESET of the CPU
run - run commands in an environment variable
saveenv - save environment variables to persistent storage
sdfuse - read images from FAT partition of SD card and write them to booting device.
setenv - set environment variables
sleep - delay execution for some time
test - minimal test like /bin/sh
tftpboot- boot image via network using TFTP protocol
version - print monitor version
x210 #
若想查看每个命令的短说明可以输入 [命令名] ? 若想查看每个命令的详细说明可以输入 help [命令名] ,按下回车,每次输完命令都必须按下回车,这是因为uboot的shell是行缓冲,在按下回车之前uboot都会认为命令还未输完。每个命令都需要一个函数实现,函数名就叫do_xx,例如help的实现函数就叫do_help。在早期的时候,uboot的命令较少,所以这些实现函数都放在了…/uboot/common/command.c文件中,但后来随着uboot的命令越来越多,官方就将后来的每个命令专门创建专属的C文件,叫cmd_xxx.c,都放在…/uboot/common目录下。
2. uboot命令处理大致流程
在uboot初始化阶段完成后就会进入main_loop函数进行分析解析命令,uboot给出两种命令处理方法,一种是hush机制,另一种是比较简单的通过readline函数读入,run_command执行的方法,他们可以通过CFG_HUSH_PARSER 宏开关来选择,代码简化后如下:
hush机制 :
void main_loop(void)
{
	char *s;
	int bootdelay;

	u_boot_hush_start();

    if (fastboot_preboot())
        run_command("fastboot", 0);

	s = getenv("bootdelay");
	bootdelay = s ? (int)simple_strtol(s, NULL, 10) : CONFIG_BOOTDELAY;

	s = getenv ("bootcmd");
	if (bootdelay >= 0 && s && !abortboot(bootdelay)) {

		parse_string_outer(s, FLAG_PARSE_SEMICOLON |
				    FLAG_EXIT_FROM_LOOP);

	}
	/*
	 * Main Loop for Monitor Command Processing
	 */
	parse_file_outer();//里面有do-while循环
	/* This point is never reached */
	for (;;);
}
简单机制 :
void main_loop(void)
{
	static char lastcommand[CFG_CBSIZE] = { 0, };
	int len;
	int rc = 1;
	int flag;
	char *s;
	int bootdelay;

    if (fastboot_preboot())
        run_command("fastboot", 0);

	s = getenv("bootdelay");
	bootdelay = s ? (int)simple_strtol(s, NULL, 10) : CONFIG_BOOTDELAY;

	s = getenv ("bootcmd");
	if (bootdelay >= 0 && s && !abortboot(bootdelay)) {
		run_command(s, 0);
	}
	/*
	 * Main Loop for Monitor Command Processing
	 */
	for (;;) {
		len = readline(CFG_PROMPT);

		flag = 0;	/* assume no special flags for now */
		if (len > 0)
			strcpy(lastcommand, console_buffer);
		else if (len == 0)
			flag |= CMD_FLAG_REPEAT;

		if (len == -1)
			puts("<INTERRUPT>\n");
		else
			rc = run_command(lastcommand, flag);

		if (rc <= 0) {
			/* invalid command or not repeatable, forget it */
			lastcommand[0] = 0;
		}
	}
}
在这两种机制中,他们最开始的代码几乎相同,除了hush机制多了一个hush的初始化,流程都是初始化fastboot,然后获取bootdelay值,等待若干秒后,如无打断操作,会执行bootargs描述的操作。其中,abortboot函数用来倒数计时,每秒都要读一下缓冲区看是否有输入,若有就会输出"\b\b\b 0",进入shell。之后开始执行两种机制的独立部分,解析执行命令。
3. uboot的命令集处理
uboot为命令定义了一个结构体:
struct cmd_tbl_s {
	char		*name;		/* Command Name			*/
	int		maxargs;	/* maximum number of arguments	*/
	int		repeatable;	/* autorepeat allowed?		*/
					/* Implementation function	*/
	int		(*cmd)(struct cmd_tbl_s *, int, int, char *[]);
	char		*usage;		/* Usage message	(short)	*/
	char		*help;		/* Help  message	(long)	*/
	/* do auto completion on the arguments */
	int		(*complete)(int argc, char *argv[], char last_char, int maxv, char *cmdv[]);
};

typedef struct cmd_tbl_s	cmd_tbl_t;
这个结构体的内容包括了命令名,最多参数,是否重复(在输完一个命令后,再按回车可执行上一个命令),命令函数的函数指针,短说明,长说明,自动补全函数。
uboot为了能够方便扩展命令集,它将所有命令结构体放到了用户自定义段中,具体实现如下:
#define Struct_Section  __attribute__ ((unused,section (".u_boot_cmd")))

#define U_BOOT_CMD(name,maxargs,rep,cmd,usage,help) \
cmd_tbl_t __u_boot_cmd_##name Struct_Section = {#name, maxargs, rep, cmd, usage, help}
Struct_Section 是一个宏定义,用来修饰命令结构体归属的链接段。在uboot.lds链接脚本中,uboot定义了命令段用于存放命令结构体内容,实现了命令体系的灵活扩展:
	__u_boot_cmd_start = .;
	.u_boot_cmd : { *(.u_boot_cmd) }
	__u_boot_cmd_end = .;
U_BOOT_CMD 宏是一个带参宏,参数就是命令结构体的内容。##符合是连接符,达到了通过参数自动修改结构体名。name前有一个#号是为了将函数名定义为字符串,以version命令为例具体说明:
int
do_version (cmd_tbl_t *cmdtp, int flag, int argc, char *argv[])
{
	extern char version_string[];
	printf ("\n%s\n", version_string);
	return 0;
}

U_BOOT_CMD(
	version,	1,		1,	do_version,
	"version - print monitor version\n",
	NULL
);
先编写命令函数,在定义命令结构体,将宏展开可以得到:cmd_tbl_t __u_boot_cmd_version __attribute__ ((unused,section (".u_boot_cmd"))) = {“version”, 1, 1, do_version, "version - print monitor version\n", NULL},其中do_version是函数指针,这样就将一个命令存放到了u_boot_cmd段中。最后在解析一条命令只需要遍历__u_boot_cmd_start 地址到__u_boot_cmd_end地址内的命令集寻找需要执行的命令的结构体,然后执行相应结构体中的函数指针,完成运行。
4. 增加自定义命令
uboot的命令体系实现过程很繁琐,以上也只是粗略分析,但正因为实现繁琐使得增添命令很方便。我们只需照猫画虎添加一个实现函数和U_BOOT_CMD宏到command.c文件中即可,也可以添加一个C文件到…/uboot/common目录下,添加一个实现函数和U_BOOT_CMD宏到此文件中,修改…/uboot/common/Makefile文件,增添COBJS-y += [创建的C文件名].o到28行AOBJS =下,重新编译下载即可。以下举一个例子:
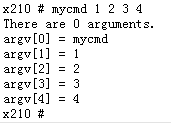
目的: 增添一个命令mycmd,用来打印命令参数到控制台。需要创建一个新的C文件
- 进入…/uboot/common/目录,
touch cmd_mycmd.c创建一个新的C文件。 vim cmd_mycmd.c打开这个C文件,编写如下内容:

vim Makefile打开Makefile文件,在30行增加一行COBJS-y += cmd_mycmd.o,:wq保存退出。./mk重新编译uboot程序- 烧录运行,有如下效果:
