1、下载安装axios
npm install axios查看版本号
npm axios -v2、引用axios
在src目录下新建axios文件夹,在axios文件夹里新建index.js文件

index.js代码:
//引入Vue框架
import Vue from 'vue'
//引入资源请求插件
import axios from 'axios'

//使用axios插件
//每个 Vue 对象都会新增一个 axios 对象
Vue.prototype.axios = axios;

//添加请求拦截器
axios.interceptors.request.use(function (config) {
  //在发送请求之前
  return config;
},function (error) {
  //请求错误时
  return Promise.reject(error);
});

//添加响应拦截器
//拦截器可以对请求做一些公共的处理,比如异常、返回数据的格式
axios.interceptors.response.use(
  response => {
    return response;
  },
  error => {
    if (error.response) {
      switch (error.response.status) {
        case 500:
          // do something
          break;
        case 402:
          // do something
          break;
      }
    }
    return Promise.reject(error.response.data);   // 返回接口返回的错误信息
  });

export default ({

});
3、配置config
axios跨域原理解释:
客户端的域名与服务器端的域名不同,比如:我的客户端的域名是(http://localhost:8080),而服务器端的域名为(http://localhost:3000),客户端请求服务器端的数据存在跨域问题。而服务器与服务器之间的数据请求不会跨域。所以,我们需要配置一个代理服务器,让代理服务器去请求目标服务器中的数据,然后把请求出来的数据返回给代理服务器,代理服务器再返回数据给客户端,这样就实现了跨域访问。原理图如下:

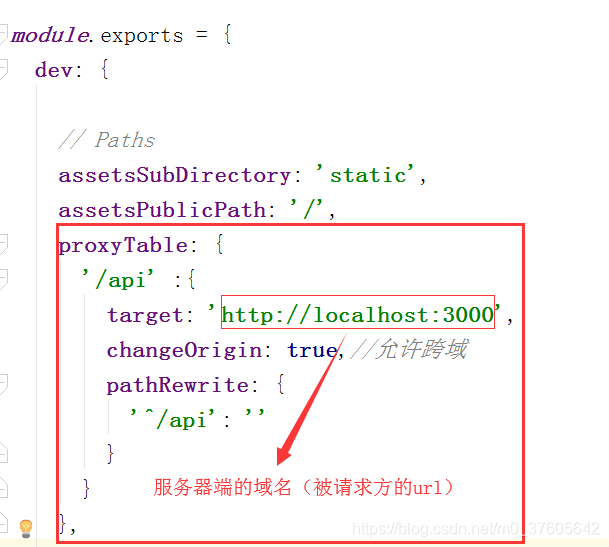
找到config目录下的index.js,在该文件中找到proxyTable,在里面添加配置代理服务器
代码如下:
'/api' :{
//目标服务器的域名
target: 'http://localhost:3000',
// 在本地会创建一个虚拟服务端,然后发送请求数据,并同时接收返回的数据,实现代理服务器与目标服务器的数据交换
changeOrigin: true,//允许跨域
pathRewrite: {
// 替换target中的请求地址,当你请求目标服务器http://localhost:3000这个地址的时候,直接写成/api即可
'^/api': ''
}
}
4、封装api接口
在根目录中的main.js中添加以下代码:
import axios from './axios'

Vue.prototype.HOST = '/api';//封装跨域接口
5、配置开发环境中的api接口
在项目根目录中找到config目录,在该目录中找到dev.env.js,添加如下代码:
API_HOST:"/api/"
6、在自定义组件中使用axios.get请求数据
前端页面:
<li v-for="item in obj">{{ item }}</li>
<button @click="getdata">get提交数据</button>定义数据obj:
data(){
    return{
        obj:null
    }
}
getdata函数实现的代码:
getdata:function () {
var url = 'api/message';//message是服务器端的数据资源,是json格式
this.axios.get(url)
.then((response) =>{
onsole.log(response.data);// response.data为后端返回的具体数据
alert("get请求成功");
this.obj = response.data;
console.log(this.obj);
console.log(response.data);
console.log(response.status);
console.log(response.statusText);
console.log(response.headers);
console.log(response.config);
}).catch(function (error) {
console.log(error);
alert("get请求失败");
})
}

api/message域名下的数据是json数据
对本地数据的访问操作,请参考另外一篇博客:https://blog.csdn.net/m0_37605642/article/details/86409875
"message": [
    {
      "id": 1,
      "name": "奥迪",
      "ctime": "2017-02-07T10:32:07.000Z"
    },
    {
      "id": 2,
      "name": "宝马",
      "ctime": "2017-02-07T10:32:17.000Z"
    },
    {
      "emulateJSON": true,
      "name": "奔驰",
      "time": "2019-01-13T08:55:45.921Z",
      "id": 3
    }
  ]
7、启动项目
npm start启动项目,展示的效果图如下:


参考文章:
https://blog.csdn.net/qq_38209578/article/details/80625480