一、<Bean>的属性及子元素
在1.1中我们对<Bean>有了初步的认识,了解了一些基本用法。
现在我们进一步理解<Bean>属性及子元素。
我们先来看下<Bena>的属性及子元素:
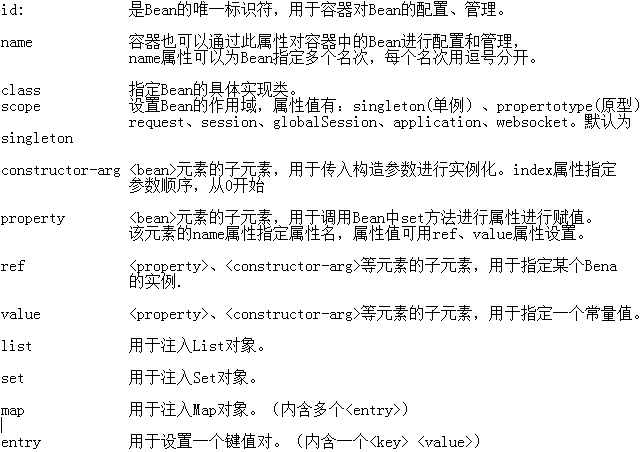
上面对<Bean>做了基本介绍,看文字可能不太理解各个属性,我们结合后续的内容来使用并理解<Bean>属性及其子元素。
二、Bean的实例化
2.1构造器实例化
构造器实例化就是通过构造对Bean进行实例化。
先创建一个Person
Person.java
public class Person {
    private String name;
    private int age;
    public String getName() {
        return name;
    }
    public void setName(String name) {
        this.name = name;
    }
    public int getAge() {
        return age;
    }
    public void setAge(int age) {
        this.age = age;
    }
}
再创建BeanInstance.java
import java.util.List;
import java.util.Map;

public class BeanInstance {
    private String str;
    private Person per;
    List<String> list;
    Map<String,Person> map;

    public BeanInstance() {};

    public BeanInstance(String str, Person per, List<String> list, Map<String, Person> map) {
        super();
        this.str = str;
        this.per = per;
        this.list = list;
        this.map = map;
    }

    public String getStr() {
        return str;
    }
    public void setStr(String str) {
        this.str = str;
    }
    public Person getPer() {
        return per;
    }
    public void setPer(Person per) {
        this.per = per;
    }
    public List<String> getList() {
        return list;
    }
    public void setList(List<String> list) {
        this.list = list;
    }
    public Map<String, Person> getMap() {
        return map;
    }
    public void setMap(Map<String, Person> map) {
        this.map = map;
    }
配置beans.xml
<?xml  version="1.0"  encoding="UTF-8"?>
<beans  xmlns="http://www.springframework.org/schema/beans"
        xmlns:xsi = "http://www.w3.org/2001/XMLSchema-instance"
              xsi:schemaLocation="http://www.springframework.org/schema/beans
http://www.springframework.org/schema/beans/spring-beans-4.3.xsd">

    <bean id = "person1" class = "com.spring.beanInstance.Person"> <!-- 无参构造器初始化 -->
        <property name="name" value="hcf"></property>   <!-- 通过set方法设置属性 -->
        <property name="age" value="20"></property>
    </bean>

    <bean id = "beanInstance" class = "com.spring.beanInstance.BeanInstance">
        <constructor-arg index = "0" value="beanString"></constructor-arg> <!-- 通过有参构造器设置参数 -->
        <constructor-arg index = "1" ref="person1"></constructor-arg>
        <constructor-arg index = "2">  <!-- 设置list -->
            <list>
                <value>"one"</value>
                <value>"two"</value>
            </list>
        </constructor-arg>
        <constructor-arg index = "3"><!-- 设置map -->
            <map>
                <entry key="hcf" value-ref="person1">  <!-- key value为设置常量键值对,加-ref为将bean实例设置键值对 -->

                </entry>
            </map>
        </constructor-arg>
    </bean>

</beans>
Main.java测试:
import java.util.Iterator;
import java.util.Map;
import java.util.Map.Entry;
import java.util.Set;

import org.springframework.context.ApplicationContext;
import org.springframework.context.support.ClassPathXmlApplicationContext;


public class Main {
    public static void main(String[] args) {
        ApplicationContext ac = new ClassPathXmlApplicationContext("beans.xml");
        BeanInstance bi = (BeanInstance)ac.getBean("beanInstance");
        System.out.println("--------BeanInstance--------");
        System.out.println(bi.getStr());
        for(String temp : bi.getList()) {//输出list
            System.out.println("list:" + temp);
        }
        Set<Entry<String,Person>> sm = bi.getMap().entrySet();
        Iterator<Entry<String,Person>> ite = sm.iterator();
        while(ite.hasNext()) {//输出map键值对
            Entry<String,Person> m = ite.next();
            Person p = m.getValue();
            System.out.println("key:" + m.getKey());
            System.out.println("value:" + p.getName() + "," + p.getAge());
        }
    }
}
运行结果:
二月 10, 2019 3:24:33 下午 org.springframework.context.support.ClassPathXmlApplicationContext prepareRefresh
信息: Refreshing org.springframework.context.support.ClassPathXmlApplicationContext@46f7f36a: startup date [Sun Feb 10 15:24:33 CST 2019]; root of context hierarchy
二月 10, 2019 3:24:33 下午 org.springframework.beans.factory.xml.XmlBeanDefinitionReader loadBeanDefinitions
信息: Loading XML bean definitions from class path resource [beans.xml]
--------BeanInstance--------
beanString
list:"one"
list:"two"
key:hcf
value:hcf,20
2.2静态工厂实例化
2.2.1创建测试类
Person.java
public class Person {
    private String name;
    private int age;
    public String getName() {
        return name;
    }
    public void setName(String name) {
        this.name = name;
    }
    public int getAge() {
        return age;
    }
    public void setAge(int age) {
        this.age = age;
    }
}
2.2.2创建静态工厂
public class MyBeansFactory {
    public static Person createPerson() {
        return new Person();
    }
}
2.2.3配置beans.xml文件
<?xml  version="1.0"  encoding="UTF-8"?>
<beans  xmlns="http://www.springframework.org/schema/beans"
        xmlns:xsi = "http://www.w3.org/2001/XMLSchema-instance"
              xsi:schemaLocation="http://www.springframework.org/schema/beans
http://www.springframework.org/schema/beans/spring-beans-4.3.xsd">
<!--  一将指定类配置给 Spring,让 Spring 创建其对象的实例一 -->

    <!-- 测试静态工厂实例化         当通过getBean("person")获取实例化对象时,会调用class指定类中对应的factory-method方法进行实例化 -->
    <bean id = "person" class = "com.spring.beanInstance.MyBeansFactory" factory-method = "createPerson">
    </bean>

</beans>
2.2.4测试
import org.springframework.context.ApplicationContext;
import org.springframework.context.support.ClassPathXmlApplicationContext;

public class Main {
    public static void main(String[] args) {
        ApplicationContext ac = new ClassPathXmlApplicationContext("beans.xml");
        Person per = (Person)ac.getBean("person");
        System.out.println(per);
    }
}
运行结果:
二月 10, 2019 3:40:25 下午 org.springframework.context.support.ClassPathXmlApplicationContext prepareRefresh
信息: Refreshing org.springframework.context.support.ClassPathXmlApplicationContext@46f7f36a: startup date [Sun Feb 10 15:40:25 CST 2019]; root of context hierarchy
二月 10, 2019 3:40:25 下午 org.springframework.beans.factory.xml.XmlBeanDefinitionReader loadBeanDefinitions
信息: Loading XML bean definitions from class path resource [beans.xml]
com.spring.beanInstance.Person@51efea79 //已被实例化
2.3实例工厂实例化
上例是静态工厂实例化,由于创建方法是静态方法,所有不需要创建对象可直接调用。
本例是先实例化工厂对象,然后调用创建方法(非静态)
2.3.1 创建测试类Person.java
public class Person {
    private String name;
    private int age;
    public String getName() {
        return name;
    }
    public void setName(String name) {
        this.name = name;
    }
    public int getAge() {
        return age;
    }
    public void setAge(int age) {
        this.age = age;
    }
}
2.3.2创建工厂类MyBeansFactory.java
public class MyBeansFactory {
    public MyBeansFactory() {
        System.out.println("MyBeansFactoryConstructor");
    }

    public Person createPerson() {
        return new Person();
    }
}
2.3.3配置beans.xml文件
<?xml  version="1.0"  encoding="UTF-8"?>
<beans  xmlns="http://www.springframework.org/schema/beans"
        xmlns:xsi = "http://www.w3.org/2001/XMLSchema-instance"
              xsi:schemaLocation="http://www.springframework.org/schema/beans
http://www.springframework.org/schema/beans/spring-beans-4.3.xsd">
<!--  一将指定类配置给 Spring,让 Spring 创建其对象的实例一 -->

    <!-- 测试静态工厂实例化 -->

    <bean id = "factory" class = "com.spring.beanInstance.MyBeansFactory"></bean>
    <bean id = "person" factory-bean="factory" factory-method = "createPerson">
    </bean>

</beans>
2.3.4测试
import org.springframework.context.ApplicationContext;
import org.springframework.context.support.ClassPathXmlApplicationContext;


public class Main {
    public static void main(String[] args) {
        ApplicationContext ac = new ClassPathXmlApplicationContext("beans.xml");
        Person per = (Person)ac.getBean("person");
        System.out.println(per);
    }
}
运行结果:
二月 10, 2019 3:58:53 下午 org.springframework.context.support.ClassPathXmlApplicationContext prepareRefresh
信息: Refreshing org.springframework.context.support.ClassPathXmlApplicationContext@46f7f36a: startup date [Sun Feb 10 15:58:53 CST 2019]; root of context hierarchy
二月 10, 2019 3:58:53 下午 org.springframework.beans.factory.xml.XmlBeanDefinitionReader loadBeanDefinitions
信息: Loading XML bean definitions from class path resource [beans.xml]
MyBeansFactoryConstructor
com.spring.beanInstance.Person@51efea79 //对象已被实例化
三、Bean的作用域
bean的作用域主要通过Scope设置

我们来测试下singleton和prototype
Person.java参照上例。
beans.xml
<?xml  version="1.0"  encoding="UTF-8"?>
<beans  xmlns="http://www.springframework.org/schema/beans"
        xmlns:xsi = "http://www.w3.org/2001/XMLSchema-instance"
              xsi:schemaLocation="http://www.springframework.org/schema/beans
http://www.springframework.org/schema/beans/spring-beans-4.3.xsd">
<!--  一将指定类配置给 Spring,让 Spring 创建其对象的实例一 -->

    <!-- 测试静态工厂实例化 -->

    <bean id = "personSingleton" class = "com.spring.beanInstance.Person" scope = "singleton"></bean>
    <bean id = "personPrototype" class = "com.spring.beanInstance.Person" scope = "prototype"></bean>

</beans>
测试
import org.springframework.context.ApplicationContext;
import org.springframework.context.support.ClassPathXmlApplicationContext;


public class Main {
    public static void main(String[] args) {
        ApplicationContext ac = new ClassPathXmlApplicationContext("beans.xml");
        Person perSingleton1 = (Person)ac.getBean("personSingleton");
        Person perSingleton2 = (Person)ac.getBean("personSingleton");
        Person perPrototype1 = (Person)ac.getBean("personPrototype");
        Person perPrototype2 = (Person)ac.getBean("personPrototype");
        System.out.println("personSingleton:" + (perSingleton1 == perSingleton2));
        System.out.println("personPrototype:" + (perPrototype1 == perPrototype2));
    }
}
运行结果:
二月 10, 2019 4:22:36 下午 org.springframework.context.support.ClassPathXmlApplicationContext prepareRefresh
信息: Refreshing org.springframework.context.support.ClassPathXmlApplicationContext@46f7f36a: startup date [Sun Feb 10 16:22:36 CST 2019]; root of context hierarchy
二月 10, 2019 4:22:36 下午 org.springframework.beans.factory.xml.XmlBeanDefinitionReader loadBeanDefinitions
信息: Loading XML bean definitions from class path resource [beans.xml]
personSingleton:true
personPrototype:false
四、Bean的装配方式
4.1基于.xml文件的装配
上例中基本都是使用的.xml装配。
4.2基于Annotation的装配
基于Annotation装配我们需要先了解Spring中定义的注解
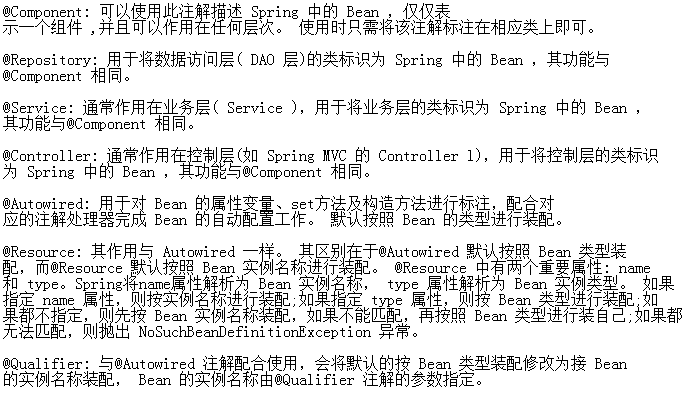
接下来我们看个小例子
使用注解装配先要导入spring-aop-x.x.x.RELEASE.jar
UserDao.java
import org.springframework.stereotype.Repository;

@Repository("userDao") //将UserDao标识为Spring中的bean,后续注入时“userDao”就是实例名称。
public class UserDao {
    public void say() {
        System.out.println("UserDao");
    }
}
UserService.java
import javax.annotation.Resource;
import org.springframework.stereotype.Service;

//将UserDao标识为Spring中的bean,与xml中<bean id = "userService" class = "com.xxx.UserService"/>关联
@Service("userService")
public class UserService {
    @Resource(name = "userDao")
    private UserDao userDao; //按实例名称注入,即将配置文件中<bean id = "userDao" ..../>实例注入。

    public void setUserDao(UserDao userDao) {
        this.userDao = userDao;
    }

    public void say() {
        userDao.say();
        System.out.println("UserService");
    }
}
UserController.java
import javax.annotation.Resource;
import org.springframework.stereotype.Controller;

//将UserDao标识为Spring中的bean,类似<bean id = "userController" class = "com.xxx.UserController"/>
@Controller("userController")
public class UserController {
    @Resource(type = UserService.class )//按实例类型注入,即将UserService.java这个类的实例注入。
    private UserService userService;

    public void setUserService(UserService userService) {
        this.userService = userService;
    }

    public void say() {
        userService.say();
        System.out.println("UserController");
    }
}
beans.xml (xml文件约束部分有几个已context结尾的不要忘记加上)
<?xml  version="1.0"  encoding="UTF-8"?>
<beans  xmlns="http://www.springframework.org/schema/beans"
        xmlns:context="http://www.springframework.org/schema/context"
        xmlns:xsi = "http://www.w3.org/2001/XMLSchema-instance"
              xsi:schemaLocation="http://www.springframework.org/schema/beans
            http://www.springframework.org/schema/beans/spring-beans-4.3.xsd
            http://www.springframework.org/schema/context
             http://www.springframework.org/schema/context/spring-context-4.3.xsd" >


    <!-- 开启注解 -->
    <context:annotation-config/>
    <!-- 配置Bean的实例 -->
    <bean id = "userDao" class = "com.spring.annotation.UserDao"></bean>
    <bean id = "userService" class = "com.spring.annotation.UserService"></bean>
    <bean id = "userController" class = "com.spring.annotation.UserController"></bean>
</beans>
测试Main.java:
import org.springframework.context.ApplicationContext;
import org.springframework.context.support.ClassPathXmlApplicationContext;

public class Main {

    public static void main(String[] args) {
        // TODO Auto-generated method stub
        ApplicationContext ac = new ClassPathXmlApplicationContext("beans.xml");
        UserController uc = (UserController)ac.getBean("userController");
        uc.say();
    }
}
运行结果:
二月 10, 2019 5:30:56 下午 org.springframework.context.support.ClassPathXmlApplicationContext prepareRefresh
信息: Refreshing org.springframework.context.support.ClassPathXmlApplicationContext@2b71fc7e: startup date [Sun Feb 10 17:30:56 CST 2019]; root of context hierarchy
二月 10, 2019 5:30:56 下午 org.springframework.beans.factory.xml.XmlBeanDefinitionReader loadBeanDefinitions
信息: Loading XML bean definitions from class path resource [beans.xml]
UserDao
UserService
UserController
4.3自动装配
采用自动装配,容器会自动寻找合适的将其注入对应属性中。
使用自动装配需要使用autowire属性。
autowire属性值:
byName:根据属性的名称进行装配。例如属性名为userDao,就会寻找配置文件中id、name为userDao的bean进行注入。
类似注解装配中的Resource(name = "xxx").
byType:根据属性类型进行装配,类似注解装配中的Resource(type = xxx).
使用自动装配对应属性必须要有set方法
UserDao.java
import org.springframework.stereotype.Repository;

//@Repository("userDao") //将UserDao标识为Spring中的bean,与xml中<bean id = "userDao" class = "com.xxx.UserDao"/>关联
public class UserDao {
    public void say() {
        System.out.println("UserDao");
    }
}
UserService.java
import javax.annotation.Resource;
import org.springframework.stereotype.Service;

//将UserDao标识为Spring中的bean,与xml中<bean id = "userService" class = "com.xxx.UserService"/>关联
//@Service("userService")
public class UserService {
    //@Resource(name = "userDao")
    private UserDao userDao; //相当于将属性与<bean id = "userDao" ..../>实例关联起来。

    public void setUserDao(UserDao userDao) {
        this.userDao = userDao;
    }

    public void say() {
        userDao.say();
        System.out.println("UserService");
    }
}
UserController.java
import javax.annotation.Resource;
import org.springframework.stereotype.Controller;

//将UserDao标识为Spring中的bean,与xml中<bean id = "userController" class = "com.xxx.UserController"/>关联
//@Controller("userController")
public class UserController {
//    @Resource(name = "userService")//相当于将属性与<bean id = "userService" ..../>实例关联起来。
    private UserService userService;

    public void setUserService(UserService userService) {
        this.userService = userService;
    }

    public void say() {
        userService.say();
        System.out.println("UserController");
    }
}
beans.xml
<?xml  version="1.0"  encoding="UTF-8"?>
<beans  xmlns="http://www.springframework.org/schema/beans"
        xmlns:context="http://www.springframework.org/schema/context"
        xmlns:xsi = "http://www.w3.org/2001/XMLSchema-instance"
              xsi:schemaLocation="http://www.springframework.org/schema/beans
            http://www.springframework.org/schema/beans/spring-beans-4.3.xsd
            http://www.springframework.org/schema/context
             http://www.springframework.org/schema/context/spring-context-4.3.xsd" >


    <!-- 开启注解 -->
    <!--  <context:annotation-config/>  -->
    <!-- 配置Bean的实例 -->
    <bean name = "userDao" class = "com.spring.annotation.UserDao" ></bean>
    <bean id = "userService" class = "com.spring.annotation.UserService" autowire = "byName"></bean>
    <bean id = "userController" class = "com.spring.annotation.UserController" autowire = "byName"></bean>
</beans>
测试Main.java
import org.springframework.context.ApplicationContext;
import org.springframework.context.support.ClassPathXmlApplicationContext;

public class Main {

    public static void main(String[] args) {
        // TODO Auto-generated method stub
        ApplicationContext ac = new ClassPathXmlApplicationContext("beans.xml");
        UserController uc = (UserController)ac.getBean("userController");
        uc.say();
    }
}
运行结果:
二月 10, 2019 6:04:58 下午 org.springframework.context.support.ClassPathXmlApplicationContext prepareRefresh
信息: Refreshing org.springframework.context.support.ClassPathXmlApplicationContext@2b71fc7e: startup date [Sun Feb 10 18:04:58 CST 2019]; root of context hierarchy
二月 10, 2019 6:04:58 下午 org.springframework.beans.factory.xml.XmlBeanDefinitionReader loadBeanDefinitions
信息: Loading XML bean definitions from class path resource [beans.xml]
UserDao
UserService
UserController