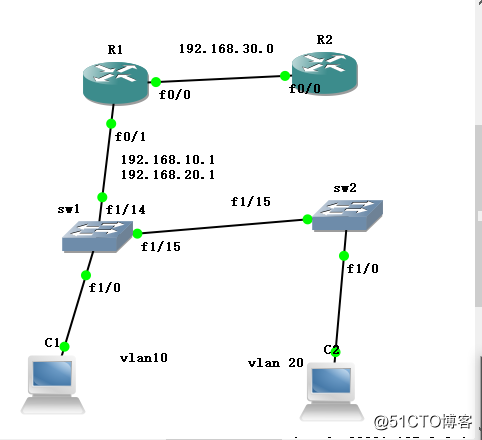
网络地址转换NAT实验实验需求:
1.pc1属于vlan10和pc2属于vlan20.
2.Pc1和pc2通过DHCP获得ip信息。
3.所有局域网成员都通过NAT上外网。
4.R2可以远程管理sw1和sw2.
实验步骤:
1.在sw1和sw2上设置vlan,基于端口设置vlan。
sw1(config)#vlan 10,20 ###创建vlan10和vlan20.
sw1(config-vlan)#exit
sw1(config)#int f1/0 ###将端口添加到vlan10里面
sw1(config-if)#switchport mode access
sw1(config-if)#switchport access vlan 10
sw1(config-if)#int range f1/14 -15 ###多个端口设置,设置中继口
sw1(config-if-range)#switchport trunk encapsulation dot1q
sw1(config-if-range)#switchport mode trunk
sw2(config)#vlan 10,20 ###设置vlan20
sw2(config-vlan)#exit
sw2(config)#int f1/0 ###将端口添加到vlan20里面。
sw2(config-if)#switchport mode access
sw2(config-if)#switchport access vlan 20
sw2(config-if)#int f1/15 ###设置中继口。
sw2(config-if)#switchport trunk encapsulation dot1q
sw2(config-if)#switchport mode trun
2.外网路由R2各个端口配IP,并给R2设置环回口测试用。
R2(config)#int f0/0 ###给外网端口配IP
R2(config-if)#ip add 192.168.20.1 255.255.255.0
R2(config-if)#no shut
R2(config)#int loopback 0 ###给环回口配IP
R2(config-if)#ip add 1.1.1.1 255.255.255.255
R2(config-if)#no shut
3.给R1配IP,因为两个vlan,并且IP网段不同,需要用到单臂路由。
R1(config-if)#int f0/0 ###给外部端口配IP
R1(config-if)#ip add 192.168.30.2 255.255.255.0
R1(config-if)#no shut
###下面运用到单臂路由,因为有两个IP网段,需要设两个ip
R1(config-if)#int f0/1
R1(config-if)#no shut
R1(config-if)#int f0/1.10 ###进入子接口
R1(config-subif)#encapsulation dot1Q 10 ###定义封装模式,后面的数字表示vlan10.
R1(config-subif)#ip add 192.168.10.1 255.255.255.0 ###给子接口配ip。
R1(config-subif)#no shut ###开启端口
R1(config-subif)#int f0/1.20
R1(config-subif)#encapsulation dot1Q 20
R1(config-subif)#ip add 192.168.20.1 255.255.255.0
R1(config-subif)#no shut
R1(config-subif)#exit
4.设置DHCP,使pc1和pc2通过DHCP获得IP地址,在R1上设置。
R1(config)#service dhcp ###开启dhcp服务
R1(config)#ip dhcp pool vlan10 ###给vlan10 配dhcp服务,注意vlan和10之间没有空格。
R1(dhcp-config)#network 192.168.10.0 /24 ###设置地址池,即dhcp网段。
R1(dhcp-config)#default-router 192.168.10.1 ###配网关。
R1(dhcp-config)#dns-server 2.2.2.2 ###配dns。
R1(dhcp-config)#exit
R1(config)#ip dhcp pool vlan20 ###给vlan20设dhcp
R1(dhcp-config)#network 192.168.20.0 /24
R1(dhcp-config)#default-router 192.168.20.1
R1(dhcp-config)#dns-server 2.2.2.2
R1(dhcp-config)#exit
测试:
VPCS[1]> dhcp
DDORA IP 192.168.10.2/24 GW 192.168.10.1
VPCS[1]> 2
VPCS[2]> dhcp
DDORA IP 192.168.20.2/24 GW 192.168.20.1
当dhcp配置不成功需要注意的地方:
当遇到"% not enough space on flash to store vlan database. trying squeeze...First create squeeze log by erasing the entire device"这种情况的时候说明空间不足!配置打不上去时解决办法:出现错误时候,鍵入end先退到特权模式,然后打入erase flash:,点确定完,再进入全局模式配置vlan即可
思科设备默认三层接口是shutdown的状态,所以你需要开启,如:
int vlan 10
no shutdown
或者你用 show ip int b 查看一下,你的vlan三层接口的物理状态应该是shutdown的状态。
5.所有局域网成员都通过NAT上外网。
这里用到端口复用模式PAT,可以多对一,结束IP地址。
R1(config)#int f0/0 ###定义外部端口
R1(config-if)#ip nat outside
R1(config-if)#int f0/1 ###定义内部端口
R1(config-if)#ip nat inside
R1(config-if)#exit
R1(config)#access-list 1 permit 192.168.10.0 0.0.0.255 ###设置地址池,所有的10.0网段,后面是反子掩码
R1(config)#ip nat inside source list 1 int f0/0 overload ###设置基于接口复用动态IP地址转换,overload 反复用
R1(config)#access-list 2 permit 192.168.20.0 0.0.0.255 ##设置地址池,所有的20.0网段,后面是反子掩码
R1(config)#ip nat inside source list 2 int f0/0 overload ###设置基于接口复用动态IP地址转换,overload 反复用
R1(config)#ip route 0.0.0.0 0.0.0.0 192.168.30.1 ###设置静态路由,不然出的去,回不来
R1(config)#int f0/1.10 ###一定要将两个子接口也定义成内部网络
R1(config-subif)#ip nat inside
R1(config-subif)#int f0/1.20
R1(config-subif)#ip nat inside
###测试
VPCS[1]> ping 1.1.1.1
1.1.1.1 icmp_seq=1 ttl=254 time=52.858 ms
1.1.1.1 icmp_seq=2 ttl=254 time=33.687 ms
1.1.1.1 icmp_seq=3 ttl=254 time=54.853 ms
1.1.1.1 icmp_seq=4 ttl=254 time=31.917 ms
1.1.1.1 icmp_seq=5 ttl=254 time=37.633 ms
VPCS[1]> 2
VPCS[2]> ping 1.1.1.1
1.1.1.1 icmp_seq=1 ttl=254 time=52.857 ms
1.1.1.1 icmp_seq=2 ttl=254 time=38.663 ms
1.1.1.1 icmp_seq=3 ttl=254 time=36.621 ms
1.1.1.1 icmp_seq=4 ttl=254 time=48.865 ms
6.R2可以远程管理sw1和sw2.
(1)给sw1和sw2配IP地址以及设置登录密码。
sw1(config)#no ip routing ###一定要关闭路由功能,不然会出错,他会把自己当成路由了。
sw1(config)#vlan 30 ###添加个vlan30,用于配IP。
sw1(config)#int f1/2 ###将虚拟端口添加到vlan 30里面。
sw1(config-if)#switchport mode access
sw1(config-if)#switchport access vlan 30
sw1(config-if)#exit
sw1(config)#int vlan 30 ###配IP
sw1(config-if)#ip default-gateway 192.168.40.1 ###定义网关
sw1(config)#int vlan 30
sw1(config-if)#ip add 192.168.40.2 255.255.255.0 ###配IP
sw1(config-if)#no shut ###开启端口
###给sw1设置登录密码
sw1(config)#line vty 0 4
sw1(config-line)#password 1234 ###登录密码
sw1(config-line)#login
sw1(config-line)#exit
sw1(config)#enable secret 1234 ###特权模式进入用护模式的密码
sw1(config)#exit
sw2(config)#vlan 30
sw2(config-if)#int f1/2
sw2(config-if)#switchport mode access
sw2(config-if)#switchport access vlan 30
sw2(config)#int vlan 30
sw2(config-if)#ip default-gateway 192.168.40.1
sw2(config)#int vlan 30
sw2(config-if)#ip add 192.168.40.3 255.255.255.0
sw2(config-if)#no shut
sw2(config)#line vty 0 4
sw2(config-line)#password 1234
sw2(config-line)#exit
sw2(config)#enable secret 1234
sw2(config)#exit
###在端口f0/1端口添加网关
R1(config-subif)#int f0/1.30
R1(config-subif)#encapsulation dot1Q 30
R1(config-subif)#ip add 192.168.40.1 255.255.255.0
R1(config-subif)#no shut
R1(config-subif)#exit
###将子端口定义成内部端口,一定不要忘,f0/1设置成内部端口,f0/1.30也一定要设置。
R1(config-subif)#int f0/1.30
R1(config-subif)#ip nat inside
###设置静态端口映射,tcp协议,端口23是运程管理。
R1(config)#ip nat inside source static tcp 192.168.40.2 23 192.168.30.2 2323 extendable
###在R2上测试,我们通过telnet 访问192.168.30.2的2323 端口就可以访问到192.168.40.2的交换机sw1,通过密码登录就可以远程管理sw1,在通过sw1跳转也可以管理sw2了。
R2#telnet 192.168.30.2 2323 ###远程登录
Trying 192.168.30.2, 2323 ... Open
User Access Verification
Password: ###输入设置的sw1登录密码 1234
sw1>enable ###从用户模式进入特权模式
Password: ###输入设置的密码
sw1#telnet 192.168.40.3 ###通过sw1远程登录sw2
Trying 192.168.40.3 ... Open
User Access Verification
Password: ###输入设置的sw2的登录密码 1234
sw2>enable ###从用户模式进入特权模式
Password: ###输如密码1234
sw2#
总结:我们在给交换设置IP的时候,必须关闭其路由功能,否则他成了三层交换机,没做静态路由,是无法访问外网。在设置vlan时会出现,当遇到"% not enough space on flash to store vlan database. trying squeeze...First create squeeze log by erasing the entire device"这种情况的时候说明空间不足!配置打不上去时解决办法:出现错误时候,鍵入end先退到特权模式,然后打入erase flash:,点确定完,再进入全局模式配置vlan即可
思科设备默认三层接口是shutdown的状态,所以你需要开启,如:
int vlan 10
no shutdown
或者你用 show ip int b 查看一下,你的vlan三层接口的物理状态应该是shutdown的状态。
注意dhcp的格式。