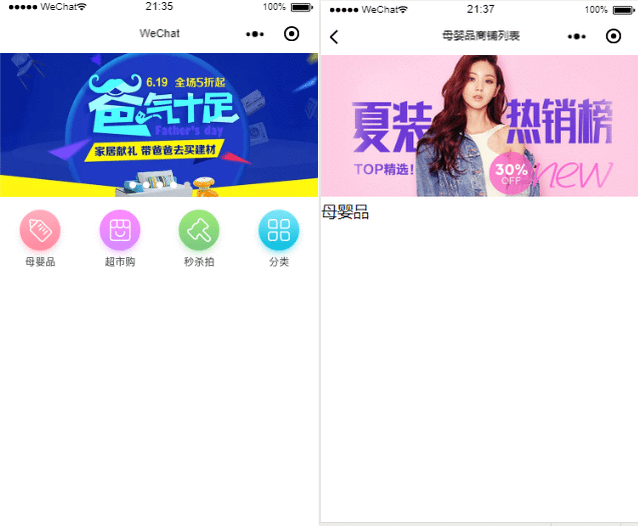
如上图点击的时候它上面的导航会切换到对应标题页面,这是一个页面,我们跳转的是一个页面
下面来段代码:
html
<!--pages/tab/tab.wxml-->
<swiper class='item-swiper' indicator-dots="true" autoplay="true" interval="5000" duration="1000" indicator-color="white" indicator-active-color="#ccc">
  <block wx:for="{{imgUrls}}" wx:key="">
    <swiper-item>
      <image src="{{item}}" class="slide-image" />
    </swiper-item>
  </block>
</swiper>
<view class='item-nav'>
  <block wx:for="{{tabBar}}" wx:key="{{item.navId}}">
  <!-- 我跳转的是我的另一个详情页,我们需要把JS中的navName拿过来  在这里我的navId拿的是当前数组的索引值 你也可以拿JS中的navId 但是需要修改 因为另一个页面根据的是索引值查找内容,如果不改的话会出现bug,后面我会给大家指出来-->
  <navigator class='item-nav-link' url='../index/index?navId={{index}}&&navName={{item.navName}}' hover-class="none">
    <image src='{{item.imgUrls}}'></image>
 </navigator>
   </block>
</view>
样式:
/* pages/tab/tab.wxss */
.item-swiper {
   height: 340rpx
}
.slide-image {
    width:750rpx;
    height: 100%;
}
.item-nav {
   display: flex;
   padding:24rpx 0 29rpx 0;
}
.item-nav-link {
  flex: 1;
  display: flex;  //必须加上这个
  justify-content: center  //让里面的元素居中
}
.item-nav-link image {
   width: 128rpx;
   height: 140rpx;
}
最重要的是js:
// pages/tab/tab.js
Page({

  /**
   * 页面的初始数据
   */
  data: {
    imgUrls: [
      '/image/banner1.png',
      '/image/banner2.png',
      '/image/banner3.png',
      '/image/banner4.png',
      '/image/banner5.png',
    ],
    tabBar:[
      {
        navId: '1',
        navName: '母婴品',
        imgUrls:'/image/[email protected]',
      },
      {
        navId: '2',
        navName: '超市购',
        imgUrls: '/image/[email protected]',
      },
      {
        navId: '3',
        navName: '秒杀拍',
        imgUrls: '/image/[email protected]',
      },
      {
        navId: '4',
        navName: '分类',
        imgUrls: '/image/[email protected]',
      },

    ],
  },
  /**
   * 生命周期函数--监听页面加载
   */
  onLoad: function (options) {

  },

  /**
   * 生命周期函数--监听页面初次渲染完成
   */
  onReady: function () {

  },

  /**
   * 生命周期函数--监听页面显示
   */
  onShow: function () {

  },

  /**
   * 生命周期函数--监听页面隐藏
   */
  onHide: function () {

  },

  /**
   * 生命周期函数--监听页面卸载
   */
  onUnload: function () {

  },

  /**
   * 页面相关事件处理函数--监听用户下拉动作
   */
  onPullDownRefresh: function () {

  },

  /**
   * 页面上拉触底事件的处理函数
   */
  onReachBottom: function () {

  },

  /**
   * 用户点击右上角分享
   */
  onShareAppMessage: function () {

  }
})
现在主页的代码已经完了,我们 看分页的代码:
 <image src='/image/banner1.png' style='width:100%' mode='widthFix'></image>
  <view>{{listContent}}</view>
  <!-- 在这里我只拿了一个图片作为内容 -->
最重要的JS文件:
data: {
  list:[
       {
        listContent:'母婴品'
     },
       {
         listContent: '超市购'
       },
       {
         listContent: '秒杀拍'
       },
       {
         listContent: '分类'
       },
     ]
}

 onLoad: function (options) {
      console.log(options)
      // 这个是navigator传过来的navId 通过get的方式
      let navId = options.navId
      console.log(navId)
      // 通过data中list的索引值查询相应的内容
      // this.data.list[navId] 这个[]中的是那数组的索引值查询的数据
    let listContent = this.data.list[navId].listContent
    console.log(listContent)
      this.setData({
        navId: navId,
        listContent:listContent
      })
      // 这个就是本文章的重点 通过这个setNavigationBarTitle方法 去设置它的title
     // 这个三元表达式如果我们闯过来的值不等于空就拿过来这个值用,如果等于空了 就是默认的商品列表
      wx.setNavigationBarTitle({
        title: (options.navName != '' ? options.navName : '') + '商铺列表'
      })
  },