补充:使用Auth0保护Spring APIs
使用Auth0保护Spring Boot API非常简单,并为表格带来了许多出色的功能。 使用Auth0(https://auth0.com/),我们只需编写几行代码即可获得可靠的身份管理解决方案,单点登录,支持社交身份提供商(如Facebook,GitHub,Twitter等)。 ),并支持企业身份提供商(如Active Directory,LDAP,SAML,自定义等)。
在以下部分中,我们将学习如何使用Auth0来保护使用Spring Boot编写的API。
创建API
首先,我们需要在我们的免费Auth0帐户上创建API(https://auth0.com/signup)。 为此,我们必须转到管理仪表板的API部分,然后单击“Create API”。 在出现的对话框中,我们可以将API命名为“Contacts API”(名称并不重要),并将其标识为https://contacts.blog-samples.com(稍后我们将使用此值)。


注册Auth0依赖项
第二步是导入一个名为auth0-spring-security-api的依赖项。 这可以通过在pom.xml中包含以下配置在Maven项目上完成(在Gradle,Ivy等上执行此操作并不困难):
<project ...>
    <!-- everything else ... -->
    <dependencies>
        <!-- other dependencies ... -->
        <dependency>
            <groupId>com.auth0</groupId>
            <artifactId>auth0-spring-security-api</artifactId>
            <version>1.0.0-rc.3</version>
        </dependency>
</dependencies>
</project>
将Auth0与Spring Security集成
第三步,添加一个继承WebSecurityConfigurerAdapter的类。 在此扩展中,我们使用JwtWebSecurityConfigurer来集成Auth0和Spring Security:
package com.auth0.samples.secure;
import com.auth0.spring.security.api.JwtWebSecurityConfigurer;
import org.springframework.beans.factory.annotation.Value;
import org.springframework.context.annotation.Configuration;
import org.springframework.security.config.annotation.method.configuration.EnableGlobalMethodSecurity;
import org.springframework.security.config.annotation.web.builders.HttpSecurity;import org.springframework.security.config.annotation.web.configuration.EnableWebSecurity;
import org.springframework.security.config.annotation.web.configuration.WebSecurityConfigurerAdapter;

@Configuration@EnableWebSecurity
@EnableGlobalMethodSecurity(prePostEnabled = true)
public class SecurityConfig extends WebSecurityConfigurerAdapter {
    @Value(value = "${auth0.apiAudience}")
    private String apiAudience;
    @Value(value = "${auth0.issuer}")
    private String issuer;

    @Override
    protected void configure(HttpSecurity http) throws Exception {
        JwtWebSecurityConfigurer
                .forRS256(apiAudience, issuer)
                .configure(http)
                .cors().and().csrf().disable().authorizeRequests()
                .anyRequest().permitAll();
    }
}
由于不想硬编码,因此我们使SecurityConfig依赖于两个环境属性:
- auth0.apiAudience:设置为我们在Auth0(https://contacts.blog-samples.com)上创建的API的标识符的值。
- auth0.issuer:我们在Auth0上的域名,包括HTTP协议。 例如:https://blog-samples.auth0.com/。
让我们在Spring应用程序的属性文件中设置它们(例如application.properties):
auth0.issuer:https://blog-samples.auth0.com/
auth0.apiAudience:https://contacts.blog-samples.com/
使用Auth0保护Endpoints
在集成Auth0和Spring Security之后,我们可以使用Spring Security注解轻松保护我们的Endpoints:
package com.auth0.samples.secure;
import com.google.common.collect.Lists;
import org.springframework.security.access.prepost.PreAuthorize;
import org.springframework.web.bind.annotation.GetMapping;
import org.springframework.web.bind.annotation.PostMapping;
import org.springframework.web.bind.annotation.RequestBody;
import org.springframework.web.bind.annotation.RequestMapping;
import org.springframework.web.bind.annotation.RestController;
import java.util.List;

@RestController
@RequestMapping(value = "/contacts/")
public class ContactController {
    private static final List<Contact> contacts = Lists.newArrayList(
            Contact.builder().name("Bruno Krebs").phone("+5551987654321").build(),
            Contact.builder().name("John Doe").phone("+5551888884444").build()
    );

    @GetMapping
    public List<Contact> getContacts() {
        return contacts;
    }

    @PostMapping
    public void addContact(@RequestBody Contact contact) {
        contacts.add(contact);
    }
}
现在,为了能够与我们的端点进行交互,我们必须从Auth0获取访问令牌。 有多种方法可以做到这一点,我们将使用的策略取决于我们正在开发的客户端应用程序的类型。 例如,如果我们正在开发单页面应用程序(SPA),我们将使用所谓的隐式授权。 如果我们正在开发移动应用程序,我们将使用PKCE的授权代码授予流程。 Auth0还有其他流程可用。 但是,对于像这样的简单测试,我们可以使用我们的Auth0仪表板来获得一个。
因此,我们可以回到Auth0仪表板中的API部分,单击我们之前创建的API,然后单击此API的Test部分。 在那里,我们将找到一个名为Copy Token的按钮。 让我们点击这个按钮将访问令牌复制到我们的剪贴板。

复制此令牌(token)后,我们可以打开终端并发出以下命令:
# create a variable with our token
ACCESS_TOKEN=<OUR_ACCESS_TOKEN>
# use this variable to fetch contacts
curl -H 'Authorization: Bearer '$ACCESS_TOKEN http://localhost:8080/contacts/
注意:我们必须使用从仪表板复制的令牌替换<OUR_ACCESS_TOKEN>。
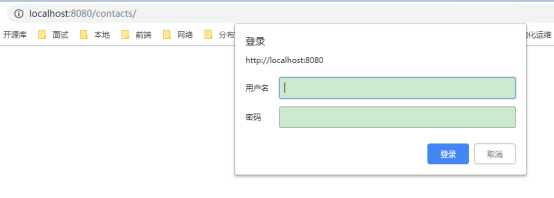
由于我们现在对发送到API的请求使用访问令牌,所以我们将设法再次获得联系人列表。
如果,没有令牌,将会让我们输入用户名和密码进行认证。
这就是我们保护Node.js后端API的方法。 很容易,对吧?
结论
Spring Boot使开发人员能够通过约定优于配置来提高工作效率。 在本文中,我们展示了将此框架与JSF结合起来很容易并为开发人员提供支持,使他们的工作效率更高。 JSF已经存在很多年了,网上有很好的社区和很多内容可以帮助开发企业应用程序。
但是,经常困扰开发人员的一个问题是可扩展性。 由于JSF应用程序通常严重依赖于服务器端会话,因此开发人员难以正确扩展这些应用程序。 在下一篇文章中,我将使用Spring Session来解决这个问题,Spring Session是一个帮助管理用户会话信息的Spring模块。
(文章结束)
用SpringBoot开发JSF应用程序系列文章: