前言
该文章脱胎于:
一起开发一个文件服务器–3、配置中心和redis(3)spring与redis的集成【草稿】
这篇文章主要是优化spring和redis的集成过程。考虑到每一个项目都应该会有自己的redis,postgresql等配置,可能是单机,也可能是集群,所以,草稿部分的新建一个WebExt项目就不做了,直接放到对应项目的plugins下面。
spring与redis集成
在子模块添加redis的依赖以及公共库的依赖,以及xxl-conf-core模块的依赖

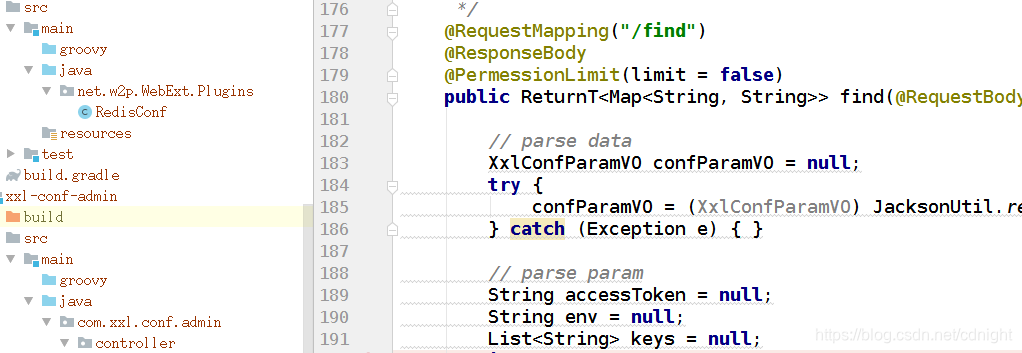
在模块下面添加一个plugins/config文件夹,然后添加一份redis的设置类,如下图:
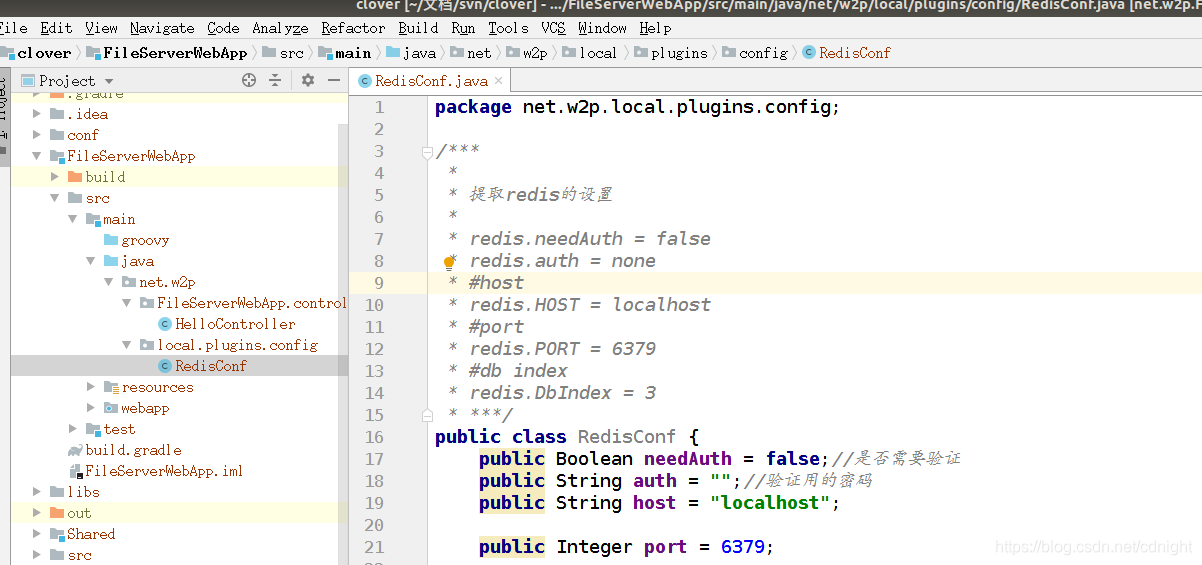
代码为:
package net.w2p.local.plugins.config;

/***
 *
 * 提取redis的设置
 *
 * redis.needAuth = false
 * redis.auth = none
 * #host
 * redis.HOST = localhost
 * #port
 * redis.PORT = 6379
 * #db index
 * redis.DbIndex = 3
 * ***/
public class RedisConf {
    public Boolean needAuth = false;//是否需要验证
    public String auth = "";//验证用的密码
    public String host = "localhost";

    public Integer port = 6379;

    public Integer dbIndex = 3;


    //    public  Integer MAX_ACTIVE =1000;
    public  Integer max_active =1000;
    // FileUtil.getPropertyValueInt("/properties/redis.properties", "max_active");;

    //控制一个pool最多有多少个状态为idle(空闲的)的jedis实例,默认值也是8。
    public  Integer max_idle = 200;
    //FileUtil.getPropertyValueInt("/properties/redis.properties", "max_idle");;

    //等待可用连接的最大时间,单位毫秒,默认值为-1,表示永不超时。如果超过等待时间,则直接抛出JedisConnectionException;
    public  Integer max_wait =5000;
    //FileUtil.getPropertyValueInt("/properties/redis.properties", "max_wait");;

    //超时时间
    public  Integer timeout = 10000;
    //FileUtil.getPropertyValueInt("/properties/redis.properties", "timeout");;

    //在borrow一个jedis实例时,是否提前进行validate操作;如果为true,则得到的jedis实例均是可用的;
    public  Boolean test_on_borrow = true;
    //FileUtil.getPropertyValueBoolean("/properties/redis.properties", "test_on_borrow");


    public Boolean getNeedAuth() {
        return needAuth;
    }

    public void setNeedAuth(Boolean needAuth) {
        this.needAuth = needAuth;
    }

    public String getAuth() {
        return auth;
    }

    public void setAuth(String auth) {
        this.auth = auth;
    }

    public String getHost() {
        return host;
    }

    public void setHost(String host) {
        this.host = host;
    }

    public Integer getPort() {
        return port;
    }

    public void setPort(Integer port) {
        this.port = port;
    }

    public Integer getDbIndex() {
        return dbIndex;
    }

    public void setDbIndex(Integer dbIndex) {
        this.dbIndex = dbIndex;
    }

    public Integer getMax_active() {
        return max_active;
    }

    public void setMax_active(Integer max_active) {
        this.max_active = max_active;
    }

    public Integer getMax_idle() {
        return max_idle;
    }

    public void setMax_idle(Integer max_idle) {
        this.max_idle = max_idle;
    }

    public Integer getMax_wait() {
        return max_wait;
    }

    public void setMax_wait(Integer max_wait) {
        this.max_wait = max_wait;
    }

    public Integer getTimeout() {
        return timeout;
    }

    public void setTimeout(Integer timeout) {
        this.timeout = timeout;
    }

    public Boolean isTest_on_borrow() {
        return test_on_borrow;
    }

    public void setTest_on_borrow(Boolean test_on_borrow) {
        this.test_on_borrow = test_on_borrow;
    }
}
好了,下面将配置xxl-conf的读取
配置xxl-conf的参数的读取机制
在FileServerWebApp添加xxl-conf-core两个依赖:

代码如下:
plugins {
    id 'war'
}

group 'net.w2p'
version '1.0-SNAPSHOT'


dependencies {


    compile project(":Shared")
    compile (project(":xxl-conf-core"))
    //--redis
    compile ref4RedisClient
    //【http相关api】
    providedCompile ref4JspAndServletApi
    compile ref4Jstl
    //【spring 框架】
    compile ref4SpringFramework

    //【mybatis】
    compile ref4MyBatis
    compile ref4MybatisSpring

    //【apache commons】
    compile ref4ApacheCommons

}
添加xxl-conf的配置文件,整合到spring中:
resource下面添加spring文件夹,下面有applicationContext-XxlConf.xml配置文件一份

代码内容为:

<?xml version="1.0" encoding="UTF-8"?>
<beans xmlns="http://www.springframework.org/schema/beans"
	   xmlns:xsi="http://www.w3.org/2001/XMLSchema-instance"
	   xmlns:context="http://www.springframework.org/schema/context"
	   xsi:schemaLocation="http://www.springframework.org/schema/beans
           	http://www.springframework.org/schema/beans/spring-beans.xsd
			http://www.springframework.org/schema/context
			http://www.springframework.org/schema/context/spring-context.xsd">


	<context:property-placeholder location="classpath:conf/xxl-conf.properties" />

	<!-- ********************************* XXL-CONF 配置工厂 ********************************* -->
	<bean id="xxlConfFactory" class="com.xxl.conf.core.spring.XxlConfFactory"  >
		<!-- 环境配置文件地址,如 "xxl-conf.properties" 或 "file:/data/webapps/xxl-conf.properties" -->
		<property name="adminAddress" value="${xxl.conf.admin.address}" />
		<property name="env" value="${xxl.conf.env}" />
		<property name="accessToken" value="${xxl.conf.access.token}" />
		<property name="mirrorfile" value="${xxl.conf.mirrorfile}" />
	</bean>

	<!-- ********************************* redis 读取的设置 ********************************* -->
	<bean id="redisConf" class="net.w2p.local.plugins.config.RedisConf">
		<property name="needAuth" value="$XxlConf{file-server.redis.needAuth}" />
		<property name="auth" value="$XxlConf{file-server.redis.auth}" />
		<property name="host" value="$XxlConf{file-server.redis.host}" />
		<property name="port" value="$XxlConf{file-server.redis.port}" />
		<property name="dbIndex" value="$XxlConf{file-server.redis.dbIndex}" />
		<property name="max_active" value="$XxlConf{file-server.redis.max_active}" />
		<property name="max_idle" value="$XxlConf{file-server.redis.max_idle}" />
		<property name="max_wait" value="$XxlConf{file-server.redis.max_wait}" />
		<property name="timeout" value="$XxlConf{file-server.redis.timeout}" />
		<property name="test_on_borrow" value="$XxlConf{file-server.redis.test_on_borrow}" />
	</bean>

</beans>
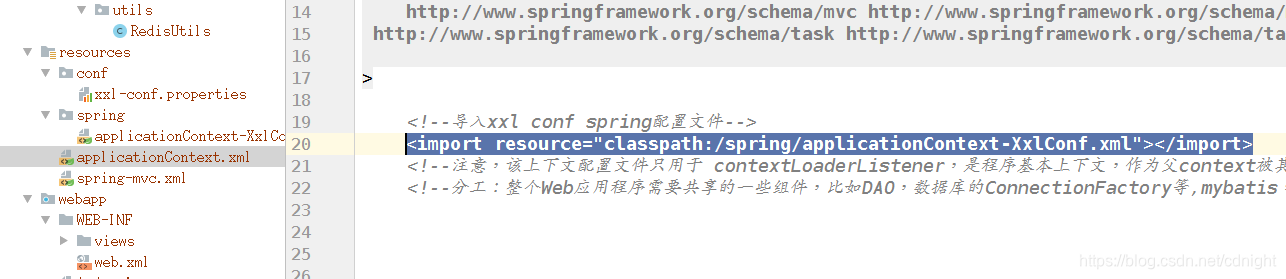
在applicationContext.xml中,需要手动导入applicationContext-XxlConf.xml
代码:
<import resource="classpath:/spring/applicationContext-XxlConf.xml"></import>
编写相关测试代码进行测试
"classpath*:spring/applicationContext-*.xml"
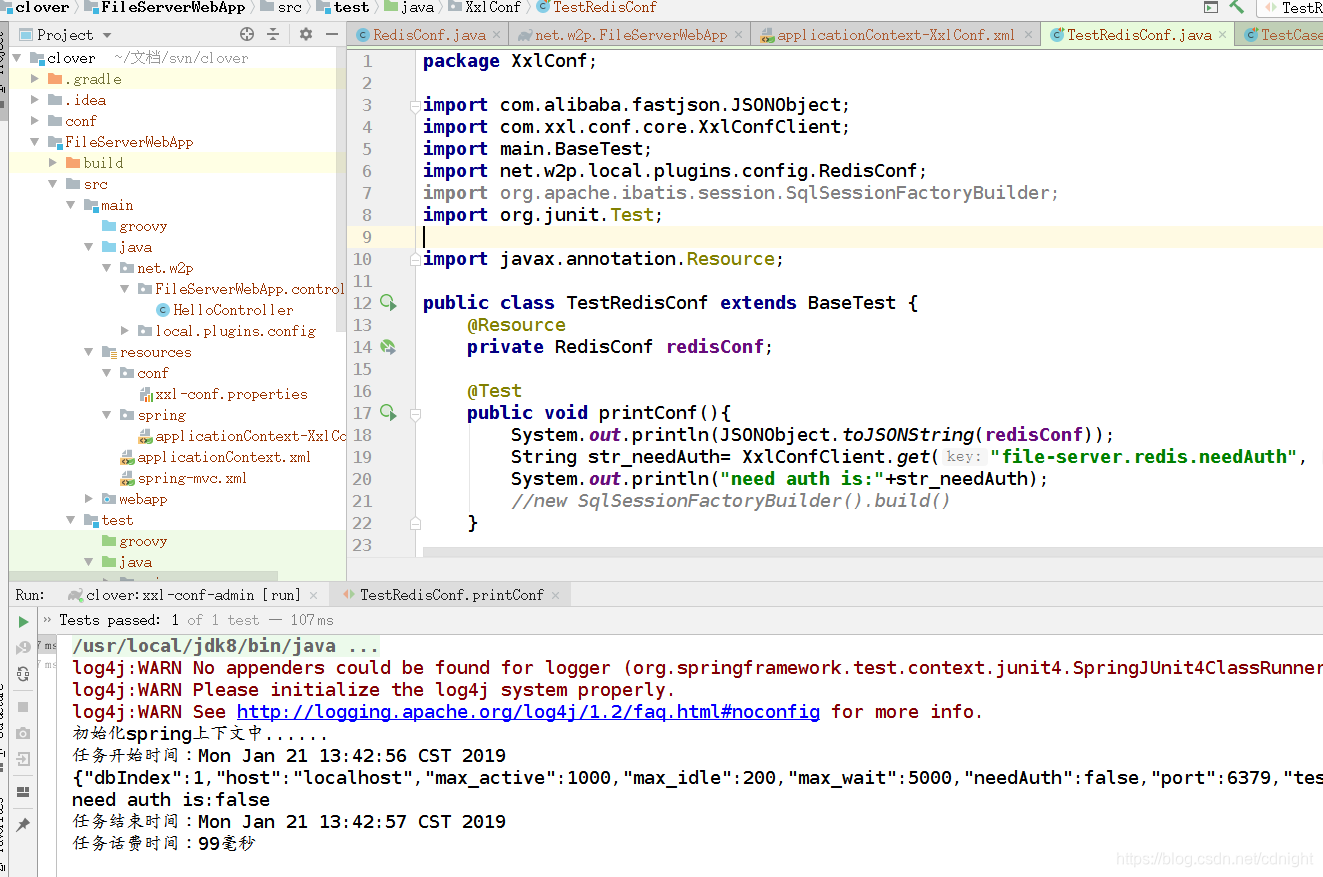
2、新建一个XxlConf文件夹,添加测试类:
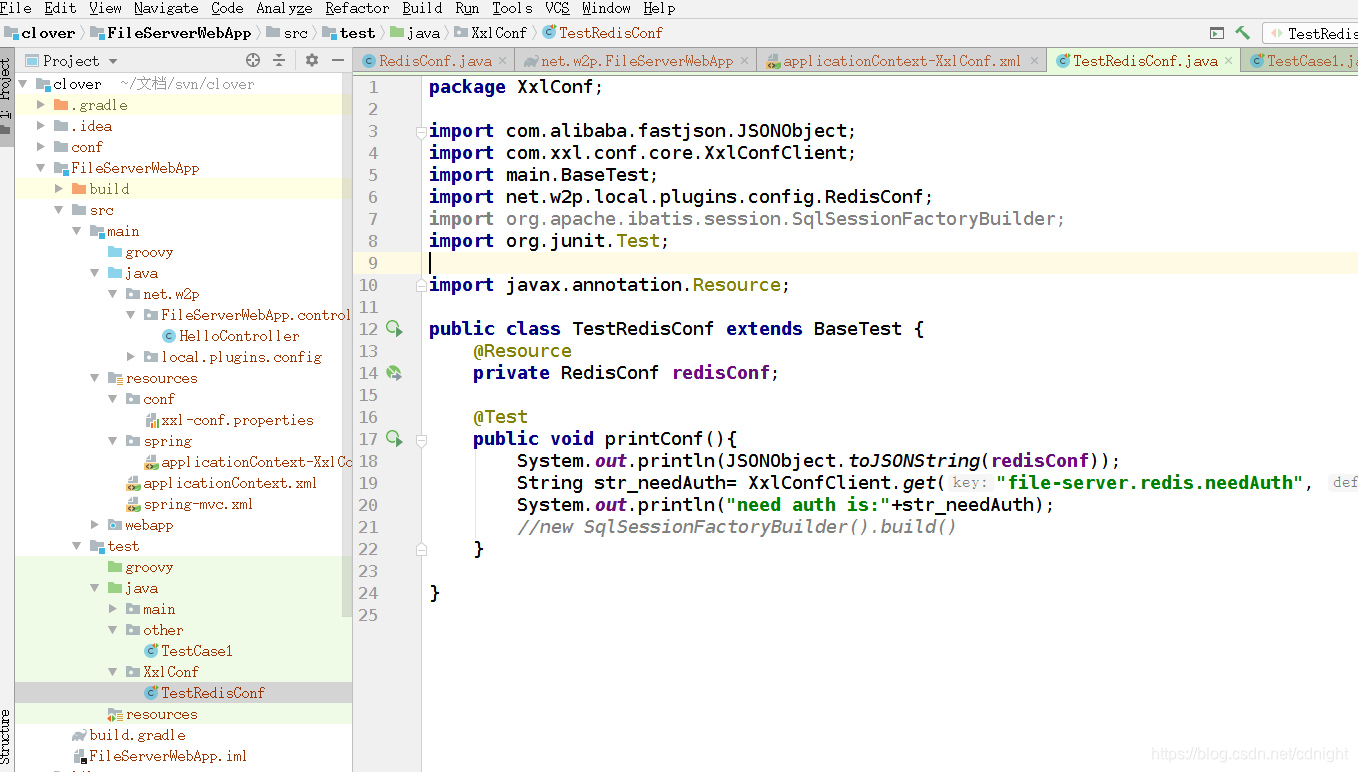
代码如下:
package XxlConf;

import com.alibaba.fastjson.JSONObject;
import com.xxl.conf.core.XxlConfClient;
import main.BaseTest;
import net.w2p.local.plugins.config.RedisConf;
import org.apache.ibatis.session.SqlSessionFactoryBuilder;
import org.junit.Test;

import javax.annotation.Resource;

public class TestRedisConf extends BaseTest {
    @Resource
    private RedisConf redisConf;

    @Test
    public void printConf(){
        System.out.println(JSONObject.toJSONString(redisConf));
        String str_needAuth= XxlConfClient.get("file-server.redis.needAuth", null);
        System.out.println("need auth is:"+str_needAuth);
        //new SqlSessionFactoryBuilder().build()
    }

}
执行测试程序,得到结果:
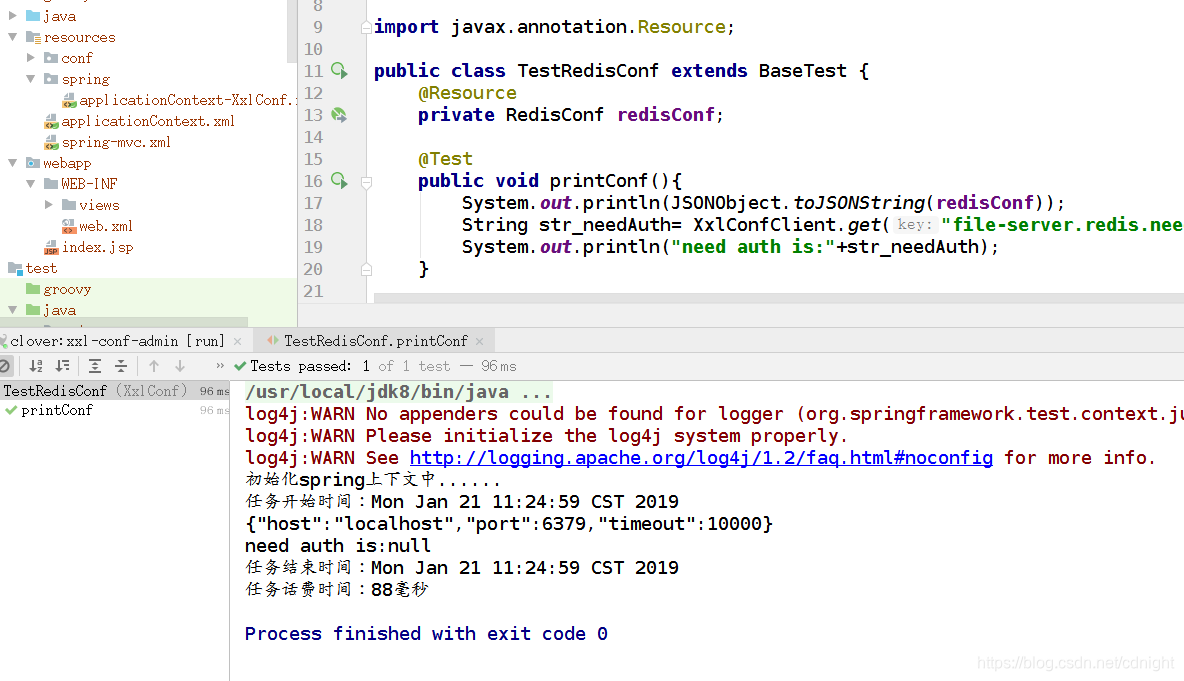
结论
基本能够获得属性。为什么用基本?因为从json格式化输出可以知道,只能获取到host,port,timeout三个属性,其余的都是null值。其余的属性有哪些?看看下图:

没办法获取的都是有大写字母还有有下划线的—额,就是说,我们修改了前台jq逻辑扩大输入访问的那几个属性是没办法获取到的。下面我们来看看这个问题,请看下一个小节。
大坑1、无法获取部分属性
在这些属性里面,大写字母还有有下划线的属性是没办法获取到值的。这个恰好是之前修改了前端逻辑直接能够输入到后台的几个属性。
下面来直接调试追踪一下哪个地方出问题了。
1、
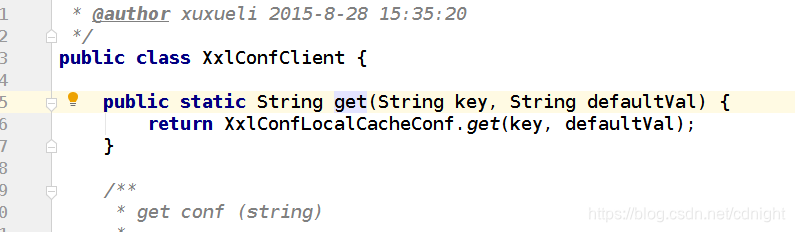
2、
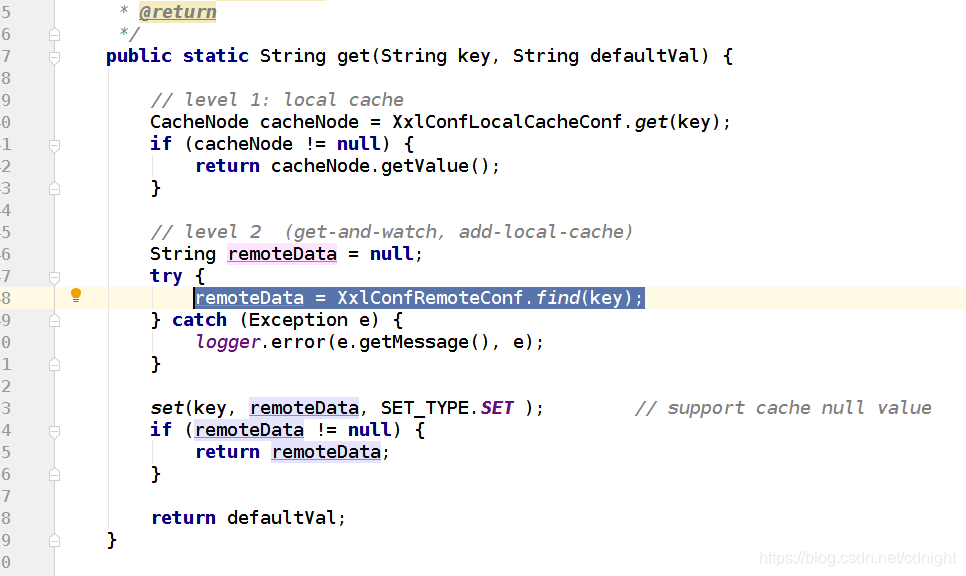
3、

4、
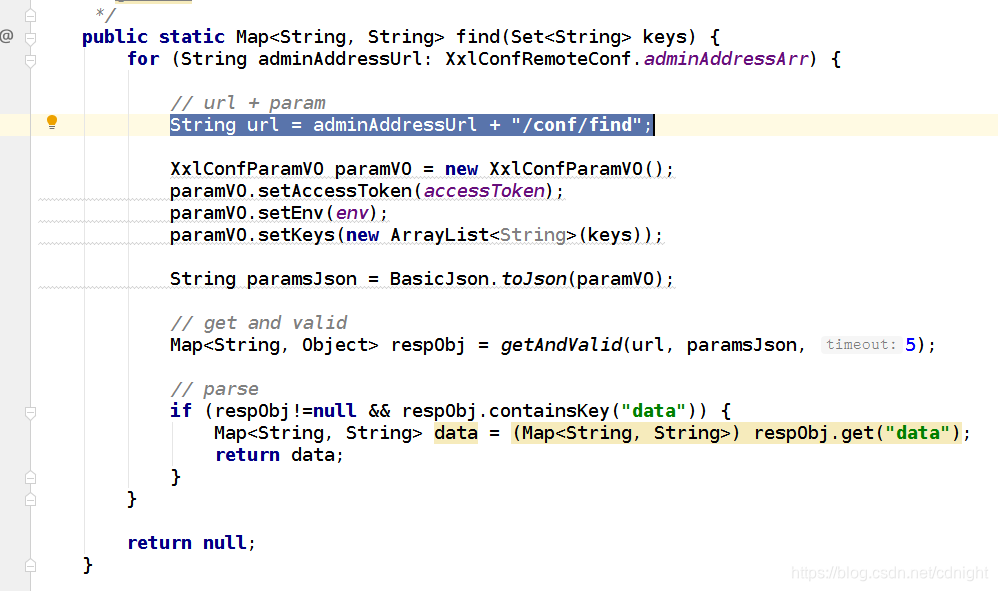
看到这里要提醒一下。。。find方法最后是通过url远程调用配置网站的/conf/find方法的。。结果就是,要跳到xxl-conf-admin下面的/conf/find来看看。
接着来看找到conf/find对应的spring boot控制器:
5、
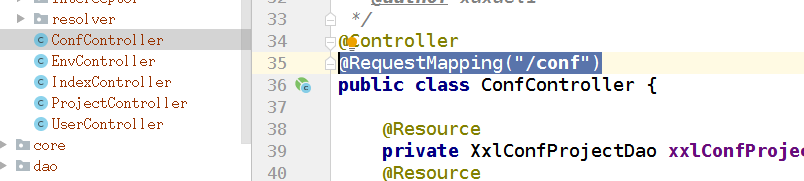
是这个没差了,看看find里面做了什么:
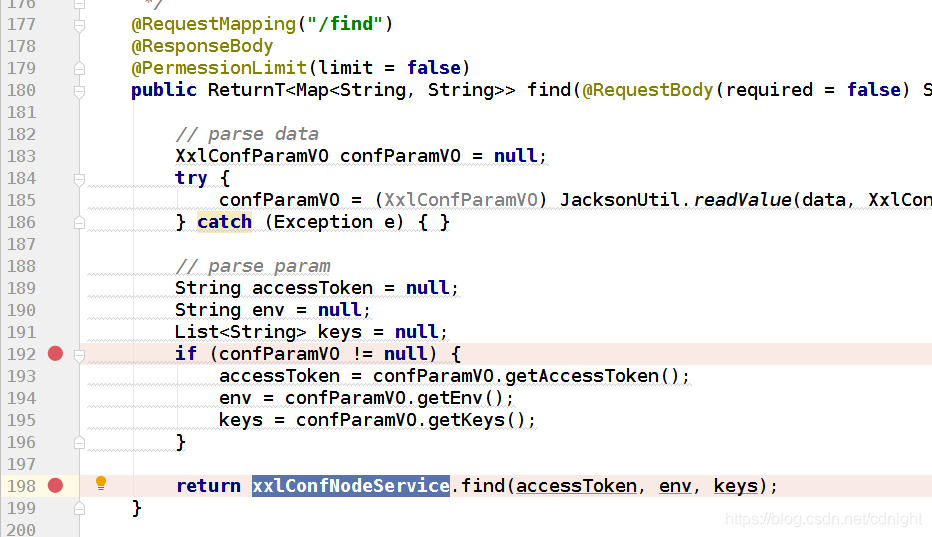
注入了一个xxlConfNodeService。。。好了,看看这个定义和方法所在:
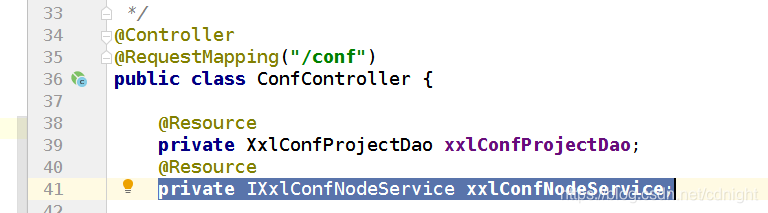
好了,检索一下哪个类继承实现了IXxlConfNodeService:

好,凭肉眼也能找到实现类了,
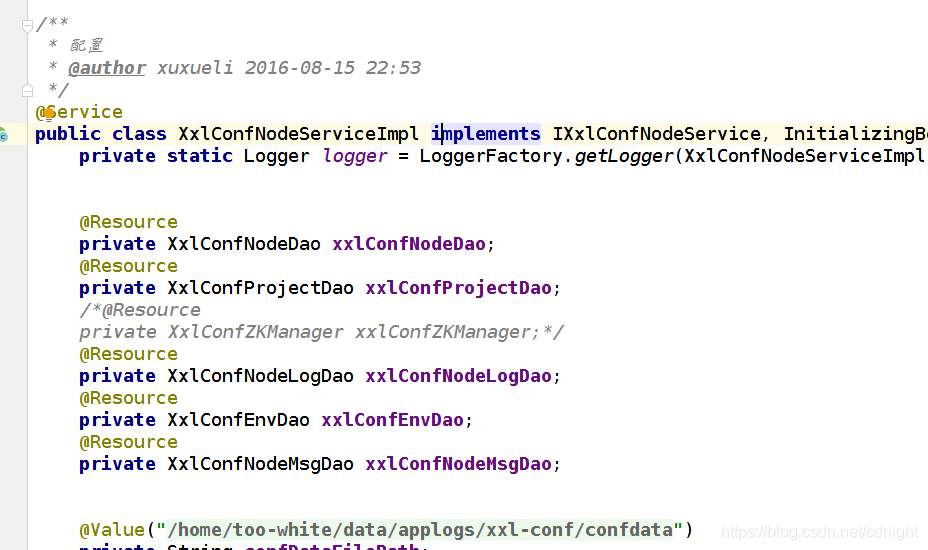
找到方法find:
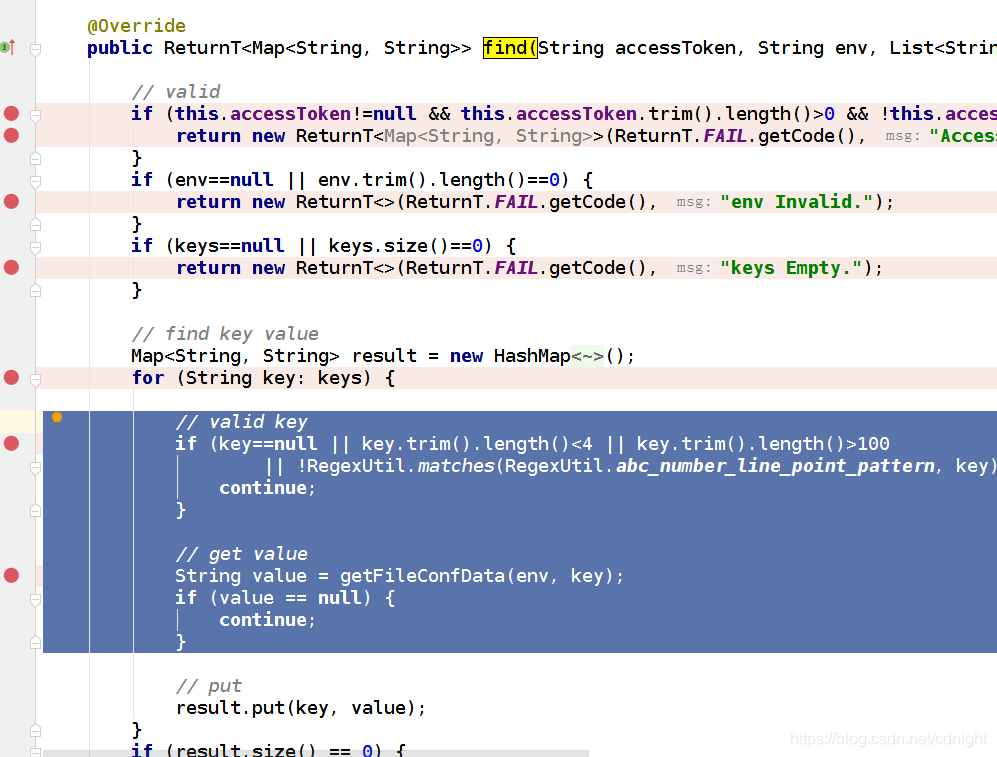
到重头戏了。重点注意一下圈出来的代码。里面的意思是,遍历需要查找值的keys,然后验证一下key是不是有效—null,空字符串都是无效,当然还有,不满足正则表达式:abc_number_line_point_pattern的也是无效的,无效的就不处理。假如有效,那么就获取值。。所以现在的关键是,在判断key是否有效的时候正则表达式是什么,是不是把刚才的needAuth都忽略了。接着看
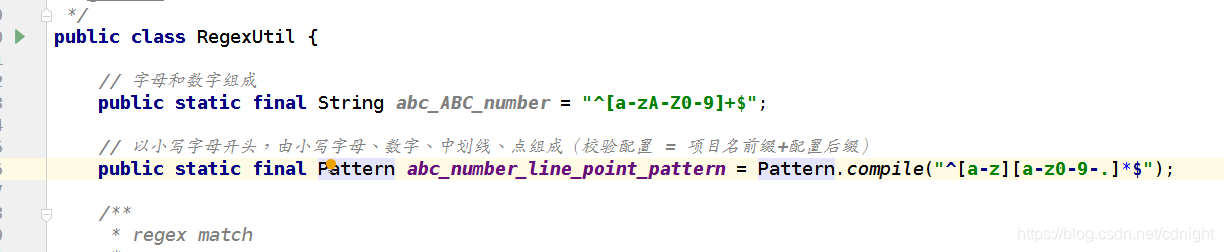
好了,答案已经出来了,正则表达式跟前端验证是一致的,我们改了前端没改后端,改为:

重启服务再测试:
结果
成功获取所有属性值。
redis引入以及引入相关辅助工具类
redis的依赖已经有了,现在我们来编写引入redisUtils:
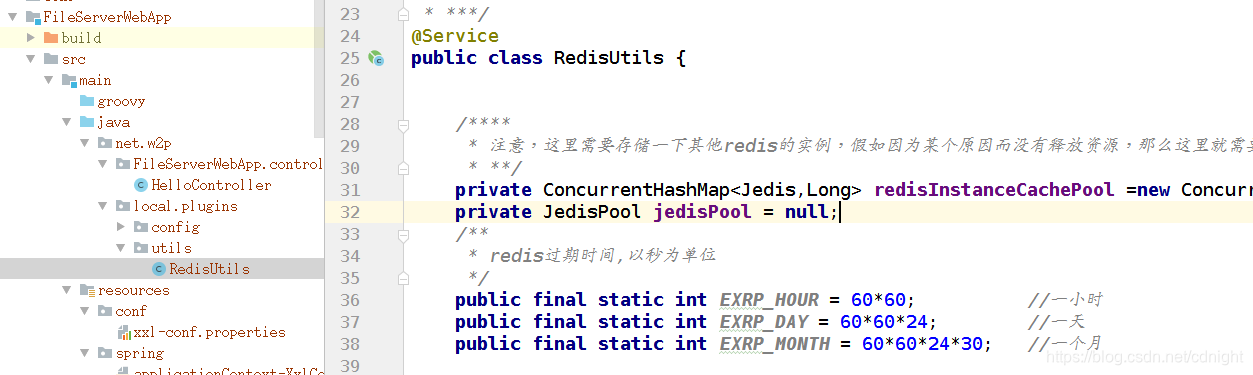
代码如下:
package net.w2p.local.plugins.utils;


import net.w2p.Shared.common.WebTools;
import net.w2p.local.plugins.config.RedisConf;
import org.springframework.stereotype.Service;
import redis.clients.jedis.Jedis;
import redis.clients.jedis.JedisPool;
import redis.clients.jedis.JedisPoolConfig;

import javax.annotation.Resource;
import java.io.*;
import java.net.URL;
import java.util.*;
import java.util.concurrent.ConcurrentHashMap;

/****
 *
 * 需要在spring里面进行托管。
 *
 * ***/
@Service
public class RedisUtils {


    /****
     * 注意,这里需要存储一下其他redis的实例,假如因为某个原因而没有释放资源,那么这里就需要释放资源了,你永远也不知道什么地方漏了释放资源的。
     * **/
    private ConcurrentHashMap<Jedis,Long> redisInstanceCachePool =new ConcurrentHashMap<>();
    private JedisPool jedisPool = null;
    /**
     * redis过期时间,以秒为单位
     */
    public final static int EXRP_HOUR = 60*60;          //一小时
    public final static int EXRP_DAY = 60*60*24;        //一天
    public final static int EXRP_MONTH = 60*60*24*30;   //一个月

    /***
     *
     * 引用redis conf
     * ***/
    @Resource
    private RedisConf redisConf;

    public RedisUtils(){

    }


    /**
     * 初始化Redis连接池
     */
    private  void initialPool(){
        try {


            JedisPoolConfig config = new JedisPoolConfig();

            config.setMaxTotal(redisConf.max_active);
            config.setMaxIdle(redisConf.max_idle);
            config.setMaxWaitMillis(redisConf.max_wait);
            config.setTestOnBorrow(redisConf.test_on_borrow);

            if(redisConf.needAuth){
                jedisPool = new JedisPool(config, redisConf.host,
                        redisConf.port,
                        redisConf.timeout,redisConf.auth);
            }
            else{
                jedisPool = new JedisPool(config, redisConf.host, redisConf.port,
                        redisConf.timeout);
            }


        } catch (Exception e) {
            e.printStackTrace();
            try{

            }catch(Exception e2){
                e2.printStackTrace();
            }
        }


    }


    /**
     * 同步获取Jedis实例
     * @return Jedis
     */
    public synchronized  Jedis getJedis() {
        if (jedisPool == null) {
//            poolInit();
            initialPool();

        }
        Jedis jedis = null;
        try {
            if (jedisPool != null) {
                jedis = jedisPool.getResource();
                jedis.select(redisConf.dbIndex);
                Long nowTime= WebTools.getPhpTimeStamp(new Date().getTime());
                redisInstanceCachePool.put(jedis,nowTime);
            }
        } catch (Exception e) {
            e.printStackTrace();
        }finally{

        }
        return jedis;
    }


    /**
     * 释放jedis资源
     * @param jedis
     */
    public  synchronized void returnResource(final Jedis jedis) {
        if (jedis != null && jedisPool !=null) {
            jedisPool.returnResource(jedis);
            if(redisInstanceCachePool.containsKey(jedis)){
                redisInstanceCachePool.remove(jedis);
            }
        }
    }
 }
然后,在applicationContext.xml中配置扫描这个包:
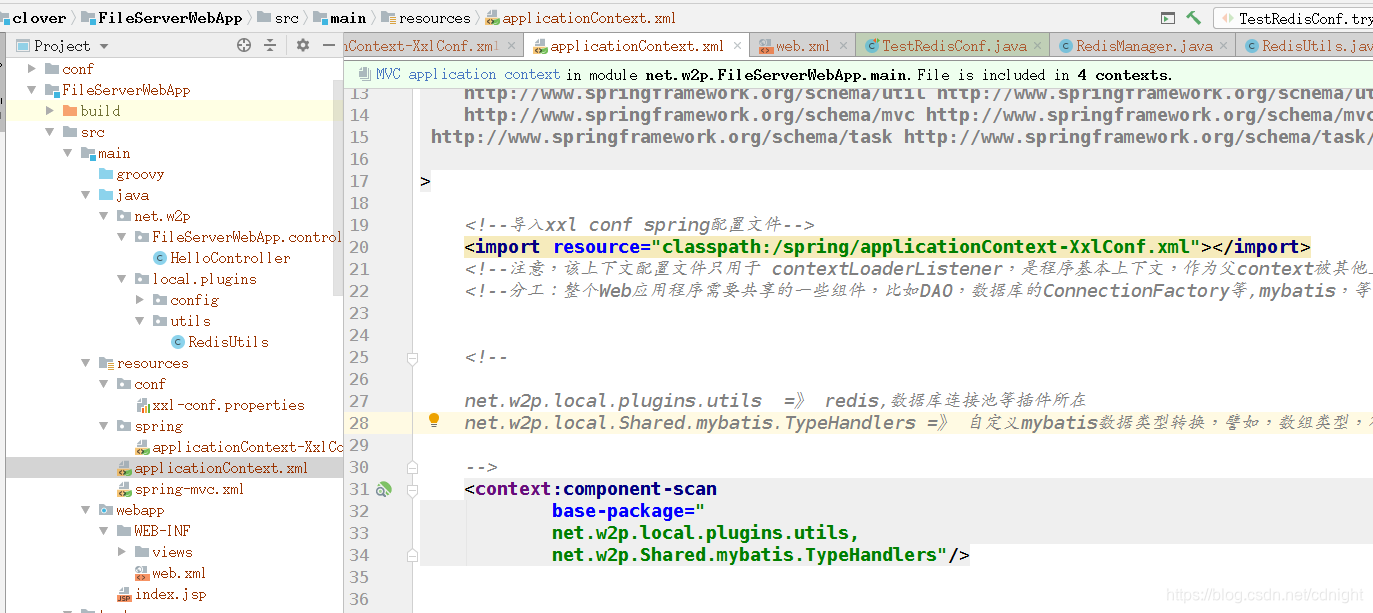
    <!--

    net.w2p.local.plugins.utils  =》 redis,数据库连接池等插件所在
    net.w2p.local.Shared.mybatis.TypeHandlers =》 自定义mybatis数据类型转换,譬如,数组类型,布尔值类型等。

    -->
    <context:component-scan
            base-package="
            net.w2p.local.plugins.utils,
            net.w2p.Shared.mybatis.TypeHandlers"/>
好了,编写测试代码,如下图:
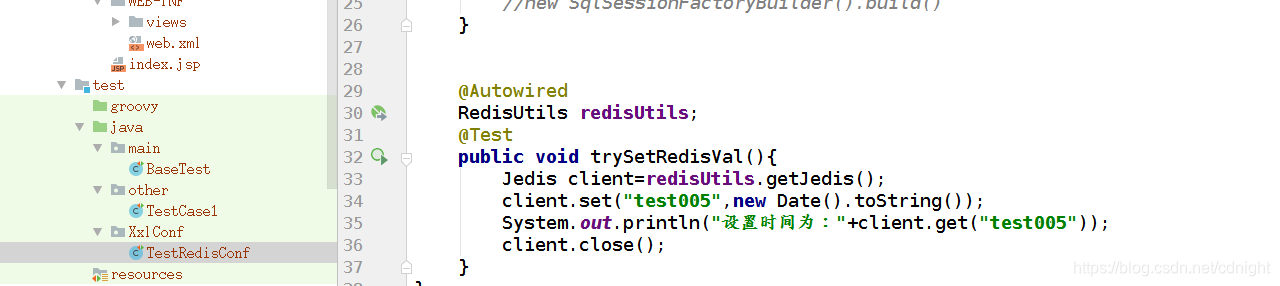
代码为:
package XxlConf;

import com.alibaba.fastjson.JSONObject;
import com.xxl.conf.core.XxlConfClient;
import main.BaseTest;
import net.w2p.local.plugins.config.RedisConf;
import net.w2p.local.plugins.utils.RedisUtils;
import org.apache.ibatis.session.SqlSessionFactoryBuilder;
import org.junit.Test;
import org.springframework.beans.factory.annotation.Autowired;
import redis.clients.jedis.Jedis;

import javax.annotation.Resource;
import java.util.Date;

public class TestRedisConf extends BaseTest {
    @Resource
    private RedisConf redisConf;

    @Test
    public void printConf(){
        System.out.println(JSONObject.toJSONString(redisConf));
        String str_needAuth= XxlConfClient.get("file-server.redis.needAuth", null);
        System.out.println("need auth is:"+str_needAuth);
        //new SqlSessionFactoryBuilder().build()
    }


    @Autowired
    RedisUtils redisUtils;
    @Test
    public void trySetRedisVal(){
        Jedis client=redisUtils.getJedis();
        client.set("test005",new Date().toString());
        System.out.println("设置时间为:"+client.get("test005"));
        client.close();
    }
}
测试,结果:

成功链接redis。
结语
spring+配置中心+redis 的整合,共三个小节到这篇文章为止已经结束。
说实话,里面的东西其实也是挺多的。
做到这步意味着解决了下面的问题:
xxl-conf-core,xxl-conf-admin部署好没有?能够本地编译了吗?
redis安装了没有?能够运行吗?
gradle怎么切换环境,根据不同的环境打包?怎么替换properties的变量?