协程
协程是什么呢?综合了很多人的总结,一言蔽之就是一种组织代码运行的方式。
协程和线程,进程不同,它通常不是由操作系统底层直接提供支持,而是通过应用层的库来实现,譬如Kotlin的协程,其实就是依赖java/android的线程/线程池再加上一些对上下文的控制逻辑来实现的。
那么使用协程能带来什么好处呢?
仅仅从概念层面去讲也可以总结出几条:
- 因为某些协程库的实现使用了任务分发(比如Kotlin),于是可以在协程函数(也就是Kotlin
coroutine中的suspend方法)中无限递归调用自身而不会栈溢出,当然这依赖具体实现,不能保证全部。 - 如上文所说,协程是一种组织代码的方式,因此可以将异步调用组织成顺序调用的书写形式,因而免除了回调地狱问题。
- 因为协程本质上是一种用户态线程,在线程基础上再加了一层自己的调度,它的创建和delay延迟调用都开销很小。
在Kotlin中使用协程
协程(Coroutines)已经随着Kotlin1.3版本一起发布了1.0正式版,android平台可以使用如下方式引入:
implementation "org.jetbrains.kotlinx:kotlinx-coroutines-android:1.0.0"
其他平台引入方式参考这里
那么如何定义一个基本的使用协程的方法呢?也很简单
suspend fun doSomething(foo: Foo): Bar { ... }
这个suspend关键字,就告诉了编译器,这个方法是一个可中断方法。对于这样的方法,我们无法在常规方法中直接调用,只能在声明了接收suspend lambda原型的方法中才能调用,如内置的coroutine-builder: launch,async,当然也可以在另一个suspend方法中调用。来看下launch是如何声明的:
    public fun CoroutineScope.launch(
        context: CoroutineContext = EmptyCoroutineContext,
        start: CoroutineStart = CoroutineStart.DEFAULT,
        block: suspend CoroutineScope.() -> Unit
    ): Job
唯一特别之处就是最后一个lambda参数前,多了一个suspend限定,因为它的参数大部分都是带默认值的,所以用起来可以像rxJava一样方便:
    GlobalScope.launch {
        val bar = doSomething(foo())
        // some code using bar
    }
这里稍稍解释下GlobalScope,它继承自CoroutineScope,这个是Kotlin1.0正式版相对于之前experimental版本变化最大之处,用来给协程分组,在同一个CoroutineScope下创建的协程(如果没有显示指定其他Scope),默认都是父子关系,这样的好处在于cancel父协程后,所有的子协程都可以被一起cancel掉。
于是上面的代码背后究竟发生了什么呢?可以简单理解为,doSomething方法和其后面的代码都被抛到异步线程执行去了。可惜这个简单的例子,并看不出和直接使用线程池相比有什么优势,那么再来个复杂的:
    suspend fun <T> retryIO(block: suspend () -> T): T {
        var currDelay = 1000L
        while (true) {
            try {
                return block()
            } catch (e: IOException) {
                e.printStackTrace()
            }
            delay(currDelay)
            currDelay = (currDelay * 2).coerceAtMost(60000L)
        }
    }
仔细看下,这个例子其实就是帮忙重试一个异步操作,得益于kotlin语言级对协程的支持,这个逻辑变得非常简洁,而且灵活性很强,不信可以尝试用rxJava或者传统的callback实现一下试试。
Let’s get started
Example1:
    object CommonUsage {

        suspend fun suspendFun1(param : Int) : Int {
            printFormatMsg("enter suspendFun1()")
            var result = GlobalScope.async {
                suspendFun2(param)
            }
            printFormatMsg("done suspendFun1()")
            return result.await() + 33
        }

        suspend fun suspendFun2(param : Int) : Int {
            printFormatMsg("enter suspendFun2()")
            delay(1000)
            printFormatMsg("done suspendFun2()")
            return 15 + param
        }

    }

    private fun testCommonUsage() {
        printFormatMsg("enter test")
        runBlocking {
            printFormatMsg("result in runBlocking is ${CommonUsage.suspendFun1(1)}")
        }
        printFormatMsg("done test")
    }
log输出:
    38:33.533 - enter test「 main」
    38:33.706 - enter suspendFun1()「 main」
    38:33.707 - done suspendFun1()「 main」
    38:33.712 - enter suspendFun2()「 DefaultDispatcher-worker-2」
    38:34.714 - done suspendFun2()「 DefaultDispatcher-worker-3」
    38:34.714 - result in runBlocking is 49「 main」
    38:34.715 - done test「 main」
这个例子很简单,展示了runBlocking的用法,可以同步执行suspend块或方法,async则是异步。那么launch和async有什么区别呢?在于返回值,async返回的是一个Deferred对象,可以通过await来同步获取执行结果。注意一点runBlocking并非coroutine-builder,所以它不需要CoroutineScope来调用,仅仅是能够接收一个suspend lambda而已。
Example2:
    object CompoundUsage {
        fun test() {
            val job1 = GlobalScope.launch(Unconfined, CoroutineStart.LAZY) {
                var count = 0
                while (true) {
                    count++
                    delay(500)
                    printFormatMsg("count::$count")
                }
            }

            val job2 = GlobalScope.async {
                job1.start()
                "Producer start"
            }

            GlobalScope.launch {
                printFormatMsg(job2.await())
                delay(3000)
                job1.cancel()
            }
        }
    }
Log输出:
    41:26.460 - Producer start「 DefaultDispatcher-worker-3」
    41:26.961 - count::1「 kotlinx.coroutines.DefaultExecutor」
    41:27.461 - count::2「 kotlinx.coroutines.DefaultExecutor」
    41:27.962 - count::3「 kotlinx.coroutines.DefaultExecutor」
    41:28.462 - count::4「 kotlinx.coroutines.DefaultExecutor」
    41:28.963 - count::5「 kotlinx.coroutines.DefaultExecutor」
这个例子演示了一些稍微高级点的用法,比如启动方式CoroutineStart.LAZY,默认是CoroutineStart.DEFAULT也就是立即开始执行了,如果用了lazy,就会hold住任务,直到手动start。另外一点job是可以cancel的,这类似于线程池的Future,不过更加灵活的是,job是可以attachChild的,这样就能构造一系列的任务。这个例子中我们看到async和launch使用的线程不太一样,那么对于任务的线程分配有什么规则么,我们再看下一个例子:
Example3:
    object SuspendOrBlocking {

        suspend fun blocking(param : Int) {
            printFormatMsg("enter blocking() with $param")
            delay(5000)
            printFormatMsg("done blocking() with $param")
        }

        suspend fun separateAsync() {
            printFormatMsg("separateAsync()")
            val deferred1 = async {
                blocking(1)
            }
            val deferred2 = async {
                blocking(2)
            }
            val deferred3 = async {
                blocking(3)
            }
            deferred1.await()
            deferred2.await()
            deferred3.await()
        }

        suspend fun separateLaunch() {
            printFormatMsg("separateLaunch()")
            val job1 = launch {
                blocking(4)
            }
            val job2 = launch {
                blocking(5)
            }
            val job3 = launch {
                blocking(6)
            }
            job1.join()
            job2.join()
            job3.join()
        }

    }

    private fun testSuspendOrBlocking() {
        runBlocking {
            SuspendOrBlocking.separateAsync()
            SuspendOrBlocking.separateLaunch()
        }
        printFormatMsg("done test")
    }
Log输出:
        46:08.694 - separateAsync()「 main」
        46:08.695 - enter blocking() with 2「 DefaultDispatcher-worker-3」
        46:08.695 - enter blocking() with 3「 DefaultDispatcher-worker-2」
        46:08.695 - enter blocking() with 1「 DefaultDispatcher-worker-1」
        46:13.700 - done blocking() with 1「 DefaultDispatcher-worker-3」
        46:13.700 - done blocking() with 2「 DefaultDispatcher-worker-1」
        46:13.700 - done blocking() with 3「 DefaultDispatcher-worker-2」
        46:13.701 - separateLaunch()「 main」
        46:13.701 - enter blocking() with 4「 DefaultDispatcher-worker-2」
        46:13.701 - enter blocking() with 5「 DefaultDispatcher-worker-1」
        46:13.701 - enter blocking() with 6「 DefaultDispatcher-worker-3」
        46:18.702 - done blocking() with 6「 DefaultDispatcher-worker-3」
        46:18.702 - done blocking() with 5「 DefaultDispatcher-worker-2」
         46:18.702 - done blocking() with 4「 DefaultDispatcher-worker-1」

    46:18.705 - done test「 main」
这个例子的结果值得分析一下:
- 首先kotlin的协程任务不具备线程亲和属性即thread-affinity,通俗讲就是当一个任务中间出现了delay后,下次恢复执行可能在同一个线程,也可以在另一个线程。(设计者针对这一点做过解释:因为不能预计用户代码对内存的使用情况,因此平均来看,使用thread-affinity带来的开销并不足以弥补其带来的好处,所以不做任何处理平均状况也还能接受,有点类似于java的内置锁默认就是非公平队列的意思,玄学嘛不深究了)
- 优先使用空闲的线程执行,当线程不足则会创建,这和DefaultDispatcher的实现有关。
- launch和async虽然内部使用了不同的Coroutine类实现,但是在线程分配策略上,并未看出什么区别。
更多的例子,请移步官网
本文中的例子,可以在这里找到
关于Delay
对于大多数同学来说,原来的线程池用的挺6的,即使有一些频繁的跨线程任务也有rxJava这样的神器相助,到底有什么理由来使用协程呢?如果上面列出的例子都不足以打动你,那么各位先系好安全带。
在android项目引入了KotlinCoroutine库之后,搜索Delay这个接口会发现定义在CommonDelay.kt中,而且是个带expect的,这个关键字表明此类/接口/方法是跨平台的,在具体平台对应的实现,会有另一个关键字actual
CommonDelay.kt
    public expect interface Delay
    public expect suspend fun delay(time: Int)
对应的实现很快可以找到在Delay.kt文件中
Delay.kt
    public interface Delay {

        suspend fun delay(time: Long) {
            if (time <= 0) return // don't delay
            return suspendCancellableCoroutine { scheduleResumeAfterDelay(time, it) }
        }

        fun scheduleResumeAfterDelay(timeMillis: Long, continuation: CancellableContinuation<Unit>)

        fun invokeOnTimeout(timeMillis: Long, block: Runnable): DisposableHandle =
            DefaultDelay.invokeOnTimeout(timeMillis, block)
    }
下面两个方法顾名思义,scheduleResumeAfterDelay是用来重新把任务恢复调度的,invokeOnTimeout显然是调度过程中发现时间到了以后要恢复执行的方法体。
至于这个delay方法表面上看上去就像是android framework中Handler.postDelay()的翻版,凭什么就说可以在解决线程上下文切换的同时保持高效?
这里先兵分两路,去看看resume过程,等研究明白再看如何delay。于是直接深入scheduleResumeAfterDelay方法的定义:
EventLoop.kt
    internal abstract class EventLoopBase: CoroutineDispatcher(), Delay, EventLoop {
       ...
        override fun scheduleResumeAfterDelay(time: Long, unit: TimeUnit, continuation: CancellableContinuation<Unit>) =
            schedule(DelayedResumeTask(time, unit, continuation))
       ...
    }
前面两个参数很简单是表明要延后执行的时间,这第三个参数就有点玄机了。为了了解什么是Continuation,我们先了解一下Continuation-passing style,简称CPS。
如果用类比的方式理解CPS,那就是另一种形式的callback。假设我们现在有个同步调用doSomething,做了一些很高深和耗时的计算比方说把传入的整形加上42然后返回,然后我们还需要对计算结果进一步的处理, 形如test函数中的做法
    fun doSomething(param: Int): Int {
        return 42 + param
    }

    fun test() {
        val ret = doSomething(10)
        //processing ret value
    }
现在我们不这么做了,想更加曲折一点,于是声明了一个Continuation的类用来处理返回值,把处理过程放到这个类里面,然后一并传给doSomething方法,就这样我们已经弄了一个CPS出来。
    class Continuation {
        fun invoke(param: Int) {
    		 //processing ret value
    	}
    }

    fun doSomething(param: Int, con: Continuation) {
        int ret =  42 + param
        con.invoke(ret)
    }

    fun test() {
    	doSomething(10, Continuation())
    }
我们可以很容易看出来这个CPS不过是换了一种写法来把对返回值的处理放到函数调用的过程中了,那么在Kotlin协程中,它扮演的角色如何呢?它不仅是处理返回,还处理了协程逻辑的上下文,这个Continuation要包含执行的序列和一个状态机,以保证每一次分发任务,都可以执行对应的逻辑,这也就是delay恢复执行后,协程仍然记得下面要执行什么代码的原因。
EventLoop.kt
    private inner class DelayedResumeTask(
            time: Long, timeUnit: TimeUnit,
            private val cont: CancellableContinuation<Unit>
    ) : DelayedTask(time, timeUnit) {
        override fun run() {
            with(cont) { resumeUndispatched(Unit) }
        }
    }
这里可以看到,DelayedResumeTask的Continuation处理的不是返回值,而是接管了run方法,以Continuation的身份调用了resumeUndispatched()。 继续跟进去,看看resumeUndispatched如何恢复执行的:
CancellableContinuation.kt
    internal class CancellableContinuationImpl<in T>(
        delegate: Continuation<T>,
        resumeMode: Int
    ) : AbstractContinuation<T>(delegate, resumeMode), CancellableContinuation<T>, Runnable {
        ...
        override fun CoroutineDispatcher.resumeUndispatched(value: T) {
            val dc = delegate as? DispatchedContinuation
            resumeImpl(value, if (dc?.dispatcher === this) MODE_UNDISPATCHED else resumeMode)
        }
        ...
    }
AbstractContinuation.kt
    internal abstract class AbstractContinuation<in T>(
        public final override val delegate: Continuation<T>,
        public final override val resumeMode: Int
    ) :  JobSupport(true), Continuation<T>, DispatchedTask<T> {
        ...
        protected fun resumeImpl(proposedUpdate: Any?, resumeMode: Int) {
            loopOnState { state ->
                when (state) {
                    is NotCompleted -> {
                        if (updateStateToFinal(state, proposedUpdate, resumeMode)) return
                    }
                    is CancelledContinuation -> {
                        if (proposedUpdate is CompletedExceptionally) {
                            handleException(proposedUpdate.cause)
                        }
                        return
                    }
                    else -> error("Already resumed, but proposed with update $proposedUpdate")
                }
            }
        }
        ...
    }
从源码分析,每一个Continuation都是一个Job,每个Job都是一个状态机,其简单状态如下(注:Active状态继承了NotCompleted接口):
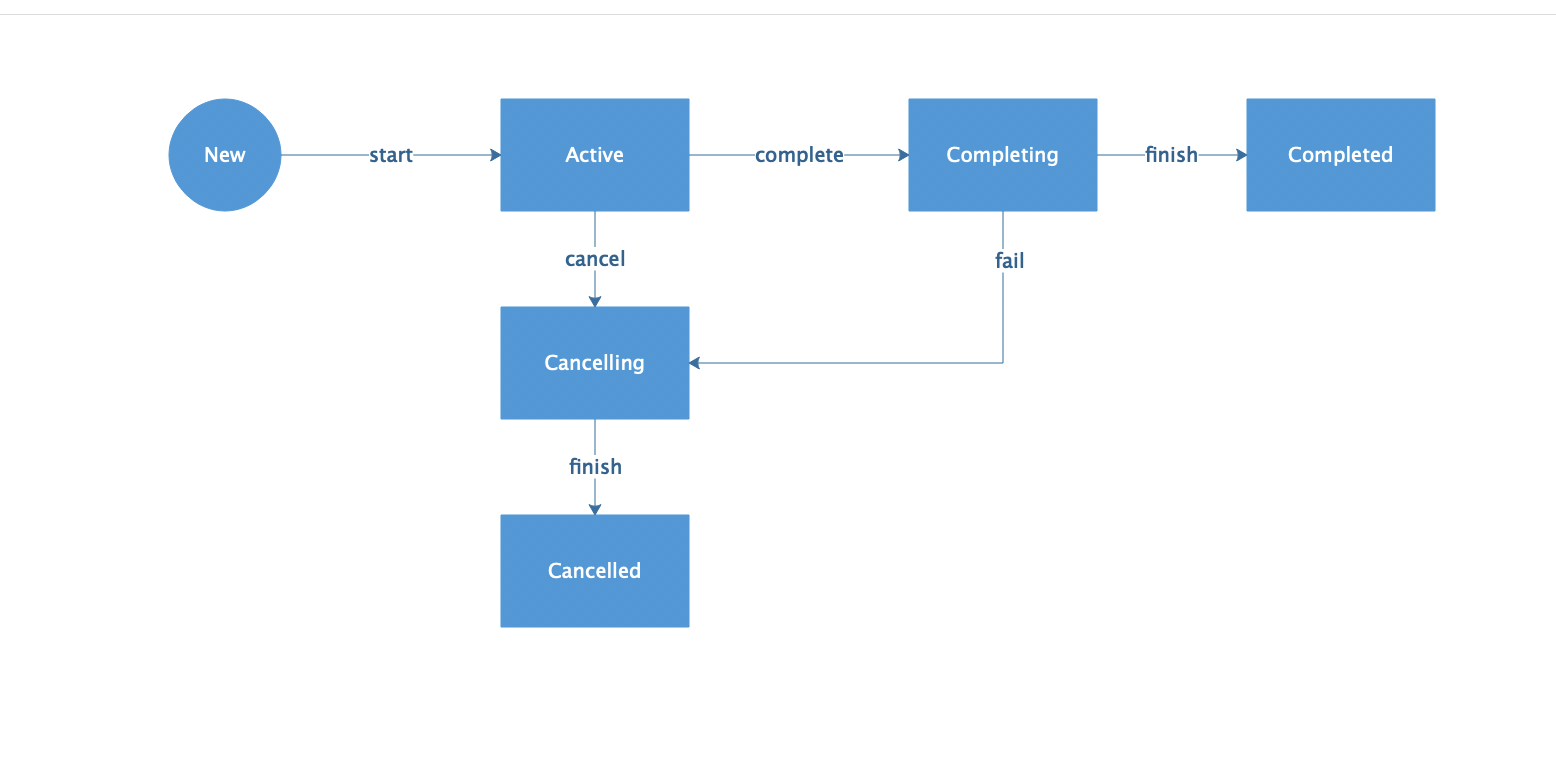
那么Job是啥呢?Job其实就代表了协程本身,协程不仅包含了上下文,其本身还是可执行体,不论是delay还是把suspend方法放到for循环里面,最终去控制执行流程的还是协程本身。这一点在Kotlin的协程框架就是通过CPS概念实现的,协程即是Continuation,Continuation继承了Job的实现JobSupport,而且还持有了CoroutineContext(这个玩意就可以理解为一个包含了各种执行状态的map)。所以你应该不会以为只要可中断方法一调用,你写的逻辑就开始执行了,no no,外面还会包上一层协程的外衣,然后你的逻辑就被限制在这个Job中,这么一看,协程还真有点像Thread,有上下文,有状态,可调度。
看一下这里是如何updateState的
AbstractContinuation.kt
    internal abstract class AbstractContinuation<in T>(
        public final override val delegate: Continuation<T>,
        public final override val resumeMode: Int
    ) :  JobSupport(true), Continuation<T>, DispatchedTask<T> {
        ...
       private fun updateStateToFinal(expect: NotCompleted, proposedUpdate: Any?, mode: Int): Boolean {
            ...
            completeStateUpdate(expect, proposedUpdate, mode)
            return true
        }

        protected fun completeStateUpdate(expect: NotCompleted, update: Any?, mode: Int) {
            ...
            dispatchResume(mode)
        }

       private fun dispatchResume(mode: Int) {
            ...
            dispatch(mode)
        }

        internal fun <T> DispatchedTask<T>.dispatch(mode: Int = MODE_CANCELLABLE) {
            val delegate = this.delegate
            if (mode.isDispatchedMode && delegate is DispatchedContinuation<*> && mode.isCancellableMode == resumeMode.isCancellableMode) {
                val dispatcher = delegate.dispatcher
                val context = delegate.context
                if (dispatcher.isDispatchNeeded(context)) {
                    dispatcher.dispatch(context, this)
                } else {
                    UndispatchedEventLoop.resumeUndispatched(this)
                }
            } else {
                resume(delegate, mode)
            }
        }
        ...
    }
删掉了不相关的代码,只保留dispatch这条主线,相信很容易个看明白最终又把这个任务放回到Dispatcher里面去了。那个else分支的resume其实内部调用的是Continuation.resume扩展方法,最终一样要调用到resumeImpl中,又回到上面已经分析的流程里了,这是处理有Continuation代理的情况。
搞明白了resume的过程,那么再看看,延时是如何做到的
EventLoop.kt
    internal abstract class EventLoopBase: CoroutineDispatcher(), Delay, EventLoop {
        private fun scheduleImpl(delayedTask: DelayedTask): Int {
            if (isCompleted) return SCHEDULE_COMPLETED
            val delayed = _delayed.value ?: run {
                _delayed.compareAndSet(null, ThreadSafeHeap())
                _delayed.value!!
            }
            return delayedTask.schedule(delayed, this)
        }
    }
看看_delayed是何方神圣,原来是一个ThreadSafeHeap类的实例
ThreadSafeHeap.kt
    public interface ThreadSafeHeapNode {
        public var index: Int
    }

    public class ThreadSafeHeap<T> where T: ThreadSafeHeapNode, T: Comparable<T> {

        private var a: Array<T?>? = null

        ...

        public fun addLastIf(node: T, cond: () -> Boolean): Boolean = synchronized(this) {
            if (cond()) {
                addImpl(node)
                true
            } else
                false
        }

        internal fun addImpl(node: T) {
            val a = realloc()
            var i = size++
            a[i] = node
            node.index = i
            siftUpFrom(i)
        }

        private tailrec fun siftUpFrom(i: Int) {
            if (i <= 0) return
            val a = a!!
            val j = (i - 1) / 2
            if (a[j]!! <= a[i]!!) return
            swap(i, j)
            siftUpFrom(j)
        }

        private fun swap(i: Int, j: Int)  { ... }

        ...
    }
这个类其实就实现了一个线程安全的ThreadSafeHeapNode类型的队列,内部存储结构为数组,多废话一句,tailrec 这个关键在kotlin中是为了告诉编译器要对该函数进行尾递归优化,也即是不要分配多余的栈空间,直接复用前一个方法调用的slot。看这个siftUpFrom的实现方式,应该是要保证元素按照从小到大排序。注意在调用addLastIf的时候,条件是!isCompleted,也就是只有未完成的状态才会添加任务。
EventLoop.kt
    internal abstract inner class DelayedTask(
            time: Long, timeUnit: TimeUnit
        ) : Runnable, Comparable<DelayedTask>, DisposableHandle, ThreadSafeHeapNode {
            @JvmField val nanoTime: Long = timeSource.nanoTime() + timeUnit.toNanos(time)

            override fun compareTo(other: DelayedTask): Int {
                val dTime = nanoTime - other.nanoTime
                return when {
                    dTime > 0 -> 1
                    dTime < 0 -> -1
                    else -> 0
                }
            }
     }
被添加的task实现了ThreadSafeHeapNode接口,其index在addLastIf中被赋值,这也就代表了其执行顺序,因其同时实现了Comparable接口,观察到它内部是按照要执行的时间排序,搞了半天还是个优先级队列没什么新意。
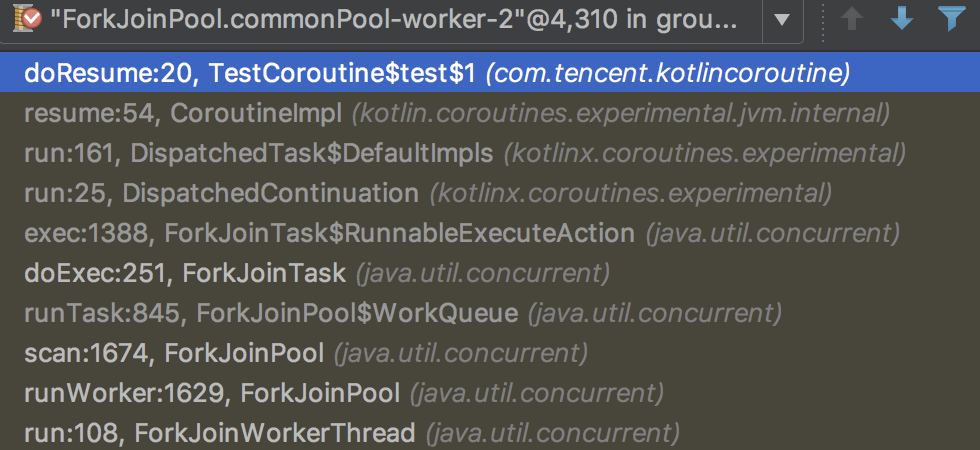
我们直接看下DelayedResumeTask被执行时的调用栈:
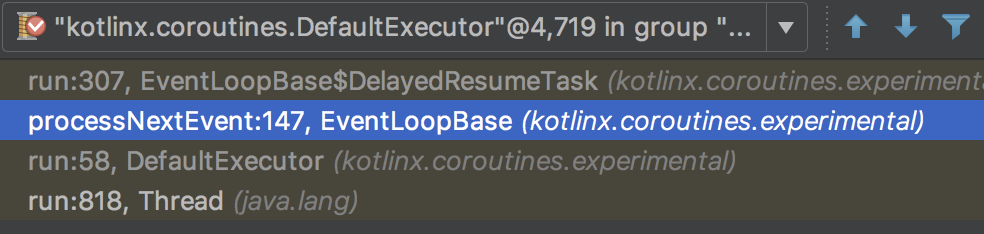
协程维持着一个自己的独立派发线程:DefaultExecutor
DefaultExecutor.kt
    internal object DefaultExecutor : EventLoopBase(), Runnable {
        override fun run() {
            ...
            while (true) {
                Thread.interrupted() // just reset interruption flag
                var parkNanos = processNextEvent()
                if (parkNanos == Long.MAX_VALUE) {
                    // nothing to do, initialize shutdown timeout
                    if (shutdownNanos == Long.MAX_VALUE) {
                        val now = timeSource.nanoTime()
                        if (shutdownNanos == Long.MAX_VALUE) shutdownNanos = now + KEEP_ALIVE_NANOS
                        val tillShutdown = shutdownNanos - now
                        if (tillShutdown <= 0) return // shut thread down
                        parkNanos = parkNanos.coerceAtMost(tillShutdown)
                    } else
                        parkNanos = parkNanos.coerceAtMost(KEEP_ALIVE_NANOS) // limit wait time anyway
                 }
                 if (parkNanos > 0) {
                        // check if shutdown was requested and bail out in this case
                        if (isShutdownRequested) return
                        timeSource.parkNanos(this, parkNanos)
                 }
            }
            ...
        }
    }
EventLoop.kt
    internal abstract class EventLoopBase: CoroutineDispatcher(), Delay, EventLoop {
        ...
        override fun processNextEvent(): Long {
            if (!isCorrectThread()) return Long.MAX_VALUE
            val delayed = _delayed.value
            if (delayed != null && !delayed.isEmpty) {
                val now = timeSource.nanoTime()
                while (true) {
                    delayed.removeFirstIf {
                        if (it.timeToExecute(now)) {
                            enqueueImpl(it)
                        } else
                            false
                    } ?: break
                }
            }
            // then process one event from queue
            dequeue()?.run()
            return nextTime
        }
        ...
    }
简要阐述下这里要做的事情:就是死循环遍历task队列该执行的就执行并出队,没到执行时间的就留在队列。这里最重要的一点是nextTime
EventLoop.kt
    internal abstract class EventLoopBase: CoroutineDispatcher(), Delay, EventLoop {
        ...
        private val nextTime: Long
            get() {
                val queue = _queue.value
                when {
                    queue === null -> {} // empty queue -- proceed
                    queue is Queue<*> -> if (!queue.isEmpty) return 0 // non-empty queue
                    queue === CLOSED_EMPTY -> return Long.MAX_VALUE // no more events -- closed
                    else -> return 0 // non-empty queue
                }
                val delayed = _delayed.value ?: return Long.MAX_VALUE
                val nextDelayedTask = delayed.peek() ?: return Long.MAX_VALUE
                return (nextDelayedTask.nanoTime - timeSource.nanoTime()).coerceAtLeast(0)
            }
        ...
    }
nextTime是那些留在队列里面的第一个任务(有序的哦)要等待的时间,我们回过头去看DefaultExecutor.run()方法,里面有句timeSource.parkNanos(this, parkNanos), 最终调用到LockSupport.parkNanos(…)里面了,在我的另一篇文章《形形色色的锁2》中有对LockSupport实现原理的剖析这里不再细说,总之就是这种情况下,线程就会真的进入block状态。
TimeSource.kt
    internal object DefaultTimeSource : TimeSource {
        ...
        override fun parkNanos(blocker: Any, nanos: Long) {
            LockSupport.parkNanos(blocker, nanos)
        }

        override fun unpark(thread: Thread) {
            LockSupport.unpark(thread)
        }
        ...
    }
忘记线程状态?没关系,复习一下:
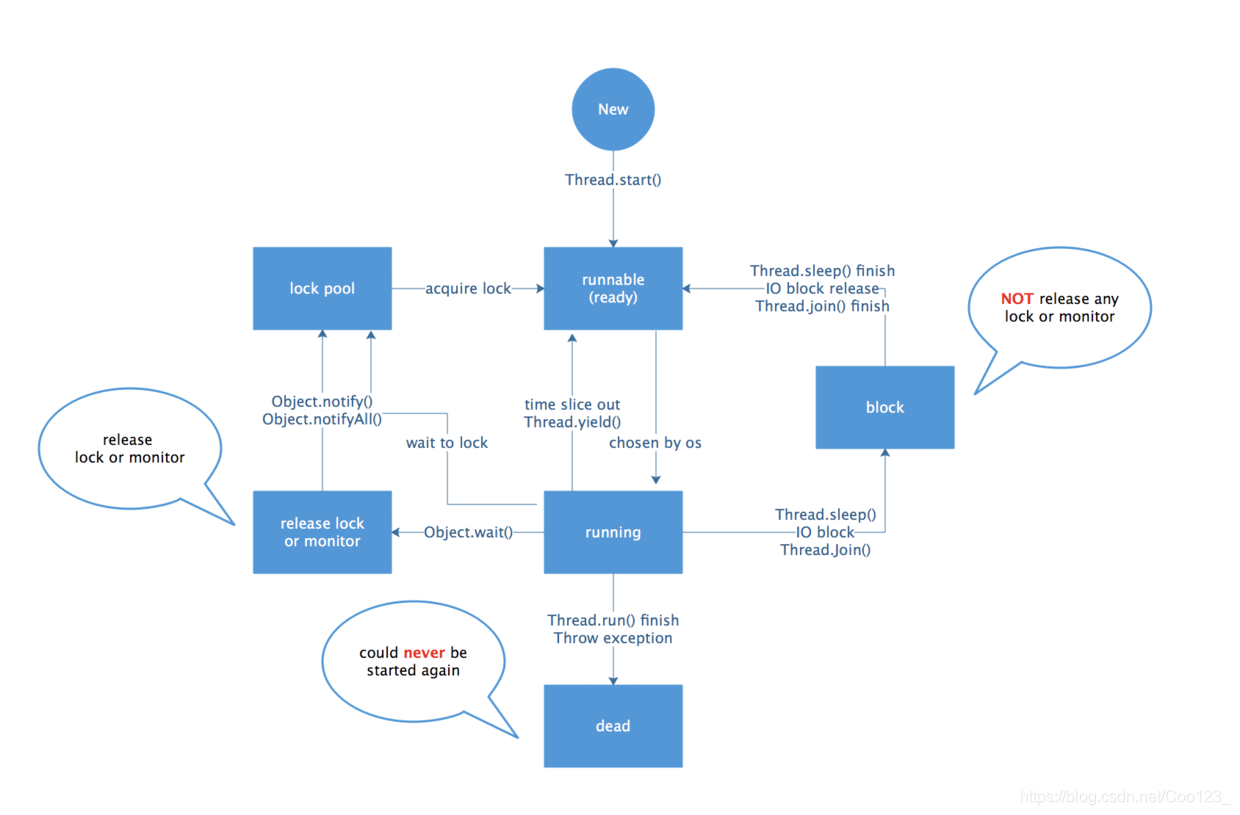
回过头总结一下,delay为何高效?因为它把当前能执行的任务都执行了,直到没得执行,才会休息,所以当若干个协程一起执行时,需要delay的会给急着执行的让路,而且在这个过程中,仅仅是协程的context在切换,并没有发生线程上下文切换(开销非常大)。看到这里,估计有人忍不住想要说了,废了这般功夫,不就是重新实现了一套android的Looper和Handler嘛,取了个高大上的名字叫协程来忽悠人。我承认,这套机制的确有涵盖Looper的功能,但是协程库的作者们绝非吃饱了撑的,协程在调度上,尤其是高吞吐量的并发情况下,是优于(理论上)多个HandlerThread的。先不急着做实验,我们来更深入一步探究其原理。
深入Async
通过对delay机制的分析,了解到可中断方法的执行,是受Job调度和协程上下文控制的,那这种包装是如何完成的呢?
我们找个例子来研究一下
    object TestCoroutine {
        suspend fun doSomething() {
            delay(100)
        }

        fun test() {
            async {
                doSomething()
            }
        }
    }
上面是我随便写了一个测试async的测试类,我们反编译一下,看看发生了什么
咦,AndroidStudio经过了长达2分钟的腹痛般的卡顿,给我生成了一个2W多行的java文件… 感觉文章快写不下去了
还好jadx依然可以正常使用,看下生成了两个类
    public final class TestCoroutine {
        public static final TestCoroutine INSTANCE = new TestCoroutine();

        private TestCoroutine() {
        }

        @Nullable
        public final Object doSomething(@NotNull Continuation<? super Unit> continuation) {
            return DelayKt.delay(100, continuation);
        }

        public final void test() {
            DeferredKt.async$default(null, null, null, new TestCoroutine$test$1(null), 7, null);
        }
    }
delay和async并不意外,直接调用对应的顶层方法,值得注意的有两个点:
1.我们平淡质朴的doSomething竟然被修改了签名,多了一个返回值,并且接收一个Continuation参数
2.可以看到,对doSomething()的直接调用正如前面所分析,被包装成了一个叫TestCoroutine$test$1的类
继续分析一下这个新生成的类:
    final class TestCoroutine$test$1 extends CoroutineImpl implements Function2<CoroutineScope, Continuation<? super Unit>, Object> {
        private CoroutineScope p$;

        TestCoroutine$test$1(Continuation continuation) {
            super(2, continuation);
        }

        @NotNull
        public final Continuation<Unit> create(@NotNull CoroutineScope coroutineScope, @NotNull Continuation<? super Unit> continuation) {
            Intrinsics.checkParameterIsNotNull(coroutineScope, "$receiver");
            Intrinsics.checkParameterIsNotNull(continuation, "continuation");
            Continuation testCoroutine$test$1 = new TestCoroutine$test$1(continuation);
            testCoroutine$test$1.p$ = coroutineScope;
            return testCoroutine$test$1;
        }

        @Nullable
        public final Object invoke(@NotNull CoroutineScope coroutineScope, @NotNull Continuation<? super Unit> continuation) {
            Intrinsics.checkParameterIsNotNull(coroutineScope, "$receiver");
            Intrinsics.checkParameterIsNotNull(continuation, "continuation");
            return ((TestCoroutine$test$1) create(coroutineScope, (Continuation) continuation)).doResume(Unit.INSTANCE, null);
        }

        @Nullable
        public final Object doResume(@Nullable Object obj, @Nullable Throwable th) {
            obj = IntrinsicsKt.getCOROUTINE_SUSPENDED();
            switch (this.label) {
                case 0:
                    if (th != null) {
                        throw th;
                    }
                    CoroutineScope coroutineScope = this.p$;
                    TestCoroutine testCoroutine = TestCoroutine.INSTANCE;
                    this.label = 1;
                    if (testCoroutine.doSomething(this) == obj) {
                        return obj;
                    }
                    break;
                case 1:
                    if (th != null) {
                        throw th;
                    }
                    break;
                default:
                    throw new IllegalStateException("call to 'resume' before 'invoke' with coroutine");
            }
            return Unit.INSTANCE;
        }
    }
这里doResume才是真正包含逻辑调用的地方,这里面包含了一个switch case结构,我们大胆猜测一下,这个case的个数,和我们直接调用suspend方法的个数有关,添加一个方法看看:
    object TestCoroutine {

        suspend fun doSomething() {
            delay(100)
        }

        suspend fun doAnotherthing(): Int {
            print("actually nothing todo")
            return 42
        }

        fun test() {
            async {
                doSomething()
                val ret = doAnotherthing()
                print("$ret")
            }
        }

    }
    final class TestCoroutine$test$1 extends CoroutineImpl implements Function2<CoroutineScope, Continuation<? super Unit>, Object> {
        ...
        @Nullable
        public final Object doResume(@Nullable Object obj, @Nullable Throwable th) {
            TestCoroutine testCoroutine;
            Object coroutine_suspended = IntrinsicsKt.getCOROUTINE_SUSPENDED();
            switch (this.label) {
                case 0:
                    if (th != null) {
                        throw th;
                    }
                    CoroutineScope coroutineScope = this.p$;
                    testCoroutine = TestCoroutine.INSTANCE;
                    this.label = 1;
                    if (testCoroutine.doSomething(this) == coroutine_suspended) {
                        return coroutine_suspended;
                    }
                    break;
                case 1:
                    if (th != null) {
                        throw th;
                    }
                    break;
                case 2:
                    if (th != null) {
                        throw th;
                    }
                    break;
                default:
                    throw new IllegalStateException("call to 'resume' before 'invoke' with coroutine");
            }
            testCoroutine = TestCoroutine.INSTANCE;
            this.label = 2;
            obj = testCoroutine.doAnotherthing(this);
            if (obj == coroutine_suspended) {
                return coroutine_suspended;
            }
            System.out.print(String.valueOf(Integer.valueOf(((Number) obj).intValue())));
            return Unit.INSTANCE;
        }
    }
确实多了一个case,只不过第二个suspend方法并没有放在case里面,也许和反编译有关,但总之其原理是通过CoroutineImpl记录执行状态,利用label的不同状态进行逻辑分发,发现阻塞if (testCoroutine.doSomething(this) == coroutine_suspended),就直接return,当状态改变后会再次进入doResume, 然后一步一步把async块中的内容给执行完
接着来分析一下async
Deferred.kt
    public actual fun <T> async(
        context: CoroutineContext = DefaultDispatcher,
        start: CoroutineStart = CoroutineStart.DEFAULT,
        parent: Job? = null,
        block: suspend CoroutineScope.() -> T
    ): Deferred<T> {
        val newContext = newCoroutineContext(context, parent)
        val coroutine = if (start.isLazy)
            LazyDeferredCoroutine(newContext, block) else
            DeferredCoroutine<T>(newContext, active = true)
        coroutine.start(start, coroutine, block)
        return coroutine
    }
- context,决定在什么地方进行分发,你可以什么都不传使用默认的DefaultDispatcher,也可以使用HandlerContext来利用android的handler机制(已经内建了一个基于MainLooper的HandlerContext名字叫UI可以直接使用)
- start,决定执行的方式,默认是async调用了就开始执行,如果选择CoroutineStart.LAZY,则构造了async以后不会直接启动,直到调用返回的Job.start()来手动启动(Deferred继承了Job)
- parent,可以指定父任务,父任务会等待所有子任务执行完才结束,主要应该还是用于launch或者async块的嵌套,自己一般应该不太需要用到
- block,就是我们要执行的协程代码
因为Kotlin的默认参数特性,编译后async方法多了些带 test$1对象,也就是一个Function2<CoroutineScope,
Continuation<? super Unit>,
Object>,同时它还是一个Coroutine(因为继承了CoroutineImpl)
AbstractCoroutine.kt
    public abstract class AbstractCoroutine<in T>(
        private val parentContext: CoroutineContext,
        active: Boolean = true
    ) : JobSupport(active), Job, Continuation<T>, CoroutineScope {
        ...
        public fun <R> start(start: CoroutineStart, receiver: R, block: suspend R.() -> T) {
            initParentJob()
            start(block, receiver, this)
        }
        ...
    }
AbstractCoroutine.start(…)这货竟然递归了,咦不对,这个参数也叫start,所以其实是调用了它的invoke,坑啊
CoroutineStart.kt
    public enum class CoroutineStart {
        ...
        public operator fun <R, T> invoke(block: suspend R.() -> T, receiver: R, completion: Continuation<T>) =
            when (this) {
                CoroutineStart.DEFAULT -> block.startCoroutineCancellable(receiver, completion)
                CoroutineStart.ATOMIC -> block.startCoroutine(receiver, completion)
                CoroutineStart.UNDISPATCHED -> block.startCoroutineUndispatched(receiver, completion)
                CoroutineStart.LAZY -> Unit // will start lazily
            }
        ...
    }
我们是default,所以走第一个
Cancellable.kt
    public fun <R, T> (suspend (R) -> T).startCoroutineCancellable(receiver: R, completion: Continuation<T>) =
        createCoroutineUnchecked(receiver, completion).resumeCancellable(Unit)
看这个又是Coroutine包Coroutine的样子,因为这里receiver本身就是在Async方法中创建的一个DeferredCoroutine/LazyDeferredCoroutine
这个createCoroutineUnchecked反正就调用了TestCoroutine$test$1.create(…)
Dispatched.kt
    internal class DispatchedContinuation<in T>(
        val dispatcher: CoroutineDispatcher,
        val continuation: Continuation<T>
    ) : Continuation<T> by continuation, DispatchedTask<T> {
        ...
        @Suppress("NOTHING_TO_INLINE") // we need it inline to save us an entry on the stack
        inline fun resumeCancellable(value: T) {
            val context = continuation.context
            if (dispatcher.isDispatchNeeded(context)) {
                _state = value
                resumeMode = MODE_CANCELLABLE
                dispatcher.dispatch(context, this)
            } else
                resumeUndispatched(value)
        }
        ...
    }
总之到了这里,就是通过 dispatcher.dispatch(…)把这个任务分发给线程/线程池去执行了,分发方式根据async的第一个参数context来指定
最后再来看一眼,线程执行到这个任务是否调用了我们的doResume
Dispatched.kt
    public interface DispatchedTask<in T> : Runnable {
         ...
        public override fun run() {
            try {
                ...
                withCoroutineContext(context) {
                    if (job != null && !job.isActive)
                        continuation.resumeWithException(job.getCancellationException())
                    else {
                        val exception = getExceptionalResult(state)
                        if (exception != null)
                            continuation.resumeWithException(exception)
                        else
                            continuation.resume(getSuccessfulResult(state))
                    }
                }
            } catch (e: Throwable) {
                throw DispatchException("Unexpected exception running $this", e)
            }
        }
    }
果然的确是调用了
总结一下async的实现手段,首先看看可定制的方面:
1.允许指定在什么线程执行(CoroutineContext)
2.允许指定什么时候执行(CoroutineStart)
3.能指定父任务(可以嵌套而不会乱序)
然后对于真正要执行的代码,层层包装,变成了一个带switch case的Coroutine对象,在执行过程中,doResume会被多次调用(delay?异常?or 多个suspend方法连续调用)
最后我们试下开篇提到的递归,看看是个什么效果
首先把测试代码改一下:
    object TestCoroutine {

        suspend fun doSomething(param: Int) {
            delay(100)
            val dec = param - 1
            if (dec > 0) {
                doSomething(dec)
            }
        }

        fun test() {
            async {
                doSomething(2)
            }
        }
    }
反编译后,发现在之前的基础上多了一个类,这证明经过处理的代码,已经不再是递归形式而是变成了一个子Coroutine,外面调用doSomething则对应TestCoroutine$test doSomething$1协程,这样suspend方法就可以随便递归也不用担心Stack Overflow了:
TestCoroutine$doSomething$1
    final class TestCoroutine$doSomething$1 extends CoroutineImpl {
        int I$0;
        int I$1;
        Object L$0;
        /* synthetic */ Object data;
        /* synthetic */ Throwable exception;
        final /* synthetic */ TestCoroutine this$0;

        TestCoroutine$doSomething$1(TestCoroutine testCoroutine, Continuation continuation) {
            this.this$0 = testCoroutine;
            super(0, continuation);
        }

        @Nullable
        public final Object doResume(@Nullable Object obj, @Nullable Throwable th) {
            this.data = obj;
            this.exception = th;
            this.label |= Integer.MIN_VALUE;
            return this.this$0.doSomething(0, this);
        }

        final /* synthetic */ int getLabel() {
            return this.label;
        }

        final /* synthetic */ void setLabel(int i) {
            this.label = i;
        }
    }
总结
本文篇幅所限,无法将Kotlin协程的设计思路全部展示出来,但是从delay何async这两个基本的协程方法,可以对其实现原理管中窥豹,使用的都还是我们常见的技术。所以协程本质上只是对代码的执行和调度加以封装,结合了一些编译期的代码生成,并没有使用什么黑科技。
那么我们该如何选择使用协程的时机呢?就这个问题也借着交流会的机会请教了jetbrain的专家Hadi Hariri,他建议:
1.需要大量创建的异步任务
2.执行IO密集型任务
3.不希望考虑多线程复杂的同步问题时(利用协程的channel)
这几种情况下可以放心大胆使用协程,此外协程还带来了如下的好处:
使得代码更加直观易读(减少了回调)
对异步接口设计可以更加明确(借助suspend关键字)
仅直观易读这一点我觉得就有非常大的吸引力,我们平时积累技术除了让代码能够正确运行以外,不就是在追求简洁和优雅吗?最后本篇作为协程入门的介绍,涉及的用法有限,一些更加精彩实用的案例,后续继续分解,敬请期待。
免费获取安卓开发架构的资料(包括Fultter、高级UI、性能优化、架构师课程、 NDK、Kotlin、混合式开发(ReactNative+Weex)和一线互联网公司关于android面试的题目汇总可以加:936332305 / 链接:点击链接加入【安卓开发架构】:https://jq.qq.com/?_wv=1027&k=515xp64