最近工作的项目,需要用到cordova进行插件开发,具体Cordova的作用,就不再赘述,大家可以自行的去百度就OK了,直接开始。具体的流程,我将已一个小的Demo进行推进讲解。也是刚刚接触,太理论的基础东西我也说不好,还是先跑起来一个Demo,才有继续学下去的动力~大家多多指教~
Step1.准备工作:
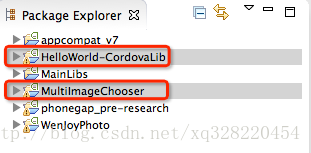
首先将我提供的Demo实例包中的HelloWorld-CordovaLib引入到工作空间中,我是使用的Eclipse,接着创建工程MultiImageChooser,同时将HelloWorld-CordovaLib作为Library引入到MultiImageChooser中:
接着,按照Demo实例包中的目录结构,引入Cordova所需要的文件,完成后的目录结构如下所示:
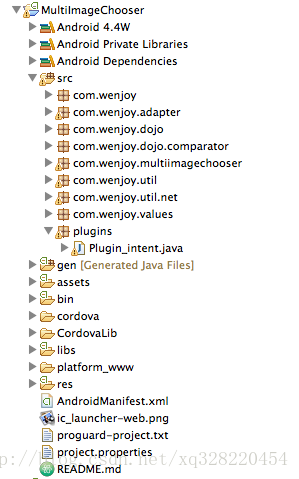
其中,res文件夹下还有一个xml文件夹,记得一并拷过去哦~
截至到现在,基本的准备工作就算是完成了。
Step2.插件的开发
插件的编写,是为了让JS可以调用我的Activity,其实编写起来还是比较简单的。
a.在src目录下建立包plugins,编写插件类Plugin_intent
package plugins;

import org.apache.cordova.CallbackContext;
import org.apache.cordova.CordovaPlugin;

import android.content.Intent;
import android.util.Log;
import android.widget.Toast;

import com.wenjoy.dojo.ResponseJSON;
import com.wenjoy.multiimagechooser.MainActivity;

/**
 * js调用java方法
 *
 * 必须继承CordovaPlugin CordovaPlugin里面有实现cordovaActivity的方法
 * 提供startActivityForResult();
 *
 * 我使用的 cordova 3.3.0版本
 *
 * @author XueQi
 *
 */
public class Plugin_intent extends CordovaPlugin {
	private String infos;

	/**
	 * 注意 构造方法不能为
	 *
	 * Plugin_intent(){}
	 *
	 * 可以不写或者 定义为如下
	 *
	 */
	public Plugin_intent() {
	}

	CallbackContext callbackContext;

	@Override
	public boolean execute(String action, org.json.JSONArray args,
			CallbackContext callbackContext) throws org.json.JSONException {
		this.callbackContext = callbackContext;
		Log.i("123", action);

		if (action.equals("intent")) {
			// 获取JS传递的args的第一个参数
			infos = args.getString(0);
			this.function();
			return true;
		}
		return false;

	}

	// 方法执行体
	private void function() {
		// cordova.getActivity() 获取当前activity的this
		Log.i("123", cordova.getActivity().toString());
		Intent intent = new Intent(cordova.getActivity(), MainActivity.class);
		intent.putExtra("infos", infos);
		cordova.startActivityForResult((CordovaPlugin) this, intent, 200);

	}

	@Override
	public void onActivityResult(int requestCode, int resultCode, Intent intent) {

		super.onActivityResult(requestCode, resultCode, intent);
		// 传递返回值 给js方法
		callbackContext.success(com.alibaba.fastjson.JSONArray
				.toJSONString(ResponseJSON.getInstance().getJsonObjects()));
		if (ResponseJSON.getInstance().getJsonObjects() != null
				&& ResponseJSON.getInstance().getJsonObjects().size() > 0) {
			Toast.makeText(cordova.getActivity(), "恭喜,上传完成", 1000).show();
		}
	}

}
b.方法编写完成后,要在res/xml/config.xml下注册,写在widget标签中添加
 <feature name="Demo">
        <param name="android-package" value="plugins.Plugin_intent" /><!-- value:包名.类名 -->
 </feature>
c.编写插件JS文件,在assert/www/plugins下,创建intent.js文件
cordova.define("org.apache.cordova.intent", function(require, exports, module) { /*
 *
 * Licensed to the Apache Software Foundation (ASF) under one
 * or more contributor license agreements.  See the NOTICE file
 * distributed with this work for additional information
 * regarding copyright ownership.  The ASF licenses this file
 * to you under the Apache License, Version 2.0 (the
 * "License"); you may not use this file except in compliance
 * with the License.  You may obtain a copy of the License at
 *
 *   http://www.apache.org/licenses/LICENSE-2.0
 *
 * Unless required by applicable law or agreed to in writing,
 * software distributed under the License is distributed on an
 * "AS IS" BASIS, WITHOUT WARRANTIES OR CONDITIONS OF ANY
 * KIND, either express or implied.  See the License for the
 * specific language governing permissions and limitations
 * under the License.
 *
*/

var exec = require('cordova/exec');

/**
 * Provides access to the vibration mechanism on the device.
 */

module.exports = {

    /**
     * 一共5个参数
       第一个 :成功会掉
       第二个 :失败回调
       第三个 :将要调用的类的配置名字(在config.xml中配置 稍后在下面会讲解)
       第四个 :调用的方法名(一个类里可能有多个方法 靠这个参数区分)
       第五个 :传递的参数  以json的格式
     */
    demo: function(mills) {
        exec(function(winParam){
        	alert(winParam);<span style="font-family: Arial, Helvetica, sans-serif;">//执行成功,winParam是类中callbackContext.success传递的参数</span>
        }, null, "Demo", "intent", [mills]);
    },
};

});
Demo:就是我们刚才在config.xml中配置的插件类的名字
mills:这里我始终只能传递一个参数,所以,我现在的解决方式是拼接一个字符串,例如:'aaa,nnn,ccc',用逗号分割三个参数
Step3.使用插件
截止到现在,整个插件就OK啦,可以创建一个html和Activiry了,这里我只列出LUNCH Activity的编写和html页面
在assert/www下建立index.html文件,很简单
<!DOCTYPE html>
<html>
<head>
  <title>Notification Example</title>
  <script type="text/javascript" charset="utf-8" src="cordova.js"></script>
  <script type="text/javascript" charset="utf-8">
   // Wait for device API libraries to load
   //
   document.addEventListener("deviceready", onDeviceReady, false);
   // device APIs are available
   //
	//	     跳转
    function intent() {          navigator.intent.demo('NDljY2E1ZGM4NzUzM2U3Yg==,order,5740');    		}    //token,eneityname,entityid

    </script>
    </head>
    <body>
    <p><a href="#" onclick="intent(); return false;">Upload Image</a></p>
    </body>
    </html>
ViewActivity:
package com.wenjoy.multiimagechooser;

import org.apache.cordova.CordovaActivity;

import android.content.Intent;
import android.os.Bundle;

/**
 * 装载HTML页面的Activity
 *
 * @author XueQi
 *
 */
public class ViewActivity extends CordovaActivity {
	@Override
	public void onCreate(Bundle savedInstanceState) {
		super.onCreate(savedInstanceState);
		super.init();
		// Set by <content src="index.html" /> in config.xml
		super.loadUrl("file:///android_asset/www/index.html");
		// super.loadUrl("file:///android_asset/www/index.html")
	}

	@Override
	protected void onActivityResult(int requestCode, int resultCode,
			Intent intent) {
		super.onActivityResult(requestCode, resultCode, intent);

	}
}
最后,至于权限什么的,大家就自己添加好了。
大工告成!附上DEMO的下载地址,要1个积分,大家不要吐槽~ http://download.csdn.net/detail/xq328220454/7620119