Camera中设置Preview的回调函数onPreviewFrame时推荐使用NV21,YV12两种格式,因为这两种格式支持所有的Camera设备。
YUV 详细讲解请看:https://docs.microsoft.com/en-us/previous-versions/aa904813(v=vs.80),文章中大部分内容来自此文章,且此文章图标更详细。
1 什么是YUV
https://blog.csdn.net/u010126792/article/details/86529743 音视频编码基础中讲解了颜色模型中包括两种RGB和YUV。RGB我们比较熟悉,三原色表示某个点的颜色的分量,一个点的颜色用红绿蓝三个分量表示。
YUV也是一种颜色编码方式,也分成三个分量分量,“Y”表示灰度值,明亮程度;而“U”和“V” 表示色彩信息代表了颜色的色调Cr(V)和饱和度Cb(U),没有UV时颜色为黑白色。YUV不像RGB那样要求三个独立的视频信号同时传输,所以用YUV方式传送占用极少的频宽。YUV和RGB可以相互转化,所以通过获取到的YUV可以还原每个点的颜色值。
YUV格式两大类:
YUV格式有两大类:planar和packed。
对于planar的YUV格式,先连续存储所有像素点的Y,紧接着存储所有像素点的U,随后是所有像素点的V。
对于packed的YUV格式,每个像素点的Y,U,V是连续交替存储的。
使用YUV的优点有两个:
一.彩色YUV图像转黑白YUV图像转换非常简单,这一特性用在于电视信号上。
二.YUV是数据总尺寸小于RGB格式
2 YUV采样方式
YUV码流的采样方式主要有三种,YUV4:4:4,YUV4:2:2,YUV4:2:0。YUV 4:4:4采样,每一个Y对应一组UV分量。YUV 4:2:2采样,每两个Y共用一组UV分量。 YUV 4:2:0采样,每四个Y共用一组UV分量。
YUV 4:4:4采样,每一个Y对应一组UV分量8+8+8 = 24bits,3个字节。
YUV 4:2:2采样,每两个Y共用一组UV分量,一个YUV占8+4+4 = 16bits 2个字节。
YUV 4:2:0采样,每四个Y共用一组UV分量一个YUV占8+2+2 = 12bits 1.5个字节。
所以YUV采样方式主要有:YUV444,YUV422,YUV420,三种YUV采样模式的表示:
- YUV444
(1)YUV444p:YYYYYYYYY VVVVVVVVV UUUUUUUU - YUV422
(1)YUV422p:YYYYYYYY VVVV UUUU
(2)YUVY:YUYV YUYV YUYV YUYV
(3)UYVY:UYVY UYVY UYVY UYVY - YUV420
-
- (1)YUV420p:
YV12:YYYYYYYY VV UU
YU12(I420):YYYYYYYY UU VV
- (1)YUV420p:
-
- (2)YUV420sp:
NV12:YYYYYYYY UVUV
NV21:YYYYYYYY VUVU
- (2)YUV420sp:
3 YUV420 存储方式
YUV420用的较为频繁所以这里讲解YUV420,从上面的采样方式中可以知道YUV420又分为YUV420P和YUV420sp,YUV420p中包含YV12,I420,YUV420sp中包含NV12和NV21,这些格式被称为存储方式,是真正存储数据的格式。
YUV420分为两种:YUV420p和YUV420sp。
YUV420sp格式如下图:
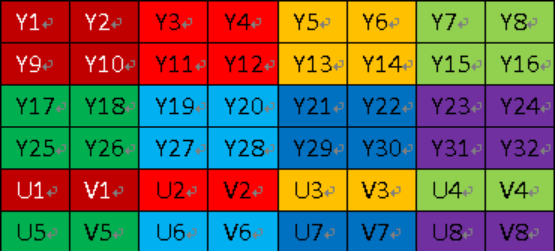
YUV420p数据格式如下图:

- YU12和YV12是一种Plane模式,将Y、U、V分量分别打包,依次存储。其每一个像素点的YUV数据提取遵循YUV420格式的提取方式,即4个Y分量共用一组UV
- NV12和NV21是一种two-plane模式,即Y和UV分为两个Plane,但是UV(CbCr)为交错存储,而不是分为三个plane
4 Android中对应的编码器颜色模式
编码器需要指定相应的颜色格式,否则编码得到的数据可能会出现花屏、叠影、颜色失真等现象。
原始数据 编码器
NV12(YUV420sp) ———> COLOR_FormatYUV420PackedSemiPlanar
NV21 ———-> COLOR_FormatYUV420SemiPlanar
YV12(I420) ———-> COLOR_FormatYUV420Planar
5 颜色格式转化
通过上面的学习我们了解了,Camera预览的格式为NV21、YV12;MediaCodec的编解码格式为:YUV420Planar/I420SemiPlanner ;由于他们在存储格式的不同,会导致视频编解码后颜色异常,所以就需要转码,把一种YUV的存储格式转化成另外一种。
NV21转I420:
public byte[] nv21ToI420(byte[] data, int width, int height) {
    byte[] ret = globalBuffer;
    int total = width * height;

    ByteBuffer bufferY = ByteBuffer.wrap(ret, 0, total);
    ByteBuffer bufferU = ByteBuffer.wrap(ret, total, total / 4);
    ByteBuffer bufferV = ByteBuffer.wrap(ret, total + total / 4, total / 4);

    bufferY.put(data, 0, total);
    for (int i=total; i<data.length; i+=2) {
        bufferV.put(data[i]);
        bufferU.put(data[i+1]);
    }

    return ret;
}
NV21转NV12
用mediacode编码h264时,因为mediacode编码视频只支持yuv420sp的nv12,需要将nv21转为nv12
private void NV21ToNV12(byte[] nv21,byte[] nv12,int width,int height){
   if(nv21 == null || nv12 == null)return;
   int framesize = width*height;
   int i = 0,j = 0;
   System.arraycopy(nv21, 0, nv12, 0, framesize);
   for(i = 0; i < framesize; i++){
      nv12[i] = nv21[i];
   }
   for (j = 0; j < framesize/2; j+=2)
   {
      nv12[framesize + j-1] = nv21[j+framesize];
   }
   for (j = 0; j < framesize/2; j+=2)
   {
      nv12[framesize + j] = nv21[j+framesize-1];
   }
}
6 YUV和RGB
RGB和YUV可以相互转化:
RGB 转换成 YUV
Y = (0.257 * R) + (0.504 * G) + (0.098 * B) + 16
Cr = V = (0.439 * R) - (0.368 * G) - (0.071 * B) + 128
Cb = U = -( 0.148 * R) - (0.291 * G) + (0.439 * B) + 128
YUV 转换成 RGB
B = 1.164(Y - 16) + 2.018(U - 128)
G = 1.164(Y - 16) - 0.813(V - 128) - 0.391(U - 128)
R = 1.164(Y - 16) + 1.596(V - 128)
RGB取值范围均为0255,Y=0255,U=-122+122,V=-157+157
7 YUV420 数据旋转
如果设置摄像头的角度为90度获取其他角度会发现利用MediaCodec获取到的编码H264数据可能和预览画面不一样,具体就是设置了摄像头旋转多少角度,就需要对获取到的原始YUV数据进行旋转多少度。
“特别注意:”如果你需要旋转90度或者270度,那么需要把宽和高对调,否则会花屏(就是图片会重复显示某个位置的数据,然后画面时花的)。为什么要宽高对调呢,如果某个画面要旋转90或者270后才是我们想要的结果,那就说明如果我们想要横屏的画面,则旋转之前是竖屏的画面,但是最终需要的是横屏的,所以旋转之前要把宽高对调,旋转后才是需要的数据。
yuv420sp的分两种,nv21和nv12。Android 取摄像头中的数据 ,当使用camera1.0 时,onPreviewFrame返回的数据yuv420sp的nv21,并且camera中取出的数据显示时是偏转的,需要将其旋转顺时针旋转270或逆时针旋转90,注:旋转后宽高对调。
具体旋转原理没有深入学习,以下算法来自网络:
   /**
 * 此处为顺时针旋转旋转90度
 * @param data 旋转前的数据
 * @param imageWidth 旋转前数据的宽
 * @param imageHeight 旋转前数据的高
 * @return 旋转后的数据
 */
private byte[] rotateYUV420Degree90(byte[] data, int imageWidth, int imageHeight)
{
    byte [] yuv = new byte[imageWidth*imageHeight*3/2];
    // Rotate the Y luma
    int i = 0;
    for(int x = 0;x < imageWidth;x++)
    {
        for(int y = imageHeight-1;y >= 0;y--)
        {
            yuv[i] = data[y*imageWidth+x];
            i++;
        }
    }
    // Rotate the U and V color components
    i = imageWidth*imageHeight*3/2-1;
    for(int x = imageWidth-1;x > 0;x=x-2)
    {
        for(int y = 0;y < imageHeight/2;y++)
        {
            yuv[i] = data[(imageWidth*imageHeight)+(y*imageWidth)+x];
            i--;
            yuv[i] = data[(imageWidth*imageHeight)+(y*imageWidth)+(x-1)];
            i--;
        }
    }
    return yuv;
}
顺时针旋转180度

private byte[] rotateYUV420Degree180(byte[] data, int imageWidth, int imageHeight){

    byte[] yuv =new byte[imageWidth*imageHeight*3/2];

    int i =0;int count =0;

    for(i = imageWidth * imageHeight -1; i >=0; i--){
        yuv[count]= data[i];
        count++;}

    i = imageWidth * imageHeight *3/2-1;for(i = imageWidth * imageHeight *3/2-1; i >= imageWidth
            * imageHeight; i -=2){
        yuv[count++]= data[i -1];
        yuv[count++]= data[i];
    }return yuv;
}

/**
 * 此处为顺时针旋转270
 * @param data 旋转前的数据
 * @param imageWidth 旋转前数据的宽
 * @param imageHeight 旋转前数据的高
 * @return 旋转后的数据
 */
private byte[] rotateYUV420Degree270(byte[] data, int imageWidth, int imageHeight){

    byte[] yuv =new byte[imageWidth*imageHeight*3/2];

    // Rotate the Y luma

    int i =0;

    for(int x = imageWidth-1;x >=0;x--){

        for(int y =0;y < imageHeight;y++){

            yuv[i]= data[y*imageWidth+x];
            i++;

        }
    }// Rotate the U and V color components
    i = imageWidth*imageHeight;

    for(int x = imageWidth-1;x >0;x=x-2){

        for(int y =0;y < imageHeight/2;y++){
            yuv[i]= data[(imageWidth*imageHeight)+(y*imageWidth)+(x-1)];
            i++;
            yuv[i]= data[(imageWidth*imageHeight)+(y*imageWidth)+x];
            i++;
        }
    }
    return yuv;
}
    //镜像
    private void Mirror(byte[] yuv_temp, int w, int h) {
        int i, j;

        int a, b;
        byte temp;
        //mirror y
        for (i = 0; i < h; i++) {
            a = i * w;
            b = (i + 1) * w - 1;
            while (a < b) {
                temp = yuv_temp[a];
                yuv_temp[a] = yuv_temp[b];
                yuv_temp[b] = temp;
                a++;
                b--;
            }
        }
        //mirror u
        int uindex = w * h;
        for (i = 0; i < h / 2; i++) {
            a = i * w / 2;
            b = (i + 1) * w / 2 - 1;
            while (a < b) {
                temp = yuv_temp[a + uindex];
                yuv_temp[a + uindex] = yuv_temp[b + uindex];
                yuv_temp[b + uindex] = temp;
                a++;
                b--;
            }
        }
        //mirror v
        uindex = w * h / 4 * 5;
        for (i = 0; i < h / 2; i++) {
            a = i * w / 2;
            b = (i + 1) * w / 2 - 1;
            while (a < b) {
                temp = yuv_temp[a + uindex];
                yuv_temp[a + uindex] = yuv_temp[b + uindex];
                yuv_temp[b + uindex] = temp;
                a++;
                b--;
            }
        }
    }
YUVYUV 详细讲解请看:https://docs.microsoft.com/en-us/previous-versions/aa904813(v=vs.80)