12306验证码识别是我人生中“抢购”这一重大环节的第一步,所以我一定会把此环节写好,现在12306已经小小成功,接下来,我打算使用keras来深度学习解决12306抢票的问题,当然,如果春运票都抢的到的话,其他抢购应该很好做。
在系列文章的第一篇(https://blog.csdn.net/galilajiao2006/article/details/86497584#comments)中,我采用google维护的开源OCR tesseract识别验证码中的关键字/question,但是效果极差。晚上发现作者用了一个pre_ocr_processing函数,我也试着用它来处理关键字,但是仍然不行,只能放弃tesseract.
tesseract的长处是开源,免费,可以识别工整的印刷体中文,但是歪曲的和明显扫描痕迹的,都识别的很差。而与此同时,不仅仅有百度OCR,还有微软OCR,还有腾讯OCR等等。所以,就不要重新造轮子了。详情可以参考这篇博文:https://segmentfault.com/a/1190000012861561
于是转而使用其他工具,使用百度通用文字识别(http://ai.baidu.com/tech/ocr/general)试了一下,果然很不错,成功率高达75%,已经很好了,我一般登陆12306都要刷新四五次。如果就算图片识别率仅弄到30%,75%*30%=22.5%,也跟我手动刷验证码相当了。在此有一篇博文:https://mp.csdn.net/mdeditor/86500057#
而且百度通用文字识别有免费版,太好了:

完整版代码我会在文末贴出,在此先讲述我编程+抄袭的过程.
把网上的代码拿来用之后,研究了程序,截图的尺寸挺好,但为什么百度识别的图都显示unknown呢?于是开始学习百度识图的流程:
首先,百度识图(http://ai.baidu.com/docs#/ImageClassify-API/top)可以先注册,登陆之后创建应用。然后编程获取access_token,再然后照着官方程序写,来识别图片。之所以不在代码中写死access_token,是因为每个access_token只有30天有效期。
其次就是我所用的方法,首先 pip install baidu-aip,然后几行程序就搞定了,比上面简单的多。编程中简单是极为关键的,因为编程讲究的就是绝对和确定,而越长的代码就越容易出错。需要注意如果用这种方法,则不论是使用百度通用文字识别,还是百度识图,都必须install baidu-aip.此方法详情见博文:https://blog.csdn.net/u012236875/article/details/74726035
确定好了方法,pip install baidu-aip之后,我开始寻找我的AppID, API Key,和Secret Key. 找了半天百度的API Key和Secret Key,后来给百度打电话查询到是在自己名字的小圆圈下面的Security Credentials里面。没想到客服也错了,这个Access Key和Secret Key不知道有啥用。
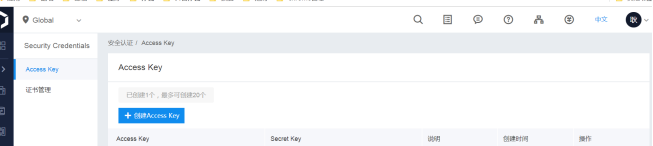
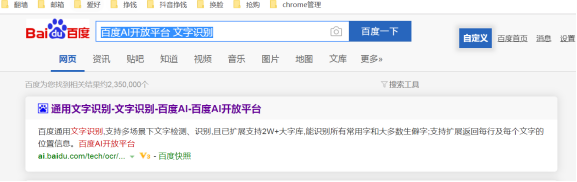
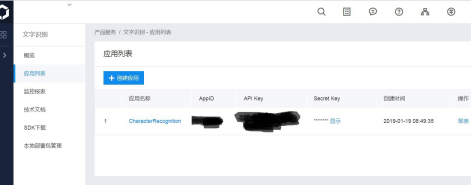
经过努力,找到了正确的寻找key的方法:
1.百度“百度AI开放平台 文字识别”:
2.选择第一条,进入相关页面:
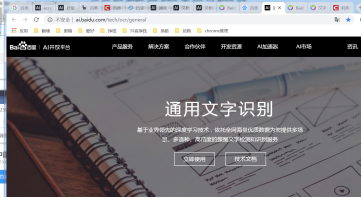
3.点击上图中的“立即使用”,进入相关页面:

4.点击上图中的“管理应用”,就可以看到AppID,API Key,Secret Key了:
现在,开始正儿八经编程了:
首先,还是说一下pip install baidu-aip.install完毕之后,不需要退出或重启pyCharm(我用的IDE),就可以在pyCharm的File-Settings-ProjectInterpretor-‘+'中可就可以找到baidu-aip.
哈哈,初步成功!话说‘双面膛’是什么鬼?

说一句题外话,貌似不需要建立一个百度AI文字识别,直接一个图片识别就可以,因为其中包含了文字识别,但是不能通过建立文字识别而包括图片识别,因为其中无相关选项:

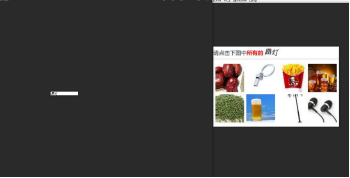
在此亮相一下12306的截图,不是我不想用百度识图达到较高的准确率,而是12306实在是太凶残了,六幅图中就一张是大半个路灯,这不仅仅是需要识图,而且需要推理了,当然,机器推理不知道如何实现,但是可以考虑深度学习,这是后话了:
运行了很多次程序,终于成功了几次(我设定在识别出的关键字与图片的一串关键字中有一个相同时,就打印“找到啦!”):


我很快在网上找到一个大牛识别率高达96%的博文:
https://blog.csdn.net/weixin_41578580/article/details/80052065
他的试验网站是https://blog.csdn.net/weixin_41578580/article/details/80052065或http://103.46.128.47:47720/
我尝试他网站的结果:

此人说自己用的是初步的keras,没啥说的,大写的服气。初级的keras都这么厉害,那高级的keras不知道得多牛了。
闲话少说,敝帚自珍,先把我的百度识图做通再转向深度识别。为了能移动到某个(x,y)坐标然后点击(通过坐标点击相应的验证码),本来打算使用了PyAutoGUI这个包,但是pip install pyautogui死活安不上,遂放弃:

然后参考了此博文:
https://blog.csdn.net/jay_wonder/article/details/82529973
成功自动勾选图片:

最后添加上一句:
self.driver.find_by_text(u"登录").click()
即可在选择相关验证码图片后自动点击登录按钮。
打完收工,贴上完整版代码,有疑惑的同学欢迎留言:
# -*- coding: utf-8 -*-
"""
@author: Steve
"""
from selenium import webdriver
from selenium.webdriver.common.action_chains import ActionChains
# 导入Keys 模块
from selenium.webdriver.common.keys import Keys
from splinter.browser import Browser
from time import sleep
from PIL import Image
from PIL import ImageFilter
#import urllib #这是python2的用法
#import urllib2 #这是python2的用法
import urllib.request
import sys
import re
import json
import ssl
import traceback
import time, sys
import winsound
import urllib.parse, urllib.request, base64
from aip import AipOcr
from aip import AipImageClassify

if hasattr(ssl, '_create_unverified_context'):
    ssl._create_default_https_context = ssl._create_unverified_context

UA = "Mozilla/5.0 (Macintosh; Intel Mac OS X 10_10_2) AppleWebKit/537.36 (KHTML, like Gecko) Chrome/41.0.2272.89 Safari/537.36"

#pic_url = "https://kyfw.12306.cn/otn/passcodeNew/getPassCodeNew?module=login&rand=sjrand&0.21191171556711197"

text_keyword = ""

def get_img(pic_url):
    resp = urllib.request.urlopen(pic_url)
    raw = resp.read()
    with open("./tmp.jpg", 'wb') as fp:
        fp.write(raw)

    return Image.open("./tmp.jpg")


def get_sub_img(im, x, y):
    assert 0 <= x <= 3
    assert 0 <= y <= 2
    WITH = HEIGHT = 68
    left = 5 + (67 + 5) * x
    top = 41 + (67 + 5) * y
    right = left + 67
    bottom = top + 67

    return im.crop((left, top, right, bottom))


def baidu_character():
    global text_keyword
    # 在这三个地方填入参数
    api_id = '15448634'
    api_key = '6RCoLGGswaGg5KIL4S5flQqL'
    secret_key = 'KN9gaY2P40TwMFbtM38nok7S0C6Cs0EK'
    client = AipOcr(api_id, api_key, secret_key)  # 到这里都是固定用法
    with open('D:/pyproject/QiangHuochepiao_yanzhengma_baiduOCR/temp_question.png', 'rb') as f:
        img = f.read()
    text = client.basicGeneral(img)
    #print('text is:',text)
    # 通用文字识别方式识别图片内容,一天50000次,像什么高精度版就是basicAccurate,具体参考下方aipocr模块文档
    for each in text.get('words_result'):
        text_keyword = each.get('words')
        #print(text_word)  # 返回的是个json,内容在这里面
    return text_keyword
    #text_str=str(text,encoding="utf-8")
    #text_dir = eval(text_str) # eval将字符串转换成字典
    #text_words= text_dir['words']
    #if (text_words):
    #    print('text_words is:',text_words)

    # #APIKey就是client_id SecretKey就是client_secret
    # host = 'https://aip.baidubce.com/oauth/2.0/token?grant_type=client_credentials&client_id=6RCoLGGswaGg5KIL4S5flQqL&client_secret=KN9gaY2P40TwMFbtM38nok7S0C6Cs0EK'
    # request = urllib.request.Request(host)
    # request.add_header('Content-Type', 'application/json; charset=UTF-8')
    # response = urllib.request.urlopen(request)
    # content = response.read()
    # if (content):
    #     print('content is:',content)
    # content_str=str(content,encoding="utf-8")
    # content_dir = eval(content_str) # eval将字符串转换成字典
    # access_token= content_dir['refresh_token']
    # if (access_token):
    #     print('access_token is:',access_token)
    #
    # #access_token = '#####调用鉴权接口获取的token#####'
    # #url = 'https://aip.baidubce.com/rest/2.0/ocr/v1/general?access_token=' + access_token
    # url = 'https://aip.baidubce.com/rest/2.0/ocr/v1/general?access_token=25.7dc71ed64600387995cc34af8a3eff5c.315360000.1863315462.282335-15448634'
    # print('url is',url)
    # # 二进制方式打开图文件
    # #f = open(r'./temp_question.png', 'rb')  # 本地图片
    # f = open(r'D:/pyproject/QiangHuochepiao_yanzhengma_baiduOCR/temp_question.png', 'rb')
    # # 参数image:图像base64编码
    # img = base64.b64encode(f.read())
    # print('1')
    # params = {"image": img}
    # print('2')
    # params = urllib.parse.urlencode(params).encode(encoding='UTF8')
    # print('3')
    # request = urllib.request.Request(url, params)
    # print('4')
    # request.add_header('Content-Type', 'application/x-www-form-urlencoded')
    # print('5')
    # response = urllib.request.urlopen(request)
    # print('6')
    # content = response.read()
    # print('7')
    # if (content):
    #     print(content) # print((content).decode())
    # return

""" 读取图片 """
def get_file_content(filePath):
    with open(filePath, 'rb') as fp:
        return fp.read()

def baidu_stu_lookup(im):
    im.save("./query_temp_img.png")
    #raw = open("./query_temp_img.png", 'rb').read()

    """ 这里输入你创建应用获得的三个参数 """
    APP_ID = '15455771'
    API_KEY = 'qYpax79Lw5Gmwg9hNFlI0GU0'
    SECRET_KEY = '13GuQoUwgb9gyedFsFoumTiK4kQTycBZ'

    client = AipImageClassify(APP_ID, API_KEY, SECRET_KEY)

    image = get_file_content("./query_temp_img.png")

    """ 调用通用物体识别 """
    text = client.advancedGeneral(image)
    print(client.advancedGeneral(image))

    """ 得到需要的关键字 """
    for each in text.get('result'):
       img_keyword = each.get('keyword')
       #print(img_keyword)
       #print(text_keyword)
       if (img_keyword==text_keyword):
           print(u"找到啦!")
           return True

       # url = url + str(len(raw))
       # if (url):
       #      print(url)
       # req = urllib.request.Request(url, raw, {'Content-Type': 'image/png', 'User-Agent': UA})
       # resp = urllib.request.urlopen(req)
       #
       # resp_url = resp.read()  # return a pure url
       #
       # if (resp_url):
       #      print(resp_url)
       # url = "http://stu.baidu.com/n/searchpc?queryImageUrl=" + urllib.request.quote(resp_url)
       #
       # req = urllib.request.Request(url, headers={'User-Agent': UA})
       # resp = urllib.request.urlopen(req)
       #
       # html = resp.read()
       # return baidu_stu_html_extract(html)

# def baidu_stu_html_extract(html):
#     # pattern = re.compile(r'<script type="text/javascript">(.*?)</script>', re.DOTALL | re.MULTILINE)
#     pattern = re.compile(r"keywords:'(.*?)'")
#     #pattern = pattern.decode('utf-8')   # https://blog.csdn.net/zoulonglong/article/details/78547191
#     html = html.decode('utf-8')
#     matches = pattern.findall(html)
#     if not matches:
#         return '[UNKNOWN]'
#     json_str = matches[0]
#
#     json_str = json_str.replace('\\x22', '"').replace('\\\\', '\\')
#
#     # print json_str
#
#     result = [item['keyword'] for item in json.loads(json_str)]
#
#     return '|'.join(result) if result else '[UNKNOWN]'


def ocr_question_extract(im):
    # [email protected]:madmaze/pytesseract.git
    global pytesseract
    try:
        import pytesseract
    except:
        print("[ERROR] pytesseract not installed")
        return
    im = im.crop((117, 3, 260, 22))
    #im = pre_ocr_processing(im)
    im.save("./temp_question.png")
    #im.show()
    return baidu_character()
    #return pytesseract.image_to_string(im, lang='chi_sim').strip()


def pre_ocr_processing(im):
    im = im.convert("RGB")
    width, height = im.size

    white = im.filter(ImageFilter.BLUR).filter(ImageFilter.MaxFilter(23))
    grey = im.convert('L')
    impix = im.load()
    whitepix = white.load()
    greypix = grey.load()

    for y in range(height):
        for x in range(width):
            greypix[x, y] = min(255, max(255 + impix[x, y][0] - whitepix[x, y][0],
                                         255 + impix[x, y][1] - whitepix[x, y][1],
                                         255 + impix[x, y][2] - whitepix[x, y][2]))

    new_im = grey.copy()
    binarize(new_im, 150)
    return new_im


def binarize(im, thresh=120):
    assert 0 < thresh < 255
    assert im.mode == 'L'
    w, h = im.size
    for y in range(0, h):  # for y in xrange(0, h): # xrange只用于python 2
        for x in range(0, w):  # for x in xrange(0, w): # xrange只用于python 2
            if im.getpixel((x, y)) < thresh:
                im.putpixel((x, y), 0)
            else:
                im.putpixel((x, y), 255)


class huoche(object):
    """docstring for huoche"""
    #dr = webdriver.Chrome()    #此命令可以成功打开chrome
    driver_name = ''
    executable_path = ''
    # 用户名,密码
    username = u"[email protected]"
    passwd = u"galilajiao2010"
    # cookies值,需自行寻找
    #starts = u"%u6B66%u6C49%2CWHN" # 武汉
    #ends = u"%u9EBB%u57CE%2CMCN"   # 麻城
    starts = u"%u5317%u4EAC%2CBJP"
    ends = u"%u9A7B%u9A6C%u5E97%u897F%2CZLN"
    # 时间格式2018-01-19
    dtime = u"2019-01-16"
    # 车次,选择第几趟,0则从上之下依次点击
    order = 0
    ###乘客名
    users = [u"耿爽","李萌萌"]
    ##席位
    xb = u"二等座"
    pz = u"成人票"

    """网址"""
    ticket_url = "https://kyfw.12306.cn/otn/leftTicket/init"
    login_url = "https://kyfw.12306.cn/otn/login/init"
    initmy_url = "https://kyfw.12306.cn/otn/view/index.html"
    buy = "https://kyfw.12306.cn/otn/confirmPassenger/initDc"
    login_url = 'https://kyfw.12306.cn/otn/login/init'

    def __init__(self):
        self.driver_name = 'chrome'
        self.executable_path = 'C:\Python27\chromedriver.exe'

    def login(self):
        self.driver.visit(self.login_url)
        #sleep(9)
        # 填充密码
        self.driver.fill("loginUserDTO.user_name", self.username)
        # sleep(1)
        self.driver.fill("userDTO.password", self.passwd)
        print(u"等待验证码,自行输入...")
        #验证码部分
        # 定位到要右击的元素
        #qqq = self.driver.driver.find_element_by_xpath("//*[@id='loginForm']/div/ul[2]/li[4]/div/div/div[3]").text
        pic = self.driver.driver.find_element_by_xpath("//*[@id='loginForm']/div/ul[2]/li[4]/div/div/div[3]/img")
        #sleep(3)
        pic_src = pic.get_attribute('src')
        # image = pic.find_element_by_tag_name("img")
        #pic_src = pic.value_of_css_property('background-color')
        #pic_src = pic.getText()
        #print('url is:  %s' % (pic_src))
        #print(pic.get_attribute("alt"))
        # 对定位到的元素执行鼠标右键操作
        #qqq2 = ActionChains(self.driver).context_click(qqq).perform()
        #ActionChains(self.driver).contextClick(qqq).sendKeys(Keys.ARROW_DOWN).build().perform()
        #actionChains = ActionChains(self.driver)
        #actionChains.context_click(qqq).send_keys(Keys.ARROW_DOWN).send_keys(Keys.ENTER).perform()
        #action = ActionChains(self.driver)
        #action.move_to_element(qqq)  # 移动到该元素
        #action.context_click(qqq)  # 右键点击该元素
        #action.send_keys(Keys.ARROW_DOWN)  # 点击键盘向下箭头
        #action.send_keys('v')  # 键盘输入V保存图
        #action.perform()  # 执行保存

        im = get_img(pic_src)
        #print('OCR Question:    ',ocr_question_extract(im))
        ocr_question_extract(im)
        print('OCR Question:',baidu_character())
        for y in range(2):
            for x in range(4):
                im2 = get_sub_img(im, x, y)
                result = baidu_stu_lookup(im2)
                if(result == True):
                    if(y==0 and x==0):
                        result00=True
                        ActionChains(self.driver.driver).move_to_element_with_offset(pic, 40 + 72 * (1 - 1),73).click().perform()
                    if(y==0 and x==1):
                        result01=True
                        ActionChains(self.driver.driver).move_to_element_with_offset(pic, 40 + 72 * (2 - 1),73).click().perform()
                    if (y==0 and x==2):
                        result02 = True
                        ActionChains(self.driver.driver).move_to_element_with_offset(pic, 40 + 72 * (3 - 1),73).click().perform()
                    if (y ==0 and x==3):
                        result03 = True
                        ActionChains(self.driver.driver).move_to_element_with_offset(pic, 40 + 72 * (4 - 1),73).click().perform()
                    if (y == 1 and x == 0):
                        result10 = True
                        ActionChains(self.driver.driver).move_to_element_with_offset(pic, 40 + 72 * (1 - 1),145).click().perform()
                    if (y == 1 and x == 1):
                        result11 = True
                        ActionChains(self.driver.driver).move_to_element_with_offset(pic, 40 + 72 * (2 - 1),145).click().perform()
                    if (y == 1 and x == 2):
                        result12 = True
                        ActionChains(self.driver.driver).move_to_element_with_offset(pic, 40 + 72 * (3 - 1),145).click().perform()
                    if (y == 1 and x == 3):
                        result13 = True
                        ActionChains(self.driver.driver).move_to_element_with_offset(pic, 40 + 72 * (4 - 1),145).click().perform()
                    #ActionChains(self.driver).context_click(pic).perform()
                    #action = ActionChains(self.driver)
                    #action.move_to_element_with_offset(pic, 5, 5)
                    #action.click()
                    #action.perform()
                    #print(y, x, result)

        #pic2 = self.driver.driver.find_element_by_xpath("//*[@id='loginForm']/div/ul[2]/li[4]/div/div/div[3]/img")
        #pic.move_to_element_with_offset(pic, 5, 5).click().perform
        print("Here!")

        #ActionChains(self.driver.driver).move_to_element_with_offset(pic, 40 + 72 * (1 - 1),73).click().perform()
        #ActionChains(self.driver.driver).move_to_element_with_offset(pic, 40 + 72 * (2 - 1), 73).click().perform()
        #        print("Here 2")
        #    else:
        #        i -= 4
        #        ActionChains(self.driver.driver).move_to_element_with_offset(pic, 40 + 72 * (i - 1),145).click().perform()
        #element = self.driver.driver.find_element_by_xpath("//*[@id='loginForm']/div/ul[2]/li[4]/div/div/div[3]/img")
        #ActionChains(self.driver.driver).move_to_element_with_offset(pic, 40 + 72 * (1 - 1), 73).click().perform()
        #ActionChains(self.driver).move_to_element_with_offset(pic, 40 + 72 * (1 - 1), 73).click().perform()
        #num = 8
        #try:
            #element = self.browser.find_element_by_class_name('touclick-img-par')
            #element = self.driver.driver.find_element_by_xpath("//*[@id='loginForm']/div/ul[2]/li[4]/div/div/div[3]/img")
            #ActionChains(self.browser).move_to_element_with_offset(element, 40 + 72 * (1 - 1), 73).click().perform()
            #ActionChains(self.driver.driver).move_to_element_with_offset(pic, 40 + 72 * (1 - 1), 73).click().perform()
            #print("Here 0")
            #for i in num:
            #    if i <= 4:
            #        print("Here 1")
            #        ActionChains(self.driver.driver).move_to_element_with_offset(pic, 40 + 72 * (i - 1),73).click().perform()
            #        print("Here 2")
            #    else:
            #        i -= 4
            #        ActionChains(self.driver.driver).move_to_element_with_offset(pic, 40 + 72 * (i - 1),145).click().perform()
        #except:
        #    print('元素不可选!')

        while True:
            self.driver.find_by_text(u"登录").click()
            #self.driver.find_by_text(u"快速注册").click()
            if self.driver.url != self.initmy_url:
                sleep(1)
            else:
                break

    def start(self):
        self.driver = Browser(driver_name=self.driver_name, executable_path=self.executable_path)
        self.driver.driver.set_window_size(1400, 1000)
        self.login()    # 此Login指上面的login函数
        # sleep(1)
        self.driver.visit(self.ticket_url)  # 打开12306界面
        try:
            print(u"购票页面开始...")
            # sleep(1)
            # 加载查询信息
            self.driver.cookies.add({"_jc_save_fromStation": self.starts})
            self.driver.cookies.add({"_jc_save_toStation": self.ends})
            self.driver.cookies.add({"_jc_save_fromDate": self.dtime})

            self.driver.reload()     # 重新加载cookies

            # 添加车次类型。放在加载之后,因为实测发现比如勾选"GC-高铁/城际"checkbox后,什么都不干页面就会自动变化
            l = ['GC-高铁/城际', 'D-动车']  # 在列表里可以去掉不需要的车次类型
            for i in l:
                btn = self.driver.find_by_text(i)
                btn.click()

            i = 0   # 上面的for循环使用了i,这里如果不清零,下面因为也用到了i,会报错。
            count = 0
            if self.order != 0:
                while self.driver.url == self.ticket_url:   # 判断是否成功跳转到目标页面
                    self.driver.find_by_text(u"查询").click()
                    count += 1
                    print(u"循环点击查询... 第 %s 次" % count)
                    # sleep(1)
                    try:
                        self.driver.find_by_text(u"预订")[self.order - 1].click()
                    except Exception as e:
                        print(e)
                        print(u"还没开始预订")
                        continue
            else:
                while self.driver.url == self.ticket_url:
                    self.driver.find_by_text(u"查询").click()
                    count += 1
                    print(u"循环点击查询... 第 %s 次" % count)
                    # sleep(0.8)
                    try:
                        for i in self.driver.find_by_text(u"预订"):
                            i.click()
                            sleep(1)
                    except Exception as e:
                        print(e)
                        print(u"还没开始预订 %s")
                        continue
            print(u"开始预订...")
            # sleep(3)
            # self.driver.reload()
            sleep(1)
            print(u'开始选择用户...')
            for user in self.users:
                self.driver.find_by_text(user).last.click()

            print(u"提交订单...")
            sleep(1)
            # self.driver.find_by_text(self.pz).click()
            # self.driver.find_by_id('').select(self.pz)
            # # sleep(1)
            # self.driver.find_by_text(self.xb).click()
            # sleep(1)
            self.driver.find_by_id('submitOrder_id').click()
            # print u"开始选座..."
            # self.driver.find_by_id('1D').last.click()
            # self.driver.find_by_id('1F').last.click()

            sleep(1.5)
            print(u"确认选座...")
            self.driver.find_by_id('qr_submit_id').click()

            # 连续发出提示音
            while True:
                winsound.Beep(300, 1000)
        except Exception as e:
            print(e)


cities = {'成都': '%u6210%u90FD%2CCDW',
          '重庆': '%u91CD%u5E86%2CCQW',
          '北京': '%u5317%u4EAC%2CBJP',
          '广州': '%u5E7F%u5DDE%2CGZQ',
          '杭州': '%u676D%u5DDE%2CHZH',
          '宜昌': '%u5B9C%u660C%2CYCN',
          '郑州': '%u90D1%u5DDE%2CZZF',
          '深圳': '%u6DF1%u5733%2CSZQ',
          '西安': '%u897F%u5B89%2CXAY',
          '大连': '%u5927%u8FDE%2CDLT',
          '武汉': '%u6B66%u6C49%2CWHN',
          '上海': '%u4E0A%u6D77%2CSHH',
          '麻城': '%u9EBB%u57CE%2CMCN',
          '临沂': '%u4E34%u6C82%2CLVK',
          '驻马店西': '%u9A7B%u9A6C%u5E97%u897F%2CZLN'}

if __name__ == '__main__':
    huoche = huoche()
    #huoche.starts = cities[sys.argv[1]]
    #huoche.ends = cities[sys.argv[2]]
    #huoche.dtime = sys.argv[3]
    huoche.start()