与上一篇一样新建SpringBoot项目,


点击finsh完成创建服务消费者项目,将上一篇中的SpringCloud的依赖复制添加进这里的pom.xml中
pom.xml
<?xml version="1.0" encoding="UTF-8"?>
<project xmlns="http://maven.apache.org/POM/4.0.0"
	xmlns:xsi="http://www.w3.org/2001/XMLSchema-instance"
	xsi:schemaLocation="http://maven.apache.org/POM/4.0.0 http://maven.apache.org/xsd/maven-4.0.0.xsd">
	<modelVersion>4.0.0</modelVersion>
	<parent>
		<groupId>org.springframework.boot</groupId>
		<artifactId>spring-boot-starter-parent</artifactId>
		<version>1.5.19.BUILD-SNAPSHOT</version>
		<relativePath /> <!-- lookup parent from repository -->
	</parent>
	<groupId>com.lyl.cloud</groupId>
	<artifactId>provider-consumer</artifactId>
	<version>0.0.1-SNAPSHOT</version>
	<name>provider-consumer</name>
	<description>Demo project for Spring Boot</description>

	<properties>
		<java.version>1.8</java.version>
	</properties>

	<dependencies>
		<dependency>
			<groupId>org.springframework.boot</groupId>
			<artifactId>spring-boot-starter-web</artifactId>
		</dependency>

		<dependency>
			<groupId>org.springframework.boot</groupId>
			<artifactId>spring-boot-starter-test</artifactId>
			<scope>test</scope>
		</dependency>
	</dependencies>

	<build>
		<plugins>
			<plugin>
				<groupId>org.springframework.boot</groupId>
				<artifactId>spring-boot-maven-plugin</artifactId>
			</plugin>
		</plugins>
	</build>

	<!-- springcloud的依赖 -->
	<dependencyManagement>
		<dependencies>
			<dependency>
				<groupId>org.springframework.cloud</groupId>
				<artifactId>spring-cloud-dependencies</artifactId>
				<version>Finchley.M7</version>
				<type>pom</type>
				<scope>import</scope>
			</dependency>
		</dependencies>
	</dependencyManagement>


	<repositories>
		<repository>
			<id>spring-snapshots</id>
			<name>Spring Snapshots</name>
			<url>https://repo.spring.io/snapshot</url>
			<snapshots>
				<enabled>true</enabled>
			</snapshots>
		</repository>
		<repository>
			<id>spring-milestones</id>
			<name>Spring Milestones</name>
			<url>https://repo.spring.io/milestone</url>
		</repository>
	</repositories>
	<pluginRepositories>
		<pluginRepository>
			<id>spring-snapshots</id>
			<name>Spring Snapshots</name>
			<url>https://repo.spring.io/snapshot</url>
			<snapshots>
				<enabled>true</enabled>
			</snapshots>
		</pluginRepository>
		<pluginRepository>
			<id>spring-milestones</id>
			<name>Spring Milestones</name>
			<url>https://repo.spring.io/milestone</url>
		</pluginRepository>
	</pluginRepositories>

</project>
新建实体类
package com.lyl.cloud.entity;

import java.math.BigDecimal;

public class User {

	private Long id;
	private String username;
	private String name;
	private Integer age;
	private BigDecimal balance;

	public Long getId() {
		return id;
	}

	public void setId(Long id) {
		this.id = id;
	}

	public String getUsername() {
		return username;
	}

	public void setUsername(String username) {
		this.username = username;
	}

	public String getName() {
		return name;
	}

	public void setName(String name) {
		this.name = name;
	}

	public Integer getAge() {
		return age;
	}

	public void setAge(Integer age) {
		this.age = age;
	}

	public BigDecimal getBalance() {
		return balance;
	}

	public void setBalance(BigDecimal balance) {
		this.balance = balance;
	}

	@Override
	public String toString() {
		return "User [id=" + id + ", username=" + username + ", name=" + name + ", age=" + age + ", balance=" + balance
				+ "]";
	}

}
在启动类上实例化RestTemplate类
ProviderConsumerApplication.java
package com.lyl.cloud;

import org.springframework.boot.SpringApplication;
import org.springframework.boot.autoconfigure.SpringBootApplication;
import org.springframework.context.annotation.Bean;
import org.springframework.web.client.RestTemplate;

@SpringBootApplication
public class ProviderConsumerApplication {

	/**
	 * 实例化一个Bean,并使用该方法的名称命名
	 * 等同于=
	 * RestTemplate restTemplate = new RestTemplate();
	 * @return
	 */
	@Bean
	public RestTemplate restTemplate() {
		return new RestTemplate();
	}

	public static void main(String[] args) {
		SpringApplication.run(ProviderConsumerApplication.class, args);
	}

}
ConsumerController.java
package com.lyl.cloud.controller;

import org.springframework.beans.factory.annotation.Autowired;
import org.springframework.web.bind.annotation.GetMapping;
import org.springframework.web.bind.annotation.PathVariable;
import org.springframework.web.bind.annotation.RestController;
import org.springframework.web.client.RestTemplate;

import com.lyl.cloud.entity.User;

@RestController
public class ConsumerController {

	@Autowired
	private RestTemplate restTemplate;

	@GetMapping("/user/{id}")
	public User findById(@PathVariable Long id) {
		return this.restTemplate.getForObject("http://localhost:8000/"+id,User.class);
	}
}
接着配置项目的server.port设为8010
server.port=8010首先启动服务提供者Provider-user项目,然后启动消费者provider-consumer项目


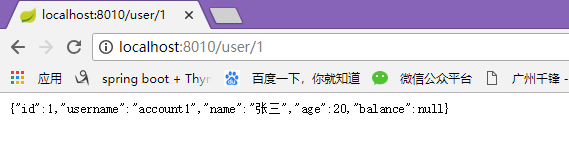
然后在浏览器上输入localhost:8010/user/1,出现数据成功