转载请注明出处,本文来自【 Mr.Simple的博客 】。
前言
自从支付宝声波支付的波纹效果出来以后,这种形式就慢慢流行开来,比如各种安全软件在扫描时会采用这种动画效果,这种波纹荡漾起来也是增加了动感十足呢,如图1。
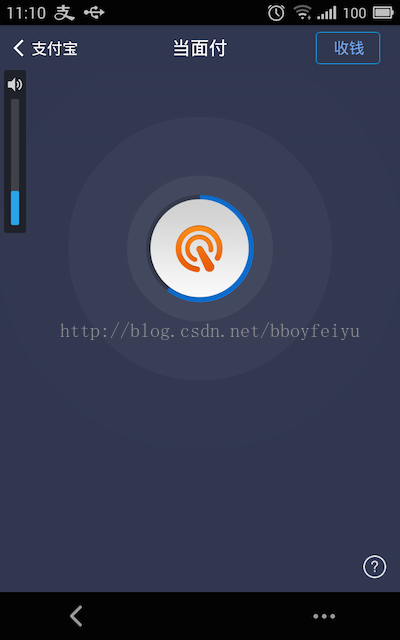
图1
今天我们就来学习如何实现这种波纹效果,以及最大限度的支持低版本的系统。
波纹实现
看到这种效果,最直接的感官就是波纹视图慢慢的变大、并且颜色变淡,因此我在第一次摸索的过程中直接继承自View,然后开启一个线程来计算这个视图的此时的大小以及颜色值,效果可以出来,但是有点卡。后面搜索了一些资料,发现有更好的方式可以实现。
新的方式就是使用属性动画,但是属性动画在api 11及其以上才支持,因此这里我们使用了NineOldAnimations动画库。基本原理就是自定义一个布局,在这个布局中会添加几个背景视图,也就是上述效果中的圆形视图,然后用户再指定一个自己的视图,如上如中的支付按钮。当用户点击支付按钮时,启动动画。此时,几个背景视图就会执行一个属性动画集,这些背景视图的x, y轴都会放大,同时视图的alpha属性会慢慢的变小。这样就产生了视图变大、颜色慢慢淡化的效果,如图2所示。
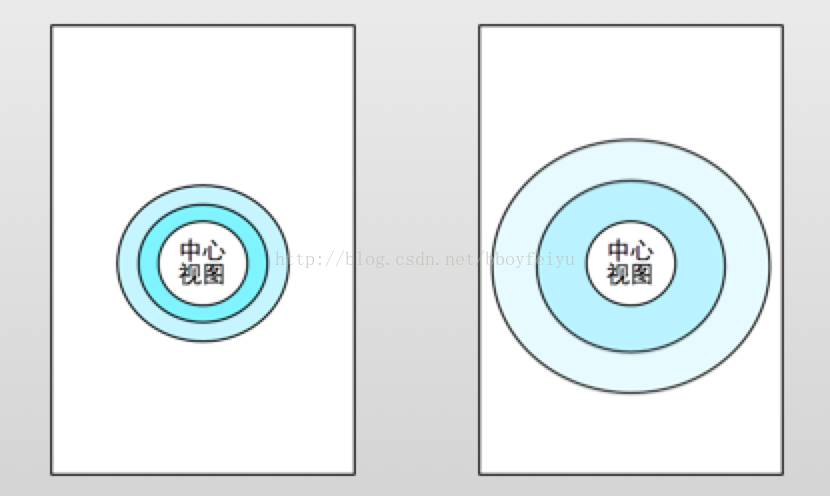
图 2
代码实现 :
/* * The MIT License (MIT) * * Copyright (c) 2014-2015 [email protected] * * Permission is hereby granted, free of charge, to any person obtaining a copy * of this software and associated documentation files (the "Software"), to deal * in the Software without restriction, including without limitation the rights * to use, copy, modify, merge, publish, distribute, sublicense, and/or sell * copies of the Software, and to permit persons to whom the Software is * furnished to do so, subject to the following conditions: * * The above copyright notice and this permission notice shall be included in * all copies or substantial portions of the Software. * * THE SOFTWARE IS PROVIDED "AS IS", WITHOUT WARRANTY OF ANY KIND, EXPRESS OR * IMPLIED, INCLUDING BUT NOT LIMITED TO THE WARRANTIES OF MERCHANTABILITY, * FITNESS FOR A PARTICULAR PURPOSE AND NONINFRINGEMENT. IN NO EVENT SHALL THE * AUTHORS OR COPYRIGHT HOLDERS BE LIABLE FOR ANY CLAIM, DAMAGES OR OTHER * LIABILITY, WHETHER IN AN ACTION OF CONTRACT, TORT OR OTHERWISE, ARISING FROM, * OUT OF OR IN CONNECTION WITH THE SOFTWARE OR THE USE OR OTHER DEALINGS IN * THE SOFTWARE. */package org.simple.ripple;import android.content.Context;import android.content.res.TypedArray;import android.graphics.Canvas;import android.graphics.Color;import android.graphics.Paint;import android.util.AttributeSet;import android.view.View;import android.view.animation.AccelerateDecelerateInterpolator;import android.widget.RelativeLayout;import com.nineoldandroids.animation.Animator;import com.nineoldandroids.animation.AnimatorSet;import com.nineoldandroids.animation.ObjectAnimator;import org.simple.ripplelayout.R;import java.util.ArrayList;/** * 这是一个类似支付宝声波支付的波纹效果布局,该布局中默认添加了不可见的圆形的视图,启动动画时会启动缩放、颜色渐变动画使得产生波纹效果. * 这些动画都是无限循环的,并且每个View的动画之间都有时间间隔,这些时间间隔就会导致视图有大有小,从而产生波纹的效果. * * @author mrsimple */public class RippleLayout extends RelativeLayout { /** * static final fields */ private static final int DEFAULT_RIPPLE_COUNT = 6; private static final int DEFAULT_DURATION_TIME = 3000; private static final float DEFAULT_SCALE = 4.0f; private static final int DEFAULT_RIPPLE_COLOR = Color.rgb(0x33, 0x99, 0xcc); private static final int DEFAULT_STROKE_WIDTH = 0; private static final int DEFAULT_RADIUS = 60; /** * */ private int mRippleColor = DEFAULT_RIPPLE_COLOR; private float mStrokeWidth = DEFAULT_STROKE_WIDTH; private float mRippleRadius = DEFAULT_RADIUS; private int mAnimDuration; private int mRippleViewNums; private int mAnimDelay; private float mRippleScale; private boolean animationRunning = false; /** * */ private Paint mPaint = new Paint(); /** * 动画集,执行缩放、alpha动画,使得背景色渐变 */ private AnimatorSet mAnimatorSet = new AnimatorSet(); /** * 动画列表,保存几个动画 */ private ArrayList<Animator> mAnimatorList = new ArrayList<Animator>(); /** * RippleView Params */ private LayoutParams mRippleViewParams; /** * @param context */ public RippleLayout(Context context) { super(context); init(context, null); } public RippleLayout(Context context, AttributeSet attrs) { super(context, attrs); init(context, attrs); } public RippleLayout(Context context, AttributeSet attrs, int defStyleAttr) { super(context, attrs, defStyleAttr); init(context, attrs); } private void init(final Context context, final AttributeSet attrs) { if (isInEditMode()) { return; } if (null != attrs) { initTypedArray(context, attrs); } initPaint(); initRippleViewLayoutParams(); generateRippleViews(); } private void initTypedArray(Context context, AttributeSet attrs) { final TypedArray typedArray = context.obtainStyledAttributes(attrs, R.styleable.RippleLayout); // mRippleColor = typedArray.getColor(R.styleable.RippleLayout_color, DEFAULT_RIPPLE_COLOR); mStrokeWidth = typedArray.getDimension(R.styleable.RippleLayout_strokeWidth, DEFAULT_STROKE_WIDTH); mRippleRadius = typedArray.getDimension(R.styleable.RippleLayout_radius, DEFAULT_RADIUS); mAnimDuration = typedArray.getInt(R.styleable.RippleLayout_duration, DEFAULT_DURATION_TIME); mRippleViewNums = typedArray.getInt(R.styleable.RippleLayout_rippleNums, DEFAULT_RIPPLE_COUNT); mRippleScale = typedArray.getFloat(R.styleable.RippleLayout_scale, DEFAULT_SCALE); // oh, baby, don't forget recycle the typedArray !! typedArray.recycle(); } private void initPaint() { mPaint = new Paint(); mPaint.setAntiAlias(true); mStrokeWidth = 0; mPaint.setStyle(Paint.Style.FILL); mPaint.setColor(mRippleColor); } private void initRippleViewLayoutParams() { // ripple view的大小为 半径 + 笔宽的两倍 int rippleSide = (int) (2 * (mRippleRadius + mStrokeWidth)); mRippleViewParams = new LayoutParams(rippleSide, rippleSide); // 居中显示 mRippleViewParams.addRule(CENTER_IN_PARENT, TRUE); } /** * 计算每个RippleView之间的动画时间间隔,从而产生波纹效果 */ private void calculateAnimDelay() { mAnimDelay = mAnimDuration / mRippleViewNums; } /** * 初始化RippleViews,并且将动画设置到RippleView上,使之在x, y不断扩大,并且背景色逐渐淡化 */ private void generateRippleViews() { calculateAnimDelay(); initAnimSet(); // 添加RippleView for (int i = 0; i < mRippleViewNums; i++) { RippleView rippleView = new RippleView(getContext()); addView(rippleView, mRippleViewParams); // 添加动画 addAnimToRippleView(rippleView, i); } // x, y, alpha动画一块执行 mAnimatorSet.playTogether(mAnimatorList); } private void initAnimSet() { mAnimatorSet.setDuration(mAnimDuration); mAnimatorSet.setInterpolator(new AccelerateDecelerateInterpolator()); } /** * 为每个RippleView添加动画效果,并且设置动画延时,每个视图启动动画的时间不同,就会产生波纹 * * @param rippleView * @param i 视图所在的索引 */ private void addAnimToRippleView(RippleView rippleView, int i) { // x轴的缩放动画 final ObjectAnimator scaleXAnimator = ObjectAnimator.ofFloat(rippleView, "scaleX", 1.0f, mRippleScale); scaleXAnimator.setRepeatCount(ObjectAnimator.INFINITE); scaleXAnimator.setRepeatMode(ObjectAnimator.RESTART); scaleXAnimator.setStartDelay(i * mAnimDelay); scaleXAnimator.setDuration(mAnimDuration); mAnimatorList.add(scaleXAnimator); // y轴的缩放动画 final ObjectAnimator scaleYAnimator = ObjectAnimator.ofFloat(rippleView, "scaleY", 1.0f, mRippleScale); scaleYAnimator.setRepeatMode(ObjectAnimator.RESTART); scaleYAnimator.setRepeatCount(ObjectAnimator.INFINITE); scaleYAnimator.setStartDelay(i * mAnimDelay); scaleYAnimator.setDuration(mAnimDuration); mAnimatorList.add(scaleYAnimator); // 颜色的alpha渐变动画 final ObjectAnimator alphaAnimator = ObjectAnimator.ofFloat(rippleView, "alpha", 1.0f, 0f); alphaAnimator.setRepeatMode(ObjectAnimator.RESTART); alphaAnimator.setRepeatCount(ObjectAnimator.INFINITE); alphaAnimator.setDuration(mAnimDuration); alphaAnimator.setStartDelay(i * mAnimDelay); mAnimatorList.add(alphaAnimator); } public void startRippleAnimation() { if (!isRippleAnimationRunning()) { makeRippleViewsVisible(); mAnimatorSet.start(); animationRunning = true; } } private void makeRippleViewsVisible() { int childCount = this.getChildCount(); for (int i = 0; i < childCount; i++) { View childView = this.getChildAt(i); if (childView instanceof RippleView) { childView.setVisibility(VISIBLE); } } } public void stopRippleAnimation() { if (isRippleAnimationRunning()) { mAnimatorSet.end(); animationRunning = false; } } public boolean isRippleAnimationRunning() { return animationRunning; } /** * RippleView产生波纹效果, 默认不可见,当启动动画时才设置为可见 * * @author mrsimple */ private class RippleView extends View { public RippleView(Context context) { super(context); this.setVisibility(View.INVISIBLE); } @Override protected void onDraw(Canvas canvas) { int radius = (Math.min(getWidth(), getHeight())) / 2; canvas.drawCircle(radius, radius, radius - mStrokeWidth, mPaint); } }}自定义属性 attrs.xml:
<?xml version="1.0" encoding="utf-8"?><resources> <declare-styleable name="RippleLayout"> <attr name="color" format="color" /> <attr name="strokeWidth" format="dimension" /> <attr name="radius" format="dimension" /> <attr name="duration" format="integer" /> <attr name="rippleNums" format="integer" /> <attr name="scale" format="float" /> </declare-styleable></resources>NineOldAnimations动画库
使用示例
从github clone一份或者将上述代码和attrs.xml拷贝到你的工程中,在布局文件中添加如下:
<org.simple.ripple.RippleLayout xmlns:ripple="http://schemas.android.com/apk/org.simple.ripplelayout" android:id="@+id/ripple_layout" android:layout_width="match_parent" android:layout_height="match_parent" ripple:duration="3000" ripple:radius="32dp" ripple:rippleNums="1" ripple:scale="4" ripple:color="#8899CC" > <ImageView android:id="@+id/centerImage" android:layout_width="64dp" android:layout_height="64dp" android:layout_centerInParent="true" android:contentDescription="@string/app_name" android:src="@drawable/phone2" /> </org.simple.ripple.RippleLayout>注意,这里引入了xmlns:ripple,也就是自定义RippleLayout属性生成的R的包路径.
代码中启动动画:
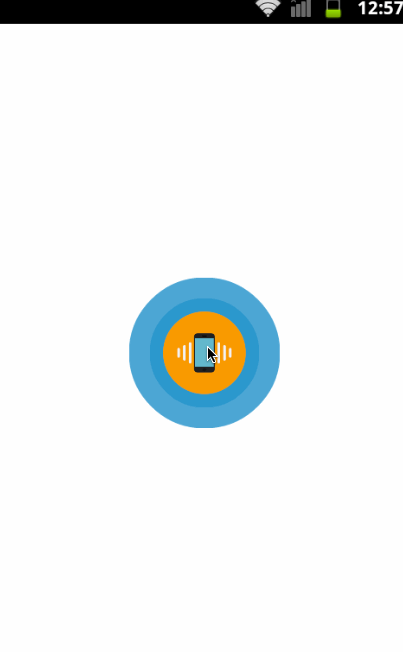
ImageView imageview; RippleLayout layout; @Override protected void onCreate(Bundle savedInstanceState) { super.onCreate(savedInstanceState); setContentView(R.layout.activity_main); layout = (RippleLayout) findViewById(R.id.ripple_layout); imageview = (ImageView) findViewById(R.id.centerImage); imageview.setOnClickListener(new OnClickListener() { @Override public void onClick(View v) { if (layout.isRippleAnimationRunning()) { layout.stopRippleAnimation(); } else { layout.startRippleAnimation(); } } }); }效果图
github地址
我正在参加博客之星,点击这里投我一票吧,谢谢~
再分享一下我老师大神的人工智能教程吧。零基础!通俗易懂!风趣幽默!还带黄段子!希望你也加入到我们人工智能的队伍中来!https://blog.csdn.net/jiangjunshow