Tensorflow 程序读取数据一共有3种方法:
- 供给数据(feeding):在程序运行的每一步,让Python代码来供给数据
- 从文件读取数据: 让一个输入管线从文件中读取数据
- 预加载数据:在tensorflow图中定义常量或变量来保存所有数据(适用于数据量小的时候)
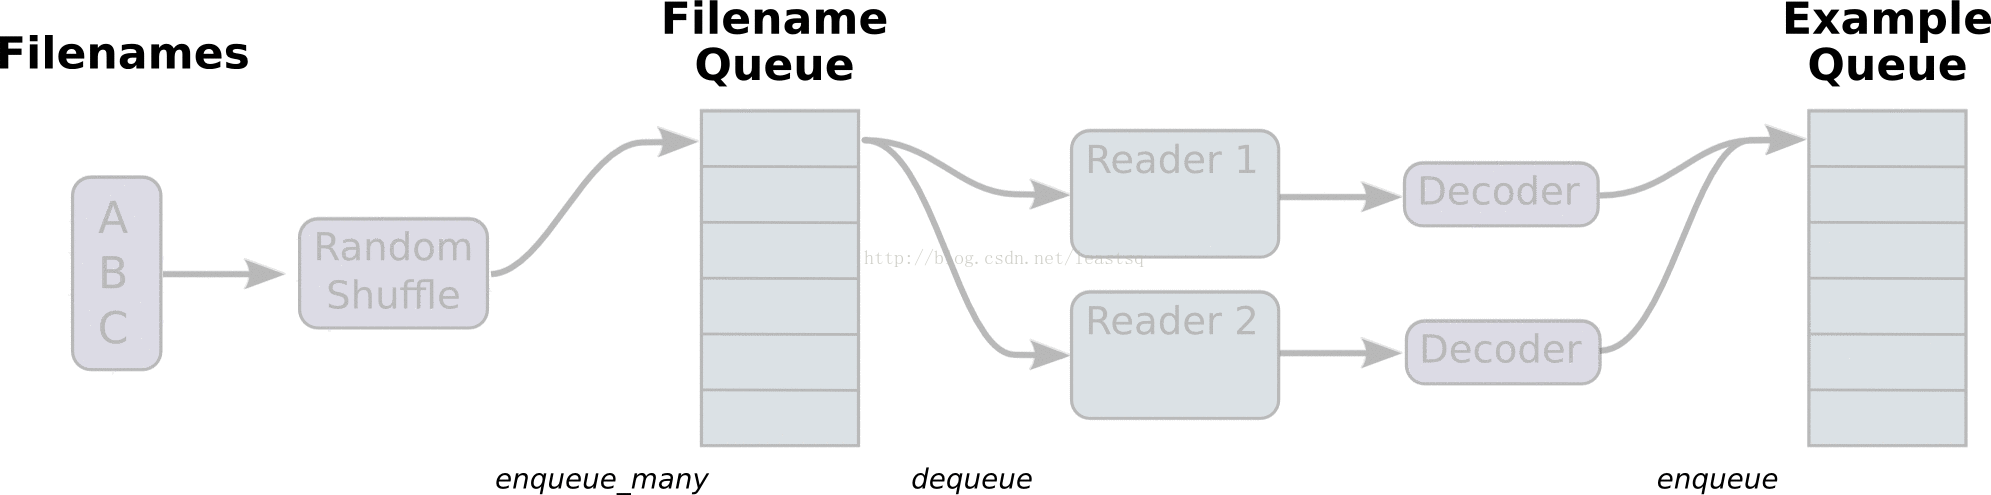
一个典型的文件读取管线会包含下面这些步骤:
- 文件名列表
- 可配置的 文件名乱序(shuffling)
- 可配置的 最大训练迭代数(epoch limit)
- 文件名队列
- 针对输入文件格式的阅读器
- 纪录解析器
- 可配置的预处理器
- 样本队列
1.得到文件名列表
- filenames=[os.path.join(data_dir,'data_batch_%d.bin'%i) for i in range(1,6)]
- for f in filenames:
- if not tf.gfile.Exists(f):
- raise ValueError('Failed to find file: '+ f)
此处用list表示文件名列表,然后依次检验文件是否存在,以抛出异常
2.将文件名列表交给tf.train.string_input_producer函数,得到一个先入先出的队列(Queue),文件阅读器会需要它来读取数据
其中可配置参数中有shuffle,是bool值,判断要不要用乱序操作
扫描二维码关注公众号,回复:
5009529 查看本文章

- filename_queue=tf.train.string_input_producer(filenames)
3.得到文件名队列后,针对输入文件格式,创建阅读器进行读取
例如:若从CSV文件中读取数据,需要使用TextLineReader和decode_csv来进行读取和解码
若是CIFAR-10 dataset文件,因为每条记录的长度固定,一个字节的标签+3072像素数据
所以此处采用FixedLengthRecordReader()和decode_raw来进行读取和解码
每次read的执行都会从文件中读取一行内容, decode_csv 操作会解析这一行内容并将其转为张量列表。如果输入的参数有缺失,record_default参数可以根据张量的类型来设置默认值。
在调用run或者eval去执行read之前, 你必须调用tf.train.start_queue_runners来将文件名填充到队列。否则read操作会被阻塞到文件名队列中有值为止。(程序挂起就死掉了,只能强制结束进程)
tf.transpose 将张量的维度变化 ,
1.tensorflow 里面的 tensor是先从高维向低维算起的
比如:’x’ is [[[1 2 3]
[4 5 6]]
[[7 8 9]
[10 11 12]]]
x的维数就是[2,2,3]
而perm的意思就是将tensor对应的不同的维数之间变换
比如perm = [2,1,0],则原tensor = [3, 2,2],全部倒过来
perm = [0,2,1],则原tensor = [2,3,2], 后两维置换
tf.transpose(x, perm=[0, 2, 1]) ==>
[[[1 4]
[2 5]
[3 6]]
[[7 10]
[8 11]
[9 12]]]
而不是
[[[1 3 2]
[4 6 5]]
[[7 9 8]
[10 12 11]]]
本例中将读取数据单独写到一个函数中
- <strong>def read_cifar10(filename_queue):</strong>
-
-
-
-
-
-
-
-
-
-
-
-
-
-
- class CIFAR10Record:
- pass
- result=CIFAR10Record()
-
- label_bytes=1
- result.height=32
- result.width=32
- result.depth=3
- image_bytes=result.height*result.width*result.depth
-
- record_bytes=label_bytes+image_bytes
-
-
- reader=tf.FixedLengthRecordReader(record_bytes=record_bytes)
- result.key,value=reader.read(filename_queue)
- <span style="white-space:pre"> </span>
-
- record_bytes=tf.decode_raw(value,tf.uint8)
-
-
- result.label=tf.cast(tf.strided_slice(record_bytes,[0],[label_bytes]),tf.int32)
-
-
- depth_major=tf.reshape(tf.strided_slice(record_bytes,[label_bytes],[label_bytes+image_bytes]),[result.depth,result.height,result.width])
-
-
- result.uint8image=tf.transpose(depth_major,[1,2,0])
- return result
read_cifar10返回了一个训练样本,包括result.label和reaule.uint8image两个数据成员
4.预处理
针对输入进来的一个样本,进行的预处理可以使加噪,添加失真,翻转等
- read_input=read_cifar10(filename_queue)
- reshaped_image=tf.cast(read_input.uint8image,tf.float32)
- height=IMAGE_SIZE
- width=IMAGE_SIZE
-
-
-
-
- distorted_image=tf.random_crop(reshaped_image,[height,width,3])
-
-
- distorted_image=tf.image.random_flip_left_right(distorted_image)
- #在图片的RGB加上一个随机的delta,delta<=max_dalta
- distorted_image=tf.image.random_brightness(distorted_image,max_delta=63)
- #contrast就是对图片的RGB三个channel,分别算出整张图片的mean,然后分别对相应channel的每一个像素做
- #x = (x-mean) * contrast_factor + mean 其中对于random_contrast函数,contrast_factor随机取自
- #[lower, upper]
- distorted_image=tf.image.random_contrast(distorted_image,lower=0.2,upper=1.8)
-
-
- float_image=tf.image.per_image_standardization(distorted_image)
-
-
- float_image.set_shape([height,width,3])
- read_input.label.set_shape([1])
-
-
- min_fraction_of_examples_in_queue=0.4
- min_queue_examples= int(NUM_EXAMPLES_PER_EPOCH_FOR_TRAIN* min_fraction_of_examples_in_queue)
- print('Filling queue with %d CIFAR images before starting to train.'% min_queue_examples+'This will take a few minutes.')
-
-
- return _generate_image_and_label_batch(float_image,read_input.label,min_queue_examples,batch_size,shuffle=True)
5.得到样本队列
在数据输入管线的末端,我们需要有另一个队列来执行输入样本的training, evaluation, inference,要对样本进行批处理
所以使用tf.train.shuffle_batch函数用16个不同的reader读到的样本组成batch返回
- def _generate_image_and_label_batch(image,label,min_queue_examples,batch_size,shuffle):
-
-
-
-
-
-
-
-
-
-
-
-
-
- <strong> num_preprocess_threads=16</strong>
-
-
-
-
-
- if shuffle:
-
- images,label_batch=tf.train.shuffle_batch(
- [image,label],
- batch_size=batch_size,
- num_threads=num_preprocess_threads,
- capacity=min_queue_examples+3*batch_size,
- min_after_dequeue=min_queue_examples)
-
-
- else:
- images,label_batch=tf.train.batch(
- [image,label],
- batch_size=batch_size,
- num_threads=num_preprocess_threads,
- capacity=min_queue_examples+3*batch_size)
-
- tf.summary.image('images',images)
- return images,tf.reshape(label_batch,[batch_size])
线程和队列
队列就是tensorFlow图中的节点,这是一种有状态的节点,就像变量一样,其他节点可以修改它的内容。
具体来说,其他节点可以把新元素插入到队列后端(rear),也可以把前端元素删除
队列的使用:
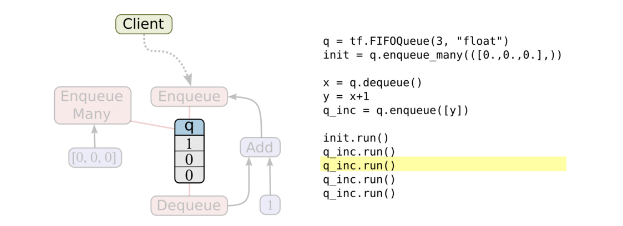
队列类型有先进先出(FIFO Queue),或者是随机的(RandomShuffleQueue)
FIFO Que
创建一个先进先出队列,以及一个“出队,+1,入队”操作:
- import tensorflow as tf
-
-
- q = tf.FIFOQueue(3, "float")
- init = q.enqueue_many(([0.1, 0.2, 0.3],))
- x = q.dequeue()
- y = x + 1
- q_inc = q.enqueue([y])
-
-
- with tf.Session() as sess:
- sess.run(init)
-
- for i in range(2):
- sess.run(q_inc)
-
- quelen = sess.run(q.size())
- for i in range(quelen):
- print (sess.run(q.dequeue()))
输出结果:
0.3
1.1
1.2
注意先入先出的规则!
一个典型的输入结构:是使用一个RandomShuffleQueue来作为模型训练的输入,多个线程准备训练样本,并且把这些样本推入队列,一个训练线程执行一个训练操作,此操作会从队列中移出最小批次的样本(mini-batches)
之前的例子中,入队操作都在主线程中进行,Session中可以多个线程一起运行。 在数据输入的应用场景中,入队操作从硬盘上读取输入,放到内存当中,速度较慢。 使用QueueRunner可以创建一系列新的线程进行入队操作,让主线程继续使用数据。如果在训练神经网络的场景中,就是训练网络和读取数据是异步的,主线程在训练网络,另一个线程在将数据从硬盘读入内存。
再举一个例子:
- import tensorflow as tf
- import sys
-
- q=tf.FIFOQueue(1000,"float")
-
- counter=tf.Variable(0.0)
-
- increment_op=tf.assign_add(counter,tf.constant(1.0))
-
- enqueue_op=q.enqueue(counter)
-
-
- qr=tf.train.QueueRunner(q,enqueue_ops=[increment_op,enqueue_op]*1)
-
-
- sess=tf.Session()
- sess.run(tf.global_variables_initializer())
- enqueue_threads=qr.create_threads(sess,start=True)
-
-
- for i in range(0,5):
- print(sess.run(q.dequeue()))
结果是:2.0
172.0
225.0
272.0
367.0
并不是如普通计数器一样的1,2,3,4,5,原因就是+1操作和入队操作不同步!可能+1操作执行了很多次之后,才会进行一次入队操作,并且出队结束后,本应程序要结束,但是因为入队线程没有显示结束,所以,整个程序就跟挂起一样,也结束不了。
Tensorflow 的session对象是支持多线程的,因此多个线程可以很方便地使用同一个会话(session),并且并行地执行操作。
然而,在Python程序实现并行运算并不容易,所有线程都必须被同步终止,异常必须能被正常地捕获并报告,会话终止的时候,队列必须能被正确地关闭。
所幸TensorFlow提供了两个类来帮助多线程的实现:tf.Coordinator和 tf.QueueRunner。从设计上这两个类必须被一起使用。Coordinator类可以用来同时停止多个工作线程并且向那个在等待所有工作线程终止的程序报告异常。QueueRunner类用来协调多个工作线程同时将多个张量推入同一个队列中。
使用tf.train.Coordinator来终止其他线程,Coordinator类主要有如下几个方法:
- should_stop():如果线程应该停止则返回True
- request_stop(<exception>):请求该线程停止
- join(<list of threads>):等待被指定的线程终止
加入Coordinator后上述例子变为:
- import tensorflow as tf
- import sys
-
- q=tf.FIFOQueue(1000,"float")
-
- counter=tf.Variable(0.0)
-
- increment_op=tf.assign_add(counter,tf.constant(1.0))
-
- enqueue_op=q.enqueue(counter)
-
-
- qr=tf.train.QueueRunner(q,enqueue_ops=[increment_op,enqueue_op]*1)
-
-
- sess=tf.Session()
- sess.run(tf.global_variables_initializer())
- coord=tf.train.Coordinator()
- enqueue_threads=qr.create_threads(sess,coord=coord,start=True)
-
-
- for i in range(0,5):
- print(sess.run(q.dequeue()))
-
- coord.request_stop()
- coord.join(enqueue_threads)
返回结果为:3.0
28.0
48.0
73.0
94.0