版权声明:本文为博主原创文章,未经博主允许不得转载。 https://blog.csdn.net/rl529014/article/details/51590317
Qt:可扩展对话框的实现
1、可扩展对话框通常用于用户对界面有区分的场合,通常情况下,只出现基本界面;当有高级应用或者需要更多的信息时,通过某种方式的切换,才显示完整的窗体,切换工作通常由一个按钮来实现。
2、切换按钮的实现。整个窗体可扩展的工作都是在此按钮所连接的槽函数中完成的。
3、可扩展对话框的基本实现方法是利用函数setSizeConstraint(QLayout::setFixedSize),是对话框的尺寸保持固定。(在整个对话框的构造函数中调用)
实例
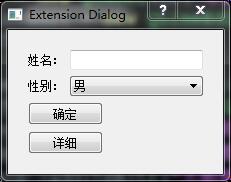
一个简单的资料填写界面。效果图如下:
步骤
- **新建Qt Gui应用,项目名称为“ExtensinDlg”,基类选择“QDialog”,取消”创建界面“复选框,单击下一步,完成新建工程。工程树结构如下:
**
**打开“Dialog.h”头文件,添加如下代码:
   #define DIALOG_H
   #include <QDialog>

class Dialog : public QDialog
{
    Q_OBJECT

public:
    Dialog(QWidget *parent = 0);
    ~Dialog();

private slots:
    void showDetailInfo();

private:
    void createBaseInfo();
    void createDetailInfo();
    QWidget *baseWidget;
    QWidget *detailWidget;
};
#endif // DIALOG_H- 打开“Dialog.cpp”文件,添加如下代码:
#include "dialog.h"
#include <QVBoxLayout>
#include <QLabel>
#include <QLineEdit>
#include <QComboBox>
#include <QPushButton>
#include <QDialogButtonBox>
#include <QHBoxLayout>

Dialog::Dialog(QWidget *parent)
    : QDialog(parent)
{
    setWindowTitle(tr("Extension Dialog"));
    createBaseInfo();
    createDetailInfo();

    //QHBoxLayout *layout = new QHBoxLayout(this);    //水平布局
    QVBoxLayout *layout = new QVBoxLayout(this);    //垂直布局
    layout->addWidget(baseWidget);
    layout->addWidget(detailWidget);
    layout->setSizeConstraint(QLayout::SetFixedSize);   //设定其为固定的大小
    layout->setSpacing(10);
}

void Dialog::createBaseInfo()
{
    baseWidget = new QWidget;

    QLabel *nameLabel = new QLabel(tr("姓名:"));
    QLineEdit *nameLineEdit = new QLineEdit;

    QLabel *sexLabel = new QLabel(tr("性别:"));
    QComboBox *sexComboBox = new QComboBox;
    sexComboBox->insertItem(0,tr("男"));
    sexComboBox->insertItem(1,tr("女"));
    sexComboBox->insertItem(2,tr("不男不女"));

    QGridLayout *leftLayout = new QGridLayout;
    leftLayout->addWidget(nameLabel,0,0);
    leftLayout->addWidget(nameLineEdit,0,1);
    leftLayout->addWidget(sexLabel,1,0);
    leftLayout->addWidget(sexComboBox,1,1);

    QPushButton *okBtn = new QPushButton(tr("确定"));
    QPushButton *detailBtn = new QPushButton(tr("详细"));
    QDialogButtonBox *dlgBtnBox = new QDialogButtonBox(Qt::Vertical);
    dlgBtnBox->addButton(okBtn, QDialogButtonBox::ActionRole);
    dlgBtnBox->addButton(detailBtn, QDialogButtonBox::ActionRole);

    QVBoxLayout *mainLayout = new QVBoxLayout(baseWidget);

   // QHBoxLayout *mainLayout = new QHBoxLayout(baseWidget);
    mainLayout->addLayout(leftLayout);
    mainLayout->addWidget(dlgBtnBox);
    connect(detailBtn,SIGNAL(clicked(bool)),this,SLOT(showDetailInfo()));
}

void Dialog::createDetailInfo()
{
    detailWidget = new QWidget;
    QLabel *ageLabel = new QLabel(tr("年龄: "));
    QLineEdit *ageLineEdit = new QLineEdit;
    ageLineEdit->setText(tr("30"));

    QLabel *departmentLabel = new QLabel(tr("部门:"));
    QComboBox *departmentComboBox = new QComboBox;
    departmentComboBox->addItem(tr("高性能计算中心"));
    departmentComboBox->addItem(tr("网络管理中心"));
    departmentComboBox->addItem(tr("大数据与云计算中心"));

    QLabel *emailLabel = new QLabel(tr("Email: "));
    QLineEdit *emailLineEdit = new QLineEdit;

    QGridLayout *mainLayout = new QGridLayout(detailWidget);
    mainLayout->addWidget(ageLabel,0,0);
    mainLayout->addWidget(ageLineEdit,0,1);
    mainLayout->addWidget(departmentLabel,1,0);
    mainLayout->addWidget(departmentComboBox,1,1);
    mainLayout->addWidget(emailLabel,2,0);
    mainLayout->addWidget(emailLineEdit,2,1);

    detailWidget->hide();   //在点击“详细”按钮之前将隐藏窗体
}

void Dialog::showDetailInfo()
{

    if(detailWidget->isHidden())
    {
        detailWidget->show();
    }
    else
    {
        detailWidget->hide();
    }
}

Dialog::~Dialog()
{

}
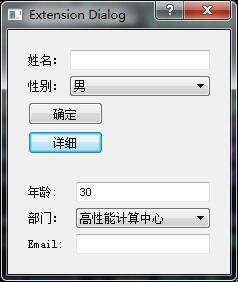
- *此时整个界面的代码就编写完了,运行效果图如下:
