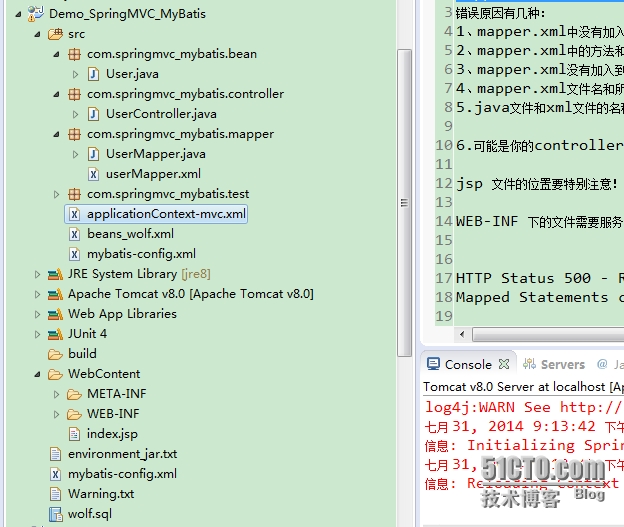
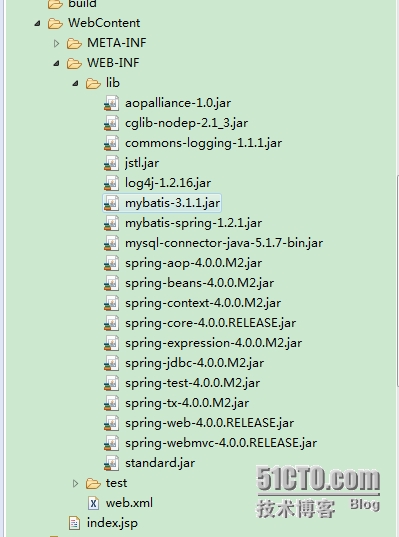
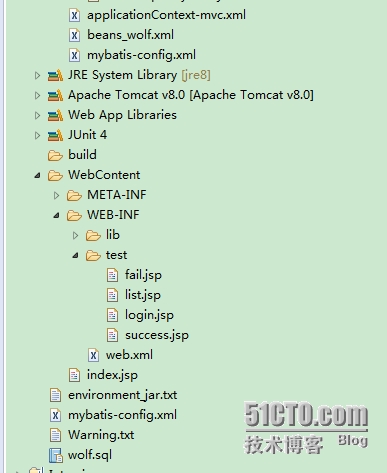
|
1
|
CREATE
DATABASE
wolf;
|
|
1
2
3
4
5
6
|
create
table
user
(
id
int
AUTO_INCREMENT
primary
key
,
name
varchar
(25)
not
null
,
pwd
varchar
(20)
not
null
,
create_time
date
)
|
|
1
2
3
4
|
insert
into
user
(
name
,pwd,create_time)
values
(
"wangxin"
,
"123"
,
"2014-02-14"
);
insert
into
user
(
name
,pwd,create_time)
values
(
"Tom"
,
"123456"
,
"2014-02-14"
);
insert
into
user
(
name
,pwd,create_time)
values
(
"Jack"
,
"123"
,
"2014-02-14"
);
insert
into
user
(
name
,pwd,create_time)
values
(
"Bob"
,
"123"
,
"2014-02-14"
);
|
|
1
2
3
4
5
6
7
8
9
10
11
12
13
14
15
16
17
18
19
20
21
22
23
24
25
26
27
28
29
30
31
32
33
34
35
36
37
38
39
40
41
42
43
44
45
46
47
48
49
50
51
52
53
54
55
56
57
58
59
60
61
62
63
64
65
66
67
68
69
70
71
72
|
package
com.springmvc_mybatis.bean;
import
java.io.Serializable;
import
java.util.Date;
import
org.springframework.format.annotation.DateTimeFormat;
public
class
User
implements
Serializable {
private
static
final
long
serialVersionUID = 1L;
private
Integer id;
private
String name;
private
String password;
@DateTimeFormat
(pattern =
"yyyy-MM-dd"
)
private
Date time;
public
User() {
super
();
}
public
User(String name, String password) {
super
();
this
.name = name;
this
.password = password;
}
public
User(Integer id, String name, String password, Date time) {
super
();
this
.id = id;
this
.name = name;
this
.password = password;
this
.time = time;
}
public
Integer getId() {
return
id;
}
public
void
setId(Integer id) {
this
.id = id;
}
public
String getName() {
return
name;
}
public
void
setName(String name) {
this
.name = name;
}
public
String getPassword() {
return
password;
}
public
void
setPassword(String password) {
this
.password = password;
}
public
Date getTime() {
return
time;
}
public
void
setTime(Date time) {
this
.time = time;
}
@Override
public
String toString() {
return
"User [id="
+ id +
", name="
+ name +
", password="
+ password
+
", time="
+ time +
"]"
;
}
}
|
|
1
2
3
4
5
6
7
8
9
10
11
12
13
14
|
package
com.springmvc_mybatis.mapper;
import
java.util.List;
import
org.apache.ibatis.annotations.Param;
import
com.springmvc_mybatis.bean.User;
//userMapper只能传入一个参数,多个的话需要注解
public
interface
UserMapper {
// value 必须与Bean 属性一致!
User login(
@Param
(value =
"name"
) String name,
@Param
(value =
"password"
) String password);
List<User> getAllUsers();
}
|
|
1
2
3
4
5
6
7
8
9
10
11
12
13
14
15
16
17
18
19
20
21
22
23
|
<?
xml
version
=
"1.0"
encoding
=
"UTF-8"
?>
<!DOCTYPE mapper PUBLIC "-//mybatis.org//DTD Mapper 3.0//EN" "http://mybatis.org/dtd/mybatis-3-mapper.dtd">
<
mapper
namespace
=
"com.springmvc_mybatis.mapper.UserMapper"
>
<
resultMap
type
=
"User"
id
=
"userResult"
>
<
result
column
=
"id"
property
=
"id"
/>
<
result
column
=
"name"
property
=
"name"
/>
<
result
column
=
"pwd"
property
=
"password"
/>
<
result
column
=
"create_time"
property
=
"time"
/>
</
resultMap
>
<
select
id
=
"login"
resultMap
=
"userResult"
>
select * from
user
where
name=#{name}
and pwd=#{password}
</
select
>
<
select
id
=
"getAllUsers"
resultMap
=
"userResult"
>
select *
from user
</
select
>
</
mapper
>
<!-- error ,,,,resultMap wrong to resultType... -->
|
|
1
2
3
4
5
6
7
8
9
10
11
12
13
14
15
16
17
18
19
20
21
22
23
24
25
26
27
28
29
30
31
32
33
34
35
36
37
38
39
40
41
42
43
44
45
46
47
48
|
<?
xml
version
=
"1.0"
encoding
=
"UTF-8"
?>
<
beans
xmlns
=
"http://www.springframework.org/schema/beans"
xmlns:xsi
=
"http://www.w3.org/2001/XMLSchema-instance"
xmlns:p
=
"http://www.springframework.org/schema/p"
xmlns:context
=
"http://www.springframework.org/schema/context"
xmlns:tx
=
"http://www.springframework.org/schema/tx"
xsi:schemaLocation="
http://www.springframework.org/schema/beans
http://www.springframework.org/schema/beans/spring-beans-3.2.xsd
http://www.springframework.org/schema/context
http://www.springframework.org/schema/context/spring-context-3.2.xsd
http://www.springframework.org/schema/tx
http://www.springframework.org/schema/tx/spring-tx-3.2.xsd">
<!-- 1. 数据源 : DriverManagerDataSource -->
<
bean
id
=
"datasource"
class
=
"org.springframework.jdbc.datasource.DriverManagerDataSource"
>
<
property
name
=
"driverClassName"
value
=
"com.mysql.jdbc.Driver"
/>
<
property
name
=
"url"
value
=
"jdbc:mysql://localhost:3307/wolf"
/>
<
property
name
=
"username"
value
=
"root"
/>
<
property
name
=
"password"
value
=
"root"
/>
</
bean
>
<!--
2. mybatis的SqlSession的工厂: SqlSessionFactoryBean
dataSource / typeAliasesPackage
-->
<
bean
id
=
"sqlSessionFactory"
class
=
"org.mybatis.spring.SqlSessionFactoryBean"
>
<
property
name
=
"dataSource"
ref
=
"datasource"
/>
<
property
name
=
"typeAliasesPackage"
value
=
"com.springmvc_mybatis.bean"
/>
<
property
name
=
"configLocation"
value
=
"classpath:mybatis-config.xml"
/>
</
bean
>
<!--
3. mybatis自动扫描加载Sql映射文件 : MapperScannerConfigurer
sqlSessionFactory / basePackage
-->
<
bean
class
=
"org.mybatis.spring.mapper.MapperScannerConfigurer"
>
<
property
name
=
"basePackage"
value
=
"com.springmvc_mybatis.mapper"
/>
<
property
name
=
"sqlSessionFactory"
ref
=
"sqlSessionFactory"
/>
</
bean
>
<!-- 4. 事务管理 : DataSourceTransactionManager -->
<
bean
id
=
"manager"
class
=
"org.springframework.jdbc.datasource.DataSourceTransactionManager"
>
<
property
name
=
"dataSource"
ref
=
"datasource"
/>
</
bean
>
<!-- 5. 使用声明式事务 -->
<
tx:annotation-driven
transaction-manager
=
"manager"
/>
</
beans
>
|
|
1
2
3
4
5
6
7
8
9
10
11
12
13
14
15
16
17
18
19
20
21
22
23
24
25
26
27
28
29
30
31
32
33
34
35
36
37
38
39
40
41
|
package
com.springmvc_mybatis.test;
import
java.util.List;
import
org.junit.Test;
import
org.junit.runner.RunWith;
import
org.springframework.beans.factory.annotation.Autowired;
import
org.springframework.test.context.ContextConfiguration;
import
org.springframework.test.context.junit4.SpringJUnit4ClassRunner;
import
com.springmvc_mybatis.bean.User;
import
com.springmvc_mybatis.mapper.UserMapper;
@RunWith
(SpringJUnit4ClassRunner.
class
)
@ContextConfiguration
(
"/beans_wolf.xml"
)
public
class
TestSimpleMyBatis {
@Autowired
private
UserMapper userMapper;
@Test
public
void
findAll() {
List<User> users = userMapper.getAllUsers();
System.out.println(users);
}
@Test
public
void
login() {
// User user = new User(null, "wx", "123456", new Date());
// User user = new User(null, "wangxin", "123456", new Date());
// User loginExit = userMapper.login(user);
// User loginExit = userMapper.login("wx", "123456");
User loginExit = userMapper.login(
"wangxin"
,
"123456"
);
if
(loginExit ==
null
) {
System.out.println(
"用户不存在"
);
}
else
{
System.out.println(loginExit);
System.out.println(
"登录成功!"
);
}
}
}
|
|
1
2
3
4
5
6
7
8
9
10
11
12
13
14
15
16
17
18
19
20
21
22
23
24
|
<?
xml
version
=
"1.0"
encoding
=
"UTF-8"
?>
<
beans
xmlns
=
"http://www.springframework.org/schema/beans"
xmlns:xsi
=
"http://www.w3.org/2001/XMLSchema-instance"
xmlns:context
=
"http://www.springframework.org/schema/context"
xmlns:mvc
=
"http://www.springframework.org/schema/mvc"
xsi:schemaLocation="
http://www.springframework.org/schema/beans http://www.springframework.org/schema/beans/spring-beans-3.0.xsd
http://www.springframework.org/schema/context http://www.springframework.org/schema/context/spring-context-3.0.xsd
http://www.springframework.org/schema/mvc http://www.springframework.org/schema/mvc/spring-mvc-3.0.xsd">
<!-- Scans the classpath of this application for @Components to deploy as
beans -->
<
context:component-scan
base-package
=
"com.springmvc_mybatis.controller"
/>
<!-- Configures the @Controller programming model -->
<
mvc:annotation-driven
/>
<!-- Resolves view names to protected .jsp resources within the /WEB-INF/views
directory -->
<
bean
id
=
"viewResolver"
class
=
"org.springframework.web.servlet.view.InternalResourceViewResolver"
>
<
property
name
=
"prefix"
value
=
"/WEB-INF/test/"
/>
<
property
name
=
"suffix"
value
=
".jsp"
/>
</
bean
>
</
beans
>
|
|
1
2
3
4
5
6
7
8
9
10
11
12
13
14
15
16
17
18
|
<?
xml
version
=
"1.0"
encoding
=
"UTF-8"
?>
<!DOCTYPE configuration
PUBLIC "-//mybatis.org//DTD Config 3.0//EN"
"http://mybatis.org/dtd/mybatis-3-config.dtd">
<
configuration
>
<!-- Spring整合myBatis后,这个配置文件基本可以不要了 -->
<!-- 设置外部配置文件 -->
<!-- 设置类别名 -->
<
typeAliases
>
<
typeAlias
type
=
"com.springmvc_mybatis.bean.User"
alias
=
"User"
/>
</
typeAliases
>
<!-- 设置数据库连接环境 -->
<!-- 映射文件 -->
<
mappers
>
<
mapper
resource
=
"com/springmvc_mybatis/mapper/userMapper.xml"
/>
</
mappers
>
</
configuration
>
|
|
1
2
3
4
5
6
7
8
9
10
11
12
13
14
15
16
17
18
19
20
21
22
23
24
25
26
27
28
29
30
31
32
33
34
35
36
37
38
39
40
41
42
43
44
45
46
|
package
com.springmvc_mybatis.controller;
import
java.util.List;
import
javax.servlet.http.HttpServletRequest;
import
org.springframework.beans.factory.annotation.Autowired;
import
org.springframework.stereotype.Controller;
import
org.springframework.ui.Model;
import
org.springframework.web.bind.annotation.RequestMapping;
import
com.springmvc_mybatis.bean.User;
import
com.springmvc_mybatis.mapper.UserMapper;
@Controller
@RequestMapping
(
"/user"
)
public
class
UserController {
@Autowired
private
UserMapper usermapper;
@RequestMapping
(
"/login"
)
public
String login(HttpServletRequest request, Model model) {
String name = request.getParameter(
"username"
);
String password = request.getParameter(
"password"
);
System.out.println(
"login"
);
User user_login = usermapper.login(name, password);
System.out.println(user_login);
if
(user_login ==
null
) {
System.out.println(
"Error login!"
);
return
"fail"
;
}
else
{
model.addAttribute(
"user"
, user_login);
return
"success"
;
}
}
@RequestMapping
(
"/list"
)
public
String getAllUsers(Model model) {
List<User> users = usermapper.getAllUsers();
model.addAttribute(
"users"
, users);
System.out.println(users);
return
"list"
;
}
}
|
|
1
|
<jsp:forward page=
"/WEB-INF/test/login.jsp"
></jsp:forward>
|
|
1
2
3
4
5
6
7
8
9
10
11
12
13
14
15
16
17
18
19
20
21
22
23
24
25
26
|
<%@ page language=
"java"
contentType=
"text/html; charset=UTF-8"
pageEncoding=
"UTF-8"
%>
<!DOCTYPE html PUBLIC
"-//W3C//DTD HTML 4.01 Transitional//EN"
"http://www.w3.org/TR/html4/loose.dtd"
>
<html>
<head>
<meta http-equiv=
"Content-Type"
content=
"text/html; charset=UTF-8"
>
<title>login</title>
</head>
<body>
<form action=
"user/login.action"
method=
"post"
>
<table align=
"left"
>
<tr>
<td>用户名:</td>
<td><input id=
"userName"
type=
"text"
name=
"username"
></td>
</tr>
<tr>
<td>密码:</td>
<td><input id=
"password"
type=
"password"
name=
"password"
></td>
</tr>
<tr>
<td><button type=
"submit"
name=
"Submit"
>登录</button></td>
</tr>
</table>
</form>
</body>
</html>
|
|
1
2
3
4
5
6
7
8
9
10
11
12
13
14
15
16
|
<%@ page language=
"java"
contentType=
"text/html; charset=UTF-8"
pageEncoding=
"UTF-8"
%>
<!DOCTYPE html PUBLIC
"-//W3C//DTD HTML 4.01 Transitional//EN"
"http://www.w3.org/TR/html4/loose.dtd"
>
<html>
<head>
<meta http-equiv=
"Content-Type"
content=
"text/html; charset=UTF-8"
>
<title>Success</title>
</head>
<body>
Welcome
<font color=
"red"
>${requestScope.user.name} </font>!
<br>
<br>
<a href=
"list.action"
>用户信息列表</a>
</body>
</html>
|
|
1
2
3
4
5
6
7
8
9
10
11
12
13
14
15
16
17
18
|
<%@ page language=
"java"
contentType=
"text/html; charset=UTF-8"
pageEncoding=
"UTF-8"
%>
<!DOCTYPE html PUBLIC
"-//W3C//DTD HTML 4.01 Transitional//EN"
"http://www.w3.org/TR/html4/loose.dtd"
>
<html>
<head>
<meta http-equiv=
"Content-Type"
content=
"text/html; charset=UTF-8"
>
<title>Insert title here</title>
</head>
<body>
<h3>
<font color=
"red"
>fail login!</font>
</h3>
<h2>
<a href=
"${pageContext.request.contextPath}"
>
return
the Login
Page!</a>
</h2>
</body>
</html>
|
|
1
2
3
4
5
6
7
8
9
10
11
12
13
14
15
16
17
18
19
20
21
22
23
24
25
26
27
28
29
30
31
32
33
34
35
36
37
38
39
40
41
42
43
44
45
46
47
48
|
<%@ page language=
"java"
contentType=
"text/html; charset=UTF-8"
pageEncoding=
"UTF-8"
%>
<%@ taglib prefix=
"c"
uri=
"http://java.sun.com/jsp/jstl/core"
%>
<%@taglib prefix=
"fmt"
uri=
"http://java.sun.com/jsp/jstl/fmt"
%>
<%@taglib prefix=
"spring"
uri=
"http://www.springframework.org/tags"
%>
<!DOCTYPE html PUBLIC
"-//W3C//DTD HTML 4.01 Transitional//EN"
"http://www.w3.org/TR/html4/loose.dtd"
>
<html>
<head>
<meta http-equiv=
"Content-Type"
content=
"text/html; charset=UTF-8"
>
<title>Insert title here</title>
</head>
<body>
<c:
if
test=
"${empty requestScope.users }"
>
<font color=
"red"
>没有员工信息!</font>
</c:
if
>
<c:
if
test=
"${!(empty requestScope.users)}"
>
<table border=
"1"
cellpadding=
"10"
cellspacing=
"0"
>
<tr>
<th>Num</th>
<th>Id</th>
<th>Name</th>
<th>Create_Time</th>
<th>Password</th>
<th colspan=
"2"
>OP</th>
</tr>
<c:forEach items=
"${requestScope.users }"
var
=
"user"
varStatus=
"s"
>
<tr>
<td>${s.count}</td>
<td>${user.id}</td>
<td>${user.name }</td>
<td><fmt:formatDate value=
"${user.time}"
pattern=
"yyyy-MM-dd"
/>
</td>
<td>${user.password}</td>
<td><a onclick=
"return false"
href=
"${pageContext.request.contextPath}/user/save.action?id=${user.id}"
><font
color=
"blue"
>edit</font></a></td>
<td><a onclick=
"return false"
href=
"${pageContext.request.contextPath}/user/delete/${user.id}.action"
><font
color=
"blue"
>
delete
</font></a></td>
</tr>
</c:forEach>
</table>
</c:
if
>
<br>
<a href=
"${pageContext.request.contextPath}"
>goto login</a>
</body>
</html>
|
|
1
2
3
4
5
6
7
8
9
10
11
12
13
14
15
16
17
18
19
20
21
22
23
24
25
26
27
|
<?
xml
version
=
"1.0"
encoding
=
"UTF-8"
?>
<
web-app
xmlns:xsi
=
"http://www.w3.org/2001/XMLSchema-instance"
xmlns
=
"http://java.sun.com/xml/ns/javaee"
xsi:schemaLocation
=
"http://java.sun.com/xml/ns/javaee http://java.sun.com/xml/ns/javaee/web-app_2_5.xsd"
id
=
"WebApp_ID"
version
=
"2.5"
>
<
display-name
>Demo_SpringMVC_MyBatis</
display-name
>
<
context-param
>
<
param-name
>contextConfigLocation</
param-name
>
<
param-value
>classpath:beans_wolf.xml</
param-value
>
</
context-param
>
<
listener
>
<
listener-class
>org.springframework.web.context.ContextLoaderListener</
listener-class
>
</
listener
>
<
servlet
>
<
servlet-name
>springDispatcherServlet</
servlet-name
>
<
servlet-class
>org.springframework.web.servlet.DispatcherServlet</
servlet-class
>
<
init-param
>
<
param-name
>contextConfigLocation</
param-name
>
<
param-value
>classpath:applicationContext-mvc.xml</
param-value
>
</
init-param
>
<
load-on-startup
>1</
load-on-startup
>
</
servlet
>
<
servlet-mapping
>
<
servlet-name
>springDispatcherServlet</
servlet-name
>
<
url-pattern
>*.action</
url-pattern
>
</
servlet-mapping
>
</
web-app
>
|
|
1
2
3
4
5
6
7
8
9
10
11
12
13
14
15
16
17
18
19
20
21
22
23
24
25
26
27
28
29
30
31
32
33
34
35
36
37
38
39
40
41
42
43
44
45
46
47
48
49
|
1.Spring基本的ApplicationContext.xml 本例中用的是 beans_wolf.xml(名字一定要注意,尽量用前面的)
配置了:
<!-- 1. 数据源 : DriverManagerDataSource -->
<!-- 2. mybatis的SqlSession的工厂: SqlSessionFactoryBean
dataSource / typeAliasesPackage -->
<!-- 3. mybatis自动扫描加载Sql映射文件 : MapperScannerConfigurer
sqlSessionFactory / basePackage /configLocation-->
<!-- 4. 事务管理 : DataSourceTransactionManager -->
<!-- 5. 使用声明式事务 -->
其中配置了数据库的具体信息,所以不在另外用属性文件了!
2.Spring MVC 的applicationContext-mvc.xml
配置了:自动扫描包,注解驱动,视图解析器
3.mybatis-config.xml 这个具体配置根据你的实际来弄!
4.web.xml
配置了:
<!-- needed for ContextLoaderListener -->
<
context-param
>
<
param-name
>contextConfigLocation</
param-name
>
<
param-value
>classpath:beans_wolf.xml</
param-value
>
</
context-param
>
<!-- Bootstraps the root web application context before servlet initialization -->
<
listener
>
<
listener-class
>
org.springframework.web.context.ContextLoaderListener
</
listener-class
>
</
listener
>
<!-- DispatcherServlet-->
<
servlet
>
<
servlet-name
>springDispatcherServlet</
servlet-name
>
<
servlet-class
>
org.springframework.web.servlet.DispatcherServlet
</
servlet-class
>
<
init-param
>
<!-- 配置 SpringMVC 配置文件的位置 -->
<
param-name
>contextConfigLocation</
param-name
>
<
param-value
>classpath:applicationContext-mvc.xml</
param-value
>
</
init-param
>
<
load-on-startup
>1</
load-on-startup
>
</
servlet
>
<
servlet-mapping
>
<
servlet-name
>springDispatcherServlet</
servlet-name
>
<!-- 配置什么样的请求交由 SpringMVC 处理 -->
<
url-pattern
>*.action</
url-pattern
>
</
servlet-mapping
>
|
|
1
2
3
4
5
|
<
bean
id
=
"sqlSessionFactory"
class
=
"org.mybatis.spring.SqlSessionFactoryBean"
>
<
property
name
=
"dataSource"
ref
=
"datasource"
/>
<
property
name
=
"typeAliasesPackage"
value
=
"com.springmvc_mybatis.bean"
/>
<
property
name
=
"configLocation"
value
=
"classpath:mybatis-config.xml"
/>
</
bean
>
|
|
1
2
3
4
5
6
7
8
|
Mapped Statements collection does not contain value for后面是什么类什么方法之类的:
错误原因有几种:
1、mapper.xml中没有加入namespace !!!!
2、mapper.xml中的方法和接口mapper的方法不对应 !!!
3、mapper.xml没有加入到mybatis-config.xml中(即总的配置文件),例外:配置了mapper文件的包路径的除外 !!!
4、mapper.xml文件名和所写的mapper名称不相同。 !!
5.java文件和xml文件的名称不一致 !
6.可能是你的controller 或者说是handler 有问题!!
|
| SpringMVC MyBatis 相关jar包下载 |


