django是python下的一个web框架.
1. 安装django
安装环境: ubuntu.
(1) 安装好python2.7
(2) 直接用pip的方式安装django即可.
easy_install django(3) 确保安装成功.
$ python
Python 2.7.14 (default, Sep 23 2017, 22:06:14)
[GCC 7.2.0] on linux2
Type "help", "copyright", "credits" or "license" for more information.
>>> import django
>>> django.VERSION
(1, 11, 12, u'final', 0)
能显示出来版本号就说明安装成功了.
2. 第一个django项目
(1) 创建项目first_django:
$ django-admin startproject first_django(2) 启动服务器:
$ cd first_django/
$ python manage.py runserver 0.0.0.0:9000
# 这时可能会报如下的错误.
You have 13 unapplied migration(s). Your project may not work properly until you apply the migrations for app(s): admin, auth, contenttypes, sessions.
Run 'python m
# 用下面这条命令即可修复该错误.
$
# 修复该错误后再启动服务器即可看到下面这些信息:
Performing system checks...

System check identified no issues (0 silenced).
April 23, 2018 - 06:49:43
Django version 1.11.12, using settings 'first_django.settings'
Starting development server at http://0.0.0.0:9000/
Quit the server with CONTROL-C.
在浏览器的地址栏中输入:127.0.0.1:9000即可看到如下画面:
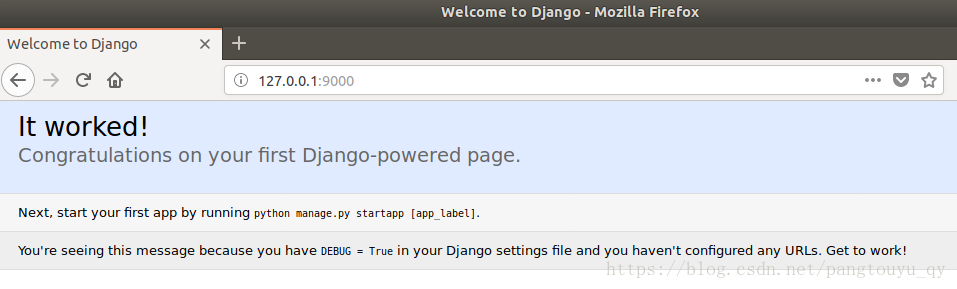
同时终端窗口会更新相应的web访问信息:
[23/Apr/2018 06:50:12] "GET / HTTP/1.1" 200 1716(3) 让web页面显示特定的内容
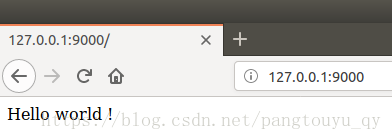
进入/first_django/first_django文件夹, 创建view.py, 输入如下代码:
from django.http import HttpResponse

def hello(request):
    return HttpResponse("Hello world ! ")
然后修改urls.py中的代码为:
from django.conf.urls import url

from . import view

urlpatterns = [
    url(r'^$', view.hello),
]
在浏览器的地址栏中输入:127.0.0.1:9000即可看到如下画面:
3. 模板
3.1 模板初探
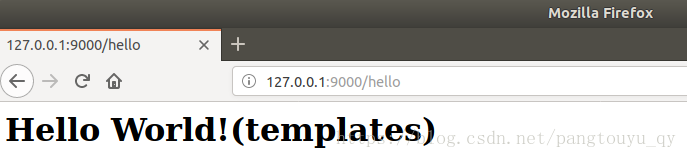
在first_django下创建文件夹templates, 然后进入templates创建hello.html, html文件的代码如下:
<h1>{{ hello }}</h1>此时first_django的文件目录为:
├── db.sqlite3
├── first_django
│   ├── __init__.py
│   ├── __init__.pyc
│   ├── settings.py
│   ├── settings.pyc
│   ├── urls.py
│   ├── urls.pyc
│   ├── view.py
│   ├── view.pyc
│   ├── wsgi.py
│   └── wsgi.pyc
├── manage.py
├── templates
│   └── hello.html
└── view.py
接下来还需要修改两个文件: settings.py和view.py.
(1) 在settings.py中加入模板文件的目录.
...TEMPLATES = [
    {
        'BACKEND': 'django.template.backends.django.DjangoTemplates',
        'DIRS': [BASE_DIR+"/templates",],       # 修改位置
        'APP_DIRS': True,
        'OPTIONS': {
            'context_processors': [
                'django.template.context_processors.debug',
                'django.template.context_processors.request',
                'django.contrib.auth.context_processors.auth',
                'django.contrib.messages.context_processors.messages',
            ],
        },
    },
]
...
(2) 在view.py中加入一个新的对象, 用于向模板提交数据.
# -*- coding: utf-8 -*-

#from django.http import HttpResponse
from django.shortcuts import render

def hello(request):
    context          = {}    # 这是一个字典
    context['hello'] = 'Hello World!(templates)' # 这个'hello'对应了模板中的{{hello}}
    return render(request, 'hello.html', context)
效果如下所示:
3.2 模板标签
3.3 模板继承
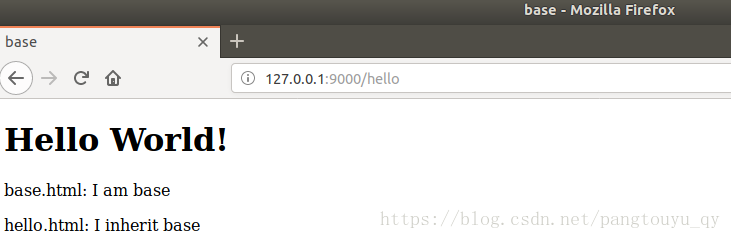
现在templates文件夹下创建一个将要被继承的文件base.html, 其代码如下:
(block中的内容是可以被继承者改动的)
<!DOCTYPE html>
<html>
<head>
<meta charset="utf-8">
<title>base</title>
</head>
<body>
    <h1>Hello World!</h1>
    <p>base.html: I am base</p>
    {% block mainbody %}
       <p>original</p>
    {% endblock %}
</body>
</html>
然后修改hello.html让它去继承base.html, 代码如下:
{% extends "base.html" %}
{% block mainbody %}<p>hello.html: I inherit base</p>
{% endblock %}
效果如下所示:
4. django模型
未完待续…