1.案例一
需求:本例要求为 http://server0.example.com 配置Web站点,要求如下:
1.从http://ldap.example.com/pub/example.html下载一个主页文件,将其重命名为 index.html
2.将此文件拷贝到站点的 DocumentRoot 目录下,不要对文件 index.html 的内容作任何修改
3.来自my133t.org的客户端的访问会被拒绝
1.1方案步骤
[root@server0 ~]# yum -y install httpd
[root@server0 ~]# cd /var/www/html/
[root@server0 html]#  wget http://classroom.example.com/pub/example.html
[root@server0 html]# mv example.html index.html
[root@server0 html]# systemctl start httpd
[root@server0 html]# systemctl start httpd
[root@server0 html]# systemctl enable httpd
[root@server0 html]# systemctl mask iptables.service ebtables.service
[root@server0 html]# systemctl stop iptable ebtables
[root@server0 html]# firewall-cmd --add-rich-rule 'rule family=ipv4 source address=172.25.0.0/24 service name=http accept'  --permanent
[root@server0 html]# firewall-cmd --reload
1.2验证结果

2.案例二
需求为站点 http://server0.example.com 配置TLS加密需求如下
1.一个已签名证书从以下地址获取 http://classroom.example.com/pub/server30.crt
2.此证书的密钥从以下地址获取 http://lclassroom.example.com/pub/server30.key
3.此证书的签名授权信息从以下地址获取http://classroom.example.com/pub/group30.crt
2.2方案步骤
[root@server0 ~]# yum -y install mod_ssl
[root@server0 ~]# cd /etc/httpd/conf.d/
[root@server0 conf.d]# vim ssl.conf
#ServerName www.example.com:443   \\去掉注释改为server0.example.com:443
[root@server0 certs]# wget http://classroom.example.com/pub/tls/certs/server0.crt
[root@server0 certs]# vim /etc/httpd/conf.d/ssl.conf
#SSLCACertificateFile /etc/pki/tls/certs/ca-bundle.crt
改为SSLCACertificateFile /etc/pki/tls/certs/www0.crt

SSLCertificateFile /etc/pki/tls/certs/localhost.crt
改为SSLCertificateFile /etc/pki/tls/certs/server0.crt

SSLCertificateKeyFile /etc/pki/tls/private/localhost.key
改成SSLCertificateKeyFile /etc/pki/tls/private/server0.key
[root@server0 certs]# cd ../private/
[root@server0 private]# wget http://classroom.example.com/pub/tls/private/server0.key
[root@server0 private]# systemctl restart httpd
[root@server0 private]#firewall-cmd --add-rich-rule 'rule family=ipv4 source address=172.25.0.0/24 service name=http accept'  --permanent
[root@server0 private]#firewall-cmd --reload
2.3验证结果
3.案例三
需求
1.新建虚拟主机 http://www.example.com
2.设置 DocumentRoot 为 /var/www/virtual
3.从 http://classroom/pub/materials/www.html 下载主页文件,并重命名为 index.html
不要对文件 index.html 的内容作任何修改
4.将文件index.html拷贝到DocumentRoot目录下
5.确保 fleyd 用户能在 /var/www/virtual 目录建文件
3.1方案步骤
[root@server0 certs]# cd /var/www/
[root@server0 certs]# wget -O virtual/index.html  http://classroom.example.com/pub/www.html
[root@server0 certs]# chown -R apache.apache /var/www/
[root@server0 certs]# useradd floyd
[root@server0 certs]#setfacl -m u:floyd:rwx virtual/
[root@server0 certs]#cd /etc/httpd/conf.d
[root@server0 conf.d]#vim httpd-vhost.conf
<VirtualHost *:80>
DocumentRoot "/var/www/html"
ServerName server0.example.com
<VirtualHost >

<VirtualHost *:80>
DocumentRoot "/var/www/virtual"
ServerName www.example.com
<VirtualHost >
[root@server0 conf.d]#systemctl restart httpd
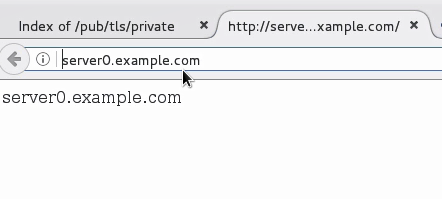
3.2验证第一个域名server0.example.com

3.3登陆客户端修改配置并验证第二个域名www.example.com
[root@desktop0]#vim /etc/hosts
172.25.0.11 www.example.com
[root@desktop0]#firefox &
3.4验证

3.5切换用户

[root@server0 conf.d]#su - floyd
[floyd@server0 ~]$cd /var/www/virtual/
[floyd@server0 virtual]$touch aa
[floyd@server0 virtual]$rm -f aa
[floyd@server0 virtual]$ls
index.html
4.案例四
需求
在你的server上的web服务器的DocumentRoot目录下创建一个名为private的目录,要求如下:
1.从 http://classroom.example.com/pub/private.html 下载一个文件副本到这个目录,并且重命名为 index.html,不要对这个文件的内容做任何修改
2.从 server 上,任何人都可以浏览 private的内容,但是从其它系统不能访问这个目录的内容
4.1方案步骤
服务端
[root@server0 ~]#cd /var/www/html/
[root@server0 html]#mkdir private
[root@server0 html]#wget -O private/index.html  http://classroom.example.com/pub/private.html
[root@server0 html]#ls
index.html
[root@server0 html]#cat private/index.html
private
[root@server0 html]#vim /etc/httpd/conf.d/httpd-vhosts.conf
<VirtualHost *:80>
DocumentRoot "/var/www/html"
ServerName server0.example.com
<Directory  "/var/www/html/private">
   Require ip 172.25.0.11
   <Directory>
<VirtualHost >
[root@server0 html]#systemctl resart httpd
4.2验证结果
客户端
[root@desktop0]#firefox &
验证成功不准许客户端登陆

服务端
[root@server0 ]#firefox &
验证成功不准许服务端登陆

5.案例五
需求:
在server30上实现动态web内容
1.动态内容由名为alt.example.com的虚拟主机提供
虚拟主机侦听端口为8909
2.从http://classroom.example.com/pub/webapp.wsgi下载一个脚本,然后放在适当的位置,不要修改文件内容
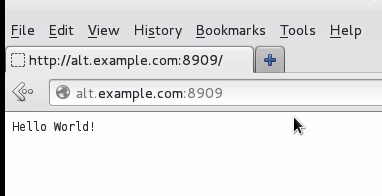
3.客户端访问http://alt.example.com:8909时,应该接收到动态生成的web页面
4.此http://alt.example.com:8909必须能被example.com内所有的系统访问
5.1方案步骤
服务端
[root@server0 ~]#cd /var/www/html/
[root@server0 www]#mkdir wsgi
[root@server0 www]#wget  -o wsgi/webapp.wsgi http://classroom.example.com/pub/webapp.wsgi
[root@server0 www]#chown -R apache.apache wsgi/
[root@server0 www]#vim /etc/httpd/conf.d/httpd-vhosts.conf
在最后添加
Listen 8909
<VirtualHost *:8909>
WSGIScripAlias / "/var/www/wsgi/webapp.wsgi"
ServerName alt.example.com
<VirtualHost >
[root@server0 www]#yum -y mod_wsgi*
[root@server0 ~]#systemctl stop httpd
[root@server0 ~]#systemctl start httpd
[root@server0 ~]#semanage port  -a
 -t  http_port_t  -p  tcp 8909
[root@server0 ~]#semanage port  -l|grep  http
[root@server0 ~]#firewall-cmd --add-rich-rule 'rule family=ipv4 source address=172.25.0.0/24 port  protocol=tcp port=8909 accept'  --permanent
[root@server0 ~]#firewall-cmd --reload
5.2验证结果
客户端
[root@desktop0]#vim /etc/hosts
172.25.0.11 alt.example.com
[root@desktop0]#firefox &
浏览器验证