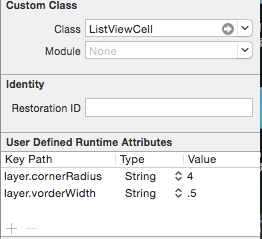
1.修改xib创建视图的圆角
layer.cornerRadius
layer.vorderWidth

2.cell分割线不能到达屏幕左边距
- (void)viewDidLoad {
    [super viewDidLoad];
    //解决不能cell分割线不能到达左边距
    if ([self.tableView respondsToSelector:@selector(setSeparatorInset:)]) {
  [self.tableView setSeparatorInset:UIEdgeInsetsZero];
   }
  if ([self.tableView respondsToSelector:@selector(setLayoutMargins:)]) {
   [self.tableView setLayoutMargins:UIEdgeInsetsZero];
   }
   }
   //在willDisplayCell中,添加代码
- (void)tableView:(UITableView *)tableView willDisplayCell:(UITableViewCell *)cell forRowAtIndexPath:(NSIndexPath *)indexPath {
    if ([cell respondsToSelector:@selector(setSeparatorInset:)]) {
        [cell setSeparatorInset:UIEdgeInsetsZero];
    }

    if ([cell respondsToSelector:@selector(setLayoutMargins:)]) {
        [cell setLayoutMargins:UIEdgeInsetsZero];
    }
}3阻止文件被iTunes和iCloud同步原文
#import “sys/xattr.h”
- (BOOL)addSkipBackupAttributeToItemAtURL:(NSURL *)URL
{
const char* filePath = [[URL path] fileSystemRepresentation];
const char* attrName = “com.apple.MobileBackup”;
u_int8_t attrValue = 1;
int result = setxattr(filePath, attrName, &attrValue, sizeof(attrValue), 0, 0);
return result == 0;
}

- (void)addSkipBackupAttributeToPath:(NSString*)path {
u_int8_t b = 1;
setxattr([path fileSystemRepresentation], “com.apple.MobileBackup”, &b, 1, 0, 0);
}
两种方法任选其一
4.删除视图上的所有子视图
[XXXX.subviews makeObjectsPerformSelector:@selector(removeFromSuperview)];5.在代码块中添加“<##>”,使自己想要输入的地方,变成可输入状态
 [MobClick event:@"XXXXX"];
 //将@“xxxxx”用<##>代替变成
[MobClick event: ];6.APP申请加急审核这里写链接内容https://developer.apple.com/contact/app-store/?topic=expedite
7.使用Reveal连接模拟器调试界面
给出了如何不用修改Xcode工程就可以加载使用Reveal的方法。
在当前用户目录新建一个文件.lldbinit,位于~/.lldbinit,LLDB每次启动的时候都会加载这个文件。
在.lldbinit中输入如下内容:
command alias reveal_load_sim expr (void*)dlopen("/Applications/Reveal.app/Contents/SharedSupport/iOS-Libraries/libReveal.dylib", 0x2);

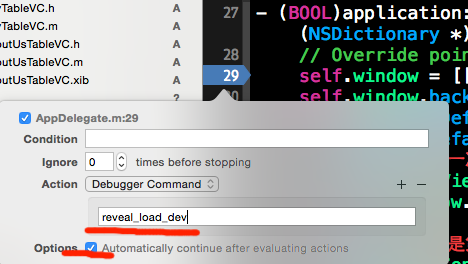
command alias reveal_load_dev expr (void*)dlopen([(NSString*)[(NSBundle*)[NSBundle mainBundle] pathForResource:@"libReveal" ofType:@"dylib"] cStringUsingEncoding:0x4], 0x2);

command alias reveal_start expr (void)[(NSNotificationCenter*)[NSNotificationCenter defaultCenter] postNotificationName:@"IBARevealRequestStart" object:nil];

command alias reveal_stop expr (void)[(NSNotificationCenter*)[NSNotificationCenter defaultCenter] postNotificationName:@"IBARevealRequestStop" object:nil];
上述文件创建了4个命令:
reveal_load_sim,reveal_load_dev, reveal_start 和 reveal_stop
reveal_load_sim 这个只在iOS模拟器上有效。它从Reveal的应用程序bundle中找到并加载libReveal.dylib(请确保你把Reveal安装到了系统的Application文件夹,如果你换地方了,你修改上述的文件)。
reveal_load_dev 这个命令在iOS设备和模拟器上都有效。不过,它需要你在Build Phase中的的Copy Bundle Resources中加上libReveal.dylib,请确保没有放到Link Binary With Libraries这个地方。
reveal_start 这个命令发出一个通知启动Reveal Server。
reveal_stop 这个命令发出一个通知停止Reveal Server。
请注意:只有在iOS应用发出了UIApplicationDidFinishLaunchingNotification通知之后,比如应用的delegate已经处理过application::didFinishLaunchingWithOptions:之后才能调用上面的reveal_load_*命令,然后再调用reveal_start
在设备起来之后,你就可以断下应用,

7.启动界面加载广告,需要SDWebImage,
#import "AppDelegate.h"
#import "UIImageView+WebCache.h"
@interface AppDelegate ()
@property (strong, nonatomic) UIView *lunchView;
@end

@implementation AppDelegate
@synthesize lunchView;

- (BOOL)application:(UIApplication *)application didFinishLaunchingWithOptions:(NSDictionary *)launchOptions {

    [self.window makeKeyAndVisible];

    lunchView = [[NSBundle mainBundle ]loadNibNamed:@"LaunchScreen" owner:nil options:nil][0];
    lunchView.frame = CGRectMake(0, 0, self.window.screen.bounds.size.width, self.window.screen.bounds.size.height);
    [self.window addSubview:lunchView];

    UIImageView *imageV = [[UIImageView alloc] initWithFrame:CGRectMake(0, 50, 320, 300)];
    NSString *str = @"http://www.jerehedu.com/images/temp/logo.gif";
    [imageV sd_setImageWithURL:[NSURL URLWithString:str] placeholderImage:[UIImage imageNamed:@"default1.jpg"]];
    [lunchView addSubview:imageV];

    [self.window bringSubviewToFront:lunchView];

    [NSTimer scheduledTimerWithTimeInterval:3 target:self selector:@selector(removeLun) userInfo:nil repeats:NO];

    return YES;
}

-(void)removeLun
{
    [lunchView removeFromSuperview];
}
8.使用SDWebImage,清除图片缓存的
1.找到SDImageCache类
2.添加如下方法:

- (float)checkTmpSize {
    float totalSize = 0;
    NSDirectoryEnumerator *fileEnumerator = [[NSFileManager defaultManager] enumeratorAtPath:diskCachePath];
    for (NSString *fileName in fileEnumerator) {
       NSString *filePath = [diskCachePath stringByAppendingPathComponent:fileName];
       NSDictionary *attrs = [[NSFileManager defaultManager] attributesOfItemAtPath:filePath error:nil];
       unsigned long long length = [attrs fileSize];
      totalSize += length / 1024.0 / 1024.0;
    }
     return totalSize;
}
//在设置中使用
- (IBAction)cleanButton:(id)sender {
    NSLog(@"清除缓存");
    [[SDImageCache sharedImageCache] clearDisk];
    [[SDWebImageManager sharedManager].imageCache clearMemory];
    [[SDWebImageManager sharedManager].imageCache clearDisk];
    [tableView reloadData];
    //计算清除后的缓存大小
    float tmpSize1 = [[SDImageCache sharedImageCache] checkTmpSize];
    self.cacheNamber.text = [NSString stringWithFormat:@"%.1fM",tmpSize1];
}

方法二,方法二比方法1好用
//清除缓存
- (void)sheZhi
{
    // 获取Caches 目录路径
    NSString *cachPath = [NSSearchPathForDirectoriesInDomains(NSCachesDirectory, NSUserDomainMask, YES) objectAtIndex:0];

    //浮点 获取folderSizeAtPath 方法里传来的值
    CGFloat fileSize = [self folderSizeAtPath:cachPath];

    // GCD   线程管理   不多说,
    dispatch_async(dispatch_get_main_queue(), ^{
        sd =[NSString stringWithFormat:@"%.2fMB",fileSize];
        NSLog(@"%@",sd);
        self.cacheNamber.text = sd;
    });

}

- (CGFloat)folderSizeAtPath:(NSString *)folderPath
{
    //  获取缓存大小,
    NSFileManager *manager = [NSFileManager defaultManager];
    if (![manager fileExistsAtPath:folderPath]) {
        return 0;
    }

    // NSEnumerator (枚举) NSEnumerator用来描述这种集合迭代运算的方式, 通过objectEnumerator向数组请求枚举器,如果想从后向前浏览集合,可使用reverseObjectEnumerator方法。
    NSEnumerator *childFilesEnumerator = [[manager subpathsAtPath:folderPath] objectEnumerator];

    NSString *fileName = nil;
    long long folderSize = 0;
    //在获得枚举器后,可以开始一个while循环,每次循环都向这个枚举器请求它的下一个对象:nextObject。nextObject返回nil值时,循环结束。
    while ((fileName = [childFilesEnumerator nextObject]) != nil) {
        NSString *fileAbsolutePath = [folderPath stringByAppendingPathComponent:fileName];
        folderSize += [self fileSizeAtPath:fileAbsolutePath];
    }
    // 因为得到的数据时bate ,所以转换成mb
    return folderSize/(1024.0*1024.0);
}

- (long long)fileSizeAtPath:(NSString *)filePath
{
    NSFileManager* manager = [NSFileManager defaultManager];
    if ([manager fileExistsAtPath:filePath]){
        return [[manager attributesOfItemAtPath:filePath error:nil] fileSize];
    }
    return 0;

}
//清除缓存
-(void)myClearCacheAction{
    dispatch_async(
                   dispatch_get_global_queue(DISPATCH_QUEUE_PRIORITY_DEFAULT, 0)
                   , ^{
                       // GCD 获取文件地址,文件里的数据个数
                       NSString *cachPath = [NSSearchPathForDirectoriesInDomains(NSCachesDirectory, NSUserDomainMask, YES) objectAtIndex:0];
                       NSArray *files = [[NSFileManager defaultManager] subpathsAtPath:cachPath];
                       NSLog(@"%@",cachPath);
                       NSLog(@"files :%lu",(unsigned long)[files count]);
                       for (NSString *p in files) {
                           NSError *error;
                           NSString *path = [cachPath stringByAppendingPathComponent:p];
                           if ([[NSFileManager defaultManager] fileExistsAtPath:path]) {
                               [[NSFileManager defaultManager] removeItemAtPath:path error:&error];
                           }
                           //                           NSString * cachePath =@"qwe";
                           CGFloat fileSize = [self folderSizeAtPath:cachPath];

                           dispatch_async(dispatch_get_main_queue(), ^{
                               NSString *sdd  = [NSString stringWithFormat:@"%.2fMB",fileSize];
                               NSLog(@"%@",sdd );
                               self.cacheNamber.text = sdd;
                           });
                       }
                       [self performSelectorOnMainThread:@selector(clearCacheSuccess) withObject:nil waitUntilDone:YES];});
}


-(void)clearCacheSuccess
{
    NSLog(@"清理成功");
}
9.cocoapods引入框架,头文件不能联想的问题
**选择Target -> Build Settings 菜单,找到\”User Header Search Paths\”设置项
新增一个值”${SRCROOT}”,并且选择\”Recursive\”,这样xcode就会在项目目录中递归搜索文件**
10.导航栏透明,iOS7以上,需要一张透明照片
    UIImage *image = [UIImage imageNamed:@"bj.jpg"];
    [self.navigationController.navigationBar setBackgroundImage:image forBarMetrics:UIBarMetricsDefault];
    [self.navigationController.navigationBar setShadowImage:image];
11.获取当前的版本号
代码实现获得应用的Verison号:

[[[NSBundle mainBundle] infoDictionary] objectForKey:@"CFBundleShortVersionString"]
或
[[NSBundle mainBundle] objectForInfoDictionaryKey:@"CFBundleShortVersionString"];

获得build号:
[[[NSBundle mainBundle] infoDictionary] objectForKey:@"CFBundleVersion"]