Appium 教您完美win10安装Appium1.7.2支持win客户端自动化


参考内容:


https://testerhome.com/topics/10193 
https://testerhome.com/topics/8223 
https://testerhome.com/topics/8812 
https://github.com/appium/appium/blob/71fac8d2759b18bb2a506a5c8359bfdf41a6443b/docs /cn/writing-running-appium/windows-app-testing.md 
https://developer.microsoft.com/zh-cn/windows/downloads/windows-10-sdk 
https://github.com/Microsoft/WinAppDriver /发布


解决步骤:


https://testerhome.com/topics/10193
该贴遗留问题:


MSBUILD : error MSB3428: 未能加载 Visual C++ 组件“VCBuild.exe”。要解决此问题,1) 安装 .NET Framework 2.0 SDK2) 安装 Microsoft Vis ual Studio 2005;或 3)
如果将该组件安装到了其他位置,请将其位置添加到系统路径中。 [D:\nodejs\node-global\node_modules\appium\node_modules\heapdump\build\bi nding.sln]


这个问题意思是需要利用报错的组件来编译WinAppDriver,WinAppDriver是用来支持windows应用UI自动化的,Appium引用了该底层支持驱动。
但是这个问题,你不关心它,还是可以继续用来做ios app或android app基于UI元素识别的自动化的,没有任何影响。


如果想解决该问题,我大致花了半天时间搜了些帖子和科学上谷大哥,绕了点弯道,最终解决了该报错,也成功的在Appium下编译安装成功了WinAppDriver组件。
达到了Win10完美安装Appium1.7.2。即不会报任何错误和警告。这样也可以直接支持Appium使用WinAppDriver做windows客户端或uwp客户端应用的UI自动化了。


解决掉了这种报错:


MSBUILD : error MSB3428: 未能加载 Visual C++ 组件“VCBuild.exe”。要解决此问题,1) 安装 .NET Framework 2.0 SDK2) 安装 Microsoft Vis ual Studio 2005;或 3)
如果将该组件安装到了其他位置,请将其位置添加到系统路径中。 [D:\nodejs\node-global\node_modules\appium\node_modules\heapdump\build\bi nding.sln]


解决掉了这种警告:


> appium-windows-driver@1.0.0 install D:\nodejs\node-global\node_modules\appium\node_modules\appium-windows-driver
> node install-npm.js
info WinAppDriver You must use WinAppDriver version 1.0
info WinAppDriver Verifying WinAppDriver version 1.0 is installed via comparing the checksum.
info WinAppDriver WinAppDriver.exe doesn't exist at the correct version 1.0, setting up
WARNING: You are not running as an administrator so WinAppDriver cannot be installed for you; please reinstall as admin
WinAppDriver was not installed; please check your system and re-run npm install if you need WinAppDriver
> heapdump@0.3.9 install D:\nodejs\node-global\node_modules\appium\node_modules\heapdump
> node-gyp rebuild
D:\nodejs\node-global\node_modules\appium\node_modules\heapdump>if not defined npm_config_node_gyp (node "D:\nodejs\node_modules\npm\node_modules\npm-lifecycle\node-gyp-bin\\..\..\node_modules\node-gyp\bin\node-gyp.js" rebuild ) else (node "D:\nodejs\node_modules\npm\node_modules\node-gyp\bin\node-gyp.js" rebuild )
在此解决方案中一次生成一个项目。若要启用并行生成,请添加“/m”开关。


具体解决步骤:


最终的方法,期间参考一些折腾了一些其他的,反复试了几次,应该是这样的步骤:


1卸载npm uninstall appium -g 
哦实际我也开启了win10的开发人员模式,此步是不是必要我暂时不清楚,参考乱七八糟的帖子折腾了许多,所以并不知道是否此步必要


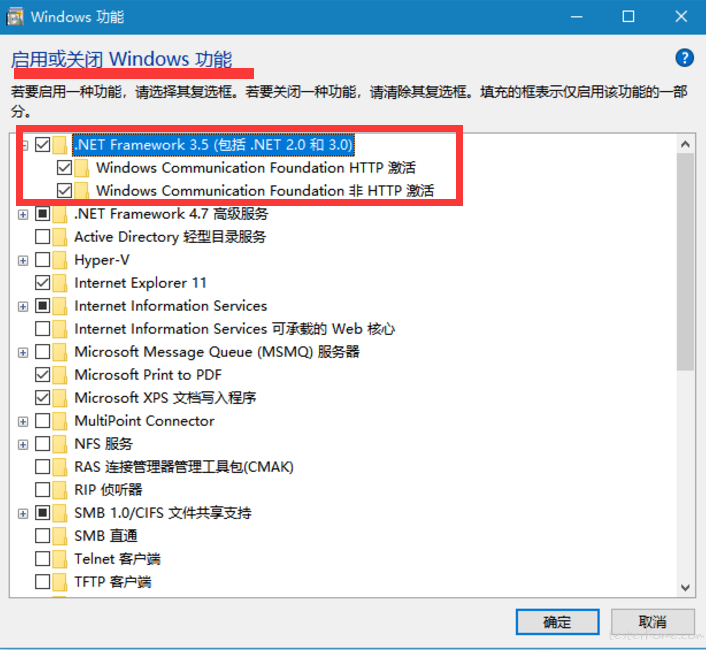
2控制面板 - >程序和功能开启标红两项


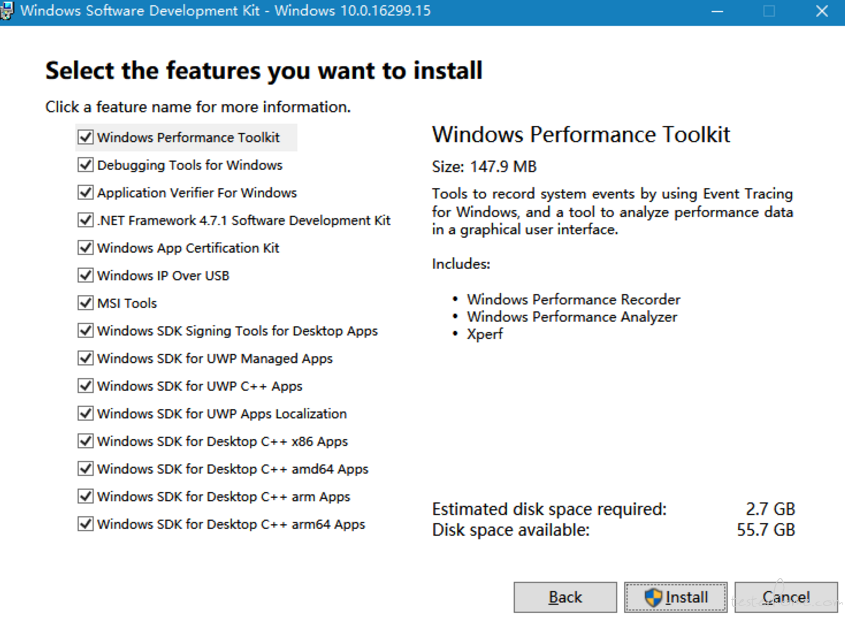
3去https://developer.microsoft.com/zh-cn/windows/downloads/windows-10-sdk 下载.iso 

一共760多MB 16299.15.170928-1534.rs3_release_WindowsSDK.iso win10可以直接双击该iso便会加载为一个光盘DVD驱动器,进去,直接双击WinSDKSetup.exe安装即可。默
认路径,默认功能全选择


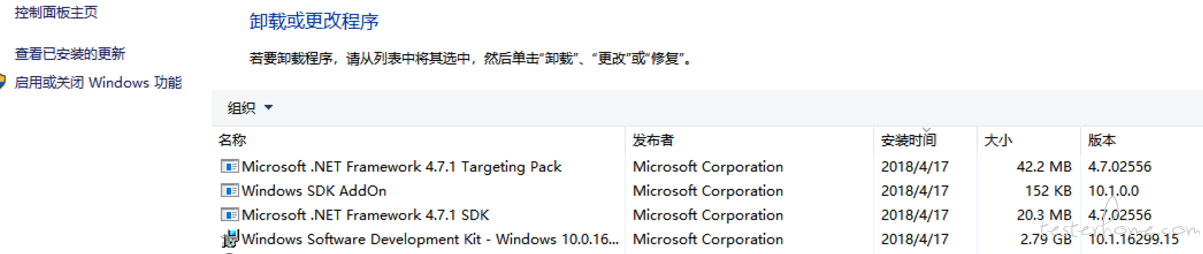
安装成功后,程序和功能会多出这几项,可以确认下


https://github.com/Microsoft/WinAppDriver/releases 下载v1.0的WindowsApplicationDriver.msi。
安装到默认C:\ Program Files(x86)\ Windows Application Driver 
路径,然后命令行到该路径,尝试启动下


保证启动正常。保证正常启动不报错后,就可以关掉了,安装其他过程中不需要保证开启该服务器


5管理员权限powershell执行npm install --global --production windows-build-tools 
过程很长,需要在线下载一些组件。我全程科学上网。


Windows PowerShell
版权所有 (C) Microsoft Corporation。保留所有权利。
PS C:\WINDOWS\system32> npm install --global --production windows-build-tools
> windows-build-tools@2.2.1 postinstall D:\nodejs\node-global\node_modules\windows-build-tools
> node ./lib/index.js
Downloading BuildTools_Full.exe
Downloading python-2.7.14.amd64.msi
[> ] 0.0% (0 B/s)
Downloaded python-2.7.14.amd64.msi. Saved to C:\Users\cmd\.windows-build-tools\python-2.7.14.amd64.msi.
Starting installation...
Launched installers, now waiting for them to finish.
This will likely take some time - please be patient!
Status from the installers:
---------- Visual Studio Build Tools ----------
Successfully installed Visual Studio Build Tools.
------------------- Python --------------------
Successfully installed Python 2.7
+ windows-build-tools@2.2.1
added 132 packages in 1365.525s


6管理员权限powershell执行npm i appium -g 

然后就正常了没警告了。


PS C:\WINDOWS\system32> npm i appium -g
D:\nodejs\node-global\appium -> D:\nodejs\node-global\node_modules\appium\build\lib\main.js

> appium-chromedriver@3.1.4 install D:\nodejs\node-global\node_modules\appium\node_modules\appium-chromedriver
> node install-npm.js

info Chromedriver Install Installing Chromedriver version '2.33' for platform 'win' and architecture '32'
info Chromedriver Install Opening temp file to write chromedriver_win32 to...
info Chromedriver Install Downloading https://chromedriver.storage.googleapis.com/2.33/chromedriver_win32.zip...
info Chromedriver Install Writing binary content to C:\Users\cmd\AppData\Local\Temp\2018317-14572-briz5r.jt6ow\chromedriver_win32.zip...
info Chromedriver Install Extracting C:\Users\cmd\AppData\Local\Temp\2018317-14572-briz5r.jt6ow\chromedriver_win32.zip to C:\Users\cmd\AppData\Local\Temp\2018317-14572-briz5r.jt6ow\chromedriver_win32
info Chromedriver Install Creating D:\nodejs\node-global\node_modules\appium\node_modules\appium-chromedriver\chromedriver\win...
info Chromedriver Install Copying unzipped binary, reading from C:\Users\cmd\AppData\Local\Temp\2018317-14572-briz5r.jt6ow\chromedriver_win32\chromedriver.exe...
info Chromedriver Install Writing to D:\nodejs\node-global\node_modules\appium\node_modules\appium-chromedriver\chromedriver\win\chromedriver.exe...
info Chromedriver Install D:\nodejs\node-global\node_modules\appium\node_modules\appium-chromedriver\chromedriver\win\chromedriver.exe successfully put in place

> appium-selendroid-driver@1.6.6 install D:\nodejs\node-global\node_modules\appium\node_modules\appium-selendroid-driver> node ./bin/install.js

dbug AndroidDriver Getting Java version
info AndroidDriver Java version is: 1.8.0_121
info Selendroid Ensuring D:\nodejs\node-global\node_modules\appium\node_modules\appium-selendroid-driver\selendroid\download exists
info Selendroid Downloading Selendroid standalone server version 0.17.0 from http://repo1.maven.org/maven2/io/selendroid/selendroid-standalone/0.17.0/selendroid-standalone-0.17.0-with-dependencies.jar --> D:\nodejs\node-global\node_modules\appium\node_modules\appium-selendroid-driver\selendroid\download\selendroid-server-7cf7163ac47f1c46eff95b62f78b58c1dabdec534acc6632da3784739f6e9d82.jar
info Selendroid Writing binary content to D:\nodejs\node-global\node_modules\appium\node_modules\appium-selendroid-driver\selendroid\download\selendroid-server.jar.tmp
info Selendroid Selendroid standalone server downloaded
info Selendroid Determining AndroidManifest location
info Selendroid Determining server apk location
info Selendroid Extracting manifest and apk to D:\nodejs\node-global\node_modules\appium\node_modules\appium-selendroid-driver\selendroid\download
info Selendroid Copying manifest and apk to D:\nodejs\node-global\node_modules\appium\node_modules\appium-selendroid-driver\selendroid
info Selendroid Cleaning up temp files
info Selendroid Fixing AndroidManifest icon bug

> appium-uiautomator2-driver@0.11.0 install D:\nodejs\node-global\node_modules\appium\node_modules\appium-uiautomator2-driver
> node ./bin/install.js

dbug AndroidDriver Getting Java version
info AndroidDriver Java version is: 1.8.0_121
info UiAutomator2 downloading UiAutomator2 Server APK v0.3.0 : https://github.com/appium/appium-uiautomator2-server/releases/download/v0.3.0/appium-uiautomator2-server-v0.3.0.apk
info UiAutomator2 downloading UiAutomator2 Server test APK v0.3.0 : https://github.com/appium/appium-uiautomator2-server/releases/download/v0.3.0/appium-uiautomator2-server-debug-androidTest.apk
info UiAutomator2 UiAutomator2 Server APKs downloaded

> appium-windows-driver@1.0.0 install D:\nodejs\node-global\node_modules\appium\node_modules\appium-windows-driver
> node install-npm.js

info WinAppDriver You must use WinAppDriver version 1.0
info WinAppDriver Verifying WinAppDriver version 1.0 is installed via comparing the checksum.
info WinAppDriver WinAppDriver.exe version 1.0 already exists with correct checksum, not re-downloading

> heapdump@0.3.9 install D:\nodejs\node-global\node_modules\appium\node_modules\heapdump
> node-gyp rebuild


D:\nodejs\node-global\node_modules\appium\node_modules\heapdump>if not defined npm_config_node_gyp (node "D:\nodejs\node_modules\npm\node_modules\npm-lifecycle\node-gyp-bin\\..\..\node_modules\node-gyp\bin\node-gyp.js" rebuild ) else (node "D:\nodejs\node_modules\npm\node_modules\node-gyp\bin\node-gyp.js" rebuild )
在此解决方案中一次生成一个项目。若要启用并行生成,请添加“/m”开关。
heapdump.cc
Creating library D:\nodejs\node-global\node_modules\appium\node_modules\heapdump\build\Release\addon.lib and object D:\nodejs\node-global\node_modules\appium\node_modules\heapdump\build\Release\addon.exp
Generating code
Finished generating code
addon.vcxproj -> D:\nodejs\node-global\node_modules\appium\node_modules\heapdump\build\Release\\addon.node
addon.vcxproj -> D:\nodejs\node-global\node_modules\appium\node_modules\heapdump\build\Release\addon.pdb (Full PDB)

> pre-commit@1.2.2 install D:\nodejs\node-global\node_modules\appium\node_modules\pre-commit
> node install.js


> wd@1.5.0 install D:\nodejs\node-global\node_modules\appium\node_modules\wd
> node scripts/build-browser-scripts


> spawn-sync@1.0.15 postinstall D:\nodejs\node-global\node_modules\appium\node_modules\spawn-sync
> node postinstall

npm WARN optional SKIPPING OPTIONAL DEPENDENCY: fsevents@1.1.3 (node_modules\appium\node_modules\fsevents):
npm WARN notsup SKIPPING OPTIONAL DEPENDENCY: Unsupported platform for fsevents@1.1.3: wanted {"os":"darwin","arch":"any"} (current: {"os":"win32","arch":"x64"})

+ appium@1.7.2
added 1375 packages in 682.967s


跑Python演示:


inspect.exe位置


根据你所安装的16299.15.170928-1534.rs3_release_WindowsSDK.iso版本,找到inspect.exe在该位置,可以用来查看界面元素
C:\ Program Files(x86)\ Windows Kits \ 10 \ bin \ 10.0.16299.0 \ 64位


git clone样例


D:\ workspace \ git> git clone https://github.com/Microsoft/WinAppDriver.git
克隆到'WinAppDriver'... 
remote:计数对象:2275,完成。
remote:压缩对象:100%(10/10),完成。
远程:总计2275(delta 4),重复使用3(delta 0),pack- 
reused 2265 接收对象:100%(2275/2275),13.97 MiB | 77.00 KiB / s,完成了。
解决增量:100%(1388/1388),完成。


开启python虚拟环境Appium364


为了确认相关appium python环境


C:\Users\cmd\Appium364>cd Scripts

C:\Users\cmd\Appium364\Scripts>activate.bat
(Appium364) C:\Users\cmd\Appium364\Scripts>pip list -o
DEPRECATION: The default format will switch to columns in the future. You can use --format=(legacy|columns) (or define a format=(legacy|columns) in your pip.conf under the [list] section) to disable this warning.
pip (9.0.2) - Latest: 10.0.0 [wheel]
wheel (0.30.0) - Latest: 0.31.0 [wheel]
You are using pip version 9.0.2, however version 10.0.0 is available.
You should consider upgrading via the 'python -m pip install --upgrade pip' command.
(Appium364) C:\Users\cmd\Appium364\Scripts>python -m pip install --upgrade pip
Collecting pip
Downloading https://files.pythonhosted.org/packages/62/a1/0d452b6901b0157a0134fd27ba89bf95a857fbda64ba52e1ca2cf61d8412/pip-10.0.0-py2.py3-none-any.whl (1.3MB)
100% |████████████████████████████████| 1.3MB 607kB/s
Installing collected packages: pip
Found existing installation: pip 9.0.2
Uninstalling pip-9.0.2:
Successfully uninstalled pip-9.0.2
Successfully installed pip-10.0.0
(Appium364) C:\Users\cmd\Appium364\Scripts>pip list -o
Package Version Latest Type
------- ------- ------ -----
wheel 0.30.0 0.31.0 wheel
(Appium364) C:\Users\cmd\Appium364\Scripts>pip list
Package Version
-------------------- -------
Appium-Python-Client 0.26
pip 10.0.0
selenium 3.11.0
setuptools 39.0.1
wheel 0.30.0


Pycharm打开项目WinAppDriver


切换好蟒蛇执行环境


好了,可以选中calculatortest.py右键Run了。
哦,先要启动appium --session-override然后
跑啊额...脚本报错了,appium server也显示


C:\Users\cmd>appium --session-override
[Appium] Welcome to Appium v1.7.2
[Appium] Non-default server args:
[Appium] sessionOverride: true
[Appium] Appium REST http interface listener started on 0.0.0.0:4723
[HTTP] --> POST /session {"capabilities":{"firstMatch":[{}],"alwaysMatch":{}},"desiredCapabilities":{"app":"Microsoft.WindowsCalculator_8wekyb3d8bbwe!App"}}
[debug] [HTTP] No route found. Setting content type to 'text/plain'
[HTTP] <-- POST /session 404 5 ms - 50


看了下脚本报错,和脚本内容,和服务器显示应该是没找到服务,既然底层是用的WinAppDriver 
那我们就直接启动该WinAppDriver服务器吧(关掉appium server否则会报冲突


C:\Program Files (x86)\Windows Application Driver>WinAppDriver.exe
Windows Application Driver listening for requests at: http://127.0.0.1:4723/
Address 'http://127.0.0.1:4723/' is already in use
Failed to initialize: 0x80004005


启动WinAppDriver服务器


C:\Program Files (x86)\Windows Application Driver>WinAppDriver.exe


哦,打开WinAppDriver服务器也需要开启,win10开发人员模式,否则会报错:


C:\Program Files (x86)\Windows Application Driver>WinAppDriver.exe
Developer mode is not enabled. Enable it through Settings and restart Windows Application Driver
Failed to initialize: 0x80004005


好,继续右键运行calculatortest.py 
可以看到成功的打开了计算器,但是执行到具体动作点击行为,报错了,从报错内容来看,应该是我的win10更新太新了,计算器的一些界面元素已经和当初该脚本不一致了,是
find_element_by_name之类没找到的错误,那说明我们的环境基本OK了。


接下来调整脚本内容,原内容为calculatortest


最终都改为不用名称改为Inspect.exe查得的AutomationId:值,即用API为find_element_by_accessibility_id 
附上最终调整后脚本:


#******************************************************************************
#
# Copyright (c) 2016 Microsoft Corporation. All rights reserved.
#
# This code is licensed under the MIT License (MIT).
#
# THE SOFTWARE IS PROVIDED "AS IS", WITHOUT WARRANTY OF ANY KIND, EXPRESS OR
# IMPLIED, INCLUDING BUT NOT LIMITED TO THE WARRANTIES OF MERCHANTABILITY,
# FITNESS FOR A PARTICULAR PURPOSE AND NONINFRINGEMENT. IN NO EVENT SHALL THE
# AUTHORS OR COPYRIGHT HOLDERS BE LIABLE FOR ANY CLAIM, DAMAGES OR OTHER
# // LIABILITY, WHETHER IN AN ACTION OF CONTRACT, TORT OR OTHERWISE, ARISING FROM,
# OUT OF OR IN CONNECTION WITH THE SOFTWARE OR THE USE OR OTHER DEALINGS IN
# THE SOFTWARE.
#
#******************************************************************************


import unittest
from appium import webdriver

class SimpleCalculatorTests(unittest.TestCase):

@classmethod

def setUpClass(self):
#set up appium
desired_caps = {}
desired_caps["app"] = "Microsoft.WindowsCalculator_8wekyb3d8bbwe!App"
self.driver = webdriver.Remote(
command_executor='http://127.0.0.1:4723',
desired_capabilities= desired_caps)

@classmethod
def tearDownClass(self):
self.driver.quit()

def getresults(self):
displaytext = self.driver.find_element_by_accessibility_id("CalculatorResults").text
displaytext = displaytext.strip("Display is " )
displaytext = displaytext.rstrip(' ')
displaytext = displaytext.lstrip(' ')
return displaytext


def test_initialize(self):
self.driver.find_element_by_accessibility_id("clearButton").click()
self.driver.find_element_by_accessibility_id("num7Button").click()
self.assertEqual(self.getresults(), "显示为 7")
self.driver.find_element_by_accessibility_id("clearButton").click()

def test_addition(self):
self.driver.find_element_by_accessibility_id("num1Button").click()
self.driver.find_element_by_accessibility_id("plusButton").click()
self.driver.find_element_by_accessibility_id("num7Button").click()
self.driver.find_element_by_accessibility_id("equalButton").click()
self.assertEqual(self.getresults(), "显示为 8")

def test_combination(self):
self.driver.find_element_by_accessibility_id("num7Button").click()
self.driver.find_element_by_accessibility_id("multiplyButton").click()
self.driver.find_element_by_accessibility_id("num9Button").click()
self.driver.find_element_by_accessibility_id("plusButton").click()
self.driver.find_element_by_accessibility_id("num1Button").click()
self.driver.find_element_by_accessibility_id("equalButton").click()
self.driver.find_element_by_accessibility_id("divideButton").click()
self.driver.find_element_by_accessibility_id("num8Button").click()
self.driver.find_element_by_accessibility_id("equalButton").click()
self.assertEqual(self.getresults(), "显示为 8")

def test_division(self):
self.driver.find_element_by_accessibility_id("num8Button").click()
self.driver.find_element_by_accessibility_id("divideButton").click()
self.driver.find_element_by_accessibility_id("num1Button").click()
self.driver.find_element_by_accessibility_id("equalButton").click()
self.assertEqual(self.getresults(), "显示为 8")

def test_multiplication(self):
self.driver.find_element_by_accessibility_id("num9Button").click()
self.driver.find_element_by_accessibility_id("multiplyButton").click()
self.driver.find_element_by_accessibility_id("num9Button").click()
self.driver.find_element_by_accessibility_id("equalButton").click()
self.assertEqual(self.getresults(), "显示为 81")

def test_subtraction(self):
self.driver.find_element_by_accessibility_id("num9Button").click()
self.driver.find_element_by_accessibility_id("minusButton").click()
self.driver.find_element_by_accessibility_id("num1Button").click()
self.driver.find_element_by_accessibility_id("equalButton").click()
self.assertEqual(self.getresults(), "显示为 8")

if __name__ == '__main__':
suite = unittest.TestLoader().loadTestsFromTestCase(SimpleCalculatorTests)
unittest.TextTestRunner(verbosity=2).run(suite)


附上WinAppDriver服务器部分日志:


POST /session/C487A78F-4370-4EBE-AB89-39840A5B5B57/element/42.463076.3.66/click HTTP/1.1
Accept: application/json
Accept-Encoding: identity
Connection: close
Content-Length: 77
Content-Type: application/json;charset=UTF-8
Host: 127.0.0.1:4723
User-Agent: Python http auth

{"id": "42.463076.3.66", "sessionId": "C487A78F-4370-4EBE-AB89-39840A5B5B57"}
HTTP/1.1 200 OK
Content-Length: 63
Content-Type: application/json

{"sessionId":"C487A78F-4370-4EBE-AB89-39840A5B5B57","status":0}

==========================================
POST /session/C487A78F-4370-4EBE-AB89-39840A5B5B57/element HTTP/1.1
Accept: application/json
Accept-Encoding: identity
Connection: close
Content-Length: 105
Content-Type: application/json;charset=UTF-8
Host: 127.0.0.1:4723
User-Agent: Python http auth

{"using": "accessibility id", "value": "num1Button", "sessionId": "C487A78F-4370-4EBE-AB89-39840A5B5B57"}

HTTP/1.1 200 OK
Content-Length: 100
Content-Type: application/json

{"sessionId":"C487A78F-4370-4EBE-AB89-39840A5B5B57","status":0,"value":{"ELEMENT":"42.463076.3.72"}}


==========================================
POST /session/C487A78F-4370-4EBE-AB89-39840A5B5B57/element/42.463076.3.72/click HTTP/1.1
Accept: application/json
Accept-Encoding: identity
Connection: close
Content-Length: 77
Content-Type: application/json;charset=UTF-8
Host: 127.0.0.1:4723
User-Agent: Python http auth

{"id": "42.463076.3.72", "sessionId": "C487A78F-4370-4EBE-AB89-39840A5B5B57"}
HTTP/1.1 200 OK
Content-Length: 63
Content-Type: application/json

{"sessionId":"C487A78F-4370-4EBE-AB89-39840A5B5B57","status":0}


疑问:


为啥直接用appium server会报那样的错,不是说WinAppDriver已经通过安装appium也安装成功了吗?那应该appium server也接收和处理的到脚本请求啊?
求解释。


解决疑问:


为啥直接用appium server会报那样的错,不是说WinAppDriver已经通过安装appium也安装成功了吗?那应该appium server也接收和处理的到
脚本请求啊?仔细去看
https://github.com/微软/ WinAppDriver / BLOB /主/ README.md
最末尾有如下内容:


Using Appium
Windows Application Driver is integrated with Appium, meaning if you use Appium as part of the test runner then it will launch WinAppDriver.exe and proxy the requests for you.

Important Notes
Appium will install Windows Application Driver for you on Windows if you don't already have it. Every release of Appium is linked to a specific release of WinAppDriver and will not proxy to a different version of WinAppDriver. The easiest way to manage this is to let Appium install WinAppDriver for you.
To create multiple sessions with one Appium server you need Appium 1.6.4 or newer
When pointing a test at Appium you need to include /wd/hub on the server URI. E.g. http://127.0.0.1:4723/wd/hub
For more details visit the Appium documentation: http://appium.io/slate/en/master/?ruby#windows-application-ui-testing


好了,得到启示,当在Appium上指向测试时,你需要在服务器URI上包含/ wd / hub。例如http://127.0.0.1:4723/wd/hub
去脚本里修改
command_executor =' http://127.0.0.1:4723 ',
改为
command_executor =' http: //127.0.0.1: 4723/wd/hub ”,


满怀欣喜,打开appium --session-override,走你跑calulatortest.py。
啊额.... appium server端报错了,仔细找到该句'“[MJSONWP]遇到内部错误运行命令:错误:你必须包括platformName功能“' 
根据错误提示,加上
desired_caps [”platformName“] =”Windows“


再执行又报错“[BaseDriver] SessionNotCreatedError:无法创建新会话。详细信息:由于以下原因,desiredCapabilities对象无效:deviceName不能为空,” 
根据错误提示,加上
desired_caps [ “deviceName”] =“WindowsPC”


最终如下:


def setUpClass(self):
#set up appium
desired_caps = {}
desired_caps["app"] = "Microsoft.WindowsCalculator_8wekyb3d8bbwe!App"
desired_caps["platformName"] = "Windows"
desired_caps["deviceName"] = "WindowsPC"
self.driver = webdriver.Remote(
command_executor='http://127.0.0.1:4723/wd/hub',
desired_capabilities= desired_caps)


好的,最后走你!!! 完美!


实际testerhome那两个帖子,已经带上了这个两个desired_caps,只是我没仔细看,不过这样折腾下来,还是锻炼了自己分析问题,找方案解决问题的能力,过程经验吸取到了。


猜你喜欢

转载自www.cnblogs.com/xuzhongtao/p/10275166.html