看直播的童鞋们应该会经常看到满屏幕的滚动弹幕,看到密密麻麻的弹幕第一印象就是怎么样高效加载来避免卡顿,弹幕组成部分包含用户头像、用户昵称、弹幕的内容、表情等,本文介绍的实现原理就是把这几部分绘制成一张图片,然后通过定时器移动弹幕图片,当图片不在屏幕范围内即销毁。
先看下效果

下面我会详细介绍下实现原理
1 .获取弹幕数据来源,因为我是模拟生成弹幕,弹幕的数据存放在工程里的plist文件中
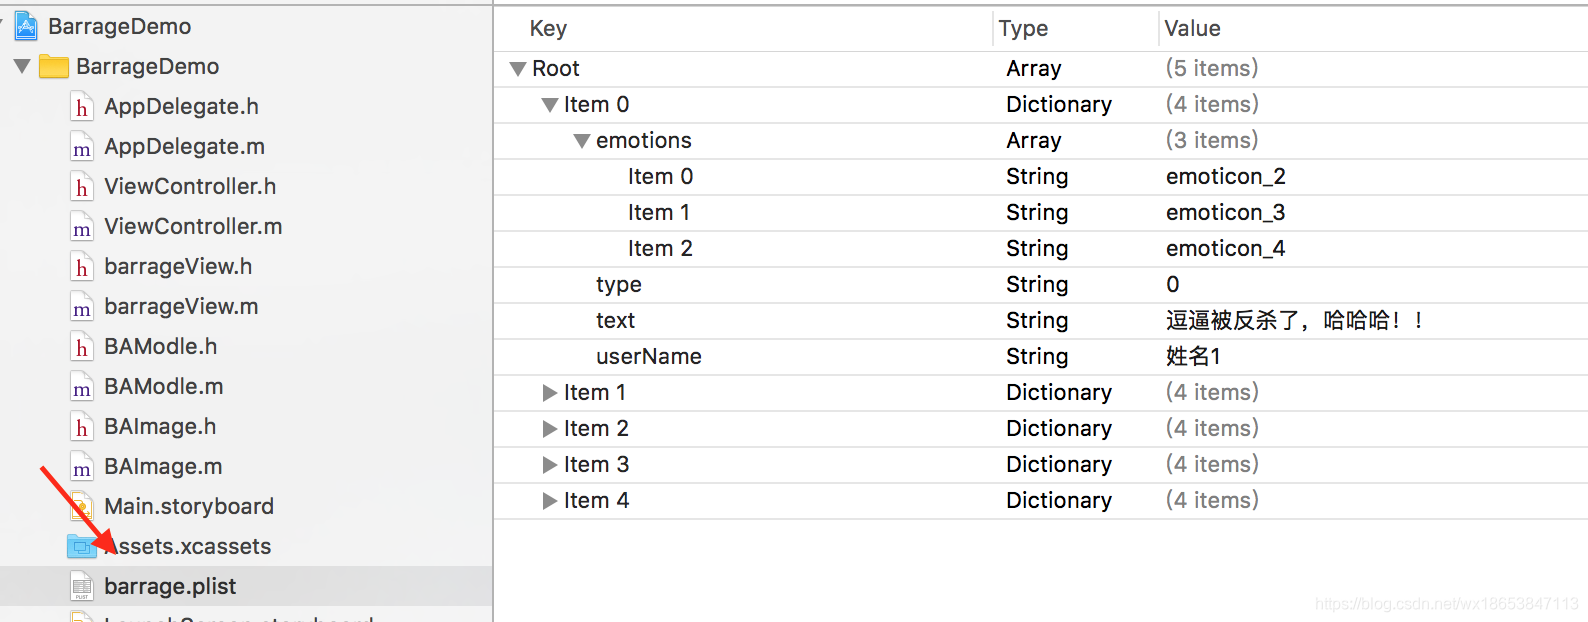
barrage.plist
emotions存放这条弹幕的表情,type表示是否是自己发的,text表示弹幕内容,userName表示用户昵称。取出plist文件的数据并转换成model。
#pragma mark - 获取数据源
- (void)loadData{
    // 获取plist全路径
    NSString *filePath = [[NSBundle mainBundle] pathForResource:@"barrage.plist" ofType:nil];
    // 从指定的路径中加载数据
    NSArray *array = [NSArray arrayWithContentsOfFile:filePath];

    // 遍历数组
    for (NSDictionary *dict in array) {
        // 字典转模型
        BAModle *barrageM = [BAModle barrageWithDict:dict];
        [self.danMus addObject:barrageM];
    }
}
2 .根据模型生成弹幕图片,通过点击屏幕生成模型,根据模型绘制图片。
#pragma mark - 触摸屏幕响应事件
- (void)touchesBegan:(NSSet<UITouch *> *)touches withEvent:(UIEvent *)event{

    // 获得一个随机整数
    NSInteger index = arc4random_uniform((u_int32_t)self.danMus.count);
    // 获得一个随机模型
    BAModle *danMu = self.danMus[index];
    // 根据模型生成图片
    BAImage *image = [self.danMuview imageWithBarrage:danMu];
    // 调整弹幕加载区域
    image.x = self.view.bounds.size.width;
    image.y = arc4random_uniform(self.danMuview.bounds.size.height - image.size.height);
    // 把图片加到弹幕view上
    [self.danMuview addImage:image];
}
下面是具体绘制弹幕图片过程,我先简单介绍下,首先在绘图之前要确定上下文的尺寸,相当于画板的大小,画板的长 = 头像的长 + 昵称的长 + 内容的长 + 表情的长 * 表情个数 + 间距。然后就是分别绘制背景图片,用户昵称,内容和表情,最后返回一张图片。
此处有两点需要注意:
1.由于头像是矩形,想显示成圆形,要先画一个圆,并设置超出圆形的部分要裁剪,再绘制头像。
2.由于上面设置超出圆形的部分要裁剪,那即将要绘制背景岂不是要被裁剪,所以在绘制圆形区域上一句执行了CGContextSaveGState(ctx)表示复制了一份画板(上下文)存到栈里,在绘制背景图片之前执行CGContextRestoreGState(ctx),表示用之前保存的画板替换当前的,因为之前保存的画板没有设置超出圆形区域要裁剪的需求,当然替换当前的画板,会把当前画板上的绘图也copy过去。
#pragma mark - 绘制弹幕图片
- (BAImage *)imageWithBarrage:(BAModle *)danMu{
    // 开启绘图上下文
    //
    UIFont *font = [UIFont systemFontOfSize:13];
    // 头像
    CGFloat iconH = 30;
    CGFloat iconW = iconH;
    // 间距
    CGFloat marginX = 5;

    // 表情的尺寸
    CGFloat emotionW = 25;
    CGFloat emotionH = emotionW;
    // 计算用户名占据的区域
    CGSize nameSize = [danMu.userName boundingRectWithSize:CGSizeMake(MAXFLOAT, MAXFLOAT) options:NSStringDrawingUsesLineFragmentOrigin attributes:@{NSFontAttributeName:font} context:nil].size;
    // 计算内容占据的区域
    CGSize textSize = [danMu.text boundingRectWithSize:CGSizeMake(MAXFLOAT, MAXFLOAT) options:NSStringDrawingUsesLineFragmentOrigin attributes:@{NSFontAttributeName:font} context:nil].size;

    // 位图上下文的尺寸
    CGFloat contentH = iconH;
    CGFloat contentW = iconW + 4 * marginX + nameSize.width + textSize.width + danMu.emotions.count * emotionH;

    CGSize contextSize = CGSizeMake(contentW, contentH);
    UIGraphicsBeginImageContextWithOptions(contextSize, NO, 0.0);

    // 获得位图上下文
    CGContextRef ctx = UIGraphicsGetCurrentContext();
    // 将上下文保存到栈中
    CGContextSaveGState(ctx);
    // 1.绘制圆形区域
    CGRect iconFrame = CGRectMake(0, 0, iconW, iconH);
    // 绘制头像圆形
    CGContextAddEllipseInRect(ctx, iconFrame);
    // 超出圆形的要裁剪
    CGContextClip(ctx);
    // 2.绘制头像
    UIImage *icon = danMu.type ? [UIImage imageNamed:@"headImage_1"]:[UIImage imageNamed:@"headImage_2"];
    [icon drawInRect:iconFrame];
    // 将上下文出栈替换当前上下文
    CGContextRestoreGState(ctx);
    // 3.绘制背景图片
    CGFloat bgX = iconW + marginX;
    CGFloat bgY = 0;
    CGFloat bgW = contentW - bgX;
    CGFloat bgH = contentH;
    danMu.type ? [[UIColor orangeColor] set]:[[UIColor whiteColor] set];
    [[UIBezierPath bezierPathWithRoundedRect:CGRectMake(bgX, bgY, bgW, bgH) cornerRadius:20.0] fill];

    // 4.绘制用户名
    CGFloat nameX = bgX + marginX;
    CGFloat nameY = (contentH - nameSize.height) * 0.5;
    [danMu.userName drawAtPoint:CGPointMake(nameX, nameY) withAttributes:@{NSAttachmentAttributeName:font,NSForegroundColorAttributeName:danMu.type == NO ? [UIColor orangeColor]:[UIColor blackColor]}];

    // 5.绘制内容
    CGFloat textX = nameX + nameSize.width + marginX;
    CGFloat textY = nameY;
    [danMu.text drawAtPoint:CGPointMake(textX, textY) withAttributes:@{NSAttachmentAttributeName:font,NSForegroundColorAttributeName:danMu.type == NO ? [UIColor blackColor]:[UIColor whiteColor]}];

    // 6.绘制表情
    __block CGFloat emotionX = textX + textSize.width;
    CGFloat emotionY = (contentH - emotionH) * 0.5;
    [danMu.emotions enumerateObjectsUsingBlock:^(NSString *emotionName, NSUInteger idx, BOOL * _Nonnull stop) {
        // 加载表情图片
        UIImage *emotion = [UIImage imageNamed:emotionName];
        [emotion drawInRect:CGRectMake(emotionX, emotionY, emotionW, emotionH)];
        // 修改emotionX
        emotionX += emotionW;
    }];
    // 从位图上下文中获得绘制好的图片
    UIImage *image = UIGraphicsGetImageFromCurrentImageContext();

    return [[BAImage alloc] initWithCGImage:image.CGImage scale:[UIScreen mainScreen].scale orientation:UIImageOrientationUp];
}
3 .开启绘图定时器,回调方法是setNeedsDisplay,这样就会执行- (void)drawRect:(CGRect)rect每次修改image.x(由于UIImage没有x、y属性,所以写了个类拓展BAImage),滚动不在屏幕范围内的会销毁
#pragma mark - 添加定时器
- (void)addTimer{
    if (self.link) {
        return;
    }
    // 每秒执行60次回调
    CADisplayLink *link = [CADisplayLink displayLinkWithTarget:self selector:@selector(setNeedsDisplay)];
    // 将定时器添加到runLoop
    [link addToRunLoop:[NSRunLoop currentRunLoop] forMode:NSRunLoopCommonModes];
    self.link = link;
}
#pragma mark - 绘制移动
- (void)drawRect:(CGRect)rect{

    for (BAImage *image in self.imageArray) {
        image.x -= 3;
        // 绘制图片
        [image drawAtPoint:CGPointMake(image.x, image.y)];
        // 判断图片是否超出屏幕
        if (image.x + image.size.width < 0) {
            [self.deleteImageArray addObject:image];
        }
    }
    // 移除超过屏幕的弹幕
    for (BAImage *image in self.deleteImageArray) {
        [self.imageArray removeObject:image];
    }
    [self.deleteImageArray removeAllObjects];
}