这是一个简易版的流式布局,为什么这么简单呢?因为我们调用的是鸿阳的依赖,是大神写完的,我们只是调用一下,下面我给大家解说一下简易版的流式布局流程,非常简单
先把依赖导入工具中
//流式布局依赖
  implementation 'com.hyman:flowlayout-lib:1.1.2'
这是一个布局类,大家可以采用一下
<?xml version="1.0" encoding="utf-8"?>
<LinearLayout xmlns:android="http://schemas.android.com/apk/res/android"
    xmlns:app="http://schemas.android.com/apk/res-auto"
    xmlns:tools="http://schemas.android.com/tools"
    android:layout_width="match_parent"
    android:layout_height="match_parent"
    android:orientation="vertical"
    tools:context=".MainActivity">

    <com.zhy.view.flowlayout.TagFlowLayout
        android:id="@+id/id_flowlayout"
        app:max_select="-1"
        android:layout_width="fill_parent"
        android:layout_height="wrap_content"
        android:padding="20dp">
    </com.zhy.view.flowlayout.TagFlowLayout>

</LinearLayout>
这是一个关键的文件,因为我们要从这里面 设置字体颜色和字体的背景色
<?xml version="1.0" encoding="utf-8"?>
<TextView xmlns:android="http://schemas.android.com/apk/res/android"
    xmlns:tools="http://schemas.android.com/tools"
    android:layout_width="wrap_content"
    android:layout_height="wrap_content"
    android:layout_margin="5dp"
    android:background="@color/colorAccent"
    android:text="Helloworld"
    android:textColor="@color/colorPrimaryDark"
    tools:ignore="MissingDefaultResource">
</TextView>
最后在主页面调用一下,写个数据就OK了
import android.os.Bundle;
import android.support.annotation.Nullable;
import android.support.v7.app.AppCompatActivity;
import android.view.View;
import android.widget.TextView;

import com.zhy.view.flowlayout.FlowLayout;
import com.zhy.view.flowlayout.TagAdapter;
import com.zhy.view.flowlayout.TagFlowLayout;

import butterknife.BindView;
import butterknife.ButterKnife;

public class MainActivity extends AppCompatActivity {
    @BindView(R.id.id_flowlayout)
    TagFlowLayout idFlowlayout;

    //数组
    private String[] data = {"流感", "咳嗽", "过敏", "发烧", "感冒", "湿疹", "便秘", "痔疮",
            "协和", "鼻炎", "失眠", "痛风", "上火", "脚气", "抑郁症", "性欲", "乳腺增生", "头晕", "腰痛"};

    @Override
    protected void onCreate(Bundle savedInstanceState) {
        super.onCreate(savedInstanceState);
        setContentView(R.layout.activity_main);
        ButterKnife.bind(this);

        idFlowlayout.setAdapter(new TagAdapter<String>(data) {
            @Override
            public View getView(FlowLayout parent, int position, String s) {
                //加入你的布局
                TextView tv = (TextView) View.inflate(MainActivity.this, R.layout.tv, null);
                tv.setText(s);
                return tv;
            }
        });

    }
}
这是效果图
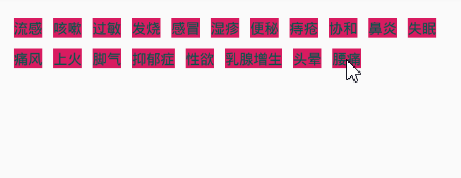
是不是特别简单