1 原有的针对文章的全文检索方式
1.1文章提交
正常情况下,发表一篇文章时,点击“提交”的时候,如图:

点击“提交”的时候是将文章所有字段的信息提交到后台,其实就是将这篇文章对应的“内容模型”中的数据都提交到后台了(“内容模型”的含义可以参考《jeecms系统使用介绍——jeecms中的内容、栏目、模型之间的关系》)。
这个过程比较重要的就是文章内容了,这里是通过百度的ueditor编辑器编辑了内容,然后将其提交的,这部分内容正文的数据其实是保存到了表:
jc_content_txt- 1
的“txt”字段之中,如图:
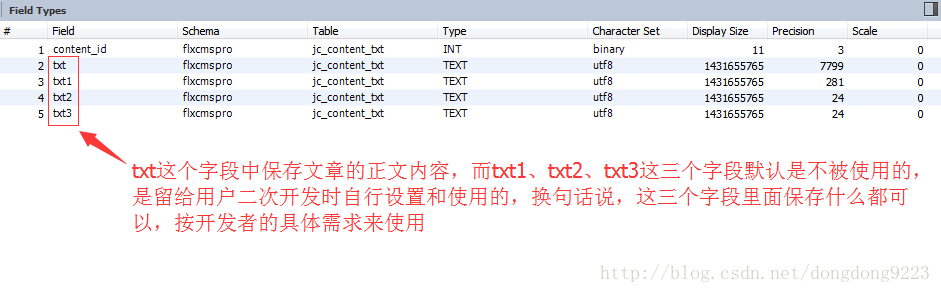
而其它几个字段:
-
txt1 -
txt2 -
txt3
- 1
- 2
- 3
这些字段中是没有保存内容的,它们是附加字段,默认没有被使用,留由用户在二次开发时自行设置。这也为我们处理对附件文件的全文检索提供了可能。
文章内容的保存是在包:
com.jeecms.cms.action.admin.main- 1
里的类:
ContentAct- 1
-
@RequiresPermissions("content:o_save") -
@RequestMapping("/content/o_save.do") -
public String save(Content bean, ContentExt ext, ContentTxt txt, -
Boolean copyimg,Integer[] channelIds, Integer[] topicIds, -
Integer[] viewGroupIds, -
String[] attachmentPaths, String[] attachmentNames, -
String[] attachmentFilenames, String[] picPaths, String[] picDescs, -
Integer channelId, Integer typeId, String tagStr, Boolean draft, -
Integer cid, Integer modelId,Short charge,Double chargeAmount, -
Boolean rewardPattern,Double rewardRandomMin, -
Double rewardRandomMax,Double[] rewardFix, HttpServletRequest request,HttpServletResponse response, ModelMap model)
- 1
- 2
- 3
- 4
- 5
- 6
- 7
- 8
- 9
- 10
- 11
1.2 建立索引
文章在“ContentAct”类的“save”方法中保存过程中,系统会单独开启一个线程,在类:
com.jeecms.cms.staticpage.ContentStatusChangeThread- 1
里的方法:
public void run()- 1
中。逐层进入到类:
com.jeecms.cms.lucene.LuceneContent- 1
里面的方法:
public static Document createDocument(Content c)- 1
在这个方法里面,会把文章的相关信息拿出来,包括文章的正文内容,存入Lucene索引里面去。
2 对文章中上传的附件进行全文检索
2.1 实现思路
我们先来说一下实现的思路。有几点我们是可以确认的:
-
1,在文章中上传的附件是保存在了服务器的磁盘上,有一个磁盘路径。
-
2,文章提交时,所有信息都会传给后台服务器。
-
3,后台服务器对文章内容有一个保存的过程。
-
4,保存过程中还会再单独建一个线程,用来对文章内容建立索引。
那么,根据我们的需求,要达到目的,我们完全可以这样来实现:
-
1,在文章中上传的附件时,将上传到服务器的附件路径及文件名称先在浏览器的前台页面保存一下。
-
2,文章提交时,将附件路径及名称也传递到后台服务器。
-
3,在后台服务器保存文章内容的过程中,将附件信息也保存一下,保存到数据库表“jc_content_txt”的字段“txt1”里面。这里相当于使用了“txt1”这个默认字段。
-
4,对文章内容创建索引时,除了对文章正文的html内容建立索引,还根据附件路径及名称,找到附件文件并进行读取,对这些附件的内容建立索引。
2.2 上传时保存附件路径及名称到文章页面
编辑文章的页面在:
{jeecms}/WebRoot/WEB-INF/jeecms_sys/content/add.html- 1
这个页面,我们在其中加入一个区域,保存上传附件的服务器路径及其名称。注意附件上传并保存到服务器之后其名称就变了,所以需要保存一下。
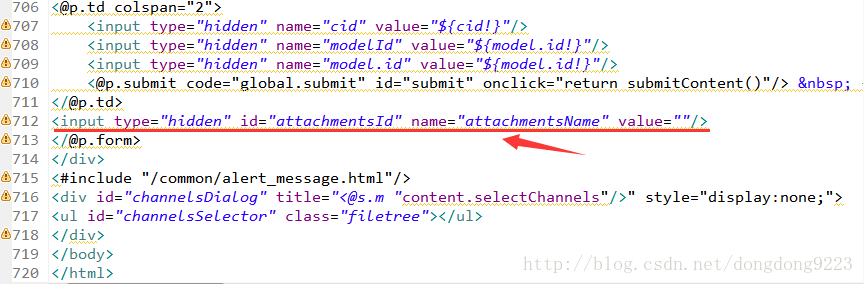
如图所示“input”为新加入部分,“value”值会存放内容。每次上传附件时会将信息保存的这个“input”的“value”里面,那么还要在上传操作中加入保存的方法。
在内容中上传附件,如图:
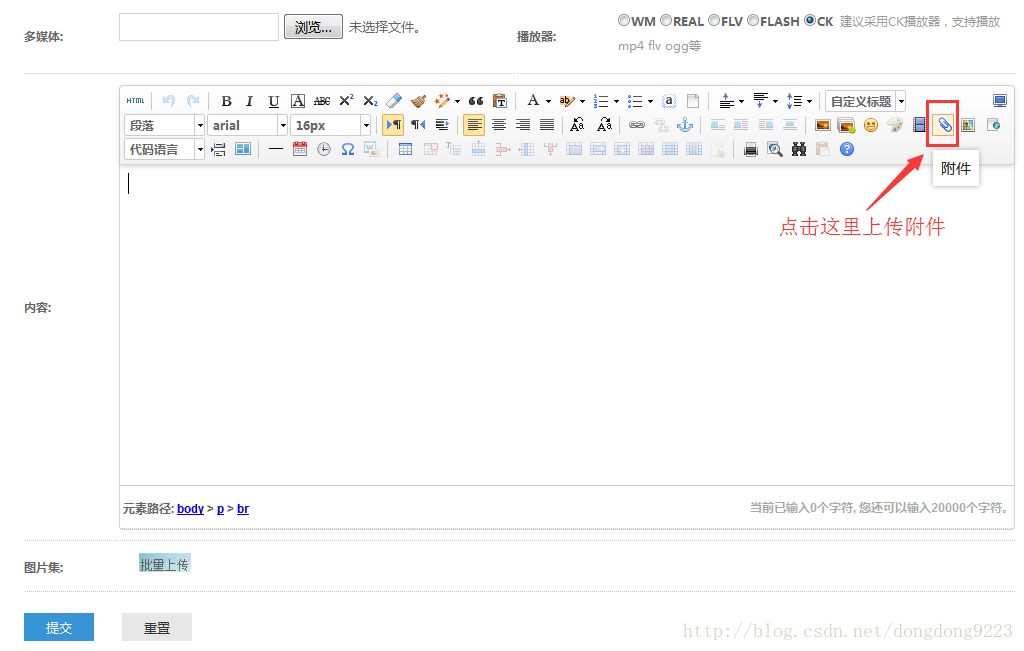
点击附件图标,进入附件上传界面,如图:
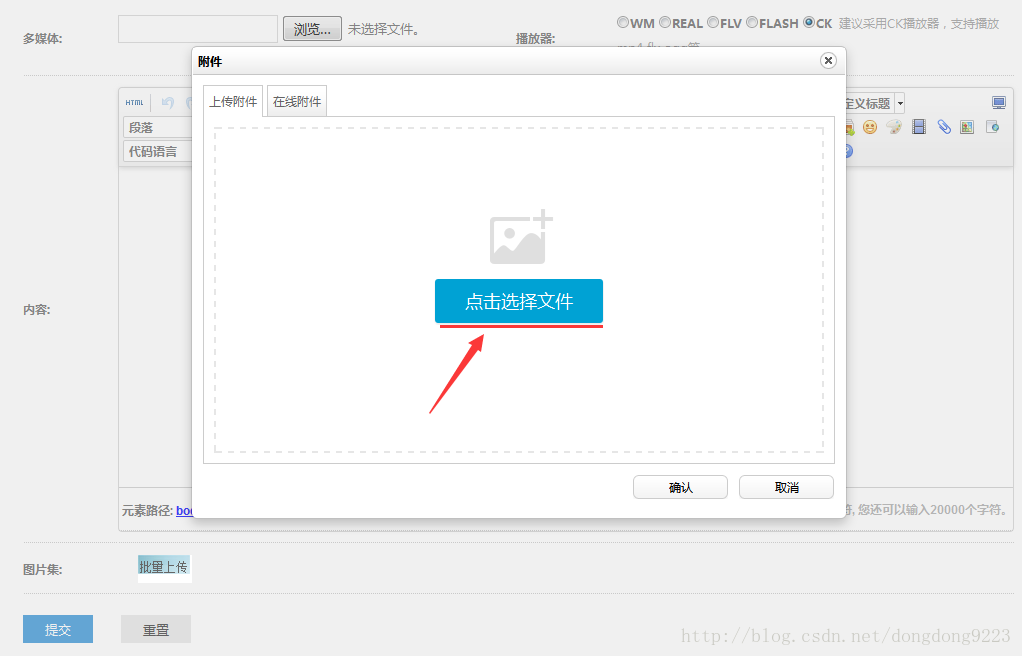
先点击“点击选择文件”按钮,选择了附件,如图:
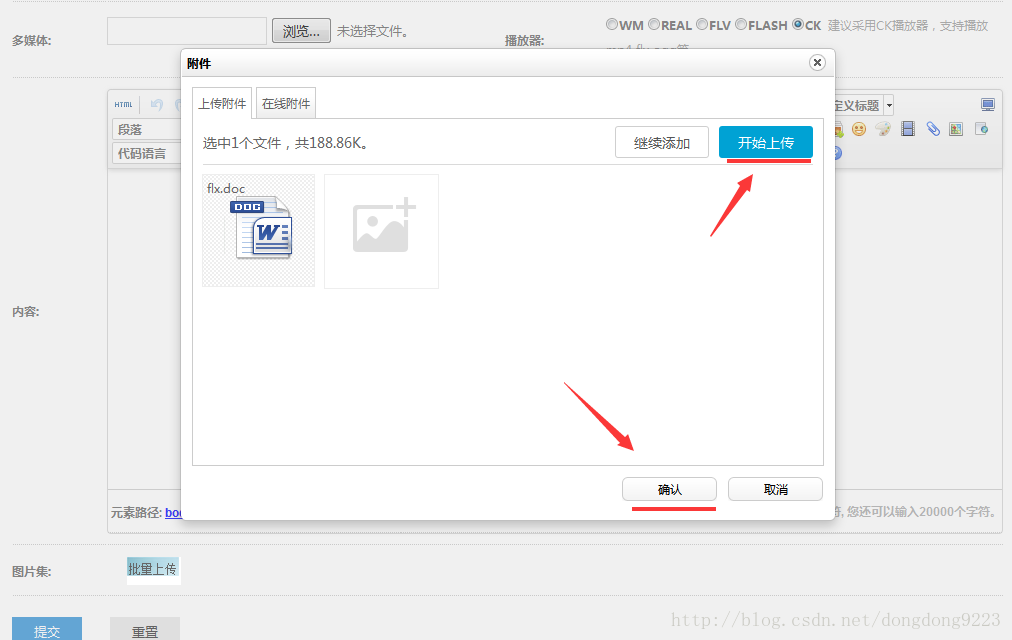
然后点击“开始上传”,这个过程会将文件上传到服务器的磁盘文件中。点击上传时的操作在:
{jeecms}/WebRoot/thirdparty/ueditor/dialogs/attachment/attachment.js
中的方法:
uploader.on
里面,这是百度“ueditor”编辑器,我们做些修改之后内容如下:
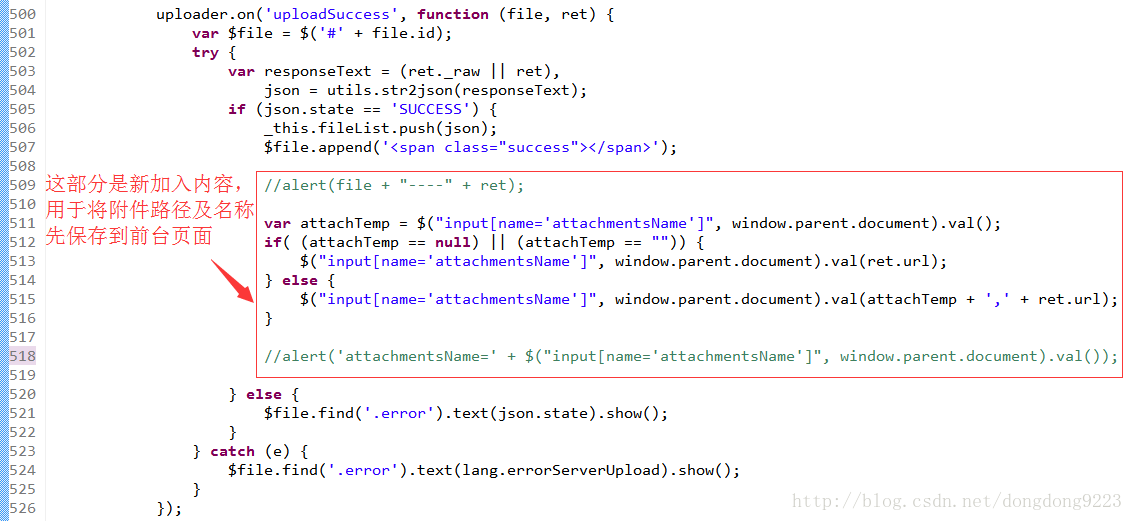
在原有内容里,加入了每次上传时先将所上传的附件文件的路径及名称保存到前台页面的功能。详细代码如下:
-
uploader.on('uploadSuccess', function (file, ret) { -
var $file = $('#' + file.id); -
try { -
var responseText = (ret._raw || ret), -
json = utils.str2json(responseText); -
if (json.state == 'SUCCESS') { -
_this.fileList.push(json); -
$file.append('<span class="success"></span>'); -
//alert(file + "----" + ret); -
var attachTemp = $("input[name='attachmentsName']", window.parent.document).val(); -
if( (attachTemp == null) || (attachTemp == "")) { -
$("input[name='attachmentsName']", window.parent.document).val(ret.url); -
} else { -
$("input[name='attachmentsName']", window.parent.document).val(attachTemp + ',' + ret.url); -
} -
//alert('attachmentsName=' + $("input[name='attachmentsName']", window.parent.document).val()); -
} else { -
$file.find('.error').text(json.state).show(); -
} -
} catch (e) { -
$file.find('.error').text(lang.errorServerUpload).show(); -
} -
});
- 1
- 2
- 3
- 4
- 5
- 6
- 7
- 8
- 9
- 10
- 11
- 12
- 13
- 14
- 15
- 16
- 17
- 18
- 19
- 20
- 21
- 22
- 23
- 24
- 25
- 26
- 27
可以把对alert的注释删除掉,然后看一下每次记录的内容。这里上传三个文件,看一下效果:
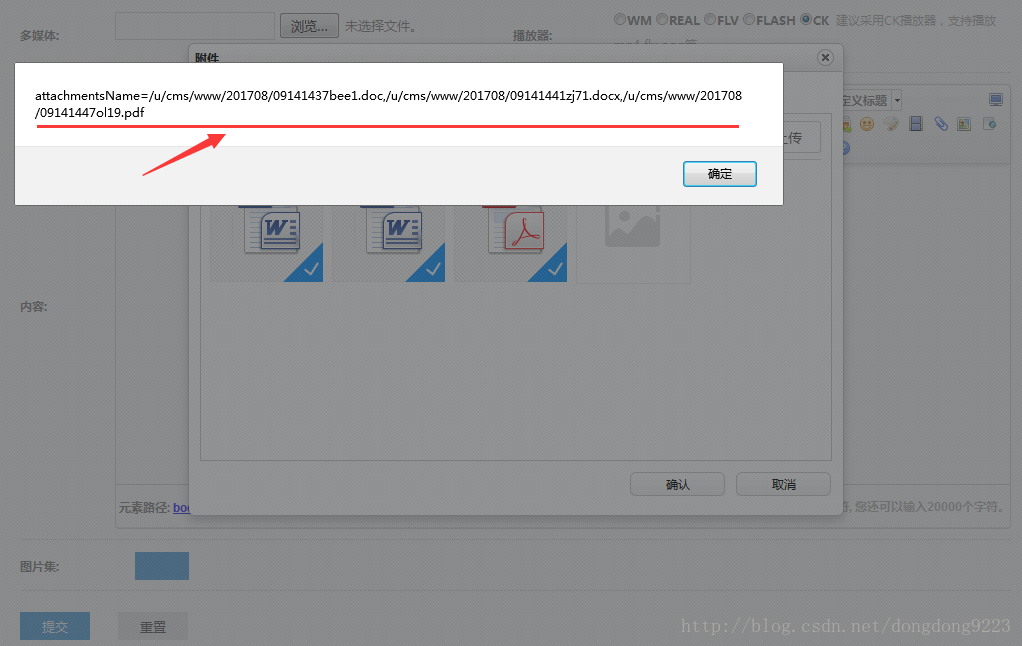
一个doc,一个docx,一个pdf,这3个上传文件的服务器相对路径及新名称都得到了。
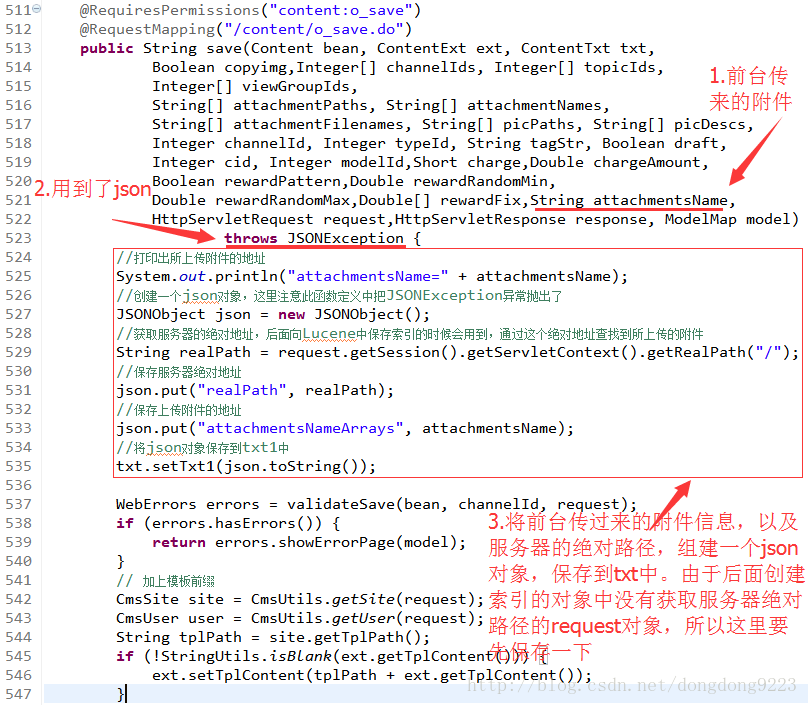
3 提交文章时将附件路径传到后台
之前已经说了,点击了“提交”按钮后,后台对文章内容的保存是在类:
com.jeecms.cms.action.admin.main.ContentAct- 1
的方法:
public String save- 1
中进行的,然后在对其建立索引。为了能够对前台传过来的附件内容也能建立索引,要对“save”方法加点内容,如下:
4 对附件创建索引
万事俱备,只欠东风。该得到的信息都得到了,最后我就需要对上传的附件创建索引了。之前讲过创建索引是在类:
com.jeecms.cms.lucene.LuceneContent- 1
里面的方法:
public static Document createDocument(Content c)- 1
进行的,这里我们还在这里面进行。
这里面有一个默认处理模型项“txt1”的地方,如下:
-
if (!StringUtils.isBlank(c.getTxt1())) { -
doc.add(new Field(CONTENT1, c.getTxt1(), Field.Store.NO, -
Field.Index.ANALYZED)); -
}
- 1
- 2
- 3
- 4
我们对它进行修改,在这个区域里面,将上传的附件按照类型的不同分别创建索引,内容如下:
-
if (!StringUtils.isBlank(c.getTxt1())) { -
InputStream in = null; -
InputStreamReader reader = null; -
try { -
//读取txt1中保存的json串 -
JSONObject json = new JSONObject(c.getContentTxt().getTxt1()); -
//读取json串中保存的应用服务器在操作系统上的绝对路径 -
String realPath = json.getString("realPath"); -
//读取json串中保村的上传附件的相对路径及名称 -
String attachmentsNameArrays = json.getString("attachmentsNameArrays"); -
//得到索引文件数组 -
String []arr = attachmentsNameArrays.split(","); -
for (int j = 0; j < arr.length; j++) { -
//将要搜索word文件的地方 -
String dateDir = realPath + "\\" + arr[j]; -
//读取当前这个附件文件 -
File file = new File(dateDir); -
//输出这个文件是第几个附件 -
System.out.println("j=" + j); -
//输出这个文件的路径及名称 -
System.out.println("file=" + file); -
//获取文件名称 -
String fileName = file.getName(); -
//获取文件后缀名 -
String fileType = fileName.substring(fileName.lastIndexOf(".") + 1, fileName.length()).toLowerCase(); -
//输出文件名称 -
System.out.println("fileName=" + fileName); -
//输出文件名称 -
System.out.println("fileType=" + fileType); -
//创建当前附件文件的输入流 -
in = new FileInputStream(file); -
//在当前附件文件的后缀名不为空的情况下进行操作,创建索引的文件包括doc、docx、pdf、txt -
if (fileType != null && !fileType.equals("")) { -
if (fileType.equals("doc")) { -
//创建斌保存doc文件索引 -
//读取doc文件 -
WordExtractor wordData = new WordExtractor(in); -
//创建Field对象,并放入lucene的document对象doc中 -
doc.add(new Field(CONTENT1, wordData.getText(), Field.Store.NO, -
Field.Index.ANALYZED)); -
//输出当前操作的文件名称 -
System.out.println("注意:已为文件“" + fileName + "”创建了索引"); -
wordData.close(); -
} else if ( fileType.equals("docx")) { -
//创建斌保存docx文件索引 -
//读取docx文件 -
XWPFWordExtractor wordData = new XWPFWordExtractor(new XWPFDocument(in)); -
//创建Field对象,并放入lucene的document对象doc中 -
doc.add(new Field(CONTENT1, wordData.getText(), Field.Store.NO, -
Field.Index.ANALYZED)); -
//输出当前操作的文件名称 -
System.out.println("注意:已为文件“" + fileName + "”创建了索引"); -
wordData.close(); -
}else if ( fileType.equals("pdf")) { -
//创建斌保存pdf文件索引 -
//读取pdf文件 -
PDFParser parser = new PDFParser(in); -
parser.parse(); -
PDDocument pdDocument = parser.getPDDocument(); -
PDFTextStripper stripper = new PDFTextStripper(); -
// String result = stripper.getText(pdDocument); -
//创建Field对象,并放入lucene的document对象doc中 -
doc.add(new Field(CONTENT1, stripper.getText(pdDocument), Field.Store.NO, -
Field.Index.ANALYZED)); -
//输出当前操作的文件名称 -
System.out.println("注意:已为文件“" + fileName + "”创建了索引"); -
pdDocument.close(); -
} else if ( fileType.equals("txt") ) { -
//创建斌保存txt文件索引 -
//读取txt文件 -
//建立一个输入流对象reader -
reader = new InputStreamReader(in); -
//建立一个对象,它把文件内容转成计算机能读懂的语言 -
BufferedReader br = new BufferedReader(reader); -
String wordData = ""; -
String line = null; -
//一次读入一行数据 -
while ((line = br.readLine()) != null) { -
wordData += line; -
} -
//创建Field对象,并放入lucene的document对象doc中 -
doc.add(new Field(CONTENT1, wordData, Field.Store.NO, -
Field.Index.ANALYZED)); -
//输出当前操作的文件名称 -
System.out.println("注意:已为文件“" + fileName + "”创建了索引"); -
} else { -
} -
} -
} -
} catch (JSONException e) { -
e.printStackTrace(); -
} catch (FileNotFoundException e) { -
e.printStackTrace(); -
} catch (IOException e) { -
e.printStackTrace(); -
} finally { -
if (in != null) { -
try { -
in.close(); -
} catch (IOException e) { -
e.printStackTrace(); -
} -
} -
if (reader != null) { -
try { -
reader.close(); -
} catch (IOException e) { -
e.printStackTrace(); -
} -
} -
} -
}
- 1
- 2
- 3
- 4
- 5
- 6
- 7
- 8
- 9
- 10
- 11
- 12
- 13
- 14
- 15
- 16
- 17
- 18
- 19
- 20
- 21
- 22
- 23
- 24
- 25
- 26
- 27
- 28
- 29
- 30
- 31
- 32
- 33
- 34
- 35
- 36
- 37
- 38
- 39
- 40
- 41
- 42
- 43
- 44
- 45
- 46
- 47
- 48
- 49
- 50
- 51
- 52
- 53
- 54
- 55
- 56
- 57
- 58
- 59
- 60
- 61
- 62
- 63
- 64
- 65
- 66
- 67
- 68
- 69
- 70
- 71
- 72
- 73
- 74
- 75
- 76
- 77
- 78
- 79
- 80
- 81
- 82
- 83
- 84
- 85
- 86
- 87
- 88
- 89
- 90
- 91
- 92
- 93
- 94
- 95
- 96
- 97
- 98
- 99
- 100
- 101
- 102
- 103
- 104
- 105
- 106
- 107
- 108
- 109
- 110
- 111
- 112
- 113
- 114
- 115
- 116
- 117
- 118
- 119
- 120
- 121
- 122
- 123
- 124
- 125
- 126
- 127
- 128
- 129
- 130
- 131
- 132
- 133
- 134
- 135
- 136
- 137
- 138
- 139
- 140
- 141
- 142
- 143
- 144
- 145
- 146
- 147
- 148
- 149
- 150
- 151
- 152
- 153
- 154
- 155
- 156
- 157
- 158
- 159
- 160
这里面对doc、docx、pdf、txt几种类型的文件分别创建了索引,具体的调用方式可以参考《使用Lucene对doc、docx、pdf、txt文档进行全文检索功能的实现》这篇文章,此处就不赘述了。
5 搜索
至此,功能事先就完成了。我们新建一篇文章,上传一个附件进去。然后搜索一个只在附件中才出现过的内容,进行搜索。比如新建一篇文章,如图:
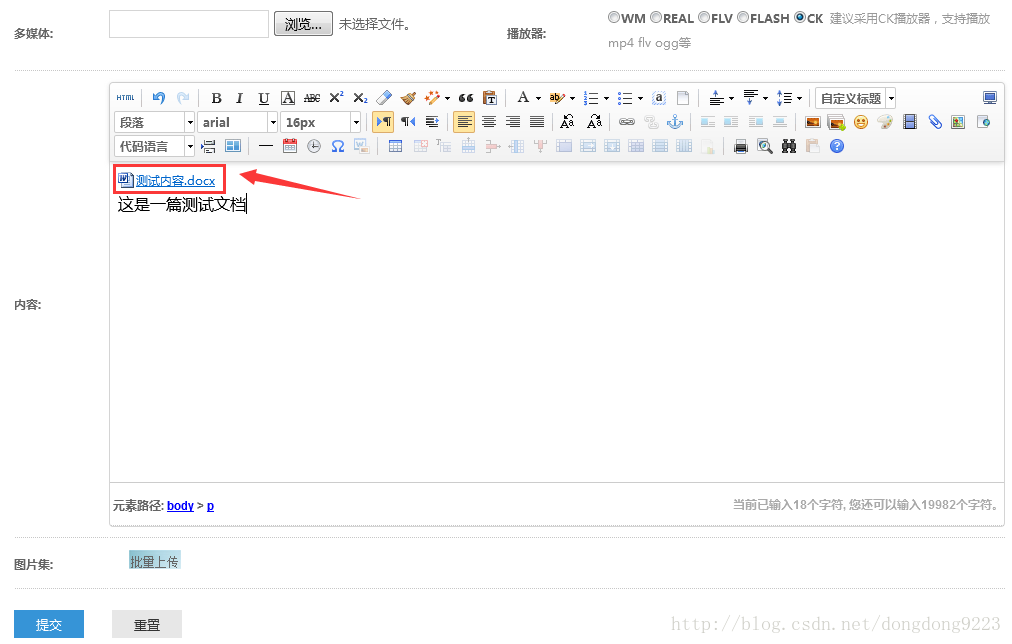
里面上传了一个附件,内容为:
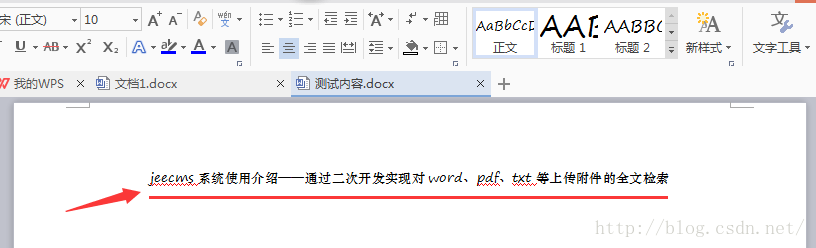
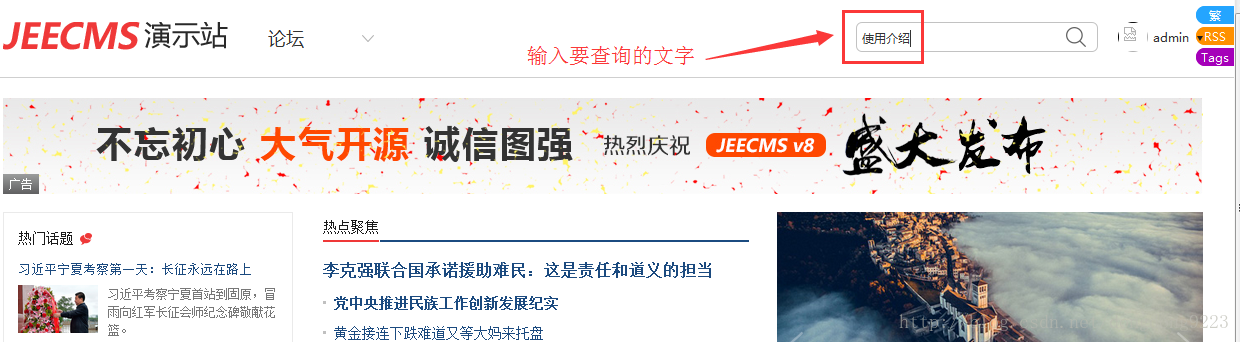
里面的内容很简单。现在我们在前台页面上搜索“上传附件”这几个汉字,比如输入“使用介绍”,如图:
然后点击键盘回车或鼠标点击右侧的搜索按钮,得到搜索结果如下:
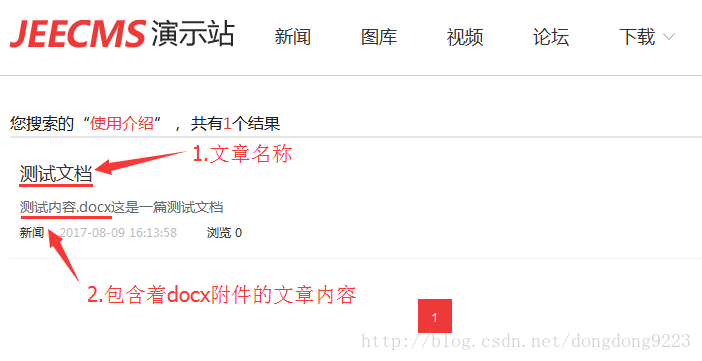
能够看到,文章的正文内容里直接看是没有“使用介绍”这几个字的,但搜索这几个字还是把这篇文章搜了出来,说明我们建立的索引生效了。