Canvas画布绘制方法
arc()方法------画圆弧
context.arc(x,y,半径,开始角度,结束角度,是否逆时针旋转);从指定的开始角度开始至结束角度为止,按指定方向进行圆弧绘制。最后的参数为true时,按逆时针旋转。角度不是“度”,而是“弧度”。转换公式:var rad(弧度)=deg(度)*Math.PI/180;
简单案例:
<!doctype html>
<html>
<head>
<meta charset="utf-8">
<title>画弧arc()</title>
</head>
<body>
<canvas id="canvas" width="400" height="400"></canvas>
<script type="text/javascript">
	var canvas=document.getElementById("canvas");
	var ctx=canvas.getContext("2d");
	//使用颜色填充矩形
	ctx.fillStyle="#f0f0f0";
	ctx.fillRect(0,0,400,400);
	//描绘圆弧
	//路径开始
	ctx.beginPath();
	var startAngle=0;
	var endAngle=120*Math.PI/180;//120度的圆弧
	ctx.arc(140,140,100,startAngle,endAngle,false);
	//绘制处理
	ctx.strokeStyle="#aa0000";
	ctx.lineWidth=2;
	ctx.stroke();
</script>
</body>
</html>

arcTo()方法------先直线后画弧
context.arcTo(x1,y1,x2,y2,半径);从路径的起点与终点分别向坐标(x1,y1)、(x2,y2)绘制直线后,再绘制指定半径的圆弧。
简单案例:
<!doctype html>
<html>
<head>
<meta charset="utf-8">
<title>arcTo()先画直线后画弧</title>
</head>

<body>
<canvas id="canvas" width="400" height="300"></canvas>
<script type="text/javascript">
	var canvas=document.getElementById("canvas");
	var ctx=canvas.getContext("2d");
	//使用颜色填充矩形
	ctx.fillStyle="#f0f0f0";
	ctx.fillRect(0,0,400,300);
	//开始画弧
	//路径开始
	ctx.beginPath();
	ctx.moveTo(30,20);
	ctx.arcTo(400,140,30,280,30);
	ctx.lineTo(30,280);
	//绘制处理
	ctx.strokeStyle="#aa0000";
	ctx.lineWidth=3;
	ctx.stroke();
</script>
</body>
</html>

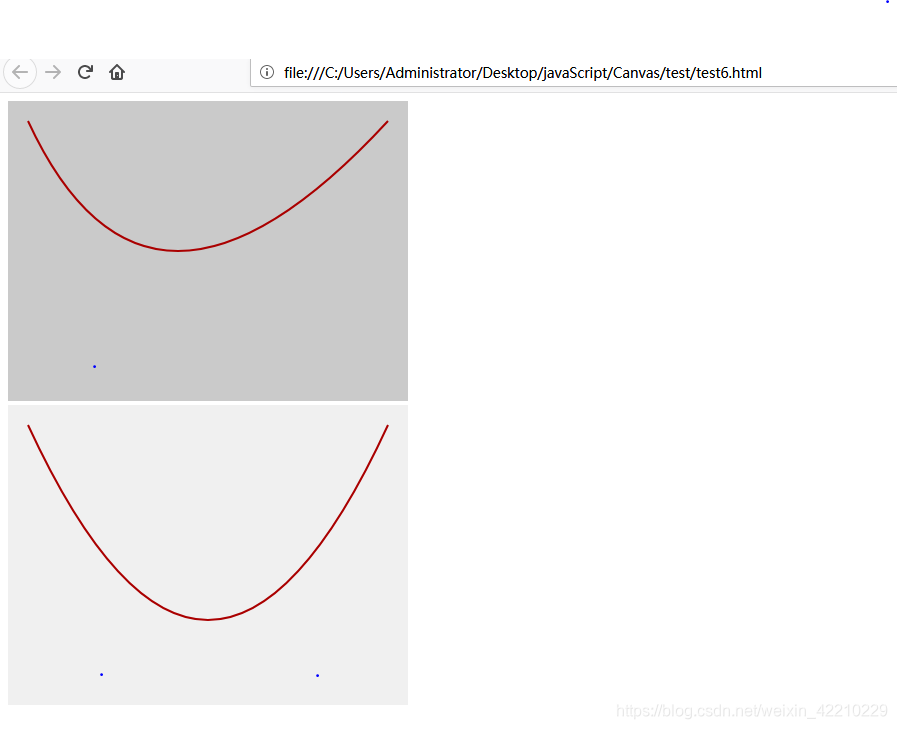
quadraticCurveTo()与bezierCurveTo()方法------画二元、三元抛物线
context.quadraticCurveTo(cpx,cpy,x,y);quadraticCurveTo()方法用于绘制二元抛物线,绘制由最后指定的位置开始至坐标(x,y)的曲线。此时,使用控制点为(cpx,cpy)的二元抛物线进行连接,并将位置(x,y)追加到路径中。
context.bezierCurveTo(cp1x,cp1y,cp2x,cp2y,x,y);绘制由最后指定路径位置至指定位置的曲线。此时,使用控制点分别为(cp1x,cp1y)、(cp2x,cp2y)的三元抛物线进行连接,并将位置(x,y)追加到路径中。
简单案例
<!doctype html>
<html>
<head>
<meta charset="utf-8">
<title>quadraticCurveTo()与bezierCurveTo()画抛物线</title>
</head>

<body>
<!--二元抛物线-->
<canvas id="canvas_a" width="400" height="300"></canvas>
<script type="text/javascript">
	var canvas_a=document.getElementById("canvas_a");
	var ctx_a=canvas_a.getContext("2d");
	//使用颜色填充矩形
	ctx_a.fillStyle="#cacaca";
	ctx_a.fillRect(0,0,400,300);
	//描绘曲线
	//路径开始
	ctx_a.beginPath();
	ctx_a.moveTo(20,20);
	ctx_a.quadraticCurveTo(140,280,380,20);
	//绘制处理
	ctx_a.strokeStyle="#aa0000";
	ctx_a.lineWidth=2;
	ctx_a.stroke();
</script>
<br/>
<!--三元抛物线-->
<canvas id="canvas" width="400" height="300"></canvas>
<script type="text/javascript">
	var canvas=document.getElementById("canvas");
	var ctx=canvas.getContext("2d");
	//使用颜色填充矩形
	ctx.fillStyle="#f0f0f0";
	ctx.fillRect(0,0,400,300);
	//描绘曲线
	//路径开始
	ctx.beginPath();
	ctx.moveTo(20,20);
	ctx.bezierCurveTo(140,280,260,280,380,20);
	//绘制处理
	ctx.strokeStyle="#aa0000";
	ctx.lineWidth=2;
	ctx.stroke();
</script>

</body>
</html>
rect()方法------用于绘制矩形
context.rect(x,y,宽度,高度);| context.strokeRect(x,y,width,height) | 绘制矩形的轮廓 |
| context.fillRect(x,y,width,height) | 填充矩形 |
| context.clearRect(x,y,width,height) | 清空矩形 |
绘制渐变效果
线性渐变
//创建CanvasGradient对象
CanvasGradient=context.createLinearGradient(x1,y1,x2,y2);
//追加渐变颜色
CanvasGradient.addColorStop(颜色开始的相对位置,颜色)
首先使用createLinearGradient()方法创建代表渐变效果的CanvasGradient对象。四个参数表示由位置(x1,y1)至位置(x2,y2)显示渐变效果。接着使用CanvasGradient对象的addColorStop()方法指定渐变中使用的颜色。其中第一个参数(开始相对位置)中指定0~1之间的数字,从而决定什么位置显示什么颜色。
<!doctype html>
<html>
<head>
<meta charset="utf-8">
<title>线性渐变</title>
</head>

<body>
<!--createLinearGradient(x1,y1,x2,y2)-->
<canvas id="canvas_a" height="300" width="400"></canvas>
<script type="text/javascript">
	var canvas_a=document.getElementById("canvas_a");
	var ctx_a=canvas_a.getContext("2d");
	//绘图
	var CanvasG_a=ctx_a.createLinearGradient(0,0,400,0);
	CanvasG_a.addColorStop(0,"rgba(255,18,21,0.5)");
	CanvasG_a.addColorStop(0.5,"rgba(255,18,21,1)");
	CanvasG_a.addColorStop(1,"rgba(255,18,21,0.5)");
	ctx_a.fillStyle=CanvasG_a;
	ctx_a.fillRect(0,0,400,300);
</script>
<br>
<canvas id="canvas_b" width="400" height="300"></canvas>
<script>
	var canvas_b=document.getElementById("canvas_b");
	var ctx_b=canvas_b.getContext("2d");
	//绘图
	var CanvasG_b=ctx_b.createLinearGradient(0,0,400,300);
	CanvasG_b.addColorStop(0,"rgba(255,18,21,0.5)");
	CanvasG_b.addColorStop(0.5,"rgba(255,18,21,1)");
	CanvasG_b.addColorStop(1,"rgba(255,18,21,0.5)");
	ctx_b.fillStyle=CanvasG_b;
	ctx_b.fillRect(0,0,400,300);
</script>
</body>
</html>
圆形渐变
//创建CanvasGradient对象
CanvasGradient=context.createRadialGradient(x1,y1,r1,x2,y2,r2);
//追加渐变颜色
CanvasGradient.addColorStop(颜色开始的相对位置,颜色);
与线性渐变一样,首先生成代表渐变效果的CanvasGradient对象,此时,通过参数指定以(x1,y1)为圆心半径为r1的圆到以(x2,y2)为圆心半径为r2的圆之间的渐变效果。
<!doctype html>
<html>
<head>
<meta charset="utf-8">
<title>圆形渐变</title>
</head>

<body>
<!--createRadialGradient(x1,y1,r1,x2,y2,r2)-->
<canvas id="canvas_a" height="400" width="400"></canvas>
<script type="text/javascript">
	var canvas_a=document.getElementById("canvas_a");
	var ctx_a=canvas_a.getContext("2d");
	//绘图
	var canvasG_a=ctx_a.createRadialGradient(200,200,40,200,200,180);
	canvasG_a.addColorStop(0.3,"rgba(125,0,0,0.8)");
	canvasG_a.addColorStop(0.6,"rgba(0,125,0,0.8)");
	canvasG_a.addColorStop(0.9,"rgba(0,0,125,0.8)");
	canvasG_a.addColorStop(1,"#ffffff");
	ctx_a.fillStyle=canvasG_a;
	ctx_a.fillRect(0,0,400,400);
</script>
</body>
</html>

Context(上下文)的属性
| fillStyle | 填充颜色 |
| font | 字体颜色 |
| globalAlpha | 透明度(0~1) |
| globalCompositeOperation | 重叠方法的指定 |
| lineCap | 线的终端类型(butt,round,square) |
| lineJoin | 线的链接类型(round,bevel,miter) |
| lineWidth | 线的粗细 |
| miterLimit | lineJoin为miter时,2直线结合部分的处理方式 |
| shadowBlur | 阴影适用的模糊水平 |
| shadowColor | 阴影的颜色 |
| shadowOffsetX | 阴影X方向的距离 |
| sahdowOffsetY | 阴影Y方向的距离 |
| strokeStyle | 线的颜色 |
| textAlign | 文本的配置方法 (start,end,left,right,center) |
| textBaseLine | 文本基准线的设置 |
---------------------->>后续《Canvas画布进阶篇------绘制图像》