在IDEA下配置SpringMVC环境是相当简单的,这里强烈推荐Intellij IDEA开发javaWEB简直完爆eclipse.
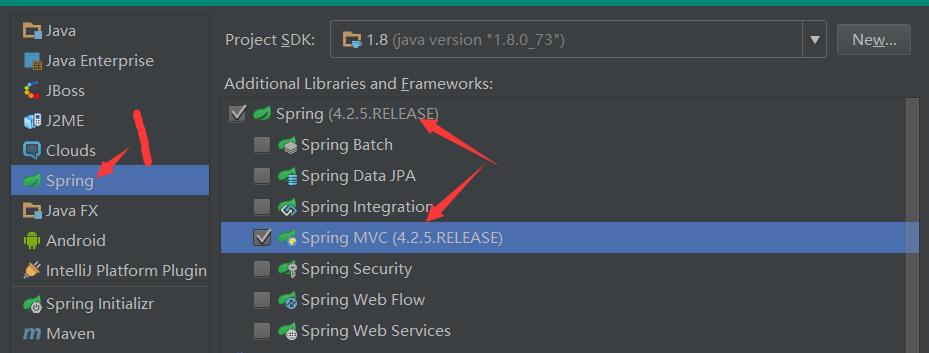
1.创建项目
创建项目很简单,直接选择SpringMVC即可,并且IDEA会自动配置Spring的架包
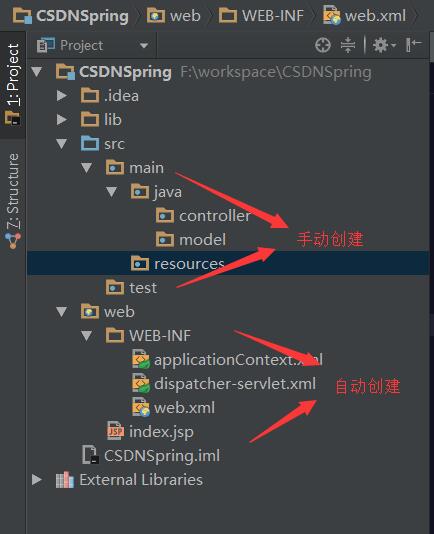
创建后的项目结构如下:
2.基本配置和tomcat服务器配置
首先在WEB-INF文件夹中建立lib文件夹,用于放我们自己的包,然后在Project Structure里面加入我们的包和tomcat的包
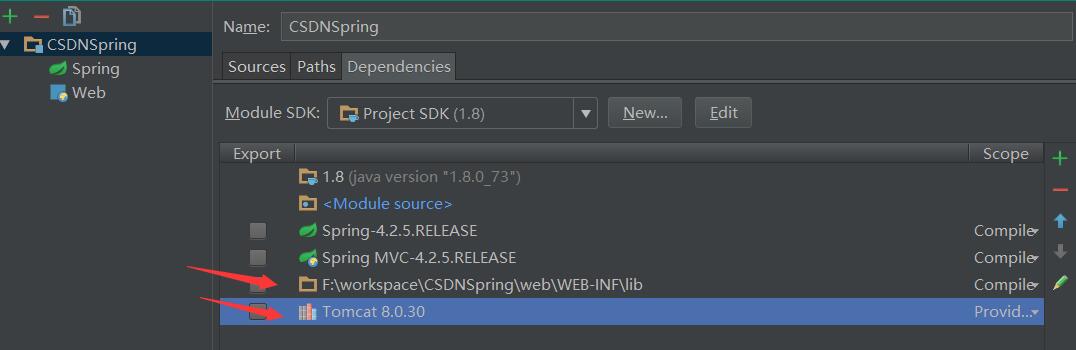
然后在运行那里配置tomcat服务器

到此环境算配置完毕,其他很多工作IDEA都帮我们做好了,下面分析下IDEA做的那些配置
3.各种xml文件配置
- web.xml
<?xml version="1.0" encoding="UTF-8"?>
<web-app xmlns="http://xmlns.jcp.org/xml/ns/javaee" xmlns:xsi="http://www.w3.org/2001/XMLSchema-instance" xsi:schemaLocation="http://xmlns.jcp.org/xml/ns/javaee http://xmlns.jcp.org/xml/ns/javaee/web-app_3_1.xsd" version="3.1"> <!--指定spring的配置文件所在的目录--> <context-param> <param-name>contextConfigLocation</param-name> <param-value>/WEB-INF/applicationContext.xml</param-value> </context-param> <!--设置spring监听器--> <listener> <listener-class>org.springframework.web.context.ContextLoaderListener</listener-class> </listener> <!--配置springMVC,这里的servlet名称决定着SpringMVC配置文件的名称--> <servlet> <servlet-name>dispatcher</servlet-name> <servlet-class>org.springframework.web.servlet.DispatcherServlet</servlet-class> <!--启动时加载,1代表优先级,越小代表越高--> <load-on-startup>1</load-on-startup> </servlet> <servlet-mapping> <servlet-name>dispatcher</servlet-name> <!--这里修改为全部页面--> <url-pattern>/</url-pattern> </servlet-mapping> <!--配置请求编码(这一部分是手动配置的)--> <filter> <filter-name>encodingFilter</filter-name> <filter-class>org.springframework.web.filter.CharacterEncodingFilter</filter-class> <init-param> <param-name>encoding</param-name> <param-value>UTF-8</param-value> <!--设置你想用的字符集,我这里用的是UTF-8--> </init-param> <!--强制使用该编码--> <init-param> <param-name>forceEncoding</param-name> <param-value>true</param-value> </init-param> </filter> <filter-mapping> <filter-name>encodingFilter</filter-name> <url-pattern>/*</url-pattern> <!--设置你想过滤的页面或者是Servlet,根据自己的需要配置--> </filter-mapping> </web-app>- ApplicationContent.xml(Spring配置文件)
<?xml version="1.0" encoding="UTF-8"?>
<beans xmlns="http://www.springframework.org/schema/beans" xmlns:xsi="http://www.w3.org/2001/XMLSchema-instance" xsi:schemaLocation="http://www.springframework.org/schema/beans http://www.springframework.org/schema/beans/spring-beans.xsd"> </beans>- dispatchce-servlet.xml(SpringMVC配置文件)
<?xml version="1.0" encoding="UTF-8"?>
<beans xmlns="http://www.springframework.org/schema/beans" xmlns:xsi="http://www.w3.org/2001/XMLSchema-instance" xsi:schemaLocation="http://www.springframework.org/schema/beans http://www.springframework.org/schema/beans/spring-beans.xsd"> </beans>
4.修改Spring MVC配置文件
修改前需要在WEB-INF下的lib中引入jstl的三个包,并且在WEB-INF中建立static文件夹,该文件夹中建立css,js,images三个子文件夹,然后按照如下配置
<?xml version="1.0" encoding="UTF-8"?>
<beans xmlns="http://www.springframework.org/schema/beans" xmlns:xsi="http://www.w3.org/2001/XMLSchema-instance" xmlns:mvc="http://www.springframework.org/schema/mvc" xmlns:content="http://www.springframework.org/schema/context" xsi:schemaLocation="http://www.springframework.org/schema/beans http://www.springframework.org/schema/beans/spring-beans.xsd http://www.springframework.org/schema/mvc http://www.springframework.org/schema/mvc/spring-mvc.xsd http://www.springframework.org/schema/context http://www.springframework.org/schema/context/spring-context.xsd"> <!-- 自动扫描该包,使SpringMVC认为包下用了@controller注解的类是控制器 --> <content:component-scan base-package="main.java.controller"/> <!-- 配置注解驱动 --> <mvc:annotation-driven/> <!-- 对模型视图名称的解析,即在模型视图名称添加前后缀(如果最后一个还是表示文件夹,则最后的斜杠不要漏了) 使用JSP--> <!-- 默认的视图解析器 在上边的解析错误时使用 (默认使用html)- --> <bean id="defaultViewResolver" class="org.springframework.web.servlet.view.InternalResourceViewResolver"> <!--可以使用jstl标签--> <property name="viewClass" value="org.springframework.web.servlet.view.JstlView"/> <property name="prefix" value="/WEB-INF/jsp/"/><!--设置JSP文件的目录位置--> <property name="suffix" value=".jsp"/> </bean> <!--静态资源映射--> <!-- 表示当浏览器有静态资源请求的时候,并且请求url路径中带有:/js/,则这个资源跑到webapp目录下的/WEB-INF/statics/js/去找 比如我们在 JSP 中引入一个 js 文件:src="${webRoot}/js/jQuery-core/jquery-1.6.1.min.js 两个*表示当前文件夹及其子文件夹都可访问 --> <mvc:resources mapping="/css/**" location="/WEB-INF/static/css/"/> <mvc:resources mapping="/js/**" location="/WEB-INF/static/js/"/> <mvc:resources mapping="/images/**" location="/WEB-INF/static/images/"/> </beans>
5.实现一个简单的Hello World
对此不解释,只是简单实现例子,下一篇开始学习controller
首先建立一个HelloController.java,让其跳转到hello.jsp
import org.springframework.stereotype.Controller;
import org.springframework.web.bind.annotation.RequestMapping;
import org.springframework.web.bind.annotation.RequestMethod;

/**
 * Created by nl101 on 2016/4/4.
 */
@Controller public class HelloController { @RequestMapping(value = "/hello",method = RequestMethod.GET) public String hello(){ return "hello"; } }
其次在WEB-INF–jsp下建立hello.jsp,写上Hello World
<%@ page contentType="text/html;charset=UTF-8" language="java" %>
<html> <head> <title>Title</title> </head> <body> <h1 style="text-align: center">Hello World!</h1> </body> </html>
启动tomcat,访问localhost:8888/hello(数字是你tomcat的端口号)

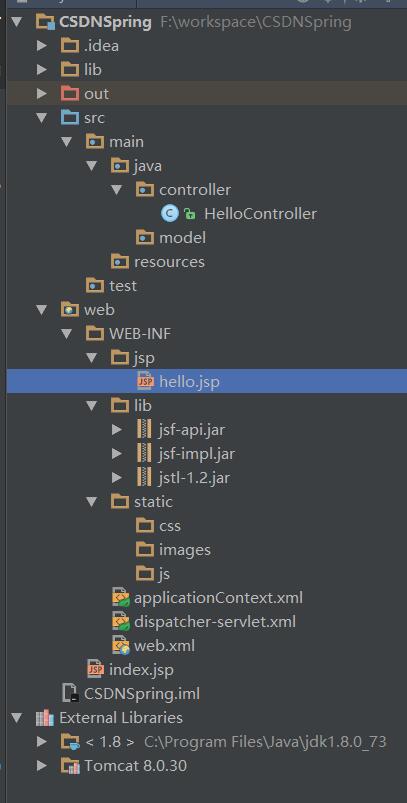
此时整个项目结构如下,希望对大家有帮助
补充
一.配置spring和springMVC映射文件
对于spring和springMVC大多时候配置文件都是统一放在resources文件夹的,这个时候就需要在web.xml中额外配置spring和springMVC的映射文件了.
如下图,我的配置文件在resources下的spring文件夹中
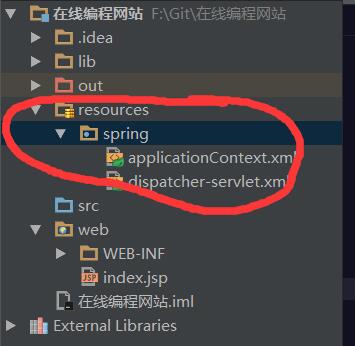
相应的我就应该单独设置映射文件路径
<!--配置spring-->
    <context-param>
        <param-name>contextConfigLocation</param-name> <!--配置文件的路径--> <param-value>classpath:spring/applicationContext.xml</param-value> </context-param> <listener> <listener-class>org.springframework.web.context.ContextLoaderListener</listener-class> </listener> <!--配置springMVC--> <servlet> <servlet-name>dispatcher</servlet-name> <servlet-class>org.springframework.web.servlet.DispatcherServlet</servlet-class> <init-param> <param-name>contextConfigLocation</param-name> <!--配置文件的路径--> <param-value>classpath:spring/dispatcher-servlet.xml</param-value> </init-param> <load-on-startup>1</load-on-startup> </servlet> <servlet-mapping> <servlet-name>dispatcher</servlet-name> <url-pattern>*.form</url-pattern> </servlet-mapping>
Java学习交流群:587131012 参考资料:http://www.makeru.com.cn/