
Robot Framework是一个基于Python可扩展地关键字驱动的测试自动化框架,使用Apache License 2.0,由Robot Framework Foundation开发和赞助。Robot Framework被广泛地使用在端到端地验收测试以及ATDD(acceptance-test-driven development )中,生态体系非常丰富,更详细的信息可以参看http://robotframework.org。本文将简单介绍如何安装Robot Framework以及运行第一个Hello World的例子。
为甚麽使用Robot Framework
有很多理由使得Robot Framework非常受欢迎,比如:
- 支持简单易用的表格型语法,使得可以用统一方式创建测试用例
- 提供可以复用既存的关键字的功能
- 提供HTML的简单易读的报表和日志结果文件
- 平台和应用相互独立
- 提供简单的Libary API,可以使用Ptyhon或者java进行实现
- 提供命令行接口也XML格式的输出文件,非常容易进行持续集成
- 支持Selenium,Java Gui测试,Telnet,SSH等
- 支持创建数据驱动的测试用例
- 变量的内建支持,尤其是不同测试环境下的测试
- 提供test case和test suite级别的setup和teardown
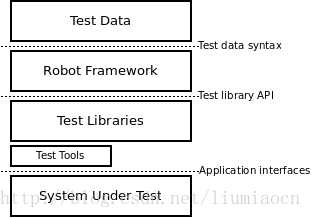
Robot架构
Robot是一个通用的测试框架,解耦做的很好,虽然很简单,整体的架构如下所示:
安装前提
因为Robot是基于Python进行开发的,使用Python2还是Python3是一个需要选择的问题,python2是在2010年发布的,目前稳定版本2.7.5,python2会支持到2020年,至于更多的区别,可以参看如下文章以决定你的选择。
| 项目 | 详细信息 |
|---|---|
| Python2还是Python3 | https://wiki.python.org/moin/Python2orPython3 |
因为没有考虑到会用到比较新的python的功能,本文的安装采用目前稳定的Python2。
[root@liumiaocn ~]# python --versionPython 2.7.5[root@liumiaocn ~]#
- 1
- 2
- 3
安装PIP
robot的安装有很多方式,为了避免第一个HelloWorld花费太多时间,果断采取PIP直接安装的方式。
[root@liumiaocn ~]# yum install epel-releaseLoaded plugins: fastestmirror...Installed: epel-release.noarch 0:7-9 Complete![root@liumiaocn ~]# [root@liumiaocn ~]# yum -y install python-pipLoaded plugins: fastestmirror...Installed: python2-pip.noarch 0:8.1.2-5.el7 Dependency Installed: python-backports.x86_64 0:1.0-8.el7 python-backports-ssl_match_hostname.noarch 0:3.4.0.2-4.el7 python-setuptools.noarch 0:0.9.8-4.el7 Complete![root@liumiaocn ~]#
- 1
- 2
- 3
- 4
- 5
- 6
- 7
- 8
- 9
- 10
- 11
- 12
- 13
- 14
- 15
- 16
- 17
- 18
- 19
- 20
- 21
- 22
确认PIP版本
[root@liumiaocn ~]# pip --versionpip 8.1.2 from /usr/lib/python2.7/site-packages (python 2.7)[root@liumiaocn ~]#
- 1
- 2
- 3
安装Robot Framework
[root@liumiaocn ~]# pip install robotframeworkCollecting robotframework Downloading robotframework-3.0.2.tar.gz (440kB) 100% |████████████████████████████████| 450kB 344kB/s Installing collected packages: robotframework Running setup.py install for robotframework ... doneSuccessfully installed robotframework-3.0.2You are using pip version 8.1.2, however version 9.0.1 is available.You should consider upgrading via the 'pip install --upgrade pip' command.[root@liumiaocn ~]#
- 1
- 2
- 3
- 4
- 5
- 6
- 7
- 8
- 9
- 10
确认Robot版本
[root@liumiaocn ~]# robot --versionRobot Framework 3.0.2 (Python 2.7.5 on linux2)[root@liumiaocn ~]# [root@liumiaocn ~]# rebot --versionRebot 3.0.2 (Python 2.7.5 on linux2)[root@liumiaocn ~]# [root@liumiaocn ~]# pybot --versionRobot Framework 3.0.2 (Python 2.7.5 on linux2)[root@liumiaocn ~]#
- 1
- 2
- 3
- 4
- 5
- 6
- 7
- 8
- 9
Robot测试脚本
准备就绪,可以开始创建第一个测试脚本了。第一个Helloworld的测试脚本如下所示:
[root@liumiaocn robot]# lshelloworld.robot[root@liumiaocn robot]# cat helloworld.robot *** Settings ****** Variables ****** Test Cases ***First test case Begin web test Second test case End web test *** Keywords *** Begin web test Log This is first test case End web test Log HelloWorld[root@liumiaocn robot]#
- 1
- 2
- 3
- 4
- 5
- 6
- 7
- 8
- 9
- 10
- 11
- 12
- 13
- 14
- 15
- 16
熟悉关键字驱动测试的都很容易地看到这是做了两个关键字和两个测试用例。
执行脚本
使用robot helloworld.robot即可开始执行。 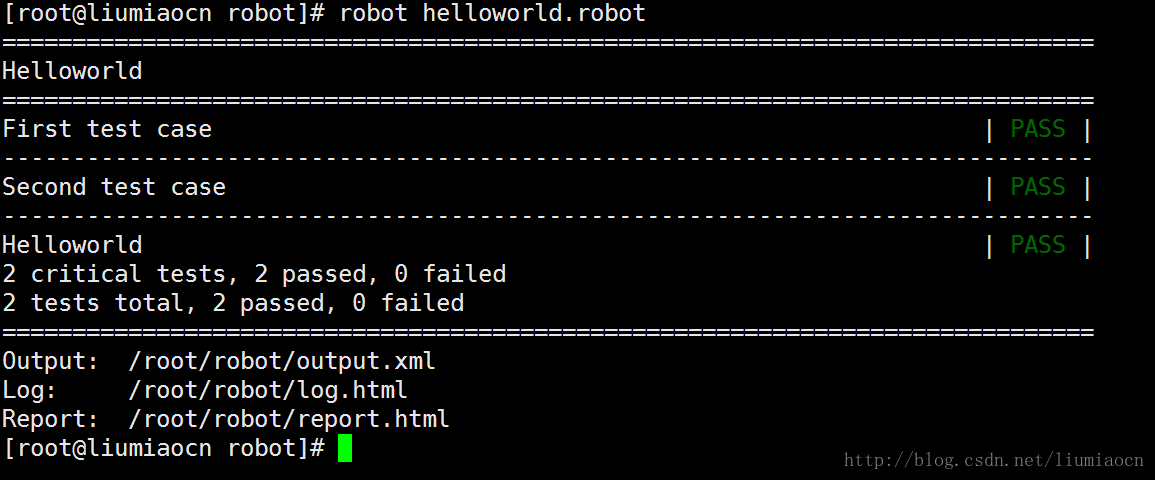
可以清楚地看到测试用例地执行情况以及它的输出。
执行结果
执行之后产生了三个结果文件:
| 文件名 | 详细信息 |
|---|---|
| log.html | 日志文件 |
| report.html | 结果报表 |
| output.xml | 输出文件 |
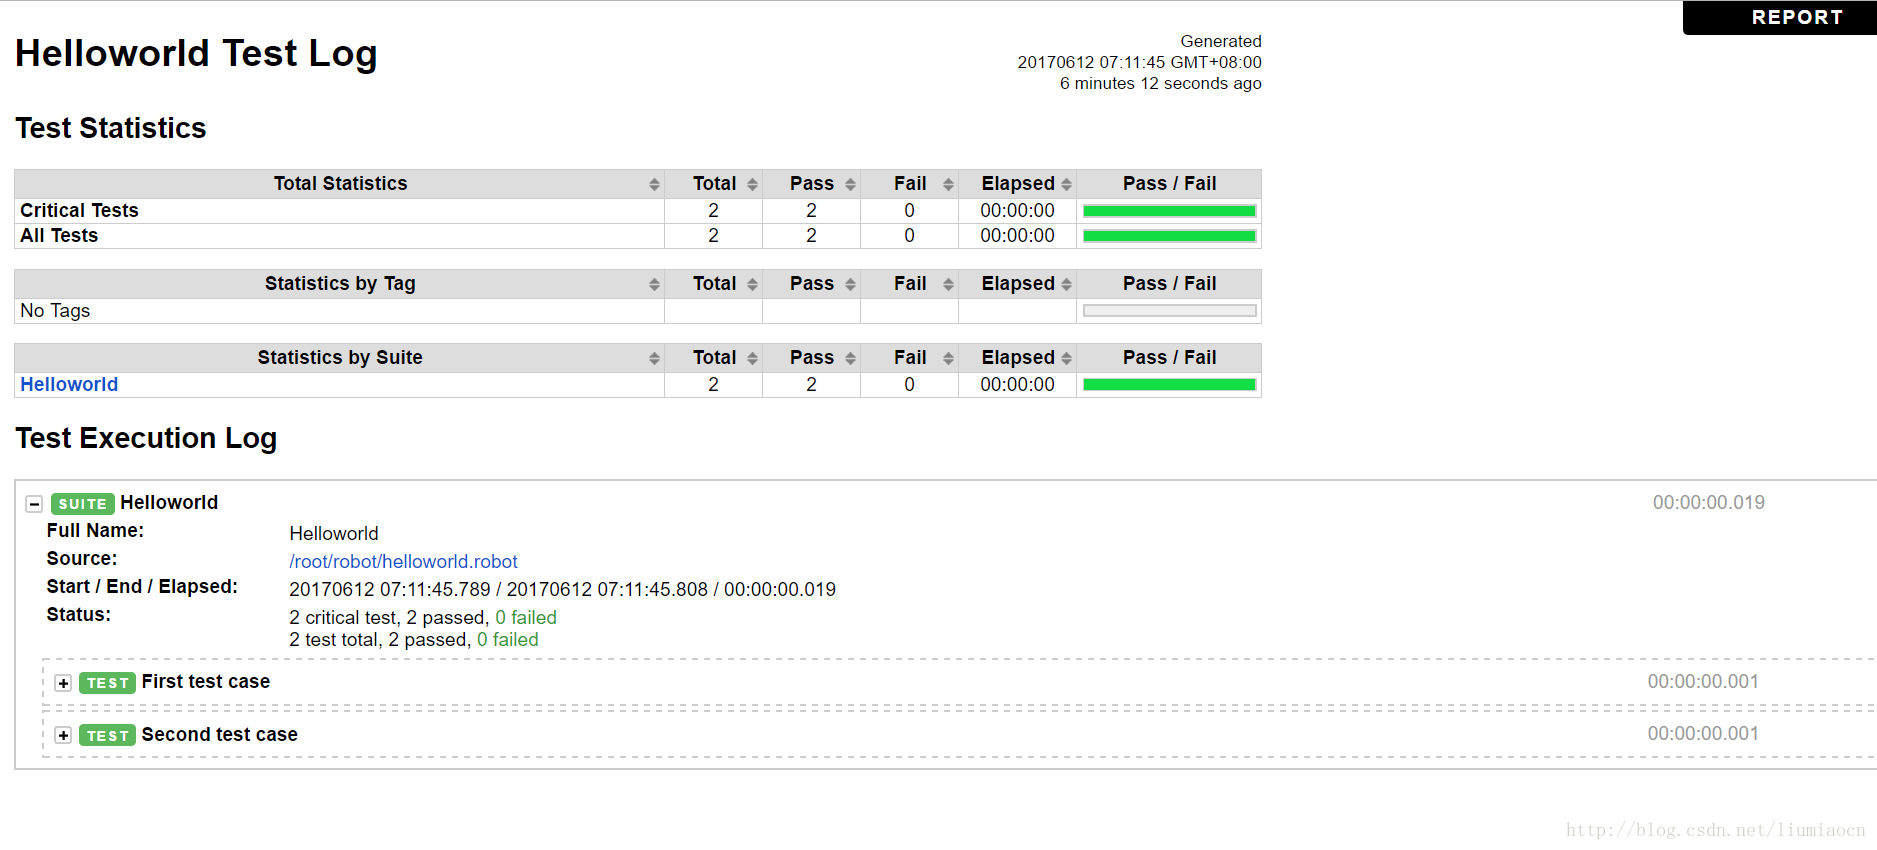
日志文件
结果报表
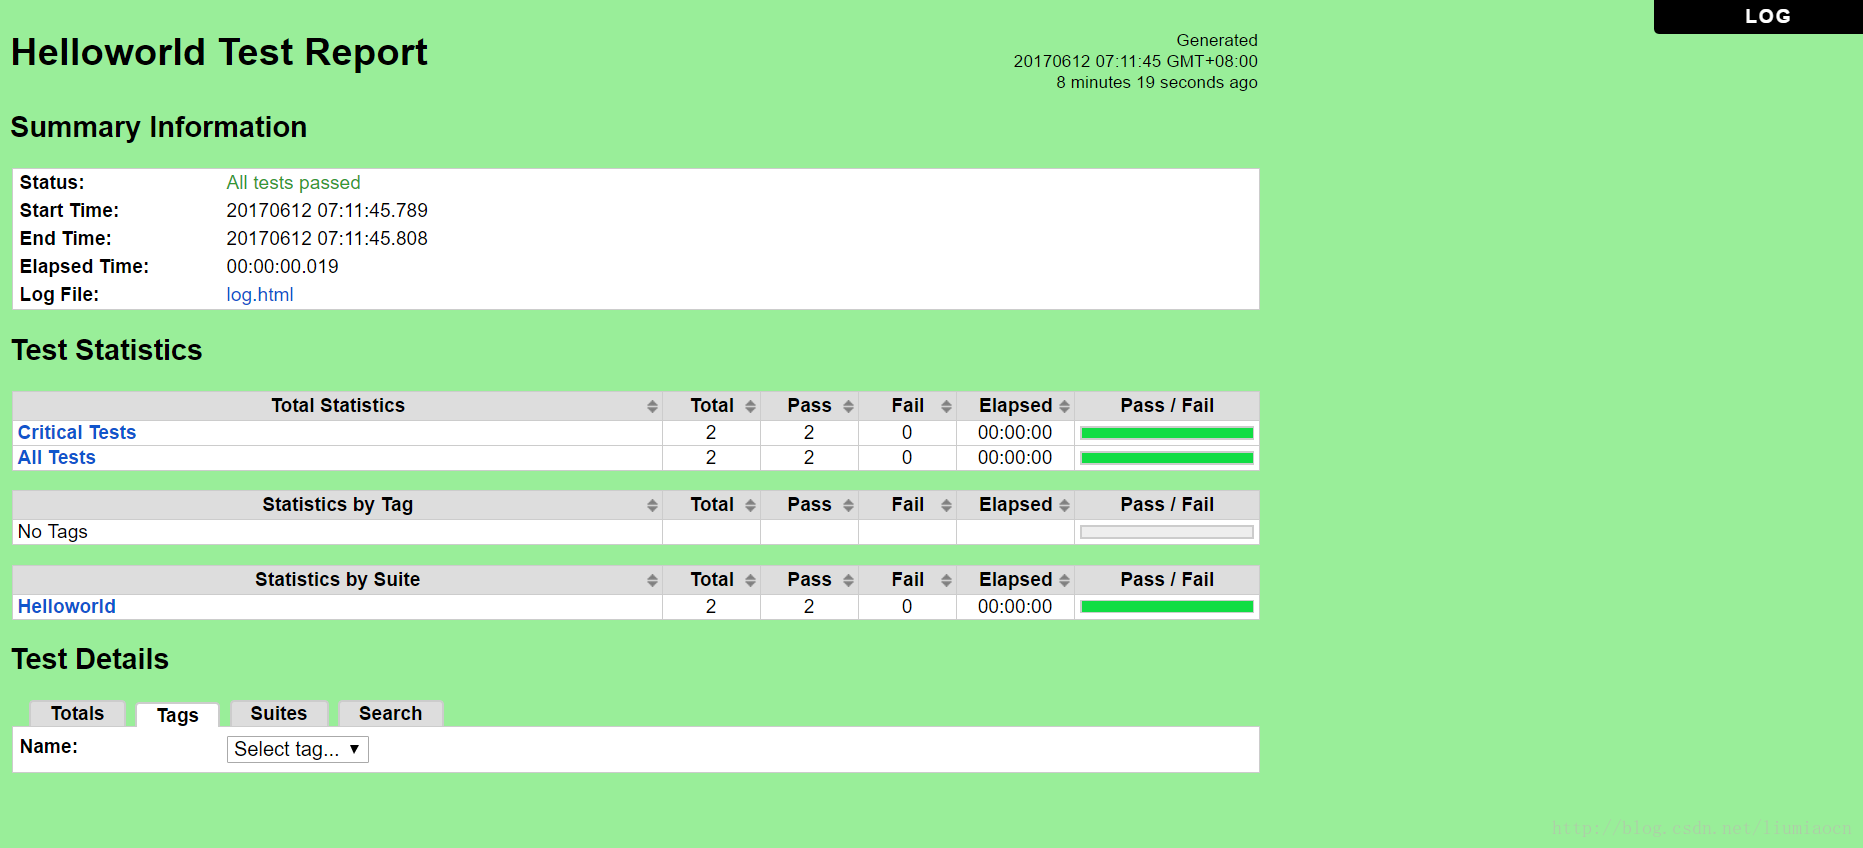
注意日志文件和报表文件都是自动连接起来地,不要人为随意改变其相对目录。
输出文件
详细的输出信息,可以使用其进行更方便的持续集成。
<?xml version="1.0" encoding="UTF-8"?><robot generated="20170611 19:11:45.787" generator="Robot 3.0.2 (Python 2.7.5 on linux2)"><suite source="/root/robot/helloworld.robot" id="s1" name="Helloworld"><test id="s1-t1" name="First test case"><kw name="Begin web test"><kw name="Log" library="BuiltIn"><doc>Logs the given message with the given level.</doc><arguments><arg>This is first test case</arg></arguments><msg timestamp="20170611 19:11:45.807" level="INFO">This is first test case</msg><status status="PASS" endtime="20170611 19:11:45.807" starttime="20170611 19:11:45.806"></status></kw><status status="PASS" endtime="20170611 19:11:45.807" starttime="20170611 19:11:45.806"></status></kw><status status="PASS" endtime="20170611 19:11:45.807" critical="yes" starttime="20170611 19:11:45.806"></status></test><test id="s1-t2" name="Second test case"><kw name="End web test"><kw name="Log" library="BuiltIn"><doc>Logs the given message with the given level.</doc><arguments><arg>HelloWorld</arg></arguments><msg timestamp="20170611 19:11:45.808" level="INFO">HelloWorld</msg><status status="PASS" endtime="20170611 19:11:45.808" starttime="20170611 19:11:45.808"></status></kw><status status="PASS" endtime="20170611 19:11:45.808" starttime="20170611 19:11:45.807"></status></kw><status status="PASS" endtime="20170611 19:11:45.808" critical="yes" starttime="20170611 19:11:45.807"></status></test><status status="PASS" endtime="20170611 19:11:45.808" starttime="20170611 19:11:45.789"></status></suite><statistics><total><stat fail="0" pass="2">Critical Tests</stat><stat fail="0" pass="2">All Tests</stat></total><tag></tag><suite><stat fail="0" id="s1" name="Helloworld" pass="2">Helloworld</stat></suite></statistics><errors></errors></robot>
- 1
- 2
- 3
- 4
- 5
- 6
- 7
- 8
- 9
- 10
- 11
- 12
- 13
- 14
- 15
- 16
- 17
- 18
- 19
- 20
- 21
- 22
- 23
- 24
- 25
- 26
- 27
- 28
- 29
- 30
- 31
- 32
- 33
- 34
- 35
- 36
- 37
- 38
- 39
- 40
- 41
- 42
- 43
- 44
- 45
- 46
- 47
总结
本文简单介绍了Robot Framework的概要信息以及如何安装和执行第一个Robot的Helloworld的测试脚本,同时确认了其输出的结果。Robot的强大在这个测试脚本中完全无法得到体现,后续会慢慢展开Robot Framework的各种使用方法。
再分享一下我老师大神的人工智能教程吧。零基础!通俗易懂!风趣幽默!还带黄段子!希望你也加入到我们人工智能的队伍中来!https://blog.csdn.net/jiangjunshow