版权声明:本文为博主原创文章,未经博主允许不得转载。 https://blog.csdn.net/u011171125/article/details/86022386
Spring入门学习(使用JdbcTemplate和JdbcDaoSupport)
使用JdbcTemplate
- 导入必要的maven依赖
<!-- https://mvnrepository.com/artifact/org.springframework/spring-context --> <dependency> <groupId>org.springframework</groupId> <artifactId>spring-context</artifactId> <version>4.1.2.RELEASE</version> </dependency> <!-- https://mvnrepository.com/artifact/org.springframework/spring-core --> <dependency> <groupId>org.springframework</groupId> <artifactId>spring-core</artifactId> <version>4.1.3.RELEASE</version> </dependency> <dependency> <groupId>org.springframework</groupId> <artifactId>spring-beans</artifactId> <version>4.1.3.RELEASE</version> </dependency> <!-- https://mvnrepository.com/artifact/org.springframework/spring-aop --> <dependency> <groupId>org.springframework</groupId> <artifactId>spring-aop</artifactId> <version>4.1.3.RELEASE</version> </dependency> <!-- https://mvnrepository.com/artifact/org.springframework/spring-aspects --> <dependency> <groupId>org.springframework</groupId> <artifactId>spring-aspects</artifactId> <version>4.1.3.RELEASE</version> </dependency> <!-- https://mvnrepository.com/artifact/org.springframework/spring-jdbc --> <dependency> <groupId>org.springframework</groupId> <artifactId>spring-jdbc</artifactId> <version>4.1.3.RELEASE</version> </dependency> <!-- https://mvnrepository.com/artifact/org.aspectj/aspectjweaver --> <dependency> <groupId>org.aspectj</groupId> <artifactId>aspectjweaver</artifactId> <version>1.6.8</version> </dependency> <!-- https://mvnrepository.com/artifact/com.mchange/c3p0 --> <dependency> <groupId>com.mchange</groupId> <artifactId>c3p0</artifactId> <version>0.9.5.2</version> </dependency> <!-- https://mvnrepository.com/artifact/mysql/mysql-connector-java --> <dependency> <groupId>mysql</groupId> <artifactId>mysql-connector-java</artifactId> <version>5.1.21</version> </dependency> <!-- https://mvnrepository.com/artifact/junit/junit --> <dependency> <groupId>junit</groupId> <artifactId>junit</artifactId> <version>4.12</version> <scope>test</scope> </dependency> - 简单配置连接mysql的数据库配置文件
db.propertiesjdbc.user=root jdbc.password=zwf1233 jdbc.driverClass=com.mysql.jdbc.Driver jdbc.jdbcUrl=jdbc:mysql://localhost:3306/springstudy3 jdbc.initPoolSize=5 jdbc.maxPoolSize=10 - 创建
applicationContext.xml配置文件,添加包扫描,导入db配置文件并配置c3p0数据源,最后添加Spring的JdbcTemplete。<?xml version="1.0" encoding="UTF-8"?> <beans xmlns="http://www.springframework.org/schema/beans" xmlns:xsi="http://www.w3.org/2001/XMLSchema-instance" xmlns:context="http://www.springframework.org/schema/context" xsi:schemaLocation="http://www.springframework.org/schema/beans http://www.springframework.org/schema/beans/spring-beans.xsd http://www.springframework.org/schema/context http://www.springframework.org/schema/context/spring-context-4.1.xsd"> <context:component-scan base-package="com.fafa.spring.*"></context:component-scan> <!-- 导入资源文件 --> <context:property-placeholder location="classpath:db.properties"/> <!-- 配置c3p0数据源 --> <bean id="dataSource" class="com.mchange.v2.c3p0.ComboPooledDataSource"> <property name="user" value="${jdbc.user}"></property> <property name="password" value="${jdbc.password}"></property> <property name="jdbcUrl" value="${jdbc.jdbcUrl}"></property> <property name="driverClass" value="${jdbc.driverClass}"></property> <property name="initialPoolSize" value="${jdbc.initPoolSize}"></property> <property name="maxPoolSize" value="${jdbc.maxPoolSize}"></property> </bean> <!-- 配置Spring的JdbcTemplete --> <bean id="jdbcTemplete" class="org.springframework.jdbc.core.JdbcTemplate"> <property name="dataSource" ref="dataSource"></property> </bean> </beans> - 创建mysql数据库中的相关表及数据:
/*Table structure for table `departments` */ DROP TABLE IF EXISTS `departments`; CREATE TABLE `departments` ( `ID` tinyint(10) NOT NULL AUTO_INCREMENT, `DEPT_NAME` varchar(20) DEFAULT NULL, PRIMARY KEY (`ID`) ) ENGINE=InnoDB AUTO_INCREMENT=4 DEFAULT CHARSET=utf8; /*Data for the table `departments` */ insert into `departments`(`ID`,`DEPT_NAME`) values (1,'财务部'),(2,'开发部'),(3,'公关部'); /*Table structure for table `employees` */ DROP TABLE IF EXISTS `employees`; CREATE TABLE `employees` ( `ID` tinyint(10) NOT NULL AUTO_INCREMENT, `LAST_NAME` varchar(20) DEFAULT NULL, `EMAIL` varchar(50) DEFAULT NULL, `DEPT_ID` tinyint(10) DEFAULT NULL, PRIMARY KEY (`ID`) ) ENGINE=InnoDB AUTO_INCREMENT=6 DEFAULT CHARSET=utf8; /*Data for the table `employees` */ insert into `employees`(`ID`,`LAST_NAME`,`EMAIL`,`DEPT_ID`) values (1,'Tom','[email protected]',1),(2,'Jerry','[email protected]',2),(3,'Mike','[email protected]',3),(4,'Rose','[email protected]',3),(5,'fafa','[email protected]',2); - 创建
JDBCTest类:
测试结果:public class JDBCTest { private ApplicationContext ctx = null; private JdbcTemplate jdbcTemplate; { ctx = new ClassPathXmlApplicationContext("classpath:applicationContext.xml"); jdbcTemplate = (JdbcTemplate) ctx.getBean("jdbcTemplete"); } @Test public void testDataSource() throws SQLException { DataSource dataSource = (DataSource) ctx.getBean("dataSource"); System.out.println(dataSource.getConnection()); } }com.mchange.v2.c3p0.impl.NewProxyConnection@1113fd74 [wrapping: com.mysql.jdbc.JDBC4Connection@3764d36e] - 使用
jdbcTemplete更新数据:
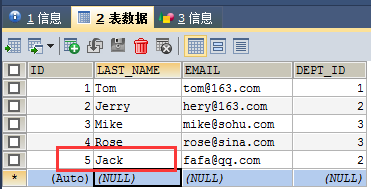
测试结果(前后结果对比):/** * 执行insert,update,delete */ @Test public void testUpdate() { String sql = "UPDATE employees SET last_name=? where id=?"; jdbcTemplate.update(sql, "Jack", 5); }

- 执行批量更新
执行结果:/** * 执行批量更新:批量insert,update,delete * 后面最后一个参数是Object[]的list类型:因为修改一条记录需要一个Object数组,多条就需要多个Object数组 */ @Test public void testBatchUpdate(){ String sql = "INSERT INTO employees(last_name,email,dept_id) VALUES(?,?,?)"; List<Object[]> batchArgs = new ArrayList<>(); batchArgs.add(new Object[]{"AA","[email protected]",1}); batchArgs.add(new Object[]{"BB","[email protected]",2}); batchArgs.add(new Object[]{"CC","[email protected]",3}); batchArgs.add(new Object[]{"DD","[email protected]",3}); batchArgs.add(new Object[]{"EE","[email protected]",2}); jdbcTemplate.batchUpdate(sql, batchArgs); }

- 查询结果为对象:
新建Employee类
测试方法:public class Employee { private Integer id; private String lastName; private String email; private Integer deptId; public Integer getId() { return id; } public void setId(Integer id) { this.id = id; } public String getLastName() { return lastName; } public void setLastName(String lastName) { this.lastName = lastName; } public String getEmail() { return email; } public void setEmail(String email) { this.email = email; } public Integer getDeptId() { return deptId; } public void setDeptId(Integer deptId) { this.deptId = deptId; } @Override public String toString() { return "Employee [id=" + id + ", lastName=" + lastName + ", email=" + email + ", deptId=" + deptId + "]"; } }
查询结果:/** * 从数据库中获取一条记录,实际得到一个对应的对象 * 注意不是调用queryForObject(String sql, Class<Employee> requiredType, Object... args) 这个方法 * 而需要调用queryForObject(String sql, RowMapper<Employee> rowMapper, Object... args) * 1. 其中rowMapper指定如何去映射结果集的行,常用的实现类为BeanPropertyRowMapper * 2. 使用SQL中的别名完成列名和属性名的映射,列入last_name lastName * 3. 不支持级联属性,JdbcTemplete 到底是一个JDBC的小工具而不是ORM框架 */ @Test public void testQueryForObject() { String sql = "SELECT id, last_name, email, dept_id as \"department.id\" FROM employees WHERE id=?"; RowMapper<Employee> rowMapper = new BeanPropertyRowMapper<>(Employee.class); Employee employee = jdbcTemplate.queryForObject(sql, rowMapper, 5); System.out.println(employee); }
Employee [id=5, lastName=Jack, [email protected], deptId=null] - 查询实体类集合:
测试结果:/** * 查询实体类集合 * 注意调用的不是queryForList方法 */ @Test public void testQueryForList(){ String sql = "SELECT id, last_name, email FROM employees WHERE id>?"; RowMapper<Employee> rowMapper = new BeanPropertyRowMapper<>(Employee.class); List<Employee> employee = jdbcTemplate.query(sql, rowMapper, 5); System.out.println(employee); }[Employee [id=6, lastName=AA, [email protected], deptId=null], Employee [id=7, lastName=BB, [email protected], deptId=null], Employee [id=8, lastName=CC, [email protected], deptId=null], Employee [id=9, lastName=DD, [email protected], deptId=null], Employee [id=10, lastName=EE, [email protected], deptId=null]] - 获取单列值或作统计:
测试结果:/** * 获取单个列的值,或作统计查询 * 使用queryForObject(String sql, Class<Long> requiredType) */ @Test public void testQueryForObject2(){ String sql = "SELECT count(id) FROM employees"; long count = jdbcTemplate.queryForObject(sql, Long.class); System.out.println(count); }10 - 使用Dao获取数据,新建
EmployeeDao类:
测试类:@Repository public class EmployeeDao { @Autowired private JdbcTemplate jdbcTemplate; public Employee get(Integer id){ String sql = "SELECT id, last_name, email FROM employees WHERE id=?"; RowMapper<Employee> rowMapper = new BeanPropertyRowMapper<>(Employee.class); Employee employee = jdbcTemplate.queryForObject(sql, rowMapper, 5); return employee; } }
测试结果:public class JDBCTest { private ApplicationContext ctx = null; private EmployeeDao employeeDao; { ctx = new ClassPathXmlApplicationContext("classpath:applicationContext.xml"); employeeDao = ctx.getBean(EmployeeDao.class); } @Test public void testEmployeeDao(){ System.out.println(employeeDao.get(1)); } }
Employee [id=5, lastName=Jack, [email protected], deptId=null]
使用JdbcDaoSupport
- 新建
Department类和DepartmentDao类
不推荐使用JdbcDaoSupport这种方式,而推荐直接使用JdbcTemplate作为DAO类成员变量
测试结果:public class Department { private Integer id; private String name; public Integer getId() { return id; } public void setId(Integer id) { this.id = id; } public String getName() { return name; } public void setName(String name) { this.name = name; } @Override public String toString() { return "Department [id=" + id + ", name=" + name + "]"; } } /** * 不推荐使用JdbcDaoSupport这种方式,而推荐直接使用JdbcTemplate作为DAO类成员变量 * @author Stark * */ @Repository public class DepartmentDao extends JdbcDaoSupport { @Autowired public void setDataSource2(DataSource dataSource){ setDataSource(dataSource); } public Department get(Integer id) { String sql = "SELECT id, dept_name name FROM departments WHERE id = ?"; RowMapper<Department> rowMapper = new BeanPropertyRowMapper<>(Department.class); Department department = getJdbcTemplate().queryForObject(sql, rowMapper,1); return department; } } public class JDBCTest { private ApplicationContext ctx = null; private DepartmentDao departmentDao; { ctx = new ClassPathXmlApplicationContext("classpath:applicationContext.xml"); departmentDao = ctx.getBean(DepartmentDao.class); } @Test public void testDepartmentDao() { System.out.println(departmentDao.get(1)); } }Department [id=1, name=财务部]
使用 NamedParameterJdbcTemplate
- 在xml配置文件中增加
NamedParameterJdbcTemplate:<!-- 配置NamedParameterJdbcTemplate,该对象可以使用具名参数,其没有无参数的构造器,所以必须为其构造器指定参数 --> <bean id="namedParameterJdbcTemplate" class="org.springframework.jdbc.core.namedparam.NamedParameterJdbcTemplate"> <constructor-arg ref="dataSource"/> </bean> - 测试类:
测试结果:public class JDBCTest { private ApplicationContext ctx = null; private NamedParameterJdbcTemplate namedParameterJdbcTemplate; { ctx = new ClassPathXmlApplicationContext("classpath:applicationContext.xml"); namedParameterJdbcTemplate = ctx.getBean(NamedParameterJdbcTemplate.class); } /** * 可以为参数起名称。 * 1. 好处:若有多个参数,则不用再去对应位置了,而直接对应参数名,增强了可维护性; * 2. 缺点:较为麻烦。 */ @Test public void testNamedParameterJdbcTemplate() { String sql = "INSERT INTO employees(last_name,email,dept_id)VALUES(:ln,:email,:deptid)"; Map<String, Object> paramMap = new HashMap<String, Object>(); paramMap.put("ln", "FF"); paramMap.put("email", "[email protected]"); paramMap.put("deptid", 2); namedParameterJdbcTemplate.update(sql, paramMap); } /** * 使用具名参数时,可以使用update(String sql, SqlParameterSource paramSource)方法进行更新操作 * 1. SQL语句中的参数名和类的属性一致! * 2. 使用 SqlParameterSource 的 BeanPropertySqlParameterSource实现类作为参数 */ @Test public void testNamedParameterJdbcTemplate2(){ String sql = "INSERT INTO employees(last_name,email,dept_id) VALUES (:lastName,:email,:deptId)"; Employee employee = new Employee(); employee.setLastName("XYZ"); employee.setEmail("[email protected]"); employee.setDeptId(3); SqlParameterSource paramSource = new BeanPropertySqlParameterSource(employee); namedParameterJdbcTemplate.update(sql, paramSource); } }

