版权声明:本文为博主原创文章,未经博主允许不得转载。 https://blog.csdn.net/yhhyhhyhhyhh/article/details/84262689
springboot-整合shiro和vue的验证登录和权限
文章目录
完整代码下载链接:
https://github.com/2010yhh/springBoot-demos.git
环境
idea2018,jdk1.8,
springboot版本:springboot1.5.9.RELEASE
durid连接
1.配置
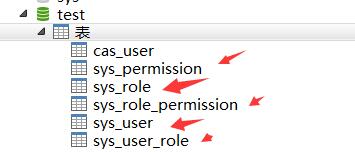
1.1数据表
这里权限控制有5张表,详情见代码中的test.sql文件
项目中的用户权限可以是:菜单,按钮,api,url,数据等可以控制的资源
MD5 hash密码比对器,db中密码已md5字符串存储:
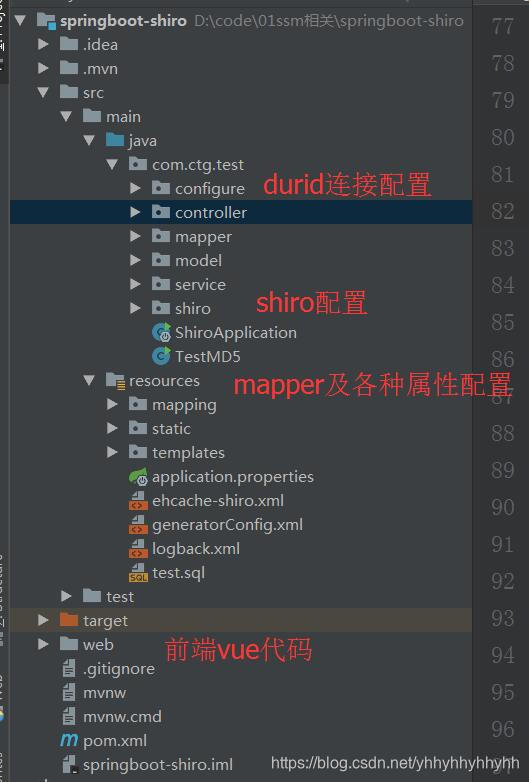
1.2工程说明:
pom需要的shiro相关jar包:
 <!-- shiro ehcache -->
        <dependency>
            <groupId>org.apache.shiro</groupId>
            <artifactId>shiro-ehcache</artifactId>
            <version>1.2.2</version>
        </dependency>
        <!-- shiro spring. -->
        <dependency>
            <groupId>org.apache.shiro</groupId>
            <artifactId>shiro-spring</artifactId>
            <version>1.2.2</version>
        </dependency>
        <!-- cache -->
        <dependency>
            <groupId>net.sf.ehcache</groupId>
            <artifactId>ehcache</artifactId>
            <version>2.10.4</version>
        </dependency>
1.3springboot下的shiro配置
1)自定义ShiroConfig类详细见代码
2)自定义Realm:
/**
 * @Description: 自定义Realm,认证用户,授权
 * @Author: yanhonghai
 * @Date: 2018/9/17 0:56
 */
public class Md5Realm extends AuthorizingRealm {
    private final static Logger logger = LoggerFactory.getLogger(Md5Realm.class);
    /**
     * 延迟加载bean,解决缓存Cache不能正常使用;事务Transaction注解不能正常运行
     */
    @Autowired
    @Lazy
    private UserServiceImpl userService;

    /**
     * 认证.登录
     * doGetAuthenticationInfo这个方法是在用户登录的时候调用的
     * 也就是执行SecurityUtils.getSubject().login()的时候调用;(即:登录验证)
     * 验证通过后会用户保存在缓存中的
     */
    @Override
    protected AuthenticationInfo doGetAuthenticationInfo(AuthenticationToken token) throws AuthenticationException {
        logger.info("##################执行Shiro登录认证##################");
        //获取用户输入的token
        UsernamePasswordToken utoken = (UsernamePasswordToken) token;
        String username = utoken.getUsername();
        //查询数据库
        User user = userService.findByUserName(username);
        //放入shiro.调用CredentialsMatcher检验密码
        if (user != null) {
            // 若存在,将此用户存放到登录认证info中,无需自己做密码对比,Shiro会为我们进行密码对比校验
            // return new SimpleAuthenticationInfo(user,user.getPassWord(),this.getClass().getName());
            //加SALT,这里的参数要给个唯一的;
            ByteSource credentialsSalt = ByteSource.Util.bytes(user.getUserName());
            //参数realmName: 当前 realm对象的name.调用父类的getName()方法即可
            return new SimpleAuthenticationInfo(user, user.getPassWord(), credentialsSalt, this.getClass().getName());
        }
        return null;
    }

    /**
     * 授权
     * doGetAuthorizationInfo方法是在我们调用
     * SecurityUtils.getSubject().isPermitted()这个方法,
     * 授权后用户角色及权限会保存在缓存中的
     *
     * @param principal
     * @return
     * @RequiresPermissions这个注解起始就是在执行SecurityUtils.getSubject().isPermitted()
     */
    @Override
    protected AuthorizationInfo doGetAuthorizationInfo(PrincipalCollection principal) {
        //获取session中的用户,以下3种都可以
        // User user=(User) principal.getPrimaryPrincipal();
        //String userName=(String) SecurityUtils.getSubject().getPrincipal();
        SimpleAuthorizationInfo info = new SimpleAuthorizationInfo();
        User user = (User) principal.fromRealm(this.getClass().getName()).iterator().next();
        //查询数据库
        user = userService.findUserInfo(user.getUserName());
        logger.info("##################执行Shiro权限授权##################user info is:{}" + JSONObject.toJSONString(user));
        Set<String> userPermissions = new HashSet<String>();
        Set<String> userRoles = new HashSet<String>();
        for (Role role : user.getRoles()) {
            userRoles.add(role.getRoleName());
            List<Permission> rolePermissions = role.getPermissions();
            for (Permission permission : rolePermissions) {
                userPermissions.add(permission.getPermName());
            }
        }
        //角色名集合
        info.setRoles(userRoles);
        //权限名集合,将权限放入shiro中,
        // 这里可以把url,按钮,菜单,api等当做资源来进行权限控制,从而对用户进行权限控制
        info.addStringPermissions(userPermissions);
        return info;
    }
}
1.4shiro登录验证的使用:
项目中定义个登录接口,如下:
  /**
     * 登录方法
     * 在调用了login方法后,SecurityManager会收到AuthenticationToken,并将其发送给已配置的Realm执行必须的      认证检查
     * 每个Realm都能在必要时对提交的AuthenticationTokens作出反应
     * @param userName
     * @param passWord
     * @param rememberMe
     * @param session
     * @return
     * @throws AuthenticationException
     */
 @RequestMapping("/login")
    @ResponseBody
    public Object loginUser(@RequestParam String userName, @RequestParam String passWord, @RequestParam boolean rememberMe, HttpSession session) throws AuthenticationException {
        Map<String, Object> result = new HashMap<>();
        result.put("code", "200");
        result.put("msg", "登录成功");
        Subject subject = SecurityUtils.getSubject();
        //已经登录过
        /*if (subject.isAuthenticated()) {
            User user = (User) subject.getPrincipal();
            result.put("user", user);
            logger.info("subject.isAuthenticated,userName:{}, login success", user.getUserName());
            return result;
        }*/
        //勾选了记住我
       /* if (subject.isRemembered()) {
            User user = (User) subject.getPrincipal();
            result.put("user", user);
            logger.info("subject.isRemembered,userName:{},login success", user.getUserName());
            return result;
        }*/
        UsernamePasswordToken usernamePasswordToken = new UsernamePasswordToken(userName, passWord, true);
        usernamePasswordToken.setRememberMe(rememberMe);
        try {
            subject.login(usernamePasswordToken);
            User user = (User) subject.getPrincipal();
            result.put("user", user);
            logger.info("userName:{},passWord:{} login success", userName, passWord);
        } catch (UnknownAccountException e) {
            //用户名不存在
            result.put("code", "-1");
            result.put("msg", "用户名不存在");
            logger.error("userName:{},passWord:{} login fail,error info is:{}", userName, passWord, e.getMessage());
        } catch (IncorrectCredentialsException e) {
            //密码错误
            result.put("code", "-1");
            result.put("msg", "用户名或密码错误");
            logger.error("userName:{},passWord:{} login fail,error info is:{}", userName, passWord, e.getMessage());
        } catch (LockedAccountException e) {
            //账户被锁定
            result.put("code", "-1");
            result.put("msg", "账户被锁定");
            logger.error("userName:{},passWord:{} login fail,error info is:{}", userName, passWord, e.getMessage());

        } catch (ExcessiveAttemptsException e) {
            //登录失败次数超过系统最大次数,请稍后重试
            result.put("code", "-1");
            result.put("msg", "登录失败次数超过系统最大次数,请稍后重试!");
            logger.error("userName:{},passWord:{} login fail,error info is:{}", userName, passWord, e.getMessage());

        } catch (DisabledAccountException e) {
            //验证未通过,帐号已经禁止登录
            result.put("code", "-1");
            result.put("msg", "验证未通过,帐号已经禁止登录!");
            logger.error("userName:{},passWord:{} login fail,error info is:{}", userName, passWord, e.getMessage());

        } catch (AuthenticationException e) {
            //出现其他异常
            result.put("code", "-1");
            result.put("msg", e.getMessage());
            logger.error("userName:{},passWord:{} login fail,error info is:{}", userName, passWord, e.getMessage());
        }

        return result;
    }
1.5前端采用vue
这里搞了个简单的测试demo,前端没有做任何其他控制和cookie设置。
修改前端代码后打包:npm run dev(先npm install);然后将生产的dist下的index.html复制到resource/template下替换原来的,将static下的所有文件夹及文件复制到resource/static下替换原来的
2.测试
Shiro过滤器配置如下:
/**
* ShiroFilterFactoryBean,是个factorybean,为了生成ShiroFilter。
* 它主要保持了三项数据,securityManager,filters,filterChainDefinitionManager
*
* @param manager
* @return
*/
@Bean
public ShiroFilterFactoryBean shiroFilter(@Qualifier("securityManager") SecurityManager manager) {
ShiroFilterFactoryBean bean = new ShiroFilterFactoryBean();
bean.setSecurityManager(manager);
//配置登录的url和登录成功的url
//setLoginUrl 如果不设置值,默认会自动寻找Web工程根目录下的"/login.jsp"页面 或 "/login" 映射
//实际可以在前端控制登录成功后的跳转
bean.setLoginUrl("/index");
bean.setSuccessUrl("/home");
// 设置无权限时跳转的 url;
bean.setUnauthorizedUrl("/403");
/**
* Shiro 内置过滤器,过滤链定义,从上向下顺序执行
* 常用的过滤器:
* anon:无需认证(登录)可以访问
* authc:必须认证才可以访问
* user:只要登录过,并且记住了密码,如果设置了rememberMe的功能可以直接访问
* perms:该资源必须得到资源权限才可以访问
* role:该资源必须得到角色的权限才可以访问
*/
LinkedHashMap<String, String> filterChainDefinitionMap = new LinkedHashMap<>();
//anon表示可以匿名访问
filterChainDefinitionMap.put("/index", "anon");
filterChainDefinitionMap.put("/login", "anon");
filterChainDefinitionMap.put("/static/**", "anon");
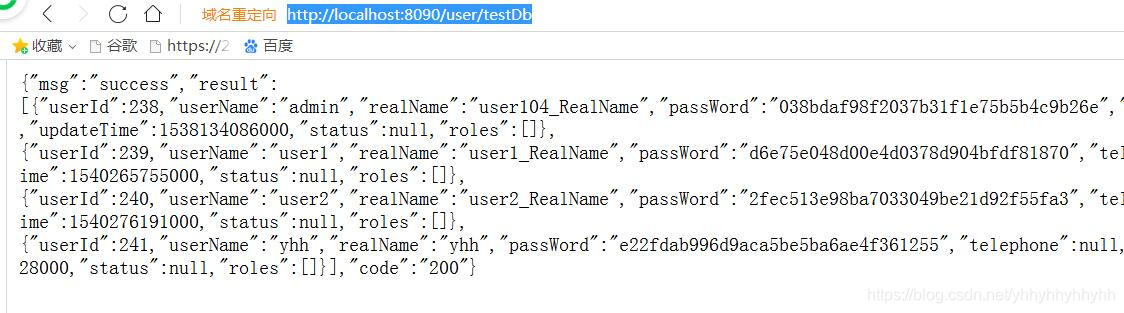
filterChainDefinitionMap.put("/user/testDb","anon");
//authc表示需要登录
filterChainDefinitionMap.put("/user/**","authc");
bean.setFilterChainDefinitionMap(filterChainDefinitionMap);
return bean;
}
2.1)直接访问http://localhost:8090/user/testDb
根据shiro过滤器配置,无需权限可以直接访问得到结果:
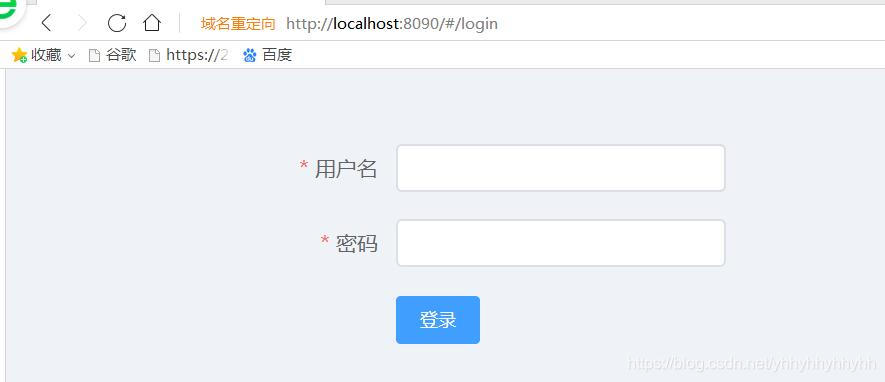
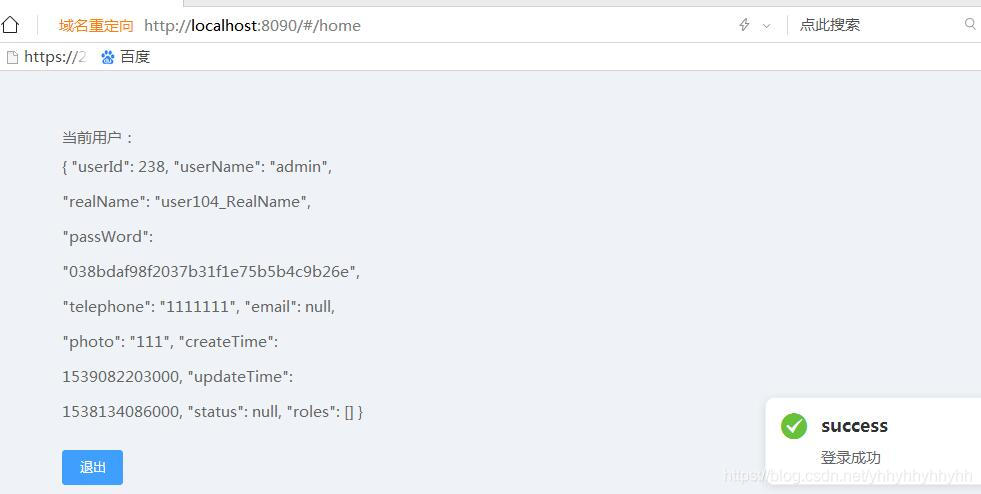
2.2)访问其他接口,会先跳转到登录页:
2.3)
admin/123456这个用户设置了所有角色,所有权限
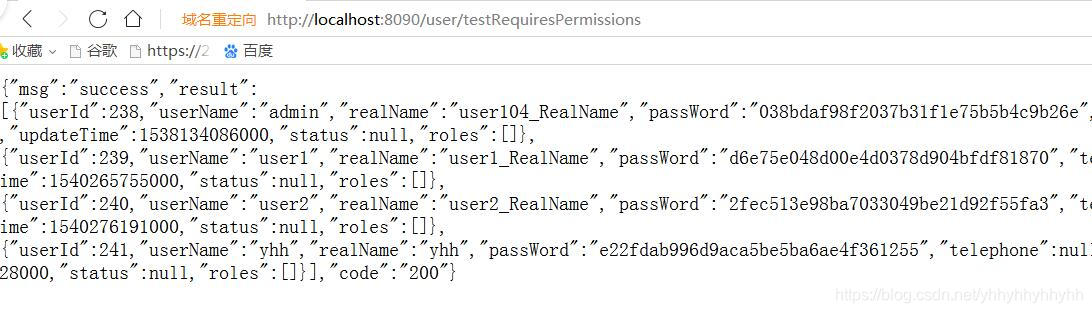

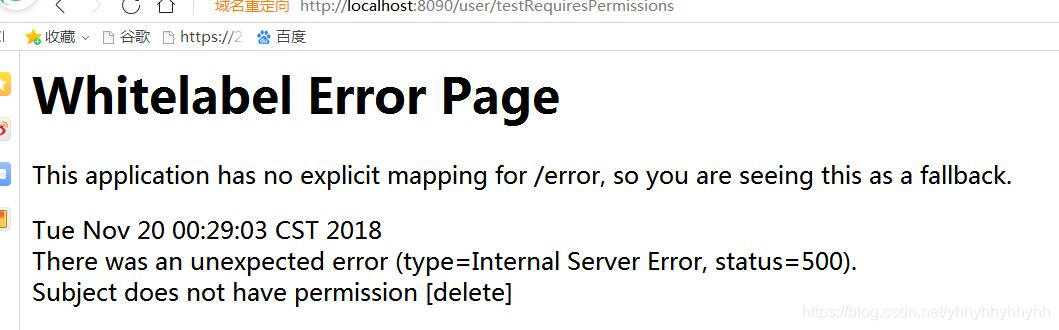
2.4)其他用户访问有权限的可以得到正常结果,访问该用户没有权限的接口,会报错提示没权限
后面再结合前端测试:密码输入次数限制;账号锁定等功能。