学习java框架的路线定为Spring + Mybatis + SpringMVC,即SSM,下面先开始经典的Spring的学习
Spring的开发包:spring-framework-4.2.4.RELEASE-dist
1、Spring相关的概念:
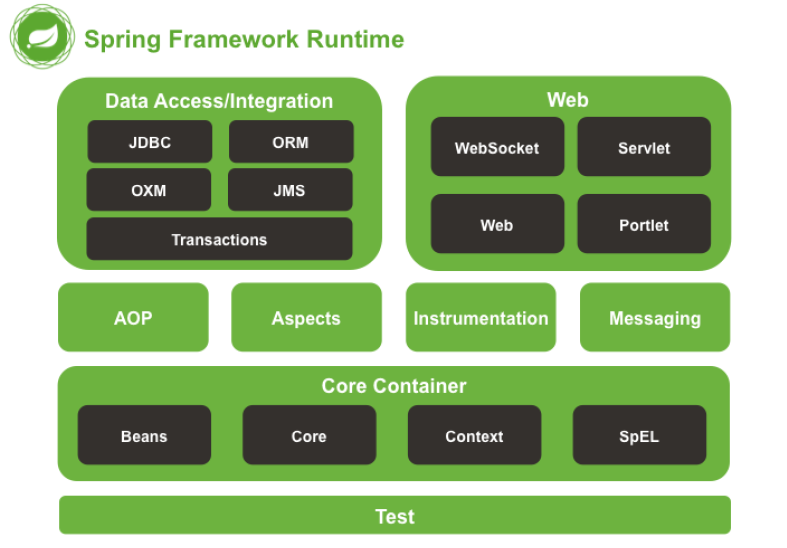
Spring:full-stack一站式/全栈式框架,下面是它的整体框架:其中最主要的就是Core Container

Tips:为什么叫一站式?
Web层:SpringMVC
Service层:Spring的Bean管理,声明式事务
Dao层:ORM模块、JDBC模板
spring的底层实现: 工厂模式+反射+配置
工厂类通过解析配置文件(XML)拿到类的名字然后反射获取类的实例
IOC和DI的区别(面试):
IOC:控制反转(Inversion of Control),将对象的创建权反转给Spring,方便解耦和,Spring的主要思想
DI:依赖注入(Dependency Injection),前提必须有IOC的环境,spring管理这个类的时候通过配置将类的依赖的属性注入(设置set)进来(设置这个值的过程就是DI)
比如:
这个类需要一个
private String name;

就可以在配置文件中来设置,这就是DI

<property name="name" value="吴彦祖" \>
进一步扩展----java类之间的关系:依赖、继承、聚合
依赖:
B里面的方法有A的属性
Class A{
}

Class B{
public void XXX(A a)
继承:
is a 麻雀是鸟
聚合:
has a 人有头发(程序员除外)
Spring的工厂类:
- BeanFactory(老版本,在调用getBean的时候才会生成类的实例)
- ApplicationContext(继承了BeanFactory接口,在加载配置文件的时候,就会将Spring管理的类都实例化)
ApplicationContext接口的两个实现类及其区别:
- ClassPathXmlApplicationContext:加载类路径下的文件(就是src下的文件,最终会被保存在WEB-INF下的class文件里,常用)
- FileSystemXmlApplicationContext:加载文件系统下的文件(就是硬盘下的)
2、Spring的配置和属性注入(其实就是在配置文件里构造类和对类的属性赋值,就不需要我们在写代码的时候再对类进行操作了):
基本上学习框架都包含了:
- 导包:Core Container的jar包
- 配置日志记录:log4j.properties(和xml一起放在src下面)
### direct log messages to stdout ###
log4j.appender.stdout=org.apache.log4j.ConsoleAppender
log4j.appender.stdout.Target=System.err
log4j.appender.stdout.layout=org.apache.log4j.PatternLayout
log4j.appender.stdout.layout.ConversionPattern=%d{ABSOLUTE} %5p %c{1}:%L - %m%n

### direct messages to file mylog.log ###
log4j.appender.file=org.apache.log4j.FileAppender
log4j.appender.file.File=c\:mylog.log
log4j.appender.file.layout=org.apache.log4j.PatternLayout
log4j.appender.file.layout.ConversionPattern=%d{ABSOLUTE} %5p %c{1}:%L - %m%n

### set log levels - for more verbose logging change 'info' to 'debug' ###
# error warn info debug trace
log4j.rootLogger= info, stdout
- 配置xml文件,默认文件名为 applicationContext.xml,配置是以Bean为单位的(只要引入上面的一部分就行了,注入可选)
<?xml version="1.0" encoding="UTF-8"?>
<beans
xmlns="http://www.springframework.org/schema/beans"
xmlns:p="http://www.springframework.org/schema/p"
   xmlns:xsi="http://www.w3.org/2001/XMLSchema-instance"
   xsi:schemaLocation="
       http://www.springframework.org/schema/beans
       http://www.springframework.org/schema/beans/spring-beans.xsd">

1、基本配置(就相当于使用了无参构造方法构造了一个实例对象):
	id="类的代号,和name没多大区别"
	class="要执行的类的全路径名"

2、生命周期配置:
	init-method="初始化方法,默认执行"
	destroy-method="销毁方法,bean必须是单例创建的"

3、作用范围的配置:
	scope:
		singleton:单例模式,默认,只创建有一个对象
		prototype:多例模式(struts2和Spring整合的时候用到)
		request:应用在web项目中,Spring创建这个类后,将这个类存入到request范围中
		session:应用在web项目中,Spring创建这个类后,将这个类存入到session范围中
		globalsession:应用在web项目中,必须在porlet环境下使用,但是如果没有这种环境,相当于session

	<bean id="类的代号,和name没多大区别" class="要执行的类的全路径名"
	  init-method="初始化方法,默认执行" destroy-method="销毁方法,bean必须是单例创建的" scope=""></bean>


4、Spring的属性注入
	4.1 构造方法的方式的属性注入
		<bean id="类的代号" class="要执行的类的全路径名" >
			<constructor-arg name="属性名name" value="属性值"></constructor-arg>
			<constructor-arg name="属性名age" value="属性值"></constructor-arg>
		</bean>

	4.2 Set方法的方式的属性注入
		<bean id="类的代号" class="要执行的类的全路径名" >
			普通类型
			<property name="属性名name" value="属性值"></property>
			对象类型,ref:设置其他类的id或者name
			<property name="user" ref="user"></property>
		</bean>

	4.3 p名称空间的方式(2.5以后版本)
		<bean id="类的代号" class="要执行的类的全路径名"
		p:name="" p:age=""  p:user-ref="">

	4.3 SpEL的方式(3.5以后版本)
		<bean id="类的代号" class="要执行的类的全路径名" >
			<property name="属性名name" value="#{‘吴彦祖’}"></property>
			<property name="属性名age" value="#{23}"></property>
			<property name="属性名user" value="#{user}"></property>
		</bean>

5、Spring的集合属性注入(就是类的属性里有集合元素,比如:数组、list、set、map)

	<bean id="类的代号" class="要执行的类的全路径名" >

		<property name="数组/list">
			<list>
				<value>普通类型</value>
				<ref>对象类型</ref>
			</list>
		</property>

		<property name="set">
			<set>
				<value>普通类型</value>
				<ref>对象类型</ref>
			</set>
		</property>

		<property name="map">
			<map>
				<entry key="" value=""></entry>
				<entry key-ref="" value-ref=""></entry>
			</map>
		</property>

	</bean>

</beans>
在配置和属性注入完成后,我们可以用下面的代码引入这个类:
package cn.nupt.test;

import org.springframework.context.ApplicationContext;
import org.springframework.context.support.ClassPathXmlApplicationContext;

public class SpringTest {

	public void test() {
		//加载配置文件
		ApplicationContext applicationContext = new ClassPathXmlApplicationContext("applicationContext.xml");
		//根据ID找到相应的类
		UserDaoImpl	userdaoImpl =  (UserDaoImpl)applicationContext.getBean("id的名字");
		//调用类里面的方法

	}

}
Tips:id和name的区别:
1、id使用了约束中的唯一约束,不能重复,不能出现特殊字符
2、name没有使用约束中的唯一约束,原则上可以重复