分享一下我老师大神的人工智能教程!零基础,通俗易懂!http://blog.csdn.net/jiangjunshow
也欢迎大家转载本篇文章。分享知识,造福人民,实现我们中华民族伟大复兴!
前言
spring的优点和实现原理不在此详述,想要自己动手写一个简单的IOC容器,要求各位对spring有一定的了解或者使用过。
自定义IOC容器的基本架构
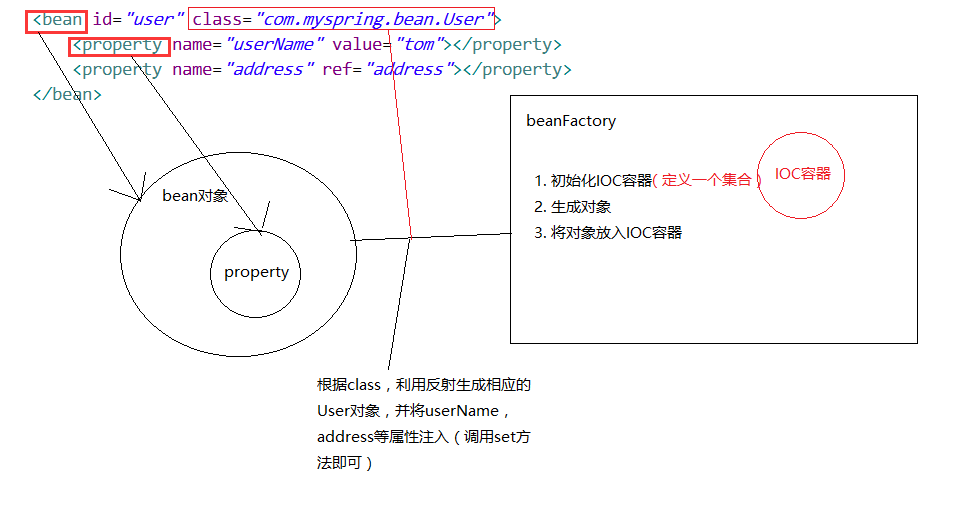
架构图解

基本思路
- 解析xml配置文件
- 根据配置的生成相应的对象
- 将对象存入IOC容器
IOC容器实现图解
IOC容器实现
要求:
1. 我们使用dom4j.jar 和 jaxen.jar 来解析xml文件(自行下载,或在文章末尾下载demo)
2. 需要懂得java的反射机制
1. 创建一个java工程
2. 导入 dom4j.jar 和 jaxen.jar
3. 创建测试用的类
package com.myspring.bean;public class User { private String userName; private Address address; public String getUserName() { return userName; } public void setUserName(String userName) { this.userName = userName; } public Address getAddress() { return address; } public void setAddress(Address address) { this.address = address; } @Override public String toString() { return "User [userName=" + userName + ", address=" + address + "]"; }}
- 1
- 2
- 3
- 4
- 5
- 6
- 7
- 8
- 9
- 10
- 11
- 12
- 13
- 14
- 15
- 16
- 17
- 18
- 19
- 20
- 21
- 22
- 23
- 24
- 25
- 26
package com.myspring.bean;public class Address { private String city; public String getCity() { return city; } public void setCity(String city) { this.city = city; } @Override public String toString() { return "Address [city=" + city + "]"; }}
- 1
- 2
- 3
- 4
- 5
- 6
- 7
- 8
- 9
- 10
- 11
- 12
- 13
- 14
- 15
- 16
- 17
- 18
- 19
- 20
4. 创建ApplicationContext.xml
将配置文件ApplicationContext.xml放在src下
<?xml version="1.0" encoding="UTF-8"?><beans> <bean id="address" class="com.myspring.bean.Address"> <property name="city" value="fuzhou"></property> </bean> <bean id="user" class="com.myspring.bean.User"> <property name="userName" value="tom"></property> <property name="address" ref="address"></property> </bean></beans>
- 1
- 2
- 3
- 4
- 5
- 6
- 7
- 8
- 9
- 10
- 11
- 12
5. XmlConfig
封装Bean和Property,对应配置文件中的bean节点和property节点

package com.myspring.config;import java.util.ArrayList;import java.util.List;/** * 封装配置文件中的bean节点 * @author 周君 */public class Bean { private String id; private String className; private List<Property> properties = new ArrayList<Property>();//bean节点下可以有多个property节点 public String getId() { return id; } public void setId(String id) { this.id = id; } public String getClassName() { return className; } public void setClassName(String className) { this.className = className; } public List<Property> getProperties() { return properties; } public void setProperties(List<Property> properties) { this.properties = properties; } @Override public String toString() { return "Bean [id=" + id + ", className=" + className + ", properties=" + properties + "]"; }}
- 1
- 2
- 3
- 4
- 5
- 6
- 7
- 8
- 9
- 10
- 11
- 12
- 13
- 14
- 15
- 16
- 17
- 18
- 19
- 20
- 21
- 22
- 23
- 24
- 25
- 26
- 27
- 28
- 29
- 30
- 31
- 32
- 33
- 34
- 35
- 36
- 37
- 38
- 39
- 40
- 41
package com.myspring.config;/** * 封装配置文件中的property节点 * * @author 周君 */public class Property { private String name; //使用value属性直接指定值,也可以使用ref属性来指定依赖的对象 private String value; private String ref; public String getName() { return name; } public void setName(String name) { this.name = name; } public String getValue() { return value; } public void setValue(String value) { this.value = value; } public String getRef() { return ref; } public void setRef(String ref) { this.ref = ref; }}
- 1
- 2
- 3
- 4
- 5
- 6
- 7
- 8
- 9
- 10
- 11
- 12
- 13
- 14
- 15
- 16
- 17
- 18
- 19
- 20
- 21
- 22
- 23
- 24
- 25
- 26
- 27
- 28
- 29
- 30
- 31
- 32
- 33
- 34
- 35
用于解析配置文件的类
package com.myspring.config;import java.io.InputStream;import java.util.HashMap;import java.util.List;import java.util.Map;import org.dom4j.Document;import org.dom4j.DocumentException;import org.dom4j.Element;import org.dom4j.io.SAXReader;/** * 读取xml配置文件的类 * @author 周君 */public class XmlConfig { /** * 读取配置文件 * @param path 配置文件路径 * @return */ public static Map<String, Bean> getConfig(String path){ Map<String, Bean> configMap = new HashMap<String, Bean>(); //使用dom4j和xpath读取xml文件 Document doc = null; SAXReader reader = new SAXReader(); InputStream in = XmlConfig.class.getResourceAsStream(path); try { doc = reader.read(in); } catch (DocumentException e) { e.printStackTrace(); throw new RuntimeException("请检查您的xml配置文件路径是否正确!"); } //定义xpath,取出所有的bean String xpath = "//bean"; //对bean进行遍历 List<Element> list = doc.selectNodes(xpath); if(list!=null){ for (Element beanEle : list) { Bean bean = new Bean(); //bean节点的id String id = beanEle.attributeValue("id"); //bean节点的class属性 String className = beanEle.attributeValue("class"); //封装到bean对象中 bean.setId(id); bean.setClassName(className); //获取bean节点下所有的property节点 List<Element> proList = beanEle.elements("property"); if(proList != null){ for (Element proEle : proList) { Property prop = new Property(); String propName = proEle.attributeValue("name"); String propValue = proEle.attributeValue("value"); String propRef = proEle.attributeValue("ref"); //封装到property属性中 prop.setName(propName); prop.setValue(propValue); prop.setRef(propRef); bean.getProperties().add(prop); } } //id是不应重复的 if(configMap.containsKey(id)){ throw new RuntimeException("bean节点ID重复:" + id); } //将bean封装到map中 configMap.put(id, bean); } } return configMap; }}
- 1
- 2
- 3
- 4
- 5
- 6
- 7
- 8
- 9
- 10
- 11
- 12
- 13
- 14
- 15
- 16
- 17
- 18
- 19
- 20
- 21
- 22
- 23
- 24
- 25
- 26
- 27
- 28
- 29
- 30
- 31
- 32
- 33
- 34
- 35
- 36
- 37
- 38
- 39
- 40
- 41
- 42
- 43
- 44
- 45
- 46
- 47
- 48
- 49
- 50
- 51
- 52
- 53
- 54
- 55
- 56
- 57
- 58
- 59
- 60
- 61
- 62
- 63
- 64
- 65
- 66
- 67
- 68
- 69
- 70
- 71
- 72
- 73
- 74
- 75
- 76
- 77
- 78
6. BeanFactory
定义BeanFactory接口
package com.myspring.core;public interface BeanFactory { Object getBean(String beanName);}
- 1
- 2
- 3
- 4
- 5
- 6
- 7
实现类,作用是初始化IOC容器,生成对象放入容器中
所谓的容器,在代码中的表现形式其实就是个集合,我们使用HashMap来作为容器
package com.myspring.core;import java.lang.reflect.Method;import java.util.HashMap;import java.util.Map;import java.util.Map.Entry;import com.myspring.config.Bean;import com.myspring.config.Property;import com.myspring.config.XmlConfig;import com.myspring.utils.BeanUtil;public class ClassPathXmlApplicationContext implements BeanFactory{ //定义一个IOC容器 private Map<String, Object> ioc; private Map<String, Bean> config; /** * 构造函数 * 1. 初始化IOC容器 * 2. 加载配置文件,生成bean对象放入IOC容器 * @param path */ public ClassPathXmlApplicationContext(String path){ //初始化IOC容器 ioc = new HashMap<String, Object>(); //读取配置文件 config = XmlConfig.getConfig(path); if(config!=null){ for(Entry<String, Bean> entry : config.entrySet()){ String beanId = entry.getKey(); Bean bean = entry.getValue(); //根据bean生成相应的对象 Object object = createBean(bean); ioc.put(beanId, object); } } } /** * 根据bean生成对象实例 * @param bean * @return */ private Object createBean(Bean bean) { String beanId = bean.getId(); String className = bean.getClassName(); Class c = null; Object object = null; try { //根据bean的calss属性生成对象 c = Class.forName(className); } catch (ClassNotFoundException e) { throw new RuntimeException("您配置的class属性不合法:"+className); } try { //该方法调用的是类的无参构造方法 object = c.newInstance(); } catch (Exception e) { throw new RuntimeException("该类缺少一个无参构造方法:"+className); } //将bean的属性封装到对象中 if(bean.getProperties() != null){ for(Property p : bean.getProperties()){ //情况一:配置文件中使用的是value属性注入 if(p.getValue() != null){ //获取属性对应的setter方法 Method getMethod = BeanUtil.getSetterMethod(object,p.getName()); try { //调用set方法注入 getMethod.invoke(object, p.getValue()); } catch (Exception e) { throw new RuntimeException("属性名称不合法或者没有相应的getter方法:"+p.getName()); } } //情况二:配置文件中使用的是ref属性注入 if(p.getRef() != null){ //获取属性对应的setter方法 Method getMethod = BeanUtil.getSetterMethod(object,p.getName()); //从容器中找到依赖的对象 Object obj = ioc.get(p.getRef()); if(obj == null){ throw new RuntimeException("没有找到依赖的对象:"+p.getRef()); }else{ //调用set方法注入 try { getMethod.invoke(object, obj); } catch (Exception e) { throw new RuntimeException("属性名称不合法或者没有相应的getter方法:"+p.getName()); } } } } } return object; } @Override public Object getBean(String beanName) { return ioc.get(beanName); }}
- 1
- 2
- 3
- 4
- 5
- 6
- 7
- 8
- 9
- 10
- 11
- 12
- 13
- 14
- 15
- 16
- 17
- 18
- 19
- 20
- 21
- 22
- 23
- 24
- 25
- 26
- 27
- 28
- 29
- 30
- 31
- 32
- 33
- 34
- 35
- 36
- 37
- 38
- 39
- 40
- 41
- 42
- 43
- 44
- 45
- 46
- 47
- 48
- 49
- 50
- 51
- 52
- 53
- 54
- 55
- 56
- 57
- 58
- 59
- 60
- 61
- 62
- 63
- 64
- 65
- 66
- 67
- 68
- 69
- 70
- 71
- 72
- 73
- 74
- 75
- 76
- 77
- 78
- 79
- 80
- 81
- 82
- 83
- 84
- 85
- 86
- 87
- 88
- 89
- 90
- 91
- 92
- 93
- 94
- 95
- 96
- 97
- 98
- 99
- 100
- 101
- 102
- 103
- 104
- 105
- 106
- 107
- 108
- 109
6. BeanUtil
package com.myspring.utils;import java.lang.reflect.Method;public class BeanUtil { /** * 获取obj类的name属性的setter方法 * @param obj * @param name * @return */ public static Method getSetterMethod(Object obj,String name){ Method method = null; //setter方法名称(驼峰) name = "set"+name.substring(0,1).toUpperCase()+name.substring(1); try { Method[] methods = obj.getClass().getMethods(); //遍历该类的所有方法 for(int i=0;i<methods.length;i++){ Method m = methods[i]; if(m.getName().equals(name)){ method = obj.getClass().getMethod(name,m.getParameterTypes()); break; } } } catch (NoSuchMethodException e) { e.printStackTrace(); } return method; }}
- 1
- 2
- 3
- 4
- 5
- 6
- 7
- 8
- 9
- 10
- 11
- 12
- 13
- 14
- 15
- 16
- 17
- 18
- 19
- 20
- 21
- 22
- 23
- 24
- 25
- 26
- 27
- 28
- 29
- 30
- 31
- 32
- 33
- 34
测试
package com.myspring.test;import java.util.Map;import java.util.Map.Entry;import com.myspring.bean.Address;import com.myspring.bean.User;import com.myspring.config.Bean;import com.myspring.config.XmlConfig;import com.myspring.core.BeanFactory;import com.myspring.core.ClassPathXmlApplicationContext;public class Test { public static void main(String[] args) { testIOC(); //testConfig(); } /** * 测试IOC容器 */ private static void testIOC(){ BeanFactory bf = new ClassPathXmlApplicationContext("/ApplicationContext.xml"); User user = (User) bf.getBean("user"); System.out.println(user); System.out.println("address hashcode:"+user.getAddress().hashCode()); Address address = (Address) bf.getBean("address"); System.out.println(address); System.out.println("address hashcode:"+address.hashCode()); } /** * 测试读取配置文件 */ private static void testConfig(){ Map<String,Bean> map = XmlConfig.getConfig("/ApplicationContext.xml"); for (Entry<String, Bean> entry : map.entrySet()) { System.out.println(entry.getKey()+"==="+entry.getValue()); } }}
- 1
- 2
- 3
- 4
- 5
- 6
- 7
- 8
- 9
- 10
- 11
- 12
- 13
- 14
- 15
- 16
- 17
- 18
- 19
- 20
- 21
- 22
- 23
- 24
- 25
- 26
- 27
- 28
- 29
- 30
- 31
- 32
- 33
- 34
- 35
- 36
- 37
- 38
- 39
- 40
- 41
- 42
- 43
- 44
demo下载
给我老师的人工智能教程打call!http://blog.csdn.net/jiangjunshow
