1、RecyclerView控件不在标准的库里面,需要先引入,引入比较简单,点击控件右边的下载按钮即可

2、先添加一个新闻实体类,用来为新闻列表提供数据,news.java:
package com.example.chenrui.common;

public class News {

    private String title;
    private int pic;

    public News(String title, int pic) {
        this.title = title;
        this.pic = pic;
    }

    public String getTitle() {
        return title;
    }

    public void setTitle(String title) {
        this.title = title;
    }

    public int getPic() {
        return pic;
    }

    public void setPic(int pic) {
        this.pic = pic;
    }
}
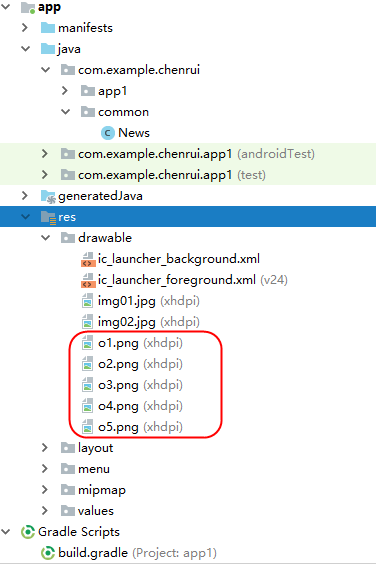
3、在res/drawable/xhdpi目录下引用几个图片,做为新闻图片的资源
4、添加一个Layout XML File,做为列表项的内容,news_item.xml:
<?xml version="1.0" encoding="utf-8"?>
<android.support.constraint.ConstraintLayout xmlns:android="http://schemas.android.com/apk/res/android"
    xmlns:app="http://schemas.android.com/apk/res-auto"
    xmlns:tools="http://schemas.android.com/tools"
    android:id="@+id/linearLayout"
    android:layout_width="match_parent"
    android:layout_height="100dp">

    <ImageView
        android:id="@+id/newsPic"
        android:layout_width="120dp"
        android:layout_height="80dp"
        android:layout_marginLeft="8dp"
        android:layout_marginTop="8dp"
        android:layout_marginBottom="8dp"
        android:adjustViewBounds="false"
        app:layout_constraintBottom_toBottomOf="parent"
        app:layout_constraintLeft_toLeftOf="parent"
        app:layout_constraintTop_toTopOf="parent" />

    <TextView
        android:id="@+id/newsTitle"
        android:layout_width="0dp"
        android:layout_height="wrap_content"
        android:text="TextView"
        app:layout_constraintLeft_toRightOf="@+id/newsPic"
        app:layout_constraintRight_toRightOf="parent"
        app:layout_constraintTop_toTopOf="@+id/newsPic" />
</android.support.constraint.ConstraintLayout>
5、添加一个适配器,这个适配器用于为RecyclerView指定使用的Layout数据项模板,以及对应的数据操作,NewsAdapter.java:
package com.example.chenrui.app1;

import android.support.annotation.NonNull;
import android.support.v7.widget.RecyclerView;
import android.view.LayoutInflater;
import android.view.View;
import android.view.ViewGroup;
import android.widget.ImageView;
import android.widget.TextView;

import com.example.chenrui.common.News;

import java.util.List;

public class NewsAdapter extends RecyclerView.Adapter<News2Adapter.ViewHolder> {

    private List<News> newsList;

    public News2Adapter(List<News> newsList) {
        this.newsList = newsList;
    }

    @NonNull
    @Override
    public ViewHolder onCreateViewHolder(@NonNull ViewGroup viewGroup, int i) {
        View view = LayoutInflater.from(viewGroup.getContext()).inflate(R.layout.news_item,viewGroup,false);
        ViewHolder viewHolder = new ViewHolder(view);
        return viewHolder;
    }

    @Override
    public void onBindViewHolder(@NonNull ViewHolder viewHolder, int i) {
        News news = newsList.get(i);
        viewHolder.newsImage.setImageResource(news.getPic());
        viewHolder.newsTitle.setText(news.getTitle());
    }

    @Override
    public int getItemCount() {
        return newsList.size();
    }

    static class ViewHolder extends RecyclerView.ViewHolder {

        ImageView newsImage;
        TextView newsTitle;

        public ViewHolder(@NonNull View itemView) {
            super(itemView);

            newsImage = itemView.findViewById(R.id.newsPic);
            newsTitle = itemView.findViewById(R.id.newsTitle);
        }
    }
}
6、接下来就是主体Activity了
activity_main.xml
<?xml version="1.0" encoding="utf-8"?>
<android.support.constraint.ConstraintLayout xmlns:android="http://schemas.android.com/apk/res/android"
    xmlns:app="http://schemas.android.com/apk/res-auto"
    xmlns:tools="http://schemas.android.com/tools"
    android:layout_width="match_parent"
    android:layout_height="match_parent"
    tools:context=".Main13Activity">

    <android.support.v7.widget.RecyclerView
        android:id="@+id/list1"
        android:layout_width="match_parent"
        android:layout_height="match_parent" />
</android.support.constraint.ConstraintLayout>
MainActivity.java
package com.example.chenrui.app1;

import android.support.v7.app.AppCompatActivity;
import android.os.Bundle;
import android.support.v7.widget.LinearLayoutManager;
import android.support.v7.widget.RecyclerView;
import android.widget.LinearLayout;

import com.example.chenrui.common.News;

import java.util.ArrayList;
import java.util.List;

public class MainActivity extends AppCompatActivity {

    @Override
    protected void onCreate(Bundle savedInstanceState) {
        super.onCreate(savedInstanceState);
        setContentView(R.layout.activity_main);

        List<News> newsList = new ArrayList();
        newsList.add(new News("新闻标题1",R.drawable.o1));
        newsList.add(new News("新闻标题2",R.drawable.o2));
        newsList.add(new News("新闻标题3",R.drawable.o3));
        newsList.add(new News("新闻标题4",R.drawable.o4));
        newsList.add(new News("新闻标题5",R.drawable.o5));
        NewsAdapter newsAdapter = new NewsAdapter(newsList);

        RecyclerView view = findViewById(R.id.list1);
        LinearLayoutManager layoutManager = new LinearLayoutManager(this);
        view.setLayoutManager(layoutManager);
        view.setAdapter(newsAdapter);
    }
}
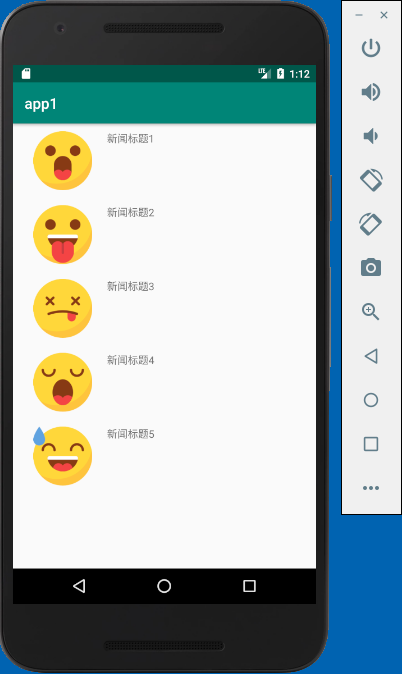
到此一个简单的RecyclerView控件示例就完成了,显示效果如下: