一、MongoDB简介
1、MongoDB是什么
MongoDB 是一个基于分布式文件存储的数据库。由 C++ 语言编写。旨在为 WEB 应用提供可扩展的高性能数据存储解决方案。MongoDB 是一个介于关系数据库和非关系数据库之间的产品,是非关系数据库当中功能最丰富,最像关系数据库的。他支持的数据结构非常松散,是类似json的bson格式,因此可以存储比较复杂的数据类型。Mongo最大的特点是他支持的查询语言非常强大,其语法有点类似于面向对象的查询语言,几乎可以实现类似关系数据库单表查询的绝大部分功能,而且还支持对数据建立索引MongoDB 将数据存储为一个文档,数据结构由键值(key=>value)对组成。MongoDB 文档类似于 JSON 对象。字段值可以包含其他文档,数组及文档数组。文档是MongoDB中数据的基本单元,非常类似于关系型数据库管理系统中的行,但更具表现力!
2、MongoDB特点
MongoDB的提供了一个面向文档存储,操作起来比较简单和容易。
你可以在MongoDB记录中设置任何属性的索引 (如:FirstName="Sameer",Address="8 Gandhi Road")来实现更快的排序。
你可以通过本地或者网络创建数据镜像,这使得MongoDB有更强的扩展性。
如果负载的增加(需要更多的存储空间和更强的处理能力) ,它可以分布在计算机网络中的其他节点上这就是所谓的分片。
Mongo支持丰富的查询表达式。查询指令使用JSON形式的标记,可轻易查询文档中内嵌的对象及数组。
MongoDb 使用update()命令可以实现替换完成的文档(数据)或者一些指定的数据字段 。
Mongodb中的Map/reduce主要是用来对数据进行批量处理和聚合操作。
Map和Reduce。Map函数调用emit(key,value)遍历集合中所有的记录,将key与value传给Reduce函数进行处理。
Map函数和Reduce函数是使用Javascript编写的,并可以通过db.runCommand或mapreduce命令来执行MapReduce操作。
GridFS是MongoDB中的一个内置功能,可以用于存放大量小文件。
MongoDB允许在服务端执行脚本,可以用Javascript编写某个函数,直接在服务端执行,也可以把函数的定义存储在服务端,下次直接调用即可。
MongoDB支持各种编程语言:RUBY,PYTHON,JAVA,C++,PHP,C#等多种语言。
MongoDB安装简单。
3、NoSQL简介
NoSQL(NoSQL = Not Only SQL ),意即"不仅仅是SQL"。在现代的计算系统上每天网络上都会产生庞大的数据量。
这些数据有很大一部分是由关系数据库管理系统(RDMBSs)来处理。 1970年 E.F.Codd's提出的关系模型的论文 "A relational model of data for large shared data banks",这使得数据建模和应用程序编程更加简单。通过应用实践证明,关系模型是非常适合于客户服务器编程,远远超出预期的利益,今天它是结构化数据存储在网络和商务应用的主导技术。
NoSQL 是一项全新的数据库革命性运动,早期就有人提出,发展至2009年趋势越发高涨。NoSQL的拥护者们提倡运用非关系型的数据存储,相对于铺天盖地的关系型数据库运用,这一概念无疑是一种全新的思维的注入。
4、关系型数据库遵循ACID规则
事务在英文中是transaction,和现实世界中的交易很类似,它有如下四个特性:
a、A (Atomicity) 原子性
原子性很容易理解,也就是说事务里的所有操作要么全部做完,要么都不做,事务成功的条件是事务里的所有操作都成功,只要有一个操作失败,整个事务就失败,需要回滚。
比如银行转账,从A账户转100元至B账户,分为两个步骤:1)从A账户取100元;2)存入100元至B账户。这两步要么一起完成,要么一起不完成,如果只完成第一步,第二步失败,钱会莫名其妙少了100元。
b、C (Consistency) 一致性
一致性也比较容易理解,也就是说数据库要一直处于一致的状态,事务的运行不会改变数据库原本的一致性约束。
例如现有完整性约束a+b=10,如果一个事务改变了a,那么必须得改变b,使得事务结束后依然满足a+b=10,否则事务失败。
c、I (Isolation) 独立性
所谓的独立性是指并发的事务之间不会互相影响,如果一个事务要访问的数据正在被另外一个事务修改,只要另外一个事务未提交,它所访问的数据就不受未提交事务的影响。
比如现有有个交易是从A账户转100元至B账户,在这个交易还未完成的情况下,如果此时B查询自己的账户,是看不到新增加的100元的。
d、D (Durability) 持久性
持久性是指一旦事务提交后,它所做的修改将会永久的保存在数据库上,即使出现宕机也不会丢失。
5、RDBMS vs NoSQL
RDBMS
- 高度组织化结构化数据
- 结构化查询语言(SQL) (SQL)
- 数据和关系都存储在单独的表中。
- 数据操纵语言,数据定义语言
- 严格的一致性
- 基础事务
NoSQL
- 代表着不仅仅是SQL
- 没有声明性查询语言
- 没有预定义的模式
-键 - 值对存储,列存储,文档存储,图形数据库
- 最终一致性,而非ACID属性
- 非结构化和不可预知的数据
- CAP定理
- 高性能,高可用性和可伸缩性
6、CAP定理(CAP theorem)
在计算机科学中, CAP定理(CAP theorem), 又被称作 布鲁尔定理(Brewer's theorem), 它指出对于一个分布式计算系统来说,不可能同时满足以下三点:
一致性(Consistency) (所有节点在同一时间具有相同的数据)
可用性(Availability) (保证每个请求不管成功或者失败都有响应)
分隔容忍(Partition tolerance) (系统中任意信息的丢失或失败不会影响系统的继续运作)
CAP理论的核心是:一个分布式系统不可能同时很好的满足一致性,可用性和分区容错性这三个需求,最多只能同时较好的满足两个。
因此,根据 CAP 原理将 NoSQL 数据库分成了满足 CA 原则、满足 CP 原则和满足 AP 原则三 大类:
CA - 单点集群,满足一致性,可用性的系统,通常在可扩展性上不太强大。
CP - 满足一致性,分区容忍性的系统,通常性能不是特别高。
AP - 满足可用性,分区容忍性的系统,通常可能对一致性要求低一些。
7、NoSQL的优点/缺点
优点:
- 高可扩展性
- 分布式计算
- 低成本
- 架构的灵活性,半结构化数据
- 没有复杂的关系
缺点:
- 没有标准化
- 有限的查询功能(到目前为止)
- 最终一致是不直观的程序
BASE:Basically Available, Soft-state, Eventually Consistent。 由 Eric Brewer 定义。
CAP理论的核心是:一个分布式系统不可能同时很好的满足一致性,可用性和分区容错性这三个需求,最多只能同时较好的满足两个。
BASE是NoSQL数据库通常对可用性及一致性的弱要求原则:
Basically Availble --基本可用
Soft-state --软状态/柔性事务。 "Soft state" 可以理解为"无连接"的, 而 "Hard state" 是"面向连接"的
Eventual Consistency --最终一致性 最终一致性, 也是是 ACID 的最终目的。
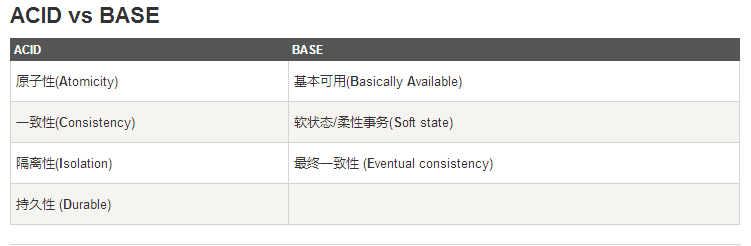
注:上图参考网上
二、MongoDB的Yum安装方式
1、MonggoDB支持以下平台:
OS X 32-bit
OS X 64-bit
Linux 32-bit
Linux 64-bit
Windows 32-bit
Windows 64-bit
Solaris i86pc
Solaris 64
下载地址: http://www.mongodb.org/downloads。
2、配置yum源
安装epel源(版本较低),如下:
# yum list all | grep mongodb
libmongodb.i686                             2.4.14-1.el6                 epel
libmongodb.x86_64                           2.4.14-1.el6                 epel
libmongodb-devel.i686                       2.4.14-1.el6                 epel
libmongodb-devel.x86_64                     2.4.14-1.el6                 epel
mongodb.x86_64                              2.4.14-1.el6                 epel
mongodb-server.x86_64                       2.4.14-1.el6                 epel
nodejs-mongodb.noarch                       1.3.19-4.el6                 epel
安装:
#yum install mongodb -y
2.6版本yum源
#vi /etc/yum.repos.d/mongodb-org-2.6.repo
[mongodb-org-2.6]
name=MongoDB 2.6 Repository
baseurl=http://downloads-distro.mongodb.org/repo/redhat/os/x86_64/
gpgcheck=0
enabled=1
安装:
#yum --enablerepo=mongodb-org-3.4  install mongodb-org -y
3.4版本yum源
#vi /etc/yum.repos.d/mongodb-org-3.4.repo
[mongodb-org-3.4]
name=MongoDB Repository
baseurl=https://repo.mongodb.org/yum/redhat/$releasever/mongodb-org/3.4/x86_64/
gpgcheck=1
enabled=1
gpgkey=

这里配置的是mongodb的3.4版本的yum源
开始安装
#yum install -y mongodb-org
或者
#yum --enablerepo=mongodb-org-3.4 install mongodb-org -y
如果报错将mongodb-org-3.4.repo中的https改为http!
如果继续报错如下:
GPG key retrieval failed: [Errno 14] Peer cert cannot be verified or peer cert invalid
将mongodb-org-3.4.repo中的gpgcheck和enabled值改为0 (有风险,测试环境可用)
查看是否安装成功
#which mongod
/usr/bin/mongod
查看安装了哪些软件包:
#rpm -qa mongodb-*
mongodb-org-server-3.4.2-1.el6.x86_64
mongodb-org-mongos-3.4.2-1.el6.x86_64
mongodb-org-3.4.2-1.el6.x86_64
mongodb-org-shell-3.4.2-1.el6.x86_64
mongodb-org-tools-3.4.2-1.el6.x86_64
启动MongoDB
service mongod start
Starting mongod: [  OK  ]
注:yum安装好MongoDB之后,默认数据存放目录是/var/lib/mongo,日志数据存放在/var/log/mongodb
目录中
启动后,查看日志
#cat /var/log/mongodb/mongod.log
2016-08-31T20:48:22.771+0800 I CONTROL  [main] ***** SERVER RESTARTED *****
2016-08-31T20:48:22.776+0800 I CONTROL  [initandlisten] MongoDB starting : pid=22171 port=27017 dbpath=/var/lib/mongo 64-bit host=elk
2016-08-31T20:48:22.776+0800 I CONTROL  [initandlisten] db version v3.4.2
2016-08-31T20:48:22.776+0800 I CONTROL  [initandlisten] git version: 3f76e40c105fc223b3e5aac3e20dcd026b83b38b
2016-08-31T20:48:22.776+0800 I CONTROL  [initandlisten] OpenSSL version: OpenSSL 1.0.1e-fips 11 Feb 2013
2016-08-31T20:48:22.776+0800 I CONTROL  [initandlisten] allocator: tcmalloc
2016-08-31T20:48:22.776+0800 I CONTROL  [initandlisten] modules: none
2016-08-31T20:48:22.776+0800 I CONTROL  [initandlisten] build environment:
2016-08-31T20:48:22.776+0800 I CONTROL  [initandlisten]     distmod: rhel62
2016-08-31T20:48:22.776+0800 I CONTROL  [initandlisten]     distarch: x86_64
2016-08-31T20:48:22.776+0800 I CONTROL  [initandlisten]     target_arch: x86_64
2016-08-31T20:48:22.776+0800 I CONTROL  [initandlisten] options: { config: "/etc/mongod.conf", net: { bindIp: "127.0.0.1", port: 27017 }, processManagement: { fork: true, pidFilePath: "/var/run/mongodb/mongod.pid" }, storage: { dbPath: "/var/lib/mongo", journal: { enabled: true } }, systemLog: { destination: "file", logAppend: true, path: "/var/log/mongodb/mongod.log" } }
2016-08-31T20:48:22.794+0800 I STORAGE  [initandlisten]
2016-08-31T20:48:22.794+0800 I STORAGE  [initandlisten] ** WARNING: Using the XFS filesystem is strongly recommended with the WiredTiger storage engine
2016-08-31T20:48:22.794+0800 I STORAGE  [initandlisten] **          See http://dochub.mongodb.org/core/prodnotes-filesystem
2016-08-31T20:48:22.794+0800 I STORAGE  [initandlisten] wiredtiger_open config: create,cache_size=424M,session_max=20000,eviction=(threads_max=4),config_base=false,statistics=(fast),log=(enabled=true,archive=true,path=journal,compressor=snappy),file_manager=(close_idle_time=100000),checkpoint=(wait=60,log_size=2GB),statistics_log=(wait=0),
2016-08-31T20:48:22.836+0800 I CONTROL  [initandlisten]
2016-08-31T20:48:22.836+0800 I CONTROL  [initandlisten] ** WARNING: Access control is not enabled for the database.
2016-08-31T20:48:22.836+0800 I CONTROL  [initandlisten] **          Read and write access to data and configuration is unrestricted.
2016-08-31T20:48:22.836+0800 I CONTROL  [initandlisten]
2016-08-31T20:48:22.836+0800 I CONTROL  [initandlisten]
2016-08-31T20:48:22.836+0800 I CONTROL  [initandlisten] ** WARNING: /sys/kernel/mm/transparent_hugepage/enabled is 'always'.
2016-08-31T20:48:22.836+0800 I CONTROL  [initandlisten] **        We suggest setting it to 'never'
2016-08-31T20:48:22.837+0800 I CONTROL  [initandlisten]
2016-08-31T20:48:22.837+0800 I CONTROL  [initandlisten] ** WARNING: /sys/kernel/mm/transparent_hugepage/defrag is 'always'.
2016-08-31T20:48:22.837+0800 I CONTROL  [initandlisten] **        We suggest setting it to 'never'
2016-08-31T20:48:22.837+0800 I CONTROL  [initandlisten]
2016-08-31T20:48:22.837+0800 I CONTROL  [initandlisten] ** WARNING: soft rlimits too low. rlimits set to 1024 processes, 64000 files. Number of processes should be at least 32000 : 0.5 times number of files.
2016-08-31T20:48:22.837+0800 I CONTROL  [initandlisten]
2016-08-31T20:48:22.842+0800 I FTDC     [initandlisten] Initializing full-time diagnostic data capture with directory '/var/lib/mongo/diagnostic.data'
2016-08-31T20:48:22.849+0800 I INDEX    [initandlisten] build index on: admin.system.version properties: { v: 2, key: { version: 1 }, name: "incompatible_with_version_32", ns: "admin.system.version" }
2016-08-31T20:48:22.849+0800 I INDEX    [initandlisten]          building index using bulk method; build may temporarily use up to 500 megabytes of RAM
2016-08-31T20:48:22.849+0800 I INDEX    [initandlisten] build index done.  scanned 0 total records. 0 secs
2016-08-31T20:48:22.850+0800 I COMMAND  [initandlisten] setting featureCompatibilityVersion to 3.4
2016-08-31T20:48:22.850+0800 I NETWORK  [thread1] waiting for connections on port 27017
可以看到有几个WARNING,查看是否启动成功了:
#netstat -tunlp
Active Internet connections (only servers)
Proto Recv-Q Send-Q Local Address               Foreign Address             State       PID/Program name
tcp        0      0 0.0.0.0:22                  0.0.0.0:*                   LISTEN      4678/sshd
tcp        0      0 127.0.0.1:25                0.0.0.0:*                   LISTEN      4759/master
tcp        0      0 127.0.0.1:27017             0.0.0.0:*                   LISTEN      22171/mongod
tcp        0      0 10.0.90.24:6379             0.0.0.0:*                   LISTEN      4809/redis-server 1
tcp        0      0 :::22                       :::*                        LISTEN      4678/sshd
tcp        0      0 ::1:25                      :::*                        LISTEN      4759/master
# ps aux | grep mongod
mongod   22171  0.5  2.1 321852 41272 ?        Sl   20:48   0:03 /usr/bin/mongod -f /etc/mongod.conf
root     22206  0.0  0.0 103244   872 pts/1    S+   20:59   0:00 grep mongod
可以看到端口和进程都在,说明启动成功了!
下面分析一下刚才日志中的几个warning:、
第一个: WARNING: Using the XFS filesystem is strongly recommended with the WiredTiger storage engine
意思是:强烈建议使用带WiredTiger存储引擎的XFS文件系统
XFS文件系统:XFS一种高性能的日志文件系统,最早于1993年,由Silicon Graphics为他们的IRIX操作系统而开发,
是IRIX 5.3版的默认文件系统。2000年5月,Silicon Graphics以GNU通用公共许可证发布这套系统的源代码,之后
被移植到Linux 内核上。XFS 特别擅长处理大文件,同时提供平滑的数据传输。
既然是warning说明不会影响mongodb的正常使用,只是提醒你安装mongodb最好使用ext4或者xfs文件系统!
本人系统已经是ext4系统了!

第二个: WARNING: Access control is not enabled for the database.
意思是:未对数据库启用访问控制,对数据和配置的读写访问不受限制(危险的warning)

第三个:WARNING: /sys/kernel/mm/transparent_hugepage/enabled is 'always'.
#cat /sys/kernel/mm/transparent_hugepage/enabled
[always] madvise never
关闭命令:
#echo never > /sys/kernel/mm/transparent_hugepage/enabled

第四个:WARNING: /sys/kernel/mm/transparent_hugepage/defrag is 'always'.
需要将/sys/kernel/mm/transparent_hugepage/defrag设置为never
#cat /sys/kernel/mm/transparent_hugepage/defrag
[always] madvise never
关闭命令:
#echo never > /sys/kernel/mm/transparent_hugepage/defrag

第五个:WARNING: soft rlimits too low. rlimits set to 1024 processes, 64000 files. Number of processes should be at least 32000
设置ulimit
#vi /etc/security/limits.conf
mongod soft nofile 64000
mongod hard nofile 64000
mongod soft nproc 32000
mongod hard nproc 32000
重启mongodb
#service mongod restart
就不会报这个warning了,不过还是会有第一个和第二个warning,下面再介绍!
三、MongoDB使用
MongoDB默认是没有设置鉴权的,业界大部分使用MongoDB的项目也没有设置访问权限。这就意味着只要知道MongoDB服务器的端口,任何能访问到这台服务器的人都可以查询和操作MongoDB数据库的内容。在一些项目当中,这种使用方式会被看成是一种安全漏洞。
1、第一次进入mongodb
可以使用MongoDB shell 来连接 MongoDB 服务器。也可以使用 PHP 来连接 MongoDB。这里我们会使用 MongoDB shell 来连接 Mongodb 服务,之后我们将会介绍如何通过php 来连接MongoDB服务。
标准 URI 连接语法:
mongodb://[username:password@]host1[:port1][,host2[:port2],...[,hostN[:portN]]][/[database][?options]]

mongodb:// 这是固定的格式,必须要指定。
username:password@ 可选项,如果设置,在连接数据库服务器之后,驱动都会尝试登陆这个数据库
host1 必须的指定至少一个host, host1 是这个URI唯一要填写的。它指定了要连接服务器的地址。如果要连接复制集,请指定多个主机地址。
portX 可选的指定端口,如果不填,默认为27017
/database 如果指定username:password@,连接并验证登陆指定数据库。若不指定,默认打开admin数据库。
?options 是连接选项。如果不使用/database,则前面需要加上/。所有连接选项都是键值对name=value,键值对之间通过&或;(分号)隔开
使用shell的方式连接:
#mongo
MongoDB shell version v3.4.2
connecting to: mongodb://127.0.0.1:27017
MongoDB server version: 3.4.2
Server has startup warnings:
2016-08-31T22:13:06.344+0800 I STORAGE  [initandlisten]
2016-08-31T22:13:06.344+0800 I STORAGE  [initandlisten] ** WARNING: Using the XFS filesystem is strongly recommended with the WiredTiger storage engine
2016-08-31T22:13:06.344+0800 I STORAGE  [initandlisten] **          See http://dochub.mongodb.org/core/prodnotes-filesystem
2016-08-31T22:13:06.571+0800 I CONTROL  [initandlisten]
2016-08-31T22:13:06.571+0800 I CONTROL  [initandlisten] ** WARNING: Access control is not enabled for the database.
2016-08-31T22:13:06.571+0800 I CONTROL  [initandlisten] **          Read and write access to data and configuration is unrestricted.
2016-08-31T22:13:06.571+0800 I CONTROL  [initandlisten]
> show databases;show databases;    #查看数据库
admin  0.000GB
local  0.000GB
>use admin    #切换数据库
>switched to db admin
如下这种方式也可以
#mongo mongodb://127.0.0.1:27017
MongoDB shell version v3.4.2
connecting to: mongodb://127.0.0.1:27017
MongoDB server version: 3.4.2
Server has startup warnings:
2016-09-02T21:07:29.630+0800 I STORAGE  [initandlisten]
2016-09-02T21:07:29.630+0800 I STORAGE  [initandlisten] ** WARNING: Using the XFS filesystem is strongly recommended with the WiredTiger storage engine
2016-09-02T21:07:29.630+0800 I STORAGE  [initandlisten] **          See http://dochub.mongodb.org/core/prodnotes-filesystem
2016-09-02T21:07:29.978+0800 I CONTROL  [initandlisten]
2016-09-02T21:07:29.978+0800 I CONTROL  [initandlisten] ** WARNING: Access control is not enabled for the database.
2016-09-02T21:07:29.978+0800 I CONTROL  [initandlisten] **          Read and write access to data and configuration is unrestricted.
2016-09-02T21:07:29.978+0800 I CONTROL  [initandlisten]
>
开启MongoDB的web界面访问
MongoDB自带一个微型的web管理信息界面,需要修改/etc/mongod.conf中的一个配置项:
net:
  port: 27017
  bindIp: 10.0.90.24
  http:
   enabled: true                  #设置为true
   RESTInterfaceEnabled: false    #设置为false
注:如果bindIp为127.0.0.1,只能在本机使用curl查看,无法再浏览器访问!
重启mongodb,会自动监听28017端口,然后访问,在浏览器输入:http://10.0.90.24:28017/,如下图: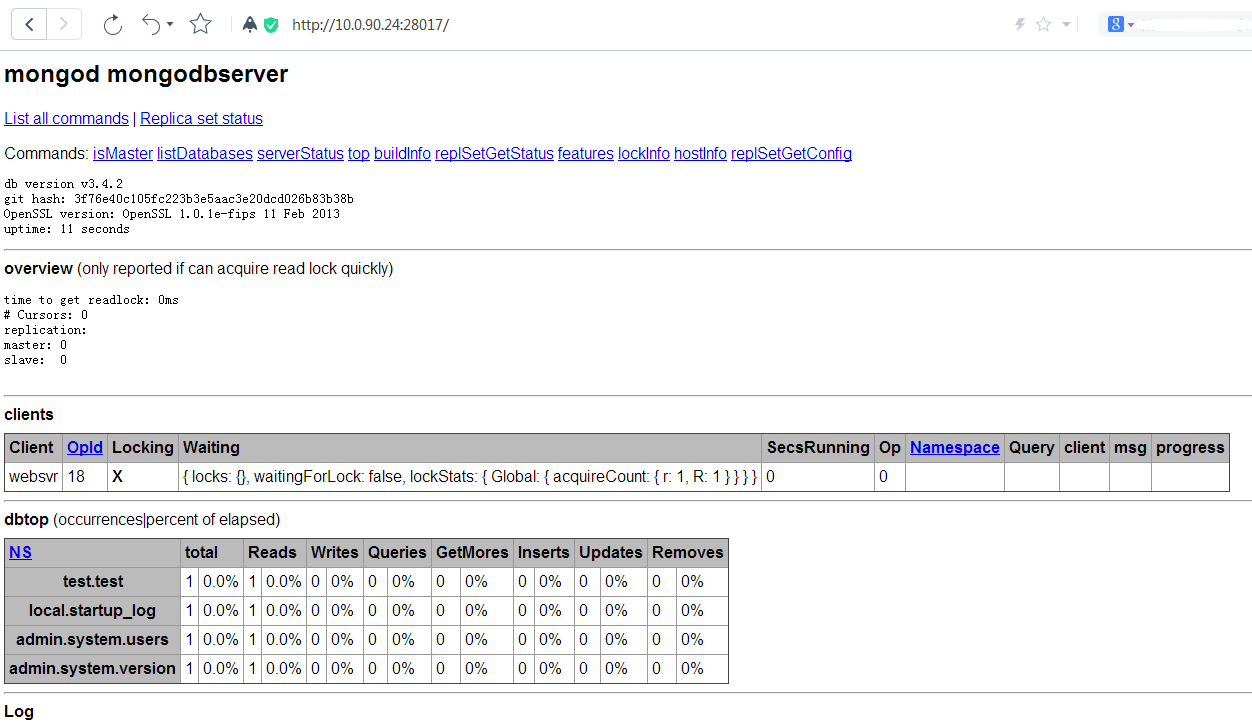
其中mongodbserver为mongodb服务器的hostname,还有其他一些连接信息!不过web界面方式使用不多。
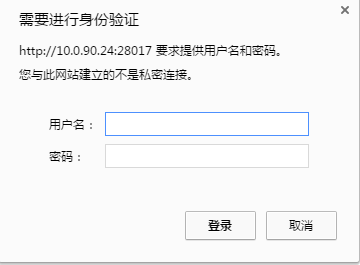
注:如果设置了net.http.enabled等于true,并且开启了security.authorization等于enabled,在浏览器访问http://10.0.90.24:28017/的时候,会提示输入用户名和密码,如下图:
2、为MongoDB创建用户管理员
MongoDB中,每个数据库的实例都可拥有多个用户,安全检查开启后,只要通过身份验证的用户才能够进行数据的读写操作。admin(管理员)和local(本地)是两个特殊的数据库,它们当中的用户可对任何数据库进行操作。这两个数据库中的用户可被看作是超级用户。经认证后,管理员用户可对任何数据库进行读写,同事能执行某些只有管理员才能执行的命令,如listDatabases和shutDown。
在默认情况下,mongod是监听在127.0.0.1之上的,任何客户端都可以直接连接27017,且没有认证。这样做的好处是,用户可以即时上手,不用担心被一堆配置弄的心烦意乱。然而坏处也是显而易见,如果直接在公网服务器上如此搭建MongoDB,那么所有人都可以直接访问并修改数据库数据了。
默认情况下,mongod也是没有管理员账户的。因此除非你在admin数据库中使用db.addUser()命令添加了管理员帐号,且使用--auth参数启动mongod,否则在数据库中任何人都可以无需认证执行所有命令,包括delete和shutdown。此外,mongod还会默认监听28017端口,同样是绑定所有ip。这是一个mongod自带的web监控界面。从中可以获取到数据库当前连接、log、状态、运行系统等信息。如果你开启了--rest参数,甚至可以直接通过web界面查询数据,执行mongod命令。
其实MongoDB本身有非常详细的安全配置准则,显然开发者也是想到了,然而他是将安全的任务推给用户去解决,这本身的策略就是偏向易用性的,对于安全性,则得靠边站了。
注:每个数据库都有自己的用户,创建用户的命令是db.createUser(),当你创建一个用户时,该用户就属于你当前所在的数据库。
MongoDB有一个比较奇怪的设置是,即便是一个admin用户,授权也必须在admin数据库下进行,而不能在其他数据库下进行。而授权之后admin用户就可以在任何数据库下进行任何操作了。当然数据库级别的用户在他自己的数据库下授权之后是不能到其他数据库进行操作的
每个用户包含三个要素:用户名、密码和角色列表。下面是一个例子:
{
user: "dbuser",
pwd : "dbpass",
roles: ["readWrite", "clusterAdmin"]
}
这个例子表示一个名为dbuser的用户,它在当前的数据库中拥有readWrite和clusterAdmin两个角色。
注:MongoDB内置了很多角色,但要注意,不是每个数据库的内置角色都一样。其中admin数据库就包含了一些其他数据库所没有的角色。熟悉Oracle的朋友都知道,数据库用户有两种,一种是管理员,用来管理用户;一种是普通用户,用来访问数据。类似的,为MongoDB规划用户鉴权时,至少要规划两种角色:用户管理员和数据库用户。如果搭建了分片或主从,可能还会要规划数据库架构管理员的角色,它们专门用来调整数据库的分布式架构。
下面是一个创建用户管理员的操作例子:
> use admin
switched to db admin
> db.createUser({user:"root",pwd:"test123",roles:["userAdminAnyDatabase"]})
Successfully added user: { "user" : "root", "roles" : [ "userAdminAnyDatabase" ] }
然后登陆测试一下
> use admin
switched to db admin
> db.auth("root","test123")
1
注:db.auth()方法返回1表示登录成功。
查看用户
>show users;
{
        "_id" : "admin.root",
        "user" : "root",
        "db" : "admin",
        "roles" : [
                {
                        "role" : "userAdminAnyDatabase",
                        "db" : "admin"
                }
        ]
}
设置完后,MongoDB客户端必须用正确的用户名和密码登录,才能在指定的数据库中操作。
下面是一个如何创建数据库用户的例子:
首先保证你已经以用户管理员的身份登录admin数据库。然后用use命令切换到目标数据库,同样用db.createUser()
命令来创建用户,其中角色名为“readWrite”,普通的数据库用户角色有两种,read和readWrite。顾名思义,
前者只能读取数据不能修改,后者可以读取和修改。
> use admin
switched to db admin
> db.auth("root","test123")
1
> show dbs;
admin  0.000GB
local  0.000GB
test   0.000GB
> use test
switched to db test
> db
test
#创建一个名为testuser123的用户,密码设置为123456,如下:
> db.createUser({user:"testuser123",pwd:"123456,",roles:["readWrite"]})
Successfully added user: { "user" : "testuser123", "roles" : [ "readWrite" ] }
> db.auth("testuser123","123456,")
1    #认证通过
以上就实现了为test库创建了一个普通用户!!!
注意:普通用户就算认证db.auth()通过之后,也没有权限执行show dbs命令,只能用db命令查看当前数据库!
3、在配置文件中开启mongodb连接认证功能
注:如果不开启认证功能,任何人只要可以ssh到mongodb的服务器,都可以进行增删改查等操作,这样
是很危险的。
在配置文件mongod.conf中开启,如下:
security:
  authorization: enabled
然后重启mongodb就开启了认证功能,测试如下:
#mongo --host 10.0.90.24          #如果是监听的127.0.0.1,就不需要加--host 参数了
MongoDB shell version v3.4.2
connecting to: mongodb://10.0.90.24:27017/
MongoDB server version: 3.4.2
>
可以看到增加了认证功能,就不会提示上面提到的第一个和第二个WARNING了。
然后直接执行show dbs 看看会不会列出所有的数据库
> show dbs
2017-02-13T11:54:45.562+0800 E QUERY    [thread1] Error: listDatabases failed:{
        "ok" : 0,
        "errmsg" : "not authorized on admin to execute command { listDatabases: 1.0 }",
        "code" : 13,
        "codeName" : "Unauthorized"
} :
_getErrorWithCode@src/mongo/shell/utils.js:25:13
Mongo.prototype.getDBs@src/mongo/shell/mongo.js:62:1
shellHelper.show@src/mongo/shell/utils.js:755:19
shellHelper@src/mongo/shell/utils.js:645:15
@(shellhelp2):1:1
>
可以看到提示类似“not authorized on admin to execute command”说明如果不进行权限认证,就无
法进行其他操作,那么我们进行认证,如下:
> use admin
switched to db admin
> db.auth("root","test123")
1
> show dbs;show dbs;
admin  0.000GB
local  0.000GB
test   0.000GB
说明认证通过,可以查看所有的数据库了!!!
一个例子:
#mongo --host 10.0.90.24         #进入mongodb
MongoDB shell version v3.4.2
connecting to: mongodb://10.0.90.24:27017/
MongoDB server version: 3.4.2
> use web
switched to db web
> db.auth("xlg","123456,")db.auth("xlg","123456,")
1
> show dbs;show dbs;        #根据提示可以看出普通用户无法执行show dbs命令
2017-02-13T15:33:32.816+0800 E QUERY    [thread1] Error: listDatabases failed:{
        "ok" : 0,
        "errmsg" : "not authorized on admin to execute command { listDatabases: 1.0 }",
        "code" : 13,
        "codeName" : "Unauthorized"
} :
_getErrorWithCode@src/mongo/shell/utils.js:25:13
Mongo.prototype.getDBs@src/mongo/shell/mongo.js:62:1
shellHelper.show@src/mongo/shell/utils.js:755:19
shellHelper@src/mongo/shell/utils.js:645:15
@(shellhelp2):1:1
> db
web
> db.web.findOne()db.web.findOne()    #查看数据
{
        "_id" : ObjectId("58a14e272fede9a9e553f929"),
        "name" : "james",
        "age" : "10"
}
> db.web.findOne({"name":"house"}) #查看name等于house的数据
{
        "_id" : ObjectId("58a150492fede9a9e553f92a"),
        "name" : "curry",
        "age" : "9"
}
> use admin             #切换到admin库
switched to db admin
> db.auth("root","test123")db.auth("root","test123")  #用管理员root认证
1
> db
admin
> use web             #切换到其他库
switched to db web
> db
web
> db.web.findOne()db.web.findOne()         #查看数据
{
        "_id" : ObjectId("58a14e272fede9a9e553f929"),
        "name" : "james",
        "age" : "10"
}
> db.web.findOne({"name":"house"})db.web.findOne({"name":"house"})
{
        "_id" : ObjectId("58a150492fede9a9e553f92a"),
        "name" : "curry",
        "age" : "9"
}
注意:如果想用admin超级用户查看除了admin之外的数据库,先用普通用户登录认证,然后切换到admin
库,再进行认证后,才可以继续其他操作。如上面的小例子
删除一个用户
>db.system.users.remove({"user" : "test_user"});  删除一个test_user用户
4、mongodb创建、删除、插入数据命令使用
> use test             #创建一个test数据库
switched to db test
> db     #列出当前db名称,为test
test
如果想列出所有数据库,使用show dbs命令
> show dbs;
admin  0.000GB
local  0.000GB
但是并没有看到刚才我们创建的test数据库,那是因为test数据库是空的,我们插入一条数据
> use test
switched to db test
> db
test
> db.test.insert({"name":"ceshishuju"})db.test.insert({"name":"ceshishuju"})
WriteResult({ "nInserted" : 1 })
> show dbsshow dbs
admin  0.000GB
local  0.000GB
test   0.000GB     #test 数据库就显示了
然后删除数据库
> use test
switched to db test
> db.dropDatabase();
{ "dropped" : "test", "ok" : 1 }
> show dbs;show dbs;
admin  0.000GB
local  0.000GB    #可以看到test库删掉了
基本查看数据
> use test
switched to db test
> db.test.findOne()
{ "_id" : ObjectId("57c8206a8a704e1515c76e7b"), "name" : "ceshishuju" }
可以看到插入的数据这里可以查看到了!
多条件查询,一个例子:
下面的示例等同于SQL语句的where name = "stephen" and age = 35
> db.test.find({"name":"stephen","age":35})
{ "_id" : ObjectId("4fd58ecbb9ac507e96276f1a"), "name" : "stephen", "age" : 35, "genda" : "male", "email" : "[email protected]" }
返回指定的文档键值对。下面的示例将只是返回name和age键值对。
> db.test.find({}, {"name":1,"age":1})
{ "_id" : ObjectId("4fd58ecbb9ac507e96276f1a"), "name" : "stephen", "age" : 35 }
指定不返回的文档键值对。下面的示例将返回除name之外的所有键值对。
> db.test.find({}, {"name":0})
{ "_id" : ObjectId("4fd58ecbb9ac507e96276f1a"), "age" : 35, "genda" : "male", "email" : "[email protected]" }
网上关于mongodb查询的博客:
http://www.cnblogs.com/stephen-liu74/archive/2012/08/03/2553803.html
5、mongodb存储引擎介绍
存储引擎(Storage Engine)是MongoDB的核心组件,负责管理数据如何存储在硬盘(Disk)和内存(Memory)上。从MongoDB 3.2 版本开始,MongoDB 支持多数据存储引擎(Storage Engine),MongoDB支持的存储引擎有:WiredTiger,MMAPv1和In-Memory。
从MongoDB 3.2版本开始,WiredTiger成为MongDB默认的Storage Engine,用于将数据持久化存储到硬盘文件中,WiredTiger提供文档级别(Document-Level)的并发控制,检查点(CheckPoint),数据压缩和本地数据加密( Native Encryption)等功能。
MongoDB不仅能将数据持久化存储到硬盘文件中,而且还能将数据只保存到内存中;In-Memory存储引擎用于将数据只存储在内存中,只将少量的元数据和诊断日志(Diagnostic)存储到硬盘文件中,由于不需要Disk的IO操作,就能获取索取的数据,In-Memory存储引擎大幅度降低了数据查询的延迟(Latency)
查看MongoDB的默认存储引擎:
#echo "db.serverStatus()"| mongo|grep wiredTiger
                "name" : "wiredTiger",
        "wiredTiger" : {
在mongod.conf中设置:
storage:
  dbPath: /var/lib/mongo
  journal:
    enabled: true
  engine: wiredTiger       #设置
WiredTiger和MMAPv1都用于持久化存储数据,相对而言,WiredTiger比MMAPv1更新,功能更强大!
一篇很好地学习文章:http://www.cnblogs.com/ljhdo/archive/2016/10/30/4947357.html
四、MongoDB使用注意事项以及性能优化
1、Test every query in your application with explain().
使用explain()测试应用程序中的每个查询。
MongoDB provides the ability to view how a query will be evaluated in the system, including which indexes are used and whether the query is covered.
This capability is similar to the Explain Plan and similar features in relational databases. The feedback from explain() will help you understand
whether your query is performing optimally.
2、Avoid scatter-gather queries. 避免分散-聚集查询
In sharded systems, queries that cannot be routed to a single shard must be broadcast to multiple shards for evaluation. Because these queries
involve multiple shards for each request they do not scale well as more shards are added.
3、Your operational applications should only read from primaries.
你的操作应用程序只应从主节点读取 (待考证)
Updates are typically replicated to secondaries quickly, depending on network latency. However, reads on the secondaries will not be consistent
with reads on the primary. Note that the secondaries are not idle as they must process all writes replicated from the primary. To increase read
capacity in your operational system consider sharding. Secondary reads can be useful for analytics and ETL applications as this approach will
isolate traffic from operational workloads. You may choose to read from secondaries if your application can tolerate eventual consistency.
4、Use the most recent drivers from MongoDB. 使用MongoDB最新的驱动程序
MongoDB supports drivers for nearly a dozen languages. These drivers are engineered by the same team that maintains the database kernel.
Drivers are updated more frequently than the database, typically every two months. Always use the most recent version of the drivers when
possible. Install native extensions if available for your language. Join the MongoDB community mailing list to keep track of updates.
5、Store all data for a record in a single document. 将记录的所有数据存储在单个文档中
MongoDB provides ACID compliance at the document level. When data for a record is stored in a single document the entire record can
be retrieved in a single seek operation, which is very efficient. In some cases it may not be practical to store all data in a single
document, or it may negatively impact other operations. Make the trade-offs that are best for your application.
6、Avoid large documents. 避免使用大文档
The maximum size for documents in MongoDB is 16 MB. In practice most documents are a few kilobytes or less. Consider documents more
like rows in a table than the tables themselves. Rather than maintaining lists of records in a single document, instead make each
record a document. For large media items, such as video or images, consider using GridFS, a convention implemented by all the
drivers that automatically stores the binary data across many smaller documents.
7、Avoid large indexed arrays. 避免使用大型索引数组
Rather than storing a large array of items in an indexed field, store groups of values across multiple fields. Updates will be more efficient.
8、Avoid unnecessarily long field names. 避免不必要的长字段名称
Field names are repeated across documents and consume space. By using smaller field names your data will consume less space, which allows
for a larger number of documents to fit in RAM. Note that with WiredTiger's native compression, long field names have less of an impact
on the amount of disk space used but the impact on RAM is the same.
9、Use caution when considering indexes on low-cardinality fields.
在考虑低基数字段上的索引时,请谨慎
Queries on fields with low cardinality can return large result sets. Avoid returning large result sets when possible. Compound indexes
may include values with low cardinality, but the value of the combined fields should exhibit high cardinality.
10、Eliminate unnecessary indexes. 取消不必要的索引。
Indexes are resource-intensive: even with compression enabled they consume RAM, and as fields are updated their associated indexes
must be maintained, incurring additional disk I/O overhead.
11、Remove indexes that are prefixes of other indexes.
删除作为其他索引的前缀的索引。
Compound indexes can be used for queries on leading fields within an index. For example, a compound index on last name, first name
can be also used to filter queries that specify last name only. In this example an additional index on last name only is unnecessary;
the compound index is sufficient for queries on last name as well as last name and first name.
12、Use a compound index rather than index intersection.
使用复合索引而不是索引交集
For best performance when querying via multiple predicates, compound indexes will generally be a better option.
13、Avoid regular expressions that are not left anchored or rooted.
避免没有留下锚定或生根的正则表达式。
Indexes are ordered by value. Leading wildcards are inefficient and may result in full index scans. Trailing wildcards can be efficient
if there are sufficient case-sensitive leading characters in the expression.
14、Use index optimizations available in the WiredTiger storage engine.
使用WiredTiger存储引擎中提供的索引优化(3.0版本之后默认是WiredTiger引擎)
As discussed earlier, the WiredTiger engine compresses indexes by default. In addition, administrators have the flexibility to place
indexes on their own separate volume, allowing for faster disk paging and lower contention.
15、Use RAID10. 使用raid10
Most MongoDB deployments should use RAID-10. RAID-5 and RAID-6 have limitations and may not provide sufficient performance.
RAID-0 provides good read and write performance, but insufficient fault tolerance. MongoDB's replica sets allow deployments
to provide stronger availability for data, and should be considered with RAID and other factors to meet the desired availability SLA.
16、Use multiple devices for different databases – WiredTiger.
对不同的数据库使用多个设备 - WiredTiger。
Set directoryForIndexes so that indexes are stored in separate directories from collections and directoryPerDB to use a different
directory for each database. The various directories can then be mapped to different storage devices, thus increasing overall
throughput. Note that using different storage devices will affect your ability to create snapshot-style backups of your data,
since the files will be on different devices and volumes.
17、Use EXT4 or XFS file systems; avoid EXT3.
避免使用ext3文件系统,使用ext4或者xfs文件系统
EXT3 is quite old and is not optimal for most database workloads. For example, MMAPv1 preallocates space for data.
In EXT3 preallocation will actually write 0s to the disk to allocate the space, which is time consuming. In EXT4 and XFS
preallocation is performed as a logical operation, which is much more efficient. With the WiredTiger storage engine, use
of XFS is strongly recommended to avoid performance issues that have been observed when using EXT4 with WiredTiger.
五、MongonDB 3.4.2版本配置文件参数详解
官网链接地址:
https://docs.mongodb.com/manual/reference/configuration-options/
注:配置参数是分级式的,比如net.http.RESTInterfaceEnabled其实在mongodb.conf中配置为:
net:
  port: 27017
  bindIp: 127.0.0.1
  http:
   enabled: true
   RESTInterfaceEnabled: false
所有下面都以net.http.RESTInterfaceEnabled这种方式介绍
参数类型一共三种:
string    字符串
boolean   布尔型 false/true
integer   整形
1、systemLog 选项如下:
systemLog.verbosity     --用法:verbosity: <integer>
日志文件输出的级别,越大级别越低,默认是0

systemLog.quiet         --用法: quite: boolean
在quite模式下会限制输出信息:
数据库命令输出,副本集活动,连接接受事件,连接关闭事件。

systemLog.traceAllExceptions     --用法:traceAllExceptions: boolean
打印用于调试的详细信息。 用于其他日志记录以进行支持相关的故障排除。

systemLog.syslogFacility         --用法:syslogFacility: string,默认为user
指定syslog日志信息的设备级别,需要指定--syslog来使用这个选项。

systemLog.logAppend      --用法:logAppend: boolean
是否启用追加日志

systemLog.destination    --用法:destination:string ,默认为file
指定一个文件或syslog。如果指定为文件,必须同时指定systemLog.path

systemLog.path           --用法:path: string 比如:/var/log/mongodb/mongod.log
日志路径

systemLog.logRotate      --用法:logRotate: string ,默认值为rename,另一个是reopen
可以实现rotage日志,实现日志切割

systemLog.timeStampFormat   --用法:timeStampFormat: string 默认值为 iso8601-local
日志消息中时间戳的时间格式。还有ctime、iso8601-utc格式

2、storage 选项用法:
范例:
storage:
   dbPath: <string>
   indexBuildRetry: <boolean>
   repairPath: <string>
   journal:
      enabled: <boolean>
      commitIntervalMs: <num>
   directoryPerDB: <boolean>
   syncPeriodSecs: <int>
   engine: <string>
   mmapv1:
      preallocDataFiles: <boolean>
      nsSize: <int>
      quota:
         enforced: <boolean>
         maxFilesPerDB: <int>
      smallFiles: <boolean>
      journal:
         debugFlags: <int>
         commitIntervalMs: <num>
   wiredTiger:
      engineConfig:
         cacheSizeGB: <number>
         journalCompressor: <string>
         directoryForIndexes: <boolean>
      collectionConfig:
         blockCompressor: <string>
      indexConfig:
         prefixCompression: <boolean>
   inMemory:
      engineConfig:
         inMemorySizeGB: <number>
具体参数的解释:
storage.dbPath     --用法:dbPath: string 默认是/data/db(linux) ;\data\db (windows)
注意:如果是yum安装的mongodb,默认是/var/lib/mongo
mongodb数据存储的路径

storage.indexBuildRetry   --用法:indexBuildRetry: boolean 默认值是true
指定数据库在索引建立过程中停止,重启后是否重新建立索引。

storage.repairPath        --用法:repairPath: string  默认值是:A _tmp_repairDatabase_<num> ( directory under the dbPath. )
在--repair操作期间MongoDB将使用的工作目录。当--repair结束后,storage.repairPath 目录变为空
注:storage.repairPath设置仅可用于mongod。

storage.journal.enabled           --用法:journal.enabled: boolean
64bit操作系统默认为true,32bit操作系统默认为false
启用或禁用持久性日志以确保数据文件保持有效和可恢复,此选项仅在您指定--dbpath选项时适用。

storage.journal.commitIntervalMs  --用法:journal.commitIntervalMs: number
mongod进程在日志操作之间允许的最大时间(以毫秒为单位),较低的值会增加日志的持久性,但会降低磁盘性能。
范围是1-500,默认值是100 毫秒。

storage.directoryPerDB            --用法:directoryPerDB: boolean 默认值时false
当为true时,MongoDB使用单独的目录来存储每个数据库的数据,目录位于storage.dbPath目录下,每个子目录名称对应于数据库名称。

storage.syncPeriodSecs            --用法:syncPeriodSecs: number 默认为60,不要设置为0
MongoDB通过fsync操作将数据刷新到数据文件之前可以经过的时间量。
特别注意:不要在生产系统上设置此值

storage.engine                    --用法: engine: wiredTiger 默认值为wiredTiger
设置mongodb的存储引擎。还有mmapv1和inMemory

storage.wiredTiger.engineConfig.cacheSizeGB  --用法:cacheSizeGB: float
WiredTiger将用于所有数据的内部缓存的最大大小。值的范围可以从256MB到10TB,可以是浮点数。 此外,默认值也已更改。
从3.4开始,WiredTiger内部缓存默认使用以下两者中较大的一个:
50% of RAM minus 1 GB(50%的RAM减去1 GB), or 256 MB.

3、net 选项用法:
net:
   port: <int>
   bindIp: <string>
   maxIncomingConnections: <int>
   wireObjectCheck: <boolean>
   ipv6: <boolean>
   unixDomainSocket:
      enabled: <boolean>
      pathPrefix: <string>
      filePermissions: <int>
   http:
      enabled: <boolean>
      JSONPEnabled: <boolean>
      RESTInterfaceEnabled: <boolean>
   ssl:
      sslOnNormalPorts: <boolean>  # deprecated since 2.6
      mode: <string>
      PEMKeyFile: <string>
      PEMKeyPassword: <string>
      clusterFile: <string>
      clusterPassword: <string>
      CAFile: <string>
      CRLFile: <string>
      allowConnectionsWithoutCertificates: <boolean>
      allowInvalidCertificates: <boolean>
      allowInvalidHostnames: <boolean>
      disabledProtocols: <string>
      FIPSMode: <boolean>
net.port     --用法  port: integer   默认值是27017
mongodb监听的端口

net.bindIp   --用法  bindIp: string  默认值是127.0.0.1
mongodb监听的ip地址,也可以自定义

net.maxIncomingConnections   --用法:maxIncomingConnections: integer 默认值是65536
mongos或mongod将接受的最大并发连接数,如果此设置高于操作系统配置的最大连接跟踪阈值,则此设置不起作用。

net.wireObjectCheck    --用法:wireObjectCheck: boolean  默认值是true
为true时,mongod或mongos实例验证客户端收到的所有请求,以防止客户端将错误格式或无效的BSON插入到MongoDB数据库中。
注意:对于具有高度子文档嵌套的对象,net.wireObjectCheck对性能有轻微影响。

net.http.enabled       --用法:enabled: boolean   默认值是false
启用或禁用HTTP接口。 启用接口可能会增加网络暴露。

net.http.RESTInterfaceEnabled  --用法:RESTInterfaceEnabled: boolean,默认为false
即使http接口选项关闭,打开也会暴露http接口,会导致更多的不安全因素。不过开启为true可以在
mongodb的web页面访问List all commands 页面!

net.unixDomainSocket.enabled   --用法 unixDomainSocket.enabled: boolean  默认值是true
在UNIX域套接字上启用或禁用侦听。 net.unixDomainSocket.enabled仅适用于基于Unix的系统。

4、security 选项
security:
   keyFile: <string>
   clusterAuthMode: <string>
   authorization: <string>
   transitionToAuth: <boolean>
   javascriptEnabled:  <boolean>
   redactClientLogData: <boolean>
   sasl:
      hostName: <string>
      serviceName: <string>
      saslauthdSocketPath: <string>
   enableEncryption: <boolean>
   encryptionCipherMode: <string>
   encryptionKeyFile: <string>
   kmip:
      keyIdentifier: <string>
      rotateMasterKey: <boolean>
      serverName: <string>
      port: <string>
      clientCertificateFile: <string>
      clientCertificatePassword: <string>
      serverCAFile: <string>
   ldap:
      servers: <string>
      bind:
         method: <string>
         saslMechanism: <string>
         queryUser: <string>
         queryPassword: <string>
         useOSDefaults: <boolean>
      transportSecurity: <string>
      timeoutMS: <int>
      userToDNMapping: <string>
      authz:
         queryTemplate: <string>

security.keyFile    --用法:keyFile: string
密钥文件的路径,该文件存储MongoDB实例用于在分片集群或副本集中彼此进行身份验证的共享密钥
keyFile意味着security.authorization!

security.clusterAuthMode   --用法: clusterAuthMode: string 默认值是keyFile
用于集群身份验证的身份验证模式

security.authorization    --用法:authorization: string  默认值是disabled
启用或禁用基于角色的访问控制(RBAC)以管理每个用户对数据库资源和操作的访问。
enabled: 用户只能访问已为其授予了权限的数据库资源和操作。
diabled: 用户可以访问任何数据库并执行任何操作

security.transitionToAuth     --用法:transitionToAuth: boolean 默认值是false
3.4版本新的功能,允许mongod或mongos接受和创建到部署中的其他mongod和mongos实例的已验证和未验证的连接

security.javascriptEnabled    --用法:javascriptEnabled: boolean 默认值是true
启用或禁用服务器端JavaScript执行,禁用时,不能使用执行服务器端执行JavaScript代码的操作,例如$ where查询运算符,mapReduce命令和db.collection.mapReduce()方法,group命令和db.collection.group()方法 。

5、setParameter 选项
设置MongoDB服务器参数中描述的MongoDB参数或参数
要在YAML配置文件中设置参数,请使用以下格式:
setParameter:
   <parameter1>: <value1>
   <parameter2>: <value2>

例如,要在配置文件中指定enableLocalhostAuthBypass
setParameter:
   enableLocalhostAuthBypass: false

6、operationProfiling   选项
operationProfiling:
   slowOpThresholdMs: <int>
   mode: <string>

operationProfiling.slowOpThresholdMs  --用法:slowOpThresholdMs: integer 默认值是100
数据库概要分析器认为查询速度缓慢的阈值(以毫秒为单位),MongoDB将所有慢查询记录到日志中,即使数据库分析器关闭
当分析器打开时,它将写入system.profile集合

operationProfiling.mode    --用法:mode: string 默认值是 off
数据库概要分析的级别,它将有关操作性能的信息插入到system.profile集合中。它的值有off、slowOp、all
注意:数据库分析可能会影响数据库性能。 仅在仔细考虑后才启用此选项

7、replication 选项
replication:
   oplogSizeMB: <int>
   replSetName: <string>
   secondaryIndexPrefetch: <string>
   enableMajorityReadConcern: <boolean>

replication.oplogSizeMB   --用法:oplogSizeMB: integer
复制操作日志的最大大小(以兆字节为单位),例如:oplog。mongod进程基于可用的最大空间量创建oplog
对64bit系统而言,oplog通常是可用磁盘空间的5%,一旦mongod第一次创建oplog,更改replication.oplogSizeMB选项将不会影响oplog的大小

replication.replSetName  --用法: replSetName: string
mongod所属的副本集的名称。 副本集中的所有主机必须具有相同的集名称。如果应用程序连接到多个副本集,则每个副本集应具有不同的名称。 某些驱动程序按副本集名称对副本集连接进行分组。

replication.secondaryIndexPrefetch --用法:secondaryIndexPrefetch: string 默认值是all
存储引擎特定功能:
replication.secondaryIndexPrefetch仅适用于mmapv1存储引擎。

replication.enableMajorityReadConcern  --用法:  enableMajorityReadConcern: boolean 默认是false
启用“多数”的读取关注级别。

8、sharding 选项
sharding:
   clusterRole: <string>
   archiveMovedChunks: <boolean>

sharding.clusterRole    --用法:clusterRole: string
mongodb实例在分片集群中具有的角色。有2个值,如下:
configsvr:将此实例作为配置服务器启动。 默认情况下,实例在端口27019上启动。
shardsvr: 将此实例作为分片启动。 默认情况下,实例在端口27018上启动。

sharding.archiveMovedChunks  --用法: archiveMovedChunks:boolean
在块迁移期间,分片不保存从分片迁移的文档。

9、auditLog 选项
仅在MongoDB Enterprise中可用
auditLog:
   destination: <string>
   format: <string>
   path: <string>
   filter: <string>

还有很多其他参数,这里不一一介绍了!
不足之处,请多多指出!