https://blog.csdn.net/for_myself0/article/details/80924208
一、Openresty
1、编译、安装opesresty
[root@server1 ~]# tar zxf openresty-1.13.6.1.tar.gz
[root@server1 ~]# cd openresty-1.13.6.1
[root@server1 openresty-1.13.6.1]# ./configure --prefix=/usr/local/lnmp/openresty
[root@server1 openresty-1.13.6.1]# gmake && gmake instal
2、配置文件
[root@server1 ~]# vim /usr/local/lnmp/openresty/nginx/conf/nginx.conf

 19         upstream memcache {
 20                 server 172.25.12.1:11211;
 21                 keepalive 512;
 22         }

 53         location /memc {
 54         internal;
 55         memc_connect_timeout 100ms;
 56         memc_send_timeout 100ms;
 57         memc_read_timeout 100ms;
 58         set $memc_key $query_string;
 59         set $memc_exptime 300;
 60         memc_pass memcache;
 61         }

 80         location ~ \.php$ {
 81             set $key $uri$args;
 82             srcache_fetch GET /memc $key;
 83             srcache_store PUT /memc $key;
 84             root           html;
 85             fastcgi_pass   127.0.0.1:9000;
 86             fastcgi_index  index.php;
 87        #     fastcgi_param  SCRIPT_FILENAME  /scripts$fastcgi_script_name;
 88             include        fastcgi.conf;
 89         }
3、打开 memcached、php-fpm、nginx
- 有关memcached和php的配置,欢迎浏览我的LNMP(Nginx+Mysql+Php)博客这里不再赘述,敬请谅解
[root@server1 ~]# /etc/init.d/memcached start
Starting memcached:                                        [  OK  ]
[root@server1 ~]# /etc/init.d/php-fpm start
Starting php-fpm  done
##Server1主机已经配置过nginx,所以这里启动openresty采用绝对路径
[root@server1 ~]# /usr/local/lnmp/openresty/nginx/sbin/nginx - 机测试
- Nginx 没有添加 Memcache 模块,Php有 Memcache 模块
[kiosk@foundation12 Desktop]$ ab -c 1 -n 1000 http://172.25.12.1/example.php

Time taken for tests:   0.762 seconds
Complete requests:      1000
Failed requests:        0
Write errors:           0
Requests per second:   1728.62 [#/sec] (mean)

[kiosk@foundation12 Desktop]$ ab -c 1 -n 1000 http://172.25.12.1/index.php

Time taken for tests:   2.328 seconds
Complete requests:      1000
Failed requests:        97

Requests per second: 429.56 [#/sec] (mean)- Nginx 添加 Memcahche 模块,Php 相当于 “双 Memcache”
[kiosk@foundation12 Desktop]$ ab -c 1 -n 1000 http://172.25.12.1/example.php

Time taken for tests:   0.405 seconds
Complete requests:      1000
Failed requests:        0
Write errors:           0
Requests per second:    2468.97 [#/sec] (mean)

[kiosk@foundation12 Desktop]$ ab -c 1 -n 1000 http://172.25.12.1/index.php

Time taken for tests:   0.491 seconds
Complete requests:      1000
Failed requests:        0
Write errors:           0
Requests per second: 2037.92 [#/sec] (mean)- 较而言,Nginx 添加 Memcache 模块后,速度由429.56 [#/sec]提高至2037.92 [#/sec],性能得到显著优化!而 Php 性能也得到了一定的优化!
Nginx+tomcat+memcache
一、安装 JDK
1、解压源码,设定链接(当jdk更新时,更新链接即可
[root@server1 ~]# tar zxf jdk-7u79-linux-x64.tar.gz -C /usr/local/
[root@server1 ~]# cd /usr/local/
[root@server1 local]# ln -s jdk1.7.0_79/ java
2、添加环境变量
[root@server1 local]# vim /etc/profile
##写入配置文件,source命令当前shell环境加载
export  JAVA_HOME=/usr/local/java
export  CLASSPATH=.:$JAVA_HOME/lib:$JAVA_HOME/jre/lib
export  PATH=$PATH:$JAVA_HOME/bin

[root@server1 ~]# source /etc/profile
[root@server1 ~]# . /etc/profile   ##在当前shell更新环境变量
[root@server1 ~]# sh /etc/profile  ##在新的shell中更新环境变量
##加载后查看是否成功
[root@server1 local]# echo $JAVA_HOME
/usr/local/java
[root@server1 local]# echo $CLASSPATH
.:/usr/local/java/lib:/usr/local/java/jre/lib
[root@server1 local]# echo $PATH
/usr/local/sbin:/usr/local/bin:/sbin:/bin:/usr/sbin:/usr/bin:/root/bin:/usr/local/lnmp/mysql/bin:/usr/local/lnmp/php/bin/:/usr/local/java/bin
3、java测试
[root@server1 ~]# vim test.java
##java语言格式
public class test {
        public  static  void main(String[] args){
                System.out.println("Hello World!");
        }
}
##javac编译".java"脚本,java运行脚本
[root@server1 ~]# javac test.java
[root@server1 ~]# java test
Hello World!
二、安装 tomcat
1、解压源码,设定链接(当tomcat更新时,更新链接即可
- 注意:tomcat测试时,关闭openresty,打开nginx做测试
[root@server1 ~]# tar zxf apache-tomcat-7.0.37.tar.gz -C /usr/local/
[root@server1 ~]# cd /usr/local/
[root@server1 local]# ln -s apache-tomcat-7.0.37/ tomcat
2、启动tomcat(访问172.25.12.1:8080查看主页,默认为8080端口)
[root@server1 ~]# cd /usr/local/tomcat/bin/
[root@server1 bin]# ./startup.sh
Using CATALINA_BASE:   /usr/local/tomcat
Using CATALINA_HOME:   /usr/local/tomcat
Using CATALINA_TMPDIR: /usr/local/tomcat/temp
Using JRE_HOME:        /usr/local/java
Using CLASSPATH: /usr/local/tomcat/bin/bootstrap.jar:/usr/local/tomcat/bin/tomcat-juli.jar- 访问网页进行测试
3、测试tomcat (访问172.25.12.1:8080/test.jsp抓取系统时间
[root@server1 ROOT]# pwd
/usr/local/tomcat/webapps/ROOT
[root@server1 ROOT]# vim test.jsp
[root@server1 ROOT]# cat test.jsp
the time is: <%=new java.util.Date() %>
4、修改nginx配置文件,当访问.jsp文件时,自动跳转(保证主页的完整性,修改nginx的默认发布目录)
[root@server1 ROOT]# vim /usr/local/lnmp/nginx/conf/nginx.conf

 48         location / {
 49            # root   html;   ##修改nginx的默认发布目录
 50             root   /usr/local/tomcat/webapps/ROOT;
 51             index  index.php index.html index.htm;
 52         }

 69         location ~ \.jsp$ {
 70             proxy_pass   http://172.25.12.1:8080;
 71         }

[root@server1 ROOT]# nginx -t
nginx: the configuration file /usr/local/lnmp/nginx/conf/nginx.conf syntax is ok
nginx: configuration file /usr/local/lnmp/nginx/conf/nginx.conf test is successful
[root@server1 ROOT]# nginx
 ##访问 172.25.12.1/index.jsp 测试
三、实现 tomcat 的负载均衡
1、另一台虚拟机(server2),配置 java 和 tomcat
- 同上述步骤,java、tomcat 需测试ok
2、server1主机,配置nginx
root@server1 ROOT]# vim /usr/local/lnmp/nginx/conf/nginx.conf

 20     upstream tomcat {
 21         server 172.25.12.1:8080;
 22         server 172.25.12.2:8080;
 23     }

 76         location ~ \.jsp$ {
 77             proxy_pass   http://tomcat;
 78         }

[root@server1 ROOT]# nginx -t
nginx: the configuration file /usr/local/lnmp/nginx/conf/nginx.conf syntax is ok
nginx: configuration file /usr/local/lnmp/nginx/conf/nginx.conf test is successful
[root@server1 ROOT]# nginx -s reload- 访问 172.25.12.1/test.jsp 出现负载均衡(网页测试)
3、Session不同步,解决方案A:ip_hash 算法
- 修改 test.jsp (/usr/local/tomcat/webapps/ROOT)
- 两台主机保持一致
[root@server2 ROOT]# cat test.jsp
<%@ page contentType="text/html; charset=GBK" %>
<%@ page import="java.util.*" %>
<html><head><title>Cluster App Test</title></head>
<body>
Server Info:
<%
out.println(request.getLocalAddr() + " : " + request.getLocalPort()+"<br>");%>
<%
out.println("<br> ID " + session.getId()+"<br>");
String dataName = request.getParameter("dataName");
if (dataName != null && dataName.length() > 0) {
String dataValue = request.getParameter("dataValue");
session.setAttribute(dataName, dataValue);
}
out.print("<b>Session list</b>");
Enumeration e = session.getAttributeNames();
while (e.hasMoreElements()) {
String name = (String)e.nextElement();
String value = session.getAttribute(name).toString();
out.println( name + " = " + value+"<br>");
System.out.println( name + " = " + value);
}
%>
<form action="test.jsp" method="POST">
name:<input type=text size=20 name="dataName">
<br>
key:<input type=text size=20 name="dataValue">
<br>
<input type=submit>
</form>
</body>
</html>- 访问 http://172.25.12.1/test.jsp 时,每次提交session 都会刷新
- 由于不同步,资料无法存储
- 修改nginx配置文件,采用 ip_hash 算法:
[root@server1 ROOT]# vim /usr/local/lnmp/nginx/conf/nginx.conf
 20     upstream tomcat {
 21         ip_hash;
 22         server 172.25.12.1:8080;
 23         server 172.25.12.2:8080;
 24     }
[root@server1 ROOT]# nginx -s reload- 访问 172.25.12.1/test.jsp,session可以保存
- 弊端:如果server1主机 tomcat shutdown,数据丢失
- ip_hash 过不了 cdn 服务器;但是 cookie 可以!
- 访问主页测试
-
cookie测试效果一样,只是原理不同
4、Session不同步,解决方案 B:memcache
-
注意:server1 和 server2 主机保持一致,配置文件稍作修改;
- 以 server1 主机为例
[root@server1 lib]# pwd ##下载模块
/usr/local/tomcat/lib
[root@server1 lib]# ls
annotations-api.jar asm-3.2.jar catalina-ant.jar
catalina-ha.jar catalina.jar catalina-tribes.jar
ecj-4.2.1.jar el-api.jar jasper-el.jar
jasper.jar jsp-api.jar kryo-1.04.jar
kryo-serializers-0.10.jar memcached-session-manager-1.6.3.jar
memcached-session-manager-tc6-1.6.3.jar memcached-session-manager-tc7-1.6.3.jar
minlog-1.2.jar msm-kryo-serializer-1.6.3.jar reflectasm-1.01.jar
servlet-api.jar spymemcached-2.7.3.jar tomcat-api.jar
tomcat-coyote.jar tomcat-dbcp.jar tomcat-i18n-es.jar
tomcat-i18n-fr.jar tomcat-i18n-ja.jar tomcat-jdbc.jar tomcat-util.jar
[root@server1 lib]# rm -fr memcached-session-manager-tc6-1.6.3.jar
[root@server1 lib]# yum install -y memcached
[root@server1 lib]# /etc/init.d/memcached start
Starting memcached: [ OK ]
[root@server1 conf]# pwd
/usr/local/tomcat/conf
[root@server1 conf]# vim context.xml
<Manager className="de.javakaffee.web.msm.MemcachedBackupSessionManager"
memcachedNodes="n1:172.25.12.1:11211,n2:172.25.12.2:11211"
failoverNodes="n2" ##注意server1主机为 n2,server2主机为 n1!!
requestUriIgnorePattern=".*\.(ico|png|gif|jpg|css|js)$"
transcoderFactoryClass="de.javakaffee.web.msm.serializer.kryo.KryoTranscoderFactory"
/>
[root@server1 tomcat]# bin/shutdown.sh
[root@server1 tomcat]# bin/startup.sh
[root@server1 tomcat]# cat logs/catalina.out
##出现下列信息说明ok
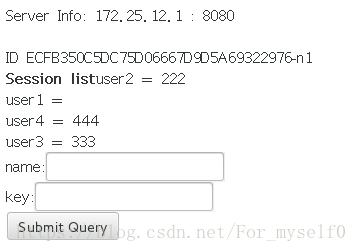
INFO: MemcachedSessionService finished initialization, sticky true, operation timeout 1000, with node ids [n2] and failover node ids [n1]5、访问 172.25.12.1/test.jsp 测试:
 Server Info: 172.25.12.2 : 8080

ID 51EAC4845CCD9734F0D21988CC4A1938-n2
Session listuser2 = 222
user1 =
user4 = 444
user3 = 333
user5 = 555
name:
key:- server1 主机 tomcat shutdown 之后,数据依然正常
- server2 主机 (安装 telnet )
- server2 主机查询 Memcache
[root@server2 tomcat]# telnet localhost 11211
Trying ::1...
Connected to localhost.
Escape character is '^]'.
get 51EAC4845CCD9734F0D21988CC4A1938-n2
VALUE 51EAC4845CCD9734F0D21988CC4A1938-n2 2048 149
Wdcj�dcj�01dcj�+dcj�=#51EAC4845CCD9734F0D21988CC4A1938-n2user5555user2222user1user4444user3333
END