1、首先在Github仓库中创建一个自己的仓库,仓库名称为:mvn-repo,如下图所示:

2、然后在mvn工具的配置文件settings.xml中(在window中配置文件会在Maven的安装目录下的conf文件夹下),找到servers标签,添加一个server,如:
    <server>
        <id>github</id>
        <username>guihub登录的用户名</username>
        <password>guihub登录的用户密码</password>
    </server>
如下图所示:

3、在maven项目的pom.xml中添加入下代码,将本地的jar发布到本地仓库中。
    <build>
        <plugins>
            <plugin>
                <artifactId>maven-deploy-plugin</artifactId>
                <version>2.8.1</version>
                <configuration>
                    <altDeploymentRepository>internal.repo::default::file://${project.build.directory}/mvn-repo</altDeploymentRepository>
                </configuration>
            </plugin>
        </plugins>
    </build>
如下图所示:

4、然后输入: mvn clean deploy命令,如下图所示bulid成功即可将jar发布到了本地残酷中了:


5、将本地仓库中发布到远程的github指定的仓库中,添加修改插件,如下代码:
           <plugin>
                <groupId>com.github.github</groupId>
                <artifactId>site-maven-plugin</artifactId>
                <version >0.12</version>
                <configuration>
                    <message >Maven artifacts for ${project.version}</message>
                    <noJekyll>true</noJekyll>
                    <outputDirectory>${project.build.directory}/mvn-repo</outputDirectory><!--本地jar地址-->
                    <branch>refs/heads/master</branch><!--分支的名称-->
                    <merge>true</merge>
                    <includes>
                        <include>**/*</include>
                    </includes>
                    <repositoryName>mvn-repo</repositoryName><!--对应github上创建的仓库名称 name-->
                    <repositoryOwner>sxjlinux</repositoryOwner><!--github 仓库所有者即登录用户名-->
                </configuration>
                <executions>
                    <execution>
                        <goals>
                            <goal>site</goal>
                        </goals>
                        <phase>deploy</phase>
                    </execution>
                </executions>
</plugin>注意:branch必须是refs/heads/开头的,后边跟分支名称,我们在网页上查看到mvn-repo下有一个master的分支,如下图所示:

6、然后加入如下代码,配置远程的github服务:
<properties>
        <github.global.server>github</github.global.server>
    </properties>
如下图所示:

7、整个配置pom.xml文件代码如下:
<?xml version="1.0" encoding="UTF-8"?>
<project xmlns="http://maven.apache.org/POM/4.0.0"
         xmlns:xsi="http://www.w3.org/2001/XMLSchema-instance"
         xsi:schemaLocation="http://maven.apache.org/POM/4.0.0 http://maven.apache.org/xsd/maven-4.0.0.xsd">
    <parent>
        <artifactId>pubmodel</artifactId>
        <groupId>com.wincom.publicmodel</groupId>
        <version>2.0</version>
    </parent>
    <modelVersion>4.0.0</modelVersion>
    <version>2.0</version>
    <artifactId>path</artifactId>
    <build>
        <plugins>
            <plugin>
                <artifactId>maven-deploy-plugin</artifactId>
                <version>2.8.1</version>
                <configuration>
                    <altDeploymentRepository>internal.repo::default::file://${project.build.directory}/mvn-repo</altDeploymentRepository>
                </configuration>
            </plugin>
            <plugin>
                <groupId>com.github.github</groupId>
                <artifactId>site-maven-plugin</artifactId>
                <version >0.12</version>
                <configuration>
                    <message >Maven artifacts for ${project.version}</message>
                    <noJekyll>true</noJekyll>
                    <outputDirectory>${project.build.directory}/mvn-repo</outputDirectory><!--本地jar地址-->
                    <branch>refs/heads/master</branch><!--分支的名称-->
                    <merge>true</merge>
                    <includes>
                        <include>**/*</include>
                    </includes>
                    <repositoryName>mvn-repo</repositoryName><!--对应github上创建的仓库名称 name-->
                    <repositoryOwner>sxjlinux</repositoryOwner><!--github 仓库所有者即登录用户名-->
                </configuration>
                <executions>
                    <execution>
                        <goals>
                            <goal>site</goal>
                        </goals>
                        <phase>deploy</phase>
                    </execution>
                </executions>
            </plugin>
        </plugins>
    </build>
    <properties>
        <github.global.server>github</github.global.server>
    </properties>
</project>
8、然后输入: mvn clean deploy命令会提示错误,此错误主要是因为在github中没有设置自己的姓名
[INFO]
[INFO] --- site-maven-plugin:0.12:site (default) @ path ---
[INFO] Creating 9 blobs
[INFO] Creating tree with 10 blob entries
[INFO] ------------------------------------------------------------------------
[INFO] BUILD FAILURE
[INFO] ------------------------------------------------------------------------
[INFO] Total time:  38.520 s
[INFO] Finished at: 2018-12-28T20:53:57+08:00
[INFO] ------------------------------------------------------------------------
[ERROR] Failed to execute goal com.github.github:site-maven-plugin:0.12:site (default) on project path: Error creating commit: Invalid request.
[ERROR]
[ERROR] For 'properties/name', nil is not a string.
[ERROR] For 'properties/name', nil is not a string. (422)
[ERROR] -> [Help 1]
[ERROR]
[ERROR] To see the full stack trace of the errors, re-run Maven with the -e switch.
[ERROR] Re-run Maven using the -X switch to enable full debug logging.
[ERROR]
[ERROR] For more information about the errors and possible solutions, please read the following articles:
[ERROR] [Help 1] http://cwiki.apache.org/confluence/display/MAVEN/MojoExecutionException
如下图所示:

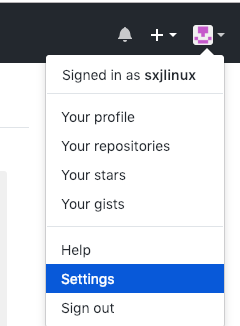
9、登录到github中,然后点击Settings,如下图所示:
10、在下图中输入自己的姓名

11、然后点击update,如下图所示:

12、在次使用mvn clean deploy命令,此时就会上传成功,如下图所示:

13、然后刷新github网页查看,如下图所示:

14、以上都是在子模块中进行的,如果有多个子模块,可以将上边用到的build统一放在项目的根目录中的pom.xml中,而子模块不需要放置build,直接在根目录执行mvn clean deploy命令,mvn会自动将所有子模块打包上传到github中的。
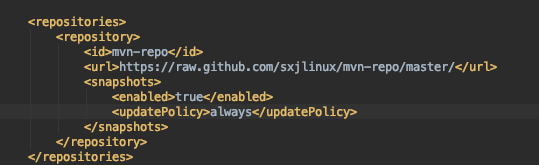
15、当上传成功后,需要在项目中使用发布到github上的jar包,只需要在项目中的pom.xml中添加github仓库,如下代码表示
<repositories>
        <repository>
            <id>mvn-repo</id>
            <url>https://raw.github.com/sxjlinux/mvn-repo/master</url>
            <snapshots>
                <enabled>true</enabled>
                <updatePolicy>always</updatePolicy>
            </snapshots>
        </repository>
    </repositories>
如下图所示:
注意:最需要注意的是上传的分支路径,下面的截图我是将分支更改为了master,所以使用的地址是https://raw.github.com/sxjlinux/mvn-repo/master/,如果在mvn-repo有一个test的分支,则网址则写为:https://raw.github.com/sxjlinux/mvn-repo/test/即可。

16、新建一个工程,然后在没加入依赖以前,代码中是显示没有改包的,如下图所示:

17、在pom.xml加入依赖,如下代码所示:
    <repositories>
        <repository>
            <id>mvn-repo</id>
            <url>https://raw.github.com/sxjlinux/mvn-repo/master</url>
            <snapshots>
                <enabled>true</enabled>
                <updatePolicy>always</updatePolicy>
            </snapshots>
        </repository>
    </repositories>
    <dependencies>
        <dependency>
            <groupId>com.wincom.publicmodel</groupId>
            <artifactId>path</artifactId>
            <version>2.0</version>
        </dependency>
    </dependencies>
如下图所示:

此处的groupId、artifactId、version是上传git仓库项目中pom.xml中的id和版本号,如:
18、此时代码中即可引用成功,并有提示,如下图所示:


19、此处运行会打印出当前路径,如下图所示:
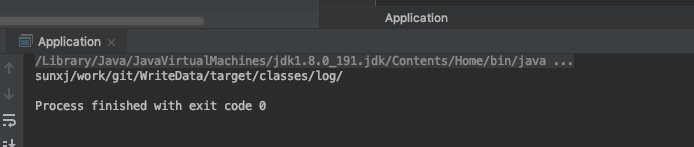
20、说明可以成功被引用。
具体的代码请看:https://github.com/sxjlinux/mvn-repo-src
以下是我多次上传中采的坑出现的错误:
1、执行mvn clean deploy命令出现错误,意思是github的仓库分支必须是以refs/开头的,如下代码所示:
[INFO] BUILD FAILURE
[INFO] ------------------------------------------------------------------------
[INFO] Total time:  40.043 s
[INFO] Finished at: 2018-12-28T20:56:50+08:00
[INFO] ------------------------------------------------------------------------
[ERROR] Failed to execute goal com.github.github:site-maven-plugin:0.12:site (default) on project path: Error creating reference: Reference name must start with 'refs/'. (422) -> [Help 1]
[ERROR]
[ERROR] To see the full stack trace of the errors, re-run Maven with the -e switch.
[ERROR] Re-run Maven using the -X switch to enable full debug logging.
[ERROR]
[ERROR] For more information about the errors and possible solutions, please read the following articles:
[ERROR] [Help 1] http://cwiki.apache.org/confluence/display/MAVEN/MojoExecutionException
如下图所示:

或者:
[INFO]
[INFO] --- site-maven-plugin:0.12:site (default) @ path ---
[INFO] Creating 12 blobs
[INFO] Creating tree with 13 blob entries
[INFO] Creating commit with SHA-1: d0eca79926ec6a3a77754fe44936455cfe885c7e
[INFO] Creating reference mvn-repo starting at commit d0eca79926ec6a3a77754fe44936455cfe885c7e
[INFO] ------------------------------------------------------------------------
[INFO] BUILD FAILURE
[INFO] ------------------------------------------------------------------------
[INFO] Total time:  50.346 s
[INFO] Finished at: 2018-12-29T22:13:05+08:00
[INFO] ------------------------------------------------------------------------
[ERROR] Failed to execute goal com.github.github:site-maven-plugin:0.12:site (default) on project path: Error creating reference: mvn-repo is not a valid ref name. (422) -> [Help 1]
[ERROR]
[ERROR] To see the full stack trace of the errors, re-run Maven with the -e switch.
[ERROR] Re-run Maven using the -X switch to enable full debug logging.
[ERROR]
[ERROR] For more information about the errors and possible solutions, please read the following articles:
[ERROR] [Help 1] http://cwiki.apache.org/confluence/display/MAVEN/MojoExecutionException
如下图所示:

2、只需要在branch标签的mvn-repo的前边加上refs/即可,如下图所示:

3、再次执行mvn clean deploy命令即可编译成功并上传,如下图所示:

4、此时发现仓库中是空的,如下图所示:

5、此时还是需要更改配置路径将refs/mvn-repo更改为refs/heads/mvn-repo,如下图所示:

6、再次执行mvn clean deploy命令即可编译成功并上传,如下图所示:

7、然后登陆到github即可查看上传的jar项目,如下图所示:


