中间件是一种装配到应用管道以处理请求和相应的软件.每个软件都可以:
1.选择是否将请求传递到管道中的下一个组件;
2.可在调用管道中的下一个组件前后执行工作.
管道由 IApplicationBuilder 创建:
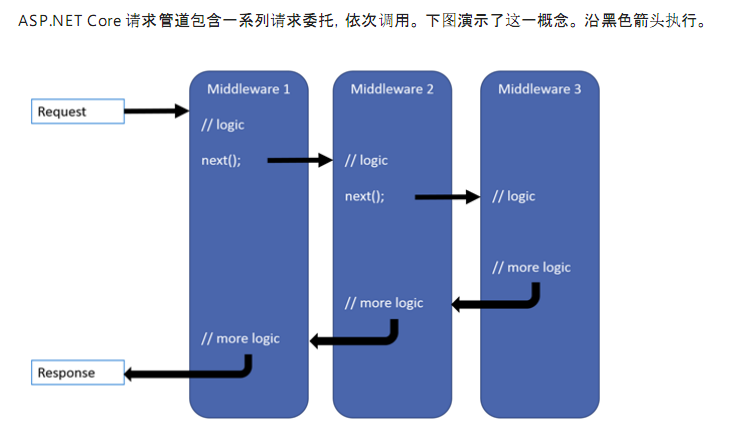
每个委托都可以在下一个委托前后执行操作,.此外,委托还可以决定不将请求传递给下一个委托,这就是对请求管道进行短路.通常需要短路,是因为这样可以避免不必要的工作.比如:
1.静态文件中间件可以返回静态文件请求并使管道的其余部分短路;
2.现在管道中调用异常处理委托,以便他们可以捕获在管道的后期阶段所发生的异常.
委托的添加方式一共有3种:
1.Run
该方法的XML注释是这样写的:
Adds a terminal middleware delegate to the application's request pipeline.向应用程序请求管道添加一个终端中间件.
通俗来讲,意思就是该方法添加的委托,会使"请求管道短路",不管该委托是否提前响应都会短路.比如下面代码中标红的部分,不管有没有这一句代码,下面的所有代码都不会执行.
        public void Configure(IApplicationBuilder app, IHostingEnvironment env)
        {
            app.Run(async context =>
            {
                await context.Response.WriteAsync("Hello World!");
            });

            //下面的都不会执行了,因为上面的委托已经终止了管道,或者说:"已经让管道短路了"
          ...
        }
2.Use
该方法的XML注释是这样写的:
Adds a middleware delegate defined in-line to the application's request pipeline.和上面的 Run 方法相比,少了"terminal".意义就已经很明显了.
                //用 Use 将多个请求委托链接在一起. next 参数表示管道中的下一个委托,可通过不调用 next 参数使管道短路.
                //通常可在下一个委托前后执行操作,如以下示例
                app.Use(async (context, next) =>
                {
                    var name = context.Request.Query["name"];
                    if (!string.IsNullOrWhiteSpace(name))
                    {
                        await context.Response.WriteAsync($"hello world , {name}");
                    }
                    await next.Invoke();
                });
请求一:

请求二:

3.Map
根据给定请求路径的匹配项来创建请求分支.如果请求路径以给定的路径开头,则执行分支,如红色部分代码
        public void Configure(IApplicationBuilder app, IHostingEnvironment env)
        {
            //Map
            app.Map(new PathString("/map1"), MapTest1);
            app.Map("/map2", MapTest2);
            app.MapWhen(context => !string.IsNullOrWhiteSpace(context.Request.Query["name"]), MapTest3);

            if (env.IsDevelopment())
            {
                app.UseDeveloperExceptionPage();
            }
            else
            {
                app.UseHsts();
            }
            app.UseHttpsRedirection();
            app.UseMvc();
        }


        public void MapTest1(IApplicationBuilder app)
        {
            app.Run(async context => { await context.Response.WriteAsync("this is maptest1"); });
        }

        public void MapTest2(IApplicationBuilder app)
        {
            app.Run(async context => { await context.Response.WriteAsync("this is maptest2"); });
        }

        public void MapTest3(IApplicationBuilder app)
        {
            app.Run(async context => { await context.Response.WriteAsync("this is maptest3"); });
        }
另外,Map 支持嵌套 : app.Map("/map2", builder => { builder.Map("/map22", MapTest22); });
封装中间件
在实际运用过程中,我们通常将中间件封装在类中,然后通过扩展方法公开出来.方式有两种:
一.启动时构造
1.自定义中间件
    public class MyMiddleware
    {
        private readonly RequestDelegate _next;

        public MyMiddleware(RequestDelegate next)
        {
            _next = next;
        }

        //方法名必须是 Invoke 或者 InvokeAsync
        public async Task InvokeAsync(HttpContext context)
        {
            var name = context.Request.Query["name"];
            if (!string.IsNullOrWhiteSpace(name))
            {
                await context.Response.WriteAsync($"hello world,{name}");
            }
            else
            {
                await _next(context);
            }
        }
    }
2.通过扩展方法公开
    public static class MyMiddlewareExtensions
    {
        public static IApplicationBuilder UseMyMiddleware(this IApplicationBuilder app)
        {
            return app.UseMiddleware<MyMiddleware>();
        }
    }
3.调用自定义的中间件.
        public void Configure(IApplicationBuilder app, IHostingEnvironment env)
        {
            if (env.IsDevelopment())
            {
                app.UseDeveloperExceptionPage();
            }
            else
            {
                app.UseHsts();
            }

            //调用自制中间件
            app.UseMyMiddleware();

            app.UseHttpsRedirection();
            app.UseMvc();
        }
这种方式编写的中间件,是在web应用启动时构造的,而不是按请求构造的,因此相当于单例.
所以,如果想正确使用中间件依赖项的生存期,则需要将这些依赖项添加到 Invoke 或者 InvokeAsync 方法的入参里面,如:
    public class Person
    {
        public string Name { get; set; }
    }
    public class Startup
    {
        ...other codes

        public void ConfigureServices(IServiceCollection services)
        {
            services.AddMvc().SetCompatibilityVersion(CompatibilityVersion.Version_2_2);
            //services.AddSingleton(new Person() { Name = "admin" });
            //services.AddTransient<Person>();
            services.AddScoped<Person>();
        }
        ...other codes
    }
        //方法名必须是 Invoke 或者 InvokeAsync
        public async Task InvokeAsync(HttpContext context, Person person)
        {
            var name = context.Request.Query["name"];
            if (!string.IsNullOrWhiteSpace(name))
            {
                await context.Response.WriteAsync($"hello world,{name},the person`s hashcode is {person.GetHashCode()}");
            }
            else
            {
                await context.Response.WriteAsync($"hello world,{person.Name},the person`s hashcode is {person.GetHashCode()}");
            }
        }
二.按请求激活
该方式需要自定义中间件实现 IMiddleware 接口.
    public class MyMiddleware : IMiddleware
    {
        private readonly Person _person;

        public MyMiddleware(Person person)
        {
            _person = person;
        }


        public async Task InvokeAsync(HttpContext context, RequestDelegate next)
        {
            var name = context.Request.Query["name"];
            if (!string.IsNullOrWhiteSpace(name))
            {
                await context.Response.WriteAsync($" {name} , hello ! the model`s hashcode is {this.GetHashCode()}");
            }
            else
            {
                await context.Response.WriteAsync($" {_person.Name} hello ! the model`s hashcode is {this.GetHashCode()}");
            }
        }
    }
扩展方法的代码没变:
    public static class MyMiddlewareExtensions
    {
        public static IApplicationBuilder UseMyMiddleware(this IApplicationBuilder app)
        {
            return app.UseMiddleware<MyMiddleware>();
        }
    }
调用自制的中间件:
    public class Startup
    {

        public void ConfigureServices(IServiceCollection services)
        {
            services.AddMvc().SetCompatibilityVersion(CompatibilityVersion.Version_2_2);
            //将中间件对象按我们需要的生存期注入到容器中.
            //services.AddTransient<MyMiddleware>();
            //services.AddScoped<MyMiddleware>();
            services.AddSingleton<MyMiddleware>();

        services.AddSingleton(new Person { Name = "admin" });
        }

        public void Configure(IApplicationBuilder app, IHostingEnvironment env)
        {
            //注册我们的中间件
            app.UseMyMiddleware();

            app.UseHttpsRedirection();
            app.UseMvc();
        }
    }
...未完待续