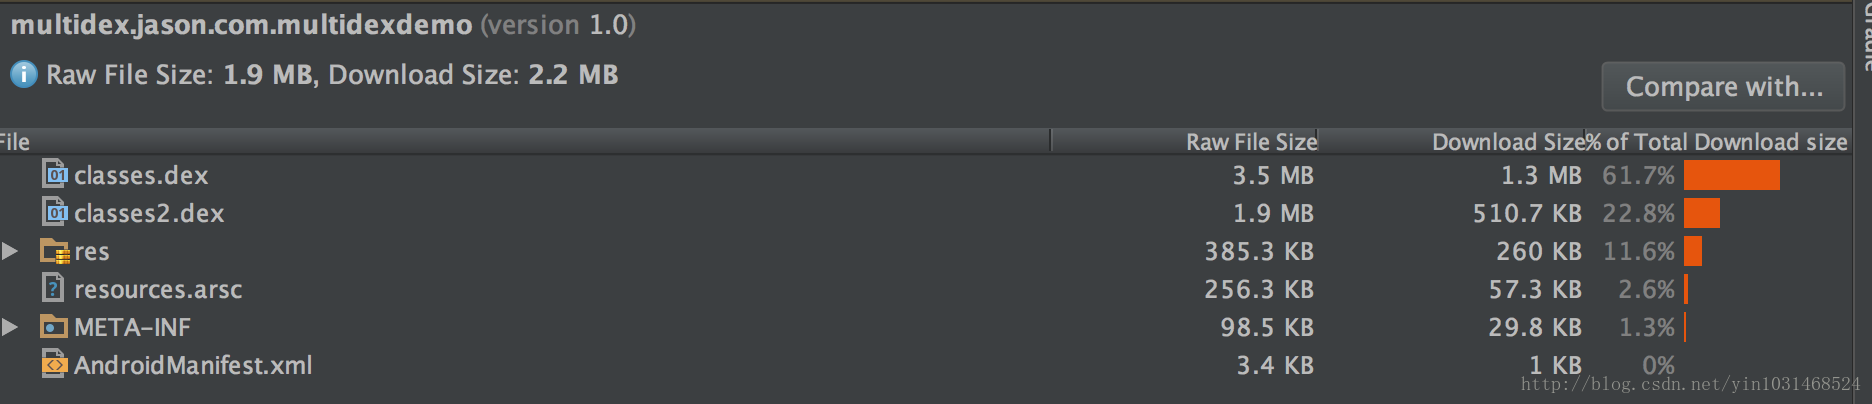
Android中单个dex文件所能包含的最大方法数是65536,这包含所依赖所有jar以及应用代码中的所有方法。简单的apk方法数很难达到这么多,但是对于一些复杂大型的应用来说65536就很容易超过,当方法数达到65536后,编译器就无法完成编译工作并抛出类似下面异常:
- FAILURE: Build failed with an exception.
- * What went wrong:
- Execution failed for task ':app:transformClassesWithDexForDebug'.
- > com.android.build.api.transform.TransformException: com.android.ide.common.process.ProcessException: java.util.concurrent.ExecutionException: com.android.dex.DexIndexOverflowException: method ID not in [0, 0xffff]: 65536
- UNEXPECTED TOP-LEVEL EXCEPTION: com.android.dex.DexIndexOverflowException: method ID not in [0, 0xffff]: 65536 at com.android.dx.merge.DexMerger$6.updateIndex(DexMerger.Java:502) at com.android.dx.merge.DexMerger$IdMerger.mergeSorted(DexMerger.java:277) at com.android.dx.merge.DexMerger.mergeMethodIds(DexMerger.java:491) at com.android.dx.merge.DexMerger.mergeDexes(DexMerger.java:168) at com.android.dx.merge.DexMerger.merge(DexMerger.java:189) at com.android.dx.command.dexer.Main.mergeLibraryDexBuffers(Main.java:454) at com.android.dx.command.dexer.Main.runMonoDex(Main.java:302) at com.android.dx.command.dexer.Main.run(Main.java:245) at com.android.dx.command.dexer.Main.main(Main.java:214) at com.android.dx.command.Main.main(Main.java:106)
- E/dalvikm Optimization failed
- E/installed: dexopt failed on '/data/dalvik-cache/[email protected]'
这样就出现了把一个dex拆分成多个dex,Google在2014年提出了multidex的解决方法,通过multidex可以很好解决方法数越界问题,下面就以AndroidStudio和Eclipse来说下具体怎么实现的,这篇先说说利用AndroidStudio拆分dex,Eclipse的用法后续更新
在Android5.0以前使用multidex需要引入Google提供的android-support-multidex.jar,这个jar在Android SDK目录下的“extras/android/support/multidex/library/libs”下,从5.0以后Android默认支持了multidex
1.修改工程中app目录下的build.gradle,在defaultConfig中添加multiDexEnabled true,如下
- android {
- compileSdkVersion 25
- buildToolsVersion "25.0.2"
- defaultConfig {
- applicationId "multidex.jason.com.multidexdemo"
- minSdkVersion 15
- targetSdkVersion 25
- versionCode 1
- versionName "1.0"
- testInstrumentationRunner "android.support.test.runner.AndroidJUnitRunner"
- multiDexEnabled true
- }
- buildTypes {
- release {
- minifyEnabled false
- proguardFiles getDefaultProguardFile('proguard-android.txt'), 'proguard-rules.pro'
- }
- }
- }
- dependencies {
- compile fileTree(include: ['*.jar'], dir: 'libs')
- androidTestCompile('com.android.support.test.espresso:espresso-core:2.2.2', {
- exclude group: 'com.android.support', module: 'support-annotations'
- })
- compile 'com.android.support:appcompat-v7:25.2.0'
- compile 'com.android.support.constraint:constraint-layout:1.0.2'
- compile 'org.robolectric:shadows-multidex:3.3.1'
- }
2、在代码中支持multidex功能,具体有下面三种方式
1⃣️ 在AndroidManifest.xml中指定Application为MultiDexApplication,如下
- <application
- android:name="android.support.multidex.MultiDexApplication"
- android:allowBackup="true"
- android:icon="@mipmap/ic_launcher"
- android:label="@string/app_name"
- android:roundIcon="@mipmap/ic_launcher_round"
- android:supportsRtl="true"
- android:theme="@style/AppTheme">
3⃣️如果不想让采用第2⃣️种,可以选择重写Application的attachBaseContext,这个方法比Application的onCreate要先执行,如下:
- public class TestApplication extends Application {
- @Override
- protected void attachBaseContext(Context base) {
- super.attachBaseContext(base);
- MultiDex.install(this);
- }
- }
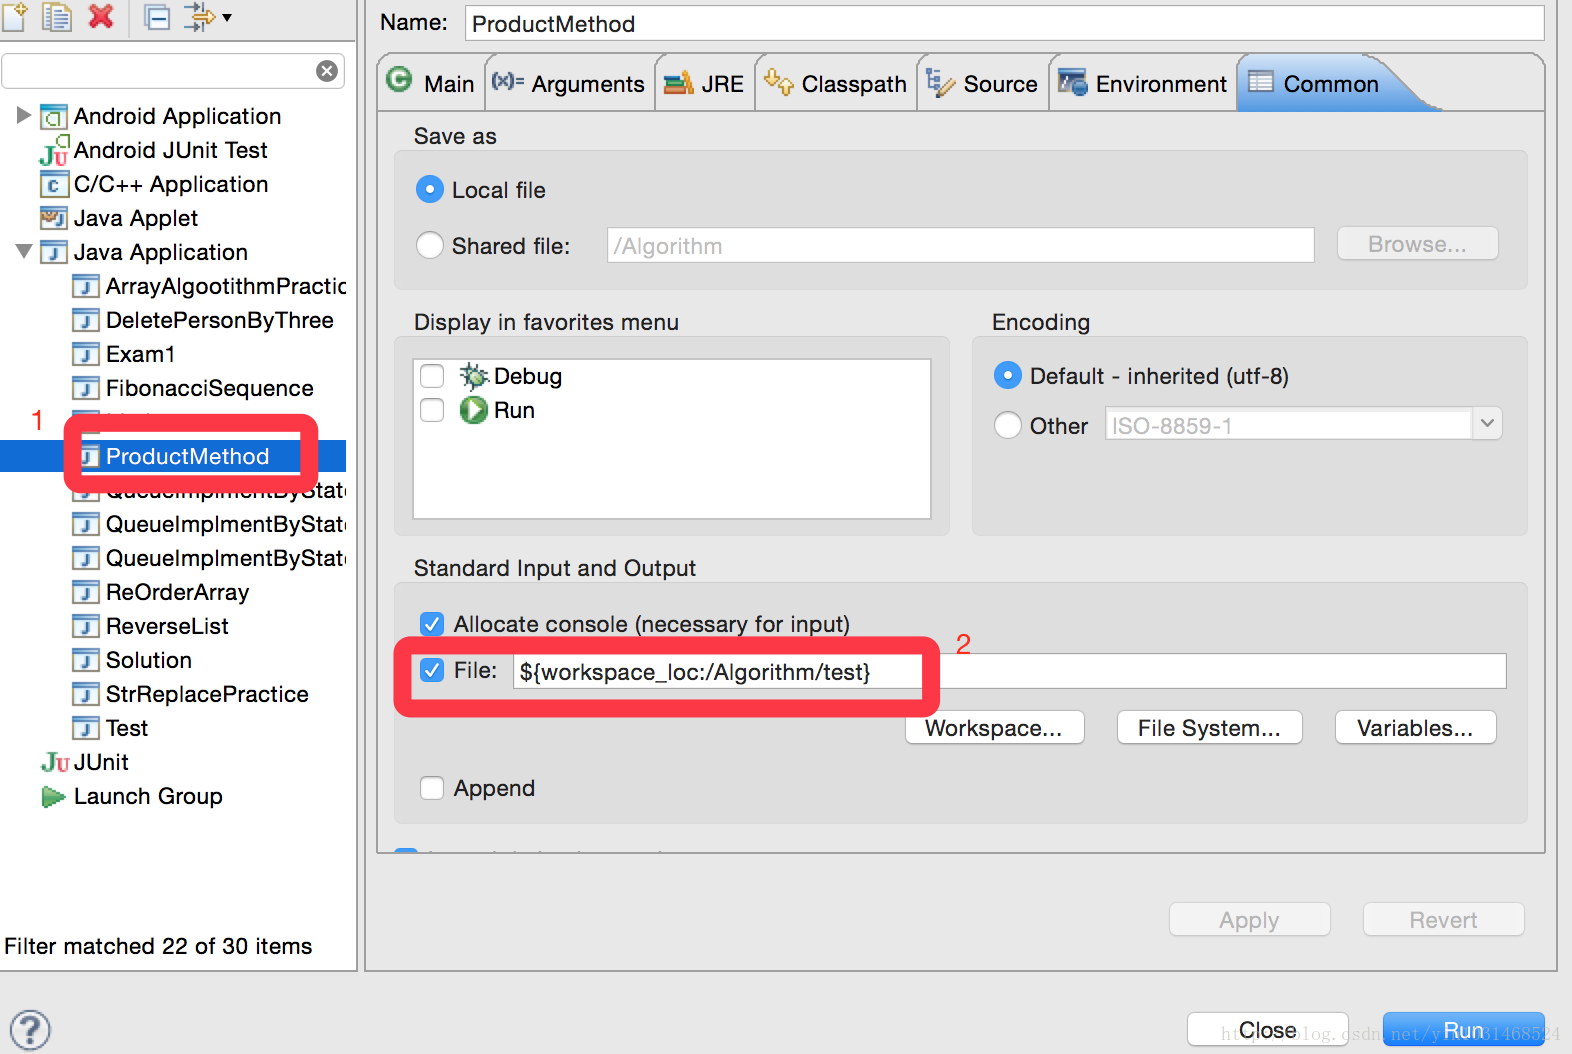
如果想自动尝试的同学,在这里提供一个生成更多方法的类
- public class ProductMethod {
- public static void main(String[] args) {
- productMethod();
- }
- private static void productMethod() {
- for (int i = 0; i < 10000; i++) {
- System.out.println("private void method" + i + "(){");
- if (i == 0) {
- System.out.println(" method" + 9999 + "();");
- } else {
- System.out.println(" method" + (i - 1) + "();");
- }
- System.out.println("}");
- }
- }
- }
这样复制到项目中某个Activity里就可以了,通过默认配置很容易就生成了多个dex文件。
当然还可以通过build.gradle文件中的一些配置项来定制dex生成过程。比如指定主dex文件所要包含的类,这个时候就可以通过--main-dex-list选项来实现这个功能,下面是修改后的build.gradle文件,在里面添加afterEvaluate和dependencies通缉,里面内容如下
- afterEvaluate {
- println("afterEvaluate")
- tasks.matching {
- it.name.startsWith('dex')
- }.each {dx ->
- def listFile = project.rootDir.absolutePath+'/app/maindexlist.txt'
- println("root dir:"+project.rootDir.absolutePath)
- println("dex task found :"+dx.name)
- if(dx.additionalParameters == null){
- dx.additionalParameters = []
- }
- dx.additionalParameters += '--multi-dex'
- dx.additionalParameters += '--main-dex-list='+listFile
- dx.additionalParameters += '--minimal-main-dex'
- }
- }
- multidex/jason/com/multidexdemo/MainActivity.class
- android/support/multidex/BuildConfig.class
- android/support/multidex/MultiDex$V14.class
- android/support/multidex/MultiDex$V19.class
- android/support/multidex/MultiDex$V4.class
- android/support/multidex/MultiDex.class
- android/support/multidex/MultiDexApplication.class
- android/support/multidex/MultiDexExtractor$1.class
- android/support/multidex/MultiDexExtractor.class
- android/support/multidex/ZipUtil$CentralDirectory.class
- android/support/multidex/ZipUtil.class
其中下面这几个是multidex的依赖的几个类,必须打包到主dex中,随着multidex的升级,可能也会有所改变;如果没有打包到主dex中,程序运行时会抛异常,无法找到multidex相关的类。另外需要注意的是Application的成员变量和代码块会先于attachBaseContext初始化执行,此时还没有其他dex文件被加载,会出现无法加载到对应的类而中止执行,在实际开发中要避免这样的错误,运行时会出现如下错误:
- E/AndroidRuntime:FATAL EXCEPTION: main
- java.lang.NoClassDefFoundError:
- UNEXPECTED TOP-LEVEL EXCEPTION:
- com.android.dex.DexException: Library dex files are not supported in multi-dex mode
- at com.android.dx.command.dexer.Main.runMultiDex(Main.java:337)
- at com.android.dx.command.dexer.Main.run(Main.java:243)
- at com.android.dx.command.dexer.Main.main(Main.java:214)
- at com.android.dx.command.Main.main(Main.java:106)
- android {
- // ...
- dexOptions {
- preDexLibraries = false
- }
- }
Android的官方文档也给了我们一个小小的建议,利用Gradle建立两个Flavor.一个minSdkVersion设置成21,这是用了ART支持的Dex格式,避免了MultiDex的开销.而另外一个Flavor就是原本支持的最小sdkVersion.平时开发时候调试程序,就用前者的Flavor,发布版本打包就用后者的Flavor.
- android {
- productFlavors {
- // Define separate dev and prod product flavors.
- dev {
- // dev utilizes minSDKVersion = 21 to allow the Android gradle plugin
- // to pre-dex each module and produce an APK that can be tested on
- // Android Lollipop without time consuming dex merging processes.
- minSdkVersion 21
- }
- prod {
- // The actual minSdkVersion for the application.
- minSdkVersion 14
- }
- }
- ...
- buildTypes {
- release {
- runProguard true
- proguardFiles getDefaultProguardFile('proguard-android.txt'),
- 'proguard-rules.pro'
- }
- }
- }
dexopt程序的dalvik分配一块内存来统计你的app的dex里面的classes的信息,由于classes太多方法太多超过这个linearAlloc 的限制 ,减小dex的大小如下。
gradle脚本如下:
- android.applicationVariants.all {
- variant ->
- dex.doFirst{
- dex->
- if (dex.additionalParameters == null) {
- dex.additionalParameters = []
- }
- dex.additionalParameters += '--set-max-idx-number=48000'
- }
- }
Multidex方法虽然解决了方法数越界问题,也有些局限性,下面是可能出现的问题
1.应用安装到手机上的时候dex文件的安装是复杂的有可能会因为第二个dex文件太大导致ANR,需要用proguard优化你的代码。
2.使用了mulitDex的App有可能在4.0(api level 14)以前的机器上无法启动,因为Dalvik linearAlloc bug(Issue 22586) ,用proguard优化你的代码将减少该bug几率。
3.使用了mulitDex的App在runtime期间有可能因为Dalvik linearAlloc limit (Issue 78035) Crash。该内存分配限制在 4.0版本被增大,但是5.0以下的机器上的Apps依然会存在这个限制。
4.主dex被dalvik虚拟机执行时候,哪些类必须在主dex文件里面这个问题比较复杂。build tools 可以搞定这个问题。但是如果你代码存在反射和native的调用也不保证100%正确