1 Canvas 与屏幕
前面讲解了Canvas的基本概念,Android绘图之Canvas概念理解(5) ,
对Canvas的概念进行了分析,但是没有说明和屏幕的关系,Canvas不等于屏幕,屏幕不会动的,我们也无法对屏幕进行(平移,缩放等)操作,只能对Canvas进行操作,所以对Canvas进行操作,屏幕不动,最终会导致看到的图像不同。
下面开始讲解Canvas的变幻操作:
包括:translate,rotate,scale,skew,clip,clipout,matrix
2 translate 平移
先从最简单的平移开始:
/**
 * Preconcat the current matrix with the specified translation
 *
 * @param dx The distance to translate in X
 * @param dy The distance to translate in Y
*/
public void translate(float dx, float dy) {
    if (dx == 0.0f && dy == 0.0f) return;
    nTranslate(mNativeCanvasWrapper, dx, dy);
}
对Canvas进行平移,
dx: x轴方向进行平移,正值向屏幕右侧
dy:y轴方向进行平移,正值向屏幕下方
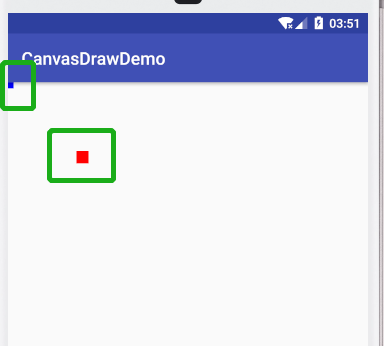
mPaint1.setStrokeWidth(50);
canvas.drawPoint(0,0,mPaint1);
mPaint1.setColor(Color.RED);
canvas.translate(300,300);
canvas.drawPoint(0,0,mPaint1);
绘制两个点查看原点位置。
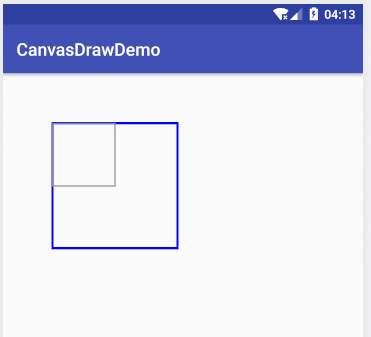
//绘制矩形:
canvas.drawRect(200,200,700,700,mPaint1);
mPaint1.setColor(Color.RED);
canvas.translate(200,200);
canvas.drawPoint(0,0,mPaint1);
canvas.drawRect(200,200,700,700,mPaint1);

mPaint1.setColor(Color.GRAY);
canvas.drawRect(300,300,800,800,mPaint1);
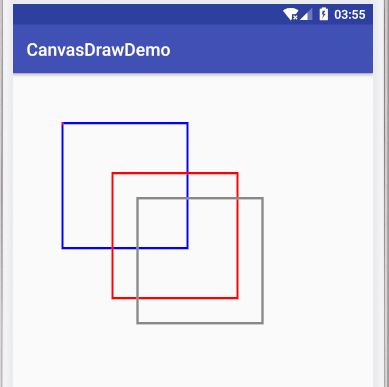
原点显然改变了,以后再绘制任何形状都是以translate后的原点开始绘制。
3 scale 缩放
/**
 * Preconcat the current matrix with the specified scale.
 *
 * @param sx The amount to scale in X
 * @param sy The amount to scale in Y
 */
public void scale(float sx, float sy) {
    if (sx == 1.0f && sy == 1.0f) return;
    nScale(mNativeCanvasWrapper, sx, sy);
}

/**
 * Preconcat the current matrix with the specified scale.
 *
 * @param sx The amount to scale in X
 * @param sy The amount to scale in Y
 * @param px The x-coord for the pivot point (unchanged by the scale)
 * @param py The y-coord for the pivot point (unchanged by the scale)
 */
public final void scale(float sx, float sy, float px, float py) {
    if (sx == 1.0f && sy == 1.0f) return;
    translate(px, py);
    scale(sx, sy);
    translate(-px, -py);
}
参数说明
sx:横向的缩放,默认为1,小数缩小,整数放大
sy:纵向的缩放,默认为1,小数缩小,整数放大
px,py,看源码知道是先translate,执行sx,sy然后再translate反方向。
第二次translate的坐标为(-pxsx,-pxsy),最终的效果就是px,py是缩放后不动的点。
canvas.drawRect(200,200,700,700,mPaint1);
canvas.scale(0.5f,0.5f);
mPaint1.setColor(Color.GRAY);
canvas.drawRect(200,200,700,700,mPaint1);
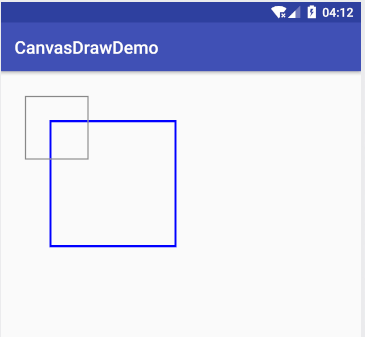
缩放后坐标减半。
如果想控制缩放后的位置,如何控制呢,这就需要第二个函数。
canvas.drawRect(200,200,700,700,mPaint1);
canvas.scale(0.5f,0.5f,200,200);
mPaint1.setColor(Color.GRAY);
canvas.drawRect(200,200,700,700,mPaint1);
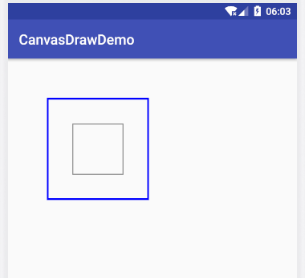
还可以控制其他位置,例如控制缩放后在中心。
canvas.drawRect(200,200,700,700,mPaint1);
canvas.scale(0.5f,0.5f,450,450);
mPaint1.setColor(Color.GRAY);
canvas.drawRect(200,200,700,700,mPaint1);
4 Canvas 的旋转rotate
/**
 * Preconcat the current matrix with the specified rotation.
 *
 * @param degrees The amount to rotate, in degrees
 */
public void rotate(float degrees) ;
/** *
 * @param degrees The amount to rotate, in degrees
 * @param px The x-coord for the pivot point (unchanged by the rotation)
 * @param py The y-coord for the pivot point (unchanged by the rotation)
 */
public final void rotate(float degrees, float px, float py) {
    if (degrees == 0.0f) return;
    translate(px, py);
    rotate(degrees);
    translate(-px, -py);
}
rotate有两个函数:
rotate(float degrees)
rotate(float degrees, float px, float py)
Degree:旋转的角度,正值为顺时针,负值为逆时针
Px,py:旋转的中心,如果不指定旋转中心默认为(0,0)点
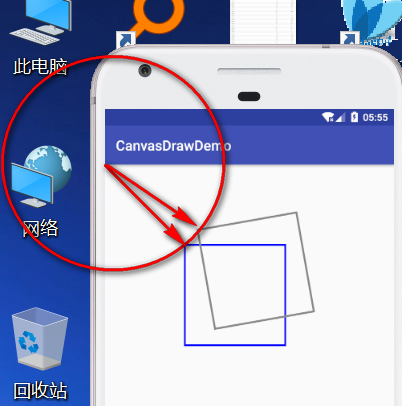
canvas.drawRect(400,400,900,900,mPaint1);
canvas.rotate(-10);
mPaint1.setColor(Color.GRAY);
canvas.drawRect(400,400,900,900,mPaint1);
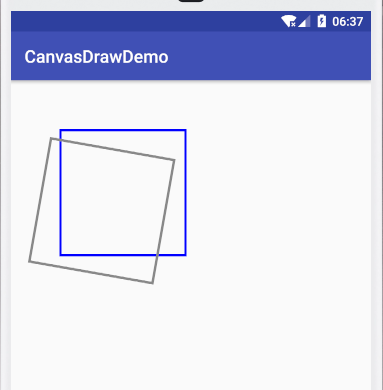
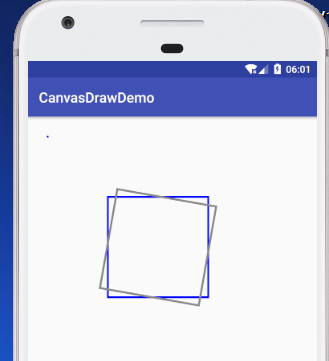
指定旋转中心为矩形中心
canvas.drawRect(400,400,900,900,mPaint1);
canvas.drawPoint(100,100,mPaint1);
canvas.rotate(10,650,650);

mPaint1.setColor(Color.GRAY);
canvas.drawRect(400,400,900,900,mPaint1);
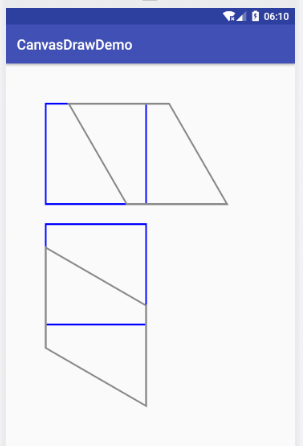
5 Skew 倾斜 画布
/**
 * Preconcat the current matrix with the specified skew.
 *
 * @param sx The amount to skew in X
 * @param sy The amount to skew in Y
 */
public void skew(float sx, float sy) {
    if (sx == 0.0f && sy == 0.0f) return;
    nSkew(mNativeCanvasWrapper, sx, sy);
}
参数说明:
sx:画布在x方向上倾斜相应的角度,sx倾斜角度的tan值,
sy:画布在y轴方向上倾斜相应的角度,sy为倾斜角度的tan值,
canvas.drawRect(200,200,700,700,mPaint1);
canvas.save();
canvas.skew(tan(30),0);
mPaint1.setColor(Color.GRAY);
canvas.drawRect(200,200,700,700,mPaint1);
canvas.restore();
mPaint1.setColor(Color.BLUE);
canvas.drawRect(200,800,700,1300,mPaint1);
canvas.save();
canvas.skew(0,tan(30));
mPaint1.setColor(Color.GRAY);
canvas.drawRect(200,800,700,1300,mPaint1);
canvas.restore();

public float tan(int degree){
   return (float) Math.tan(degree*1.0/180*Math.PI);
}
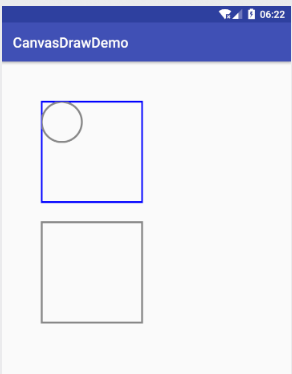
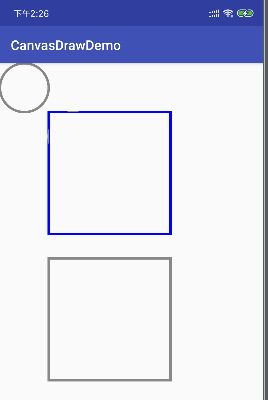
6 clip 切割画布
根据矩形或者路径裁剪画布,画布被切割之后,只有部分区域可用,其他区域无法绘制内容。
Clip函数切割的区域可用,clipOut未被切割的区域可用。(过时函数不再讲解)
clipRect(@NonNull RectF rect)
clipRect(@NonNull Rect rect)
clipRect(float left, float top, float right, float bottom)
clipRect(int left, int top, int right, int bottom)

clipPath(@NonNull Path path)

一下函数需要api26以上
clipOutRect(@NonNull RectF rect)
clipOutRect(@NonNull Rect rect)
clipOutRect(float left, float top, float right, float bottom)
clipOutRect(int left, int top, int right, int bottom)
clipOutPath(@NonNull Path path)

canvas.drawRect(200,200,700,700,mPaint1);
mPaint1.setColor(Color.GRAY);
canvas.drawRect(200,800,700,1300,mPaint1);
canvas.clipRect(200, 200, 700, 700);//截取画布大小为
canvas.drawCircle(100,100,100,mPaint1);//画布被剪切,无法画上
canvas.drawCircle(300,300,100,mPaint1);//可以画上
canvas.drawRect(200,200,700,700,mPaint1);
mPaint1.setColor(Color.GRAY);
canvas.drawRect(200,800,700,1300,mPaint1);
canvas.clipOutRect(200, 200, 700, 700);//截取画布大小为
canvas.drawCircle(100,100,100,mPaint1);//可以画上
canvas.drawCircle(300,300,100,mPaint1);//无法画上
7 matrix 变换
Matrix提供了一些方法来控制变换:
setTranslate(float dx,float dy):平移操作
setSkew(float kx,float ky):skew操作
setSkew(float kx,float ky,float px,float py):
setRotate(float degrees):旋转
setRotate(float degrees,float px,float py):
setScale(float sx,float sy):缩放
setScale(float sx,float sy,float px,float py):
Matrix的pre XXX和postXXX是左乘右乘的区别,是为了组合各种操作,因为矩阵不符合交换率,所以左乘右乘效果不同,一般利用matrix的效果需要反着乘得到最终的matrix.
以上的效果和canvas的set操作效果一样。
canvas.drawRect(200,200,700,700,mPaint1);
mPaint1.setColor(Color.GRAY);
Matrix matrix = new Matrix();
matrix.setRotate(10);
canvas.setMatrix(matrix);
canvas.drawRect(200,200,700,700,mPaint1);