一、SpringCloud版本
本文介绍的Springboot版本为2.1.1.RELEASE,SpringCloud版本为Greenwich.RC1,JDK版本为1.8,集成环境为IntelliJ IDEA
二、Ribbon介绍
Ribbon是一个客户端负载均衡器,它可以很好地控制HTTP和TCP客户端的行为。Feign已经使用Ribbon,所以如果您使用@FeignClient,则本节也适用。
Ribbon中的中心概念是指定客户端的概念。每个负载平衡器是组合的组合的一部分,它们一起工作以根据需要联系远程服务器,并且集合具有您将其作为应用程序开发人员(例如使用@FeignClient注释)的名称。Spring Cloud使用RibbonClientConfiguration为每个命名的客户端根据需要创建一个新的合奏作为ApplicationContext。这包含(除其他外)ILoadBalancer,RestClient和ServerListFilter。
要在项目中包含Ribbon,请使用组org.springframework.cloud和工件ID spring-cloud-starter-netflix-ribbon的起始器。
三、创建Ribbon服务
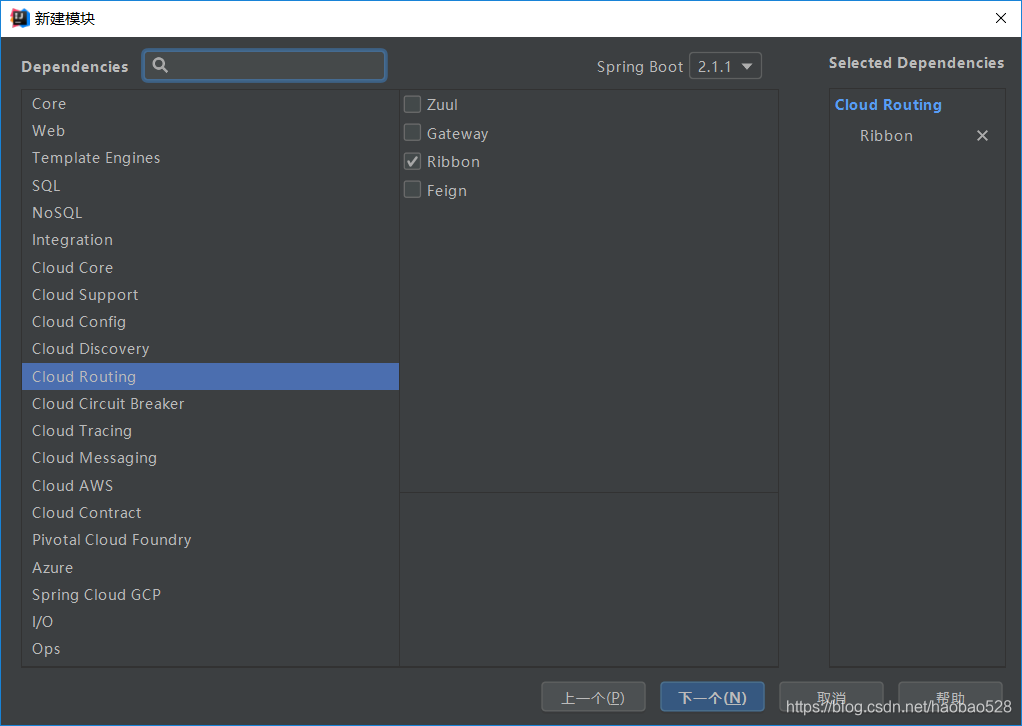
- 3.1创建
创建一个module,取名为cloudribbon,选择Cloud Routing,再勾选上Ribbon,完成
 创建完成的pom文件
<?xml version="1.0" encoding="UTF-8"?>
<project xmlns="http://maven.apache.org/POM/4.0.0" xmlns:xsi="http://www.w3.org/2001/XMLSchema-instance"
         xsi:schemaLocation="http://maven.apache.org/POM/4.0.0 http://maven.apache.org/xsd/maven-4.0.0.xsd">
    <modelVersion>4.0.0</modelVersion>
    <groupId>com.jthao</groupId>
    <artifactId>cloudribbon</artifactId>
    <version>0.0.1-SNAPSHOT</version>
    <name>cloudribbon</name>
    <description>Demo project for Spring Boot</description>

    <parent>
        <groupId>com.jthao</groupId>
        <artifactId>cloudser</artifactId>
        <version>0.0.1-SNAPSHOT</version>
    </parent>

    <dependencies>
        <dependency>
            <groupId>org.springframework.cloud</groupId>
            <artifactId>spring-cloud-starter-netflix-ribbon</artifactId>
        </dependency>

        <dependency>
            <groupId>org.springframework.cloud</groupId>
            <artifactId>spring-cloud-starter-netflix-eureka-server</artifactId>
        </dependency>
    </dependencies>

</project>
在配置文件中设置端口为8005,服务名为cloudribbon,并指向服务注册中心
eureka.client.service-url.defaultZone: http://localhost:8001/eureka/
server.port=8005
spring.application.name=cloudribbon
- 3.2启动
启动ribbon向服务中心注册,并在程序注入一个Bean,通过@LoadBalanced注解来实现负载访问功能
package com.jthao.cloudribbon;

import org.springframework.boot.SpringApplication;
import org.springframework.boot.autoconfigure.SpringBootApplication;
import org.springframework.cloud.client.discovery.EnableDiscoveryClient;
import org.springframework.cloud.client.loadbalancer.LoadBalanced;
import org.springframework.context.annotation.Bean;
import org.springframework.web.client.RestTemplate;

@SpringBootApplication
@EnableDiscoveryClient
public class CloudribbonApplication {

    public static void main(String[] args) {
        SpringApplication.run(CloudribbonApplication.class, args);
    }

    @Bean
    @LoadBalanced
    RestTemplate restTemplate() {
        return new RestTemplate();
    }

}
定义一个接口,通过注入的RestTemplate来访问cloudclient的test方法
package com.jthao.cloudribbon.service;

import org.springframework.beans.factory.annotation.Autowired;
import org.springframework.stereotype.Service;
import org.springframework.web.client.RestTemplate;

@Service
public class TestService {

    @Autowired
    RestTemplate restTemplate;

    public String test(String name) {
        return restTemplate.getForObject("http://cloudclient/test?name="+name,String.class);
    }
}
创建一个controller,来调用TestService的方法
package com.jthao.cloudribbon.controller;

import com.jthao.cloudribbon.service.TestService;
import org.springframework.beans.factory.annotation.Autowired;
import org.springframework.web.bind.annotation.RequestMapping;
import org.springframework.web.bind.annotation.RequestParam;
import org.springframework.web.bind.annotation.RestController;

@RestController
public class TestController {

    @Autowired
    TestService testService;

    @RequestMapping(value = "/test")
    public String test(@RequestParam String name) {

        return testService.test(name);
    }

}
- 3.3访问
通过浏览器多次访问http://localhost:8005/test?name=huahua
我们可以看到如下展示
huahua===端口:8002被调用了===
huahua===端口:8003被调用了===