1 OkHttp框架源码剖析
1.1 OkHttp同步请求
1.1.1 OkHttp同步请求基本用法
OkHttpClient client = new OkHttpClient.Builder().readTimeout(5, TimeUnit.SECONDS).build();
public void synRequest(){
    Request request = new Request.Builder().url("http://www.baidu.com")
            .get().build();
    Call call = client.newCall(request);
    try {
        Response response = call.execute();
        System.out.println(response.body().string());
    } catch (IOException e) {
        e.printStackTrace();
    }
}
1.1.2 OkHttp同步方法总结
- 1.创建OkHttpClient和Request对象
都是通过Builder模式创建
- 2.将Request封装成Call对象
Call是Request和Response的桥梁 是实际的OkHttp请求
Call是一个接口,实现类是RealCall
- 3.调用Call的execute()发送同步请求
1.1.3 OkHttp同步请求注意点
- 发送请求后,当前线程就会进入阻塞状态,直到收到响应为止
1.2 OkHttp异步请求
1.2.1 基本用法
OkHttpClient client = new OkHttpClient.Builder().readTimeout(5, TimeUnit.SECONDS).build();
public void asyRequest(){
    Request request = new Request.Builder().url("http://www.baidu.com")
            .get().build();
    Call call = client.newCall(request);
    call.enqueue(new Callback() {
        @Override
        public void onFailure(Call call, IOException e) {
            System.out.println("Fail");
        }

        @Override
        public void onResponse(Call call, Response response) throws IOException {

            System.out.println(response.body().string());

        }
    });
}
异步请求执行call.enqueue之后会开启一个新的线程
1.2.2 OkHttp异步请求方法总结
- 1.创建OkHttpClient和Request对象
它们都是同过Builder模式构建的
- 2.将Request封装成Call对象
Call是Request和Response的桥梁 是实际的OkHttp请求
Call是一个接口,实现类是RealCall
- 3.调用Call的enqueue方法进行异步请求
在Callback的onResponse和onFailure中进行请求成功和失败的处理
1.2.3 注意点
- onResponse和onFailure都是在子线程中执行的
1.3 OkHttp请求流程图
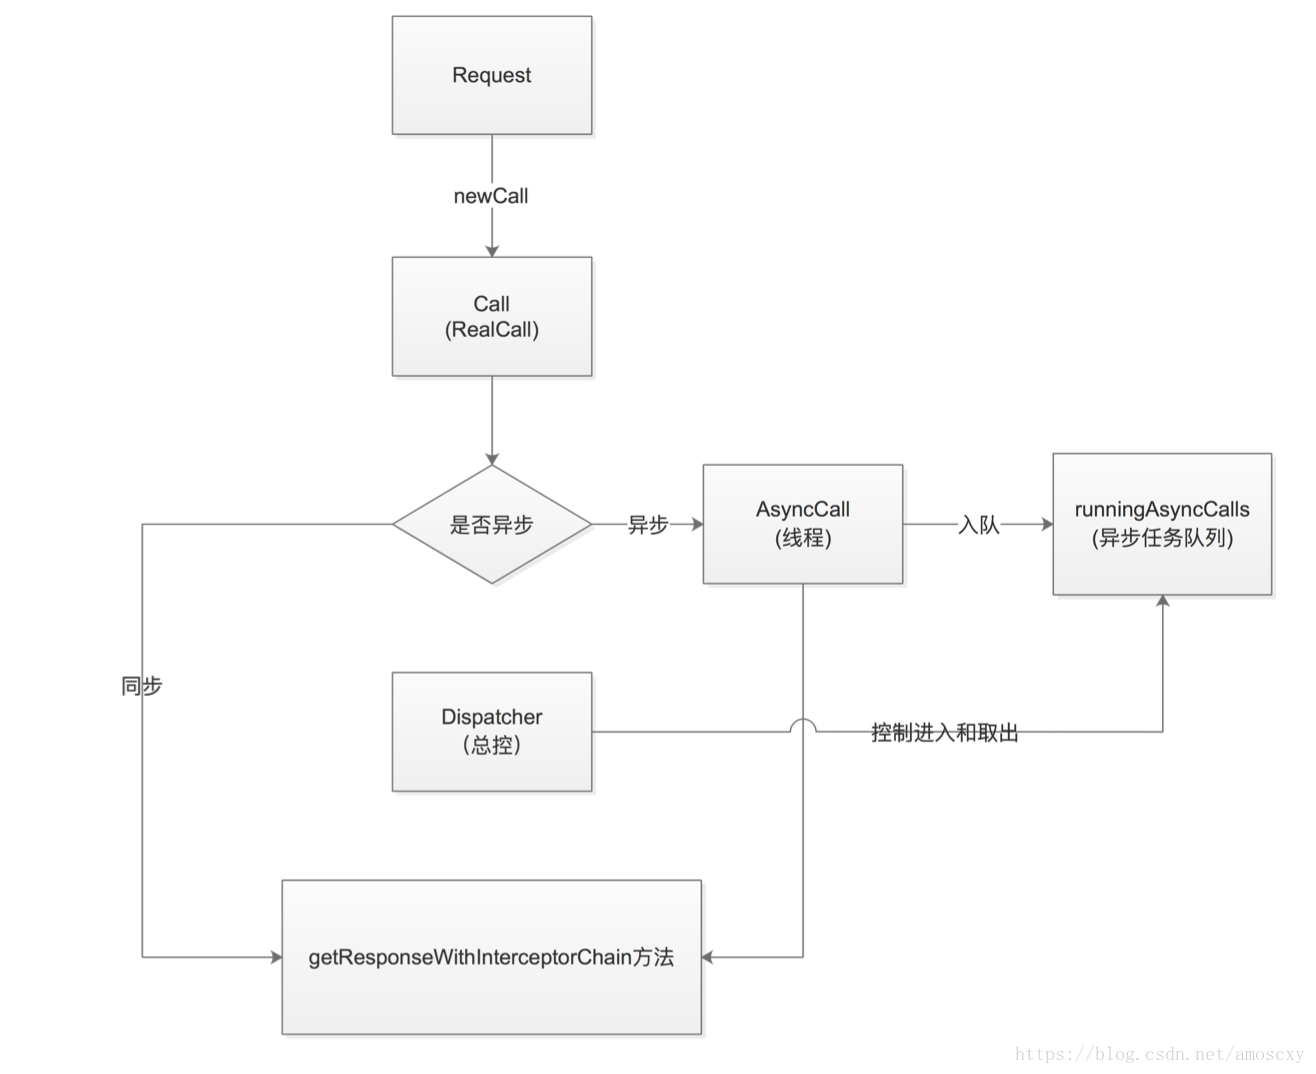
1.4 OkHttp同步和异步请求的区别
- 1.发起请求时的方法调用不同
同步请求执行RealCall的execute()方法发起请求
异步请求执行RealCall的enqueue方法发起异步请求
- 2.是否会阻塞当前线程
同步请求会阻塞当前线程,异步请求不会阻塞当前线程,会开启一个新的工作线程去完成网络请求的操作
- 3.控制器类Dispatcher作用不同
同步请求都存储在同步请求任务队列(runningSyncCalls)中,控制器类Dispatcher的作用的向同步队列中添加请求和移除请求
异步请求都存储在异步请求任务队列(runningAsyncCalls)中,通过控制器类Dispatcher类控制异步请求的入队和出队
1.5 OkHttp同步请求执行流程和源码分析
从OkHttp请求构建步骤可知,同步和异步请求都要通过Builder模式初始化OkHttpClient和Request,之后通过OkHttpClient的newCall方法将Request构建成实际的OkHttp请求RealCall,同步和异步发起请求的方法不同,同步请求通过调用RealCall的execute()方法,异步请求通过调用RealCall的enqueue方法
1.5.1 先看构建OkHttpClient的内部类Builder构造方法源码:
public Builder() {
    this.dispatcher = new Dispatcher();
    this.protocols = OkHttpClient.DEFAULT_PROTOCOLS;
    this.connectionSpecs = OkHttpClient.DEFAULT_CONNECTION_SPECS;
    this.eventListenerFactory = EventListener.factory(EventListener.NONE);
    this.proxySelector = ProxySelector.getDefault();
    this.cookieJar = CookieJar.NO_COOKIES;
    this.socketFactory = SocketFactory.getDefault();
    this.hostnameVerifier = OkHostnameVerifier.INSTANCE;
    this.certificatePinner = CertificatePinner.DEFAULT;
    this.proxyAuthenticator = Authenticator.NONE;
    this.authenticator = Authenticator.NONE;
    this.connectionPool = new ConnectionPool();
    this.dns = Dns.SYSTEM;
    this.followSslRedirects = true;
    this.followRedirects = true;
    this.retryOnConnectionFailure = true;
    this.connectTimeout = 10000;
    this.readTimeout = 10000;
    this.writeTimeout = 10000;
    this.pingInterval = 0;
}
需要注意的有:
1.初始化了Dispatcher对象,Dispatcher对象是OkHttp请求的分发器,由它来管理异步请求是直接处理还是缓存等待,将同步请求放入处理队列中去执行
2.初始化了ConnectionPool对象,它是连接池,客户端和服务端之间的链接抽象为一个Connection,每个Connection都会放进ConnectionPool链接池中,有它来进行统一的管理;
作用:管理ConnectionPool中的哪些连接可以保持连接状态,哪些连接可以作为缓存复用,当请求的url相同时,就可以选择缓存复用
1.5.2 又通过Builder模式初始化了Request请求报文类,看Builder的构造方法:
public Builder() {
    this.method = "GET";
    this.headers = new okhttp3.Headers.Builder();
}
指定请求方法默认是get方法
通过Builder模式构造内部类Headers对象,来保存请求头部信息
看Request的build方法:
public Request build() {
    if(this.url == null) {
        throw new IllegalStateException("url == null");
    } else {
        return new Request(this);
    }
}
new Request(this);的作用是将当前Builder对象赋值给Request对象,实际上是将配置的url、请求方式、头文件等赋值给Request对象,来看一下Request的构造方法就可以知道了:
Request(Request.Builder builder) {
    this.url = builder.url;
    this.method = builder.method;
    this.headers = builder.headers.build();
    this.body = builder.body;
    this.tag = builder.tag != null?builder.tag:this;
}
通过Request的构造方法传入了,url、请求方法、头文件、请求内容、和tag等
1.5.3 同步请求前两步总结
- 1.创建一个OkHttpClient对象
- 2.构建了携带请求信息的Request对象
1.5.4 第三步构建实际的RealCall请求
Call call = client.newCall(request);看OkHttpClient的newCall源码:
public Call newCall(Request request) {
    return RealCall.newRealCall(this, request, false);
}
实际上调用了RealCall的newRealCall方法
static RealCall newRealCall(OkHttpClient client, Request originalRequest, boolean forWebSocket) {
    RealCall call = new RealCall(client, originalRequest, forWebSocket);
    call.eventListener = client.eventListenerFactory().create(call);
    return call;
}
可以看到初始化了RealCall方法,赋值了eventListener变量,又返回了RealCall
再看RealCall的构造方法源码:
private RealCall(OkHttpClient client, Request originalRequest, boolean forWebSocket) {
    this.client = client;
    this.originalRequest = originalRequest;
    this.forWebSocket = forWebSocket;
    this.retryAndFollowUpInterceptor = new RetryAndFollowUpInterceptor(client, forWebSocket);
}
可以看到,持有了前两步初始化好的OkHttpClient和Request对象,还赋值了一个RetryAndFollowUpInterceptor重定向拦截器
1.5.5 执行同步请求
执行同步请求需要调用RealCall的execute()方法:
Response response = call.execute();再看Call的实际实现类RealCall的execute()方法:
public Response execute() throws IOException {
    synchronized(this) {
        if(this.executed) {
            throw new IllegalStateException("Already Executed");
        }

        this.executed = true;
    }

    this.captureCallStackTrace();
    this.eventListener.callStart(this);

    Response var2;
    try {
        this.client.dispatcher().executed(this);
        Response result = this.getResponseWithInterceptorChain();
        if(result == null) {
            throw new IOException("Canceled");
        }

        var2 = result;
    } catch (IOException var7) {
        this.eventListener.callFailed(this, var7);
        throw var7;
    } finally {
        this.client.dispatcher().finished(this);
    }

    return var2;
}
synchronized同步代码块中,this.executed的作用是同步请求只能执行一次
开启了一个监听事件:
this.eventListener.callStart(this);每当RealCall调用的execute()或者是enqueue方法是就会开启这个监听事件
this.client.dispatcher().executed(this);看OkHttpClient的dispatcher()方法:
public Dispatcher dispatcher() {
    return this.dispatcher;
}
返回了Dispatcher分发器
再看Dispatcher的executed方法:
synchronized void executed(RealCall call) {
    this.runningSyncCalls.add(call);
}
同步请求就是将RealCall实际请求添加到同步请求队列当中
同步请求Dispatcher分发器机制图:

Call执行任务时,通过Dispatcher这个分发器类将任务推到执行队列当中,Dispatcher还维护了个线程池,在线程池中依次执行请求任务,一个请求任务执行完成通知同步请求队列执行下一个请求任务
同步请求队列:
private final Deque<RealCall> runningSyncCalls = new ArrayDeque();继续RealCall的execute()方法往下看:
Response result = this.getResponseWithInterceptorChain();通过调用RealCall的getResponseWithInterceptorChain拦截器链方法获得Response,在拦截器链方法中会依次调用拦截器来进行相应的操作
继续RealCall的execute()方法往下看:
this.client.dispatcher().finished(this);Dispatcher分发器会主动回收OkHttp请求
继续看Dispatcher的finished方法:
void finished(RealCall call) {
    this.finished(this.runningSyncCalls, call, false);
}
调用了另外一个finished方法:
private <T> void finished(Deque<T> calls, T call, boolean promoteCalls) {
    int runningCallsCount;
    Runnable idleCallback;
    synchronized(this) {
        if(!calls.remove(call)) {
            throw new AssertionError("Call wasn't in-flight!");
        }

        if(promoteCalls) {
            this.promoteCalls();
        }

        runningCallsCount = this.runningCallsCount();
        idleCallback = this.idleCallback;
    }

    if(runningCallsCount == 0 && idleCallback != null) {
        idleCallback.run();
    }

}
它把我们的同步请求队列传了进来
if(!calls.remove(call)) {
    throw new AssertionError("Call wasn't in-flight!");
}
首先在同步请求队列当中移除当前的同步请求,不能移除就会抛出异常
if(promoteCalls) {
    this.promoteCalls();
}
同步请求这里的promoteCalls为false,不能执行到if条件语句当中,异步请求这里的promoteCalls为true
继续看:
runningCallsCount = this.runningCallsCount();通过Dispatcher中的runningCallsCount()方法计算目前还在运行的请求
public synchronized int runningCallsCount() {
    return this.runningAsyncCalls.size() + this.runningSyncCalls.size();
}
返回了正在执行的异步和同步请求之和
继续看:
if(runningCallsCount == 0 && idleCallback != null) {
    idleCallback.run();
}
当正在执行的请求数为0时,表示当前的Dispatcher分发器类中没有可执行的请求了
当前正在执行的请求数不为0且idleCallback不为空时可以执行方法idleCallback.run();
1.5.6 同步请求总结
- 1.创建一个OkHttpClient对象
- 2.构建一个Request对象,通过OkHttpClient和Request对象,构建出实际请求RealCall对象
- 3.调用RealCall的execute()方法执行同步请求
1.6 OkHttp异步请求的执行流程及源码分析
1.6.1 OkHttp异步请求
OkHttpClient client = new OkHttpClient.Builder().readTimeout(5, TimeUnit.SECONDS).build();
public void asyRequest(){
    Request request = new Request.Builder().url("http://www.baidu.com")
            .get().build();
    Call call = client.newCall(request);
    call.enqueue(new Callback() {
        @Override
        public void onFailure(Call call, IOException e) {
            System.out.println("Fail");
        }

        @Override
        public void onResponse(Call call, Response response) throws IOException {

            System.out.println(response.body().string());

        }
    });
}
前三步只是做了OkHttp请求的准备,真正的异步请求使call.enqueue,下面看Call的实现类RealCall的enqueue方法的源码
public void enqueue(Callback responseCallback) {
    synchronized(this) {
        if(this.executed) {
            throw new IllegalStateException("Already Executed");
        }

        this.executed = true;
    }

    this.captureCallStackTrace();
    this.eventListener.callStart(this);
    this.client.dispatcher().enqueue(new RealCall.AsyncCall(responseCallback));
}
先看源码
synchronized(this) {
    if(this.executed) {
        throw new IllegalStateException("Already Executed");
    }

    this.executed = true;
}
首先锁住了RealCall对象,this.executed的作用是确保实际请求对象RealCall只能执行一次
再看this.client.dispatcher().enqueue(new RealCall.AsyncCall(responseCallback));
其中new RealCall.AsyncCall(responseCallback)的作用是将Callback对象responseCallback封装成了RealCall.AsyncCall对象,下面看RealCall.AsyncCall到底是什么
final class AsyncCall extends NamedRunnable {
    private final Callback responseCallback;

    AsyncCall(Callback responseCallback) {
        super("OkHttp %s", new Object[]{RealCall.this.redactedUrl()});
        this.responseCallback = responseCallback;
    }
    ...
}
可以看出AsyncCall继承自NamedRunnable,那么NamedRunnable又是什么呢
public abstract class NamedRunnable implements Runnable {
    protected final String name;

    public NamedRunnable(String format, Object... args) {
        this.name = Util.format(format, args);
    }

    public final void run() {
        String oldName = Thread.currentThread().getName();
        Thread.currentThread().setName(this.name);

        try {
            this.execute();
        } finally {
            Thread.currentThread().setName(oldName);
        }

    }

    protected abstract void execute();
}
可以看到NamedRunnable实现了Runnable接口,是一个Runnable
那么RealCall.AsyncCall对象就是Runnable对象了,即new RealCall.AsyncCall(responseCallback)的作用是将Callback类型的对象responseCallback封装成Runnable对象
再看this.client.dispatcher().enqueue(new RealCall.AsyncCall(responseCallback));其它部分的源码
其中this.client.dispatcher()的作用就是获得分发器类Dispatcher的对象,可以看源码
public Dispatcher dispatcher() {
    return this.dispatcher;
}
我们就会有疑问这个分发器类的对象是在哪里初始化的呢,其实是在出初始化OkHttpClient的时候就初始化了Dispatcher分发器类
看OkHttpClient内部类Builder的构造方法源码
public Builder() {
    this.dispatcher = new Dispatcher();
    this.protocols = OkHttpClient.DEFAULT_PROTOCOLS;
    this.connectionSpecs = OkHttpClient.DEFAULT_CONNECTION_SPECS;
    ...
}
的确在这里初始化的
下面继续看this.client.dispatcher().enqueue(new RealCall.AsyncCall(responseCallback));的其它部分Dispatcher类的enqueue源码
synchronized void enqueue(AsyncCall call) {
    if(this.runningAsyncCalls.size() < this.maxRequests && this.runningCallsForHost(call) < this.maxRequestsPerHost) {
        this.runningAsyncCalls.add(call);
        this.executorService().execute(call);
    } else {
        this.readyAsyncCalls.add(call);
    }

}
先了解几个变量
- runningAsyncCalls:正在运行的异步请求的队列,this.runningAsyncCalls.size()作用的获取并发请求的数量
- maxRequests:并发请求的最大数,这里为64
- readyAsyncCalls:等待请求的异步缓存的队列
- runningCallsForHost(call):正在发起call请求的主机数
- maxRequestsPerHost:相同主机的最大网络请求数,这里为5
现在就可以解释这段源码了
当正在运行的并发请求数小于64,相同主机的网络请求数小于5时就把传递进来的AsyncCall加入到正在运行的异步请求的队列中,然后通过线程池执行这个异步请求,否则就把传进来的AsyncCall加入到等待请求的异步缓存的队列中
enqueue方法总结
1. 判断当前的实际请求RealCall是否只执行了一次,不是的话就会抛出异常
2. 将传入的Callback对象封装成RealCall.AsyncCall对象,实际上是个Runnable
3. 构建了RealCall.AsyncCall对象之后就可以执行分发器类Dispatcher的enqueue方法来进行异步网络请求,判断逻辑是,当前正在执行的异步请求个数小于64,并且相同主机的网络请求数小于5时就把当前的AsyncCall加入到正在运行的异步请求的队列中,然后通过线程池执行这个异步请求,否则就把当前的AsyncCall加入到等待请求的异步请求的队列中
1.6.2 okhttp框架异步请求流程和源码解析 - 线程池操作
看上文分析到的源码:
synchronized void enqueue(AsyncCall call) {
    if(this.runningAsyncCalls.size() < this.maxRequests && this.runningCallsForHost(call) < this.maxRequestsPerHost) {
        this.runningAsyncCalls.add(call);
        this.executorService().execute(call);
    } else {
        this.readyAsyncCalls.add(call);
    }

}
当正在执行的异步请求队列的长度小于64且正在执行传入的相同主机的网络请求数小于5时,就会把这个AsyncCall请求加入到正在执行的异步请求队列当中,之后又会调用线程池执行请求,先看this.executorService()源码:
public synchronized ExecutorService executorService() {
    if(this.executorService == null) {
        this.executorService = new ThreadPoolExecutor(0, 2147483647, 60L, TimeUnit.SECONDS, new SynchronousQueue(), Util.threadFactory("OkHttp Dispatcher", false));
    }

    return this.executorService;
}
可以看到,使用synchronized来锁住了ExecutorService线程池对象,来保证线程池的单例,创建线程池的方法是:
this.executorService = new ThreadPoolExecutor(0, 2147483647, 60L, TimeUnit.SECONDS, new SynchronousQueue(), Util.threadFactory("OkHttp Dispatcher", false));可以看到,线程池的最大线程数设置成了2147483647,那么当网络请求数很大的时候,会导致网络消耗太大呢?答案是不会的,因为上文已经分析了,正在执行的异步网络请求数小于64时才有可能将当前的异步网络请求加入到正在执行的异步网络请求队列中,否则只会将当前的异步网络请求加入到等待请求的异步缓存队列中。
继续看源码:
this.executorService().execute(call);当获得了线程池之后,又会调用ExecutorService线程池的execute方法,由于它是线程池,就会执行每个子线程的run方法,这是又会调用AsyncCall的run方法,下面看一下AsyncCall的怎么实现run方法的:
final class AsyncCall extends NamedRunnable {
    private final Callback responseCallback;

    AsyncCall(Callback responseCallback) {
        super("OkHttp %s", new Object[]{RealCall.this.redactedUrl()});
        this.responseCallback = responseCallback;
    }

    String host() {
        return RealCall.this.originalRequest.url().host();
    }

    Request request() {
        return RealCall.this.originalRequest;
    }

    RealCall get() {
        return RealCall.this;
    }

    protected void execute() {
        boolean signalledCallback = false;

        try {
            Response response = RealCall.this.getResponseWithInterceptorChain();
            if(RealCall.this.retryAndFollowUpInterceptor.isCanceled()) {
                signalledCallback = true;
                this.responseCallback.onFailure(RealCall.this, new IOException("Canceled"));
            } else {
                signalledCallback = true;
                this.responseCallback.onResponse(RealCall.this, response);
            }
        } catch (IOException var6) {
            if(signalledCallback) {
                Platform.get().log(4, "Callback failure for " + RealCall.this.toLoggableString(), var6);
            } else {
                RealCall.this.eventListener.callFailed(RealCall.this, var6);
                this.responseCallback.onFailure(RealCall.this, var6);
            }
        } finally {
            RealCall.this.client.dispatcher().finished(this);
        }

    }
}
可以看到,AsyncCall没有实现run方法,但AsyncCall又继承自NamedRunnable,看NamedRunnable中是否实现了run方法:
public abstract class NamedRunnable implements Runnable {
    protected final String name;

    public NamedRunnable(String format, Object... args) {
        this.name = Util.format(format, args);
    }

    public final void run() {
        String oldName = Thread.currentThread().getName();
        Thread.currentThread().setName(this.name);

        try {
            this.execute();
        } finally {
            Thread.currentThread().setName(oldName);
        }

    }

    protected abstract void execute();
}NamedRunnable实现了run方法,但只是包装了一层,实质逻辑在this.execute();当中,而execute()这个抽象方法又在AsyncCall中得到了实现,这里才是run方法逻辑真正实现的地方:
final class AsyncCall extends NamedRunnable {
    ...
    protected void execute() {
        boolean signalledCallback = false;

        try {
            Response response = RealCall.this.getResponseWithInterceptorChain();
            if(RealCall.this.retryAndFollowUpInterceptor.isCanceled()) {
                signalledCallback = true;
                this.responseCallback.onFailure(RealCall.this, new IOException("Canceled"));
            } else {
                signalledCallback = true;
                this.responseCallback.onResponse(RealCall.this, response);
            }
        } catch (IOException var6) {
            if(signalledCallback) {
                Platform.get().log(4, "Callback failure for " + RealCall.this.toLoggableString(), var6);
            } else {
                RealCall.this.eventListener.callFailed(RealCall.this, var6);
                this.responseCallback.onFailure(RealCall.this, var6);
            }
        } finally {
            RealCall.this.client.dispatcher().finished(this);
        }

    }
}先看Response response = RealCall.this.getResponseWithInterceptorChain();构建了一个拦截器链,它的内部有各种连接器的实现,之后返回了一个Response对象,再往下看:
if(RealCall.this.retryAndFollowUpInterceptor.isCanceled()) {
    signalledCallback = true;
    this.responseCallback.onFailure(RealCall.this, new IOException("Canceled"));
} else {
    signalledCallback = true;
    this.responseCallback.onResponse(RealCall.this, response);
}RealCall.this.retryAndFollowUpInterceptor是其中一个拦截器叫做重定向和重试拦截器,如果这个拦截器被取消了,就会调用Callback的onFailure方法,而这个Callback就是在call.enqueue(new Callback(){})中传进来的Callback,如果这个拦截器没有被取消,就会到Callback的onResponse这个回调方法当中。因为上文提到执行的是线程池中每个子线程的run方法,因此Callback的onFailure和onResponse方法是在子线程中执行的,再看finally中执行的方法:
RealCall.this.client.dispatcher().finished(this);看finished的源码:
void finished(AsyncCall call) {
    this.finished(this.runningAsyncCalls, call, true);
}
可以看到,又调用了另一个finished方法:
private <T> void finished(Deque<T> calls, T call, boolean promoteCalls) {
    int runningCallsCount;
    Runnable idleCallback;
    synchronized(this) {
        if(!calls.remove(call)) {
            throw new AssertionError("Call wasn't in-flight!");
        }

        if(promoteCalls) {
            this.promoteCalls();
        }

        runningCallsCount = this.runningCallsCount();
        idleCallback = this.idleCallback;
    }

    if(runningCallsCount == 0 && idleCallback != null) {
        idleCallback.run();
    }

}
这个finished方法是Dispatcher分发器中一个很重要的方法,它做了三件事:
第一件事:
calls.remove(call)将这个AsyncCall请求从正在执行的异步请求队列中移除
第二件事情:
promoteCalls看它的源码:
private void promoteCalls() {
    if(this.runningAsyncCalls.size() < this.maxRequests) {
        if(!this.readyAsyncCalls.isEmpty()) {
            Iterator i = this.readyAsyncCalls.iterator();

            do {
                if(!i.hasNext()) {
                    return;
                }

                AsyncCall call = (AsyncCall)i.next();
                if(this.runningCallsForHost(call) < this.maxRequestsPerHost) {
                    i.remove();
                    this.runningAsyncCalls.add(call);
                    this.executorService().execute(call);
                }
            } while(this.runningAsyncCalls.size() < this.maxRequests);

        }
    }
}
调整整个异步请求的缓存队列,这个缓存队列是非线程安全的,因此用synchronized来锁住这个操作
第三件事:
runningCallsCount = this.runningCallsCount();重新计算正在执行的异步请求的线程数
1.6.3 异步总结
- 1.创建一个OkHttpClient对象
它是OkHttpClient对象的客户端类
- 2.构建一个Request对象,通过OkHttpClient和Request对象,构建出Call对象
在这个Request对象中,可以通过Builder模式,设置url、头信息等
Call对象为实际的OkHttp请求
- 3.执行call的enqueue方法
将OkHttp请求添加到调度器当中,由于是异步的要注入一个Callback对象,用于网络请求的分发过程
要特别重视Dispatcher这个分发器类,它有两个队列:
- 正在执行异步请求的缓存队列
- 等待执行异步请求的缓存队列
- 还有个线程池来处理异步请求操作
不管异步还是同步网络请求,正真的网络请求时通过拦截器链进行操作的
- OkHttp有很多核心内容,最重要的两个核心内容是Dispatcher分发器类和拦截器链
1.7 OkHttp任务调度 - Dispatcher分发器类
1.7.1 Q1. OkHttp如何实现同步异步请求的区别?
发送的同步/异步请求都会通过Dispatcher类来管理其同步/异步请求队列的状态
1.7.2 Q2.到底什么是Dispatcher?
Dispatcher的作用是通过维护不同的缓存队列来维护同步/异步请求的状态,并维护了一个线程池,用于高效执行相应的请求
1.7.3 Dispatcher源码分析
先看几个重要变量:
private ExecutorService executorService;
private final Deque<AsyncCall> readyAsyncCalls = new ArrayDeque();
private final Deque<AsyncCall> runningAsyncCalls = new ArrayDeque();
private final Deque<RealCall> runningSyncCalls = new ArrayDeque();其中private ExecutorService executorService;是Dispatcher分发器类维护的线程池,它维护了同步/异步网络请求,并高效执行同步/异步网络操作;
private final Deque<AsyncCall> readyAsyncCalls = new ArrayDeque();是等待执行的异步请求缓存队列,当条件不满足时访问的异步请求就会进入到等待执行的异步请求队列当中来进行缓存,当条件再次满足时,就会把这里面的异步请求放入正在执行的异步请求队列中去进行执行;
private final Deque<AsyncCall> runningAsyncCalls = new ArrayDeque();是正在执行的异步请求队列,它包含了已经取消但没有执行完的异步请求;
private final Deque<RealCall> runningSyncCalls = new ArrayDeque();是正在执行的同步请求队列
1.7.5 Q3.Dispathcer类在哪个线程中执行?
Dispatcher类默认在主线程中执行
1.7.4 Q4.异步请求为什么需要两个队列?
异步请求维护了两个队列,一个是正在执行的异步请求队列,一个是等待执行的异步请求缓存队列,可以理解成生产者消费者模型,Dispatcher分发器类对应于生产者,ExecutorService线程池对应于消费者池,因此需要两个队列来存放正在执行的异步请求和等待执行的异步请求
每当新的请求通过调用call.enqueue进入到分发器类Dispatcher中的时候,就会判断,当正在执行的异步请求数小于64,相同主机的网络请求数小于5时,就会把这个请求加入到正在执行的异步请求队列当中,并通过线程池执行网络请求操作,否则就会加入到等待执行的异步请求缓存队列当中去,当正在执行的异步请求队列有空间了再将缓存中的异步请求转移到正在执行的异步请求缓存队列当中去,当请求执行完之后,会调用finished方法中的promoteCall()这个调度任务的方法,它会手动清除缓存区