以classpathXmlApplication为例
入口方法包含3个部分,
public ClassPathXmlApplicationContext(String[] configLocations, boolean refresh, ApplicationContext parent)
            throws BeansException {
        super(parent);
        setConfigLocations(configLocations);
        if (refresh) {
            refresh();
        }
    }
1.继承父类,没什么东西
2.设置配置文件
3.执行refresh方法(关键)。下面我们就这两个方法看看内部实现
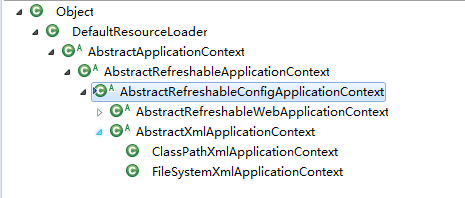
设置配置文件,这块其实没什么东西,就是给context对象设置一个configLocations的数组,我们看一下context类的继承关系
下面看重点的refresh方法
 1 public void refresh() throws BeansException, IllegalStateException {
 2         synchronized (this.startupShutdownMonitor) {//锁住一个对象,防止多线程同时执行初始化的操作
 3             // Prepare this context for refreshing.准备上下文,这里设置一下开始实现,准备propery等
 4             prepareRefresh();
 5
 6             // Tell the subclass to refresh the internal bean factory.
 7             ConfigurableListableBeanFactory beanFactory = obtainFreshBeanFactory();
 8
 9             // Prepare the bean factory for use in this context.
10             prepareBeanFactory(beanFactory);
11
12             try {
13                 // Allows post-processing of the bean factory in context subclasses.
14                 postProcessBeanFactory(beanFactory);
15
16                 // Invoke factory processors registered as beans in the context.
17                 invokeBeanFactoryPostProcessors(beanFactory);
18
19                 // Register bean processors that intercept bean creation.
20                 registerBeanPostProcessors(beanFactory);
21
22                 // Initialize message source for this context.
23                 initMessageSource();
24
25                 // Initialize event multicaster for this context.
26                 initApplicationEventMulticaster();
27
28                 // Initialize other special beans in specific context subclasses.
29                 onRefresh();
30
31                 // Check for listener beans and register them.
32                 registerListeners();
33
34                 // Instantiate all remaining (non-lazy-init) singletons.
35                 finishBeanFactoryInitialization(beanFactory);
36
37                 // Last step: publish corresponding event.
38                 finishRefresh();
39             }
40
41             catch (BeansException ex) {
42                 if (logger.isWarnEnabled()) {
43                     logger.warn("Exception encountered during context initialization - " +
44                             "cancelling refresh attempt: " + ex);
45                 }
46
47                 // Destroy already created singletons to avoid dangling resources.
48                 destroyBeans();
49
50                 // Reset 'active' flag.
51                 cancelRefresh(ex);
52
53                 // Propagate exception to caller.
54                 throw ex;
55             }
56
57             finally {
58                 // Reset common introspection caches in Spring's core, since we
59                 // might not ever need metadata for singleton beans anymore...
60                 resetCommonCaches();
61             }
62         }
63     }
这个代码有点长,我们把每个方法干什么先研究一下,在深入看每个方法怎么实现的。
从7行开始看,这个方法是为了一个refreshBeanFactory。返回的类是ConfigurableListableBeanFactory,而这个factory是一个接口,我们待会看看这个接口有哪些实现,先看看这个方法内部实现
protected ConfigurableListableBeanFactory obtainFreshBeanFactory() {
        refreshBeanFactory();
        ConfigurableListableBeanFactory beanFactory = getBeanFactory();
        if (logger.isDebugEnabled()) {
            logger.debug("Bean factory for " + getDisplayName() + ": " + beanFactory);
        }
        return beanFactory;
    }
我们看到最后return的beanFactory就是ConfigurableListableBeanFactory。而这个接口只有一个default实现类DefaultListableBeanFactory。我们看看这个类主要有哪些成员变量
 1 private boolean allowEagerClassLoading = true;
 2
 3     /** Optional OrderComparator for dependency Lists and arrays */
 4     private Comparator<Object> dependencyComparator;
 5
 6     /** Resolver to use for checking if a bean definition is an autowire candidate */
 7     private AutowireCandidateResolver autowireCandidateResolver = new SimpleAutowireCandidateResolver();
 8
 9     /** Map from dependency type to corresponding autowired value */
10     private final Map<Class<?>, Object> resolvableDependencies = new ConcurrentHashMap<Class<?>, Object>(16);
11
12     /** Map of bean definition objects, keyed by bean name */
13     private final Map<String, BeanDefinition> beanDefinitionMap = new ConcurrentHashMap<String, BeanDefinition>(256);
14
15     /** Map of singleton and non-singleton bean names, keyed by dependency type */
16     private final Map<Class<?>, String[]> allBeanNamesByType = new ConcurrentHashMap<Class<?>, String[]>(64);
17
18     /** Map of singleton-only bean names, keyed by dependency type */
19     private final Map<Class<?>, String[]> singletonBeanNamesByType = new ConcurrentHashMap<Class<?>, String[]>(64);
20
21     /** List of bean definition names, in registration order */
22     private volatile List<String> beanDefinitionNames = new ArrayList<String>(256);
23
24     /** List of names of manually registered singletons, in registration order */
25     private volatile Set<String> manualSingletonNames = new LinkedHashSet<String>(16);
26
27     /** Cached array of bean definition names in case of frozen configuration */
28     private volatile String[] frozenBeanDefinitionNames;
29
30     /** Whether bean definition metadata may be cached for all beans */
31     private volatile boolean configurationFrozen = false;
这些成员变量有机会我们一个个分析下,我们知道每个bean 有一个beanDefinition对象来定义。在13行,我们看到有一个BeanDefinition的Map,我们随便调试一下,看看这个里面存了什么东西。
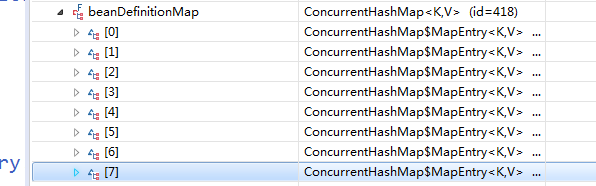
这里面竟然只有7个对象,分别是:ConfigurationClassPostProcessor、DefaultEventListenerFactory、MessageResolver、EventListenerMethodProcessor、AutowiredAnnotationBeanPostProcessor、CommonAnnotationBeanPostProcessor、PropertiesFactoryBean、RequiredAnnotationBeanPostProcessor。这七个对象怎么来的呢,举个例子来看ConfigurationClassPostProcessor,这个类说明是,当配置文件中
Registered by default when using {@code <context:annotation-config/>} or
* {@code <context:component-scan/>}有这两个配置的时候,便会注入这么个类。好吧,那我们看看在哪里register的。我们猜测是在
refreshBeanFactory();这个方法里面。那看看这个方法
 1 protected final void refreshBeanFactory() throws BeansException {
 2         if (hasBeanFactory()) {
 3             destroyBeans();
 4             closeBeanFactory();
 5         }
 6         try {
 7             DefaultListableBeanFactory beanFactory = createBeanFactory();
 8             beanFactory.setSerializationId(getId());
 9             customizeBeanFactory(beanFactory);
10             loadBeanDefinitions(beanFactory);
11             synchronized (this.beanFactoryMonitor) {
12                 this.beanFactory = beanFactory;
13             }
14         }
15         catch (IOException ex) {
16             throw new ApplicationContextException("I/O error parsing bean definition source for " + getDisplayName(), ex);
17         }
18     }
我们看到第7行,创建了一个DefaultListableBeanFactory ,第10行有loadBeanDefinition。应该是在这里处理的。我们还是先调试下看看。执行7行代码,这个时候beanDefinitionMap是空的。执行完10行代码,我们的beanDefinitionMap有值了。这里面为了加深理解,我们在我们的spring-config.xml文件中加一个bean看看会怎么样。原来的spring-config.xml文件如下
 1 <?xml version="1.0" encoding="UTF-8"?>
 2 <beans xmlns="http://www.springframework.org/schema/beans"
 3        xmlns:xsi="http://www.w3.org/2001/XMLSchema-instance"
 4        xmlns:context="http://www.springframework.org/schema/context"
 5        xmlns:util="http://www.springframework.org/schema/util"
 6        xsi:schemaLocation="
 7            http://www.springframework.org/schema/beans
 8            http://www.springframework.org/schema/beans/spring-beans-4.1.xsd
 9            http://www.springframework.org/schema/context
10            http://www.springframework.org/schema/context/spring-context-4.1.xsd
11            http://www.springframework.org/schema/util
12            http://www.springframework.org/schema/util/spring-util-4.1.xsd">
13
14     <context:annotation-config/>
15
16     <context:component-scan base-package="com.newbie.common"></context:component-scan>
17
18     <util:properties id="systemProperties" location="classpath:conf/user.properties" />
19
20
21 </beans>
我们随便加一个bean,如下图所示,有多个一个beanDefinition。所以这个地就是定义所以beanDefinition的入口,而我们从autowire的bean是由相关processor处理的,这个今后如果有时间的话,我们在分析。我们继续往下看

我们回到原来的refresh方法里面。
 1 public void refresh() throws BeansException, IllegalStateException {
 2         synchronized (this.startupShutdownMonitor) {
 3             // Prepare this context for refreshing.
 4             prepareRefresh();
 5
 6             // Tell the subclass to refresh the internal bean factory.
 7             ConfigurableListableBeanFactory beanFactory = obtainFreshBeanFactory();
 8
 9             // Prepare the bean factory for use in this context.
10             prepareBeanFactory(beanFactory);
11
12             try {
13                 // Allows post-processing of the bean factory in context subclasses.
14                 postProcessBeanFactory(beanFactory);
15
16                 // Invoke factory processors registered as beans in the context.
17                 invokeBeanFactoryPostProcessors(beanFactory);
18
19                 // Register bean processors that intercept bean creation.
20                 registerBeanPostProcessors(beanFactory);
21
22                 // Initialize message source for this context.
23                 initMessageSource();
24
25                 // Initialize event multicaster for this context.
26                 initApplicationEventMulticaster();
27
28                 // Initialize other special beans in specific context subclasses.
29                 onRefresh();
30
31                 // Check for listener beans and register them.
32                 registerListeners();
33
34                 // Instantiate all remaining (non-lazy-init) singletons.
35                 finishBeanFactoryInitialization(beanFactory);
36
37                 // Last step: publish corresponding event.
38                 finishRefresh();
39             }
40
41             catch (BeansException ex) {
42                 if (logger.isWarnEnabled()) {
43                     logger.warn("Exception encountered during context initialization - " +
44                             "cancelling refresh attempt: " + ex);
45                 }
46
47                 // Destroy already created singletons to avoid dangling resources.
48                 destroyBeans();
49
50                 // Reset 'active' flag.
51                 cancelRefresh(ex);
52
53                 // Propagate exception to caller.
54                 throw ex;
55             }
56
57             finally {
58                 // Reset common introspection caches in Spring's core, since we
59                 // might not ever need metadata for singleton beans anymore...
60                 resetCommonCaches();
61             }
62         }
63     }
我们现在知道第7行返回的这个ConfigurableListableBeanFactory 有我们所有的beanDefintion。这个方法是给ConfigurableListableBeanFactory 设置了若干预设变量,现在我们也不清楚这个变量是干嘛的,我们先跳过这个方法,等回头再分析他。
第14行postProcessBeanFactory(ConfigurableListableBeanFactory )。我们看看这个代码是做什么事情,我们有一个关注点,我们@autowired的bean是怎么被处理的。这个代码,会根据不同context子类加入不同Processors,这个我们也暂时不分析他,等回头再看
第17行invokeBeanFactoryPostProcessors(ConfigurableListableBeanFactory )。这个方法应该就是能看到bean是如何创建的。这个代码比较长,我们先把调用关系简单画出来
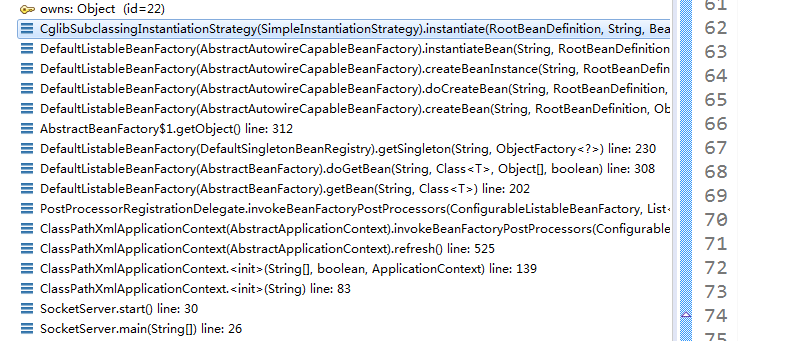
执行invokeBeanFactoryPostProcessors之后,这里主要是讲各个processors类注册进去,这里需要获得具体的bean了,根据beanName和BeanDefinition。如何获得bean,通过DefaultListableBeanFactory的getBean方法,这里判断bean是单利还是原型的,进入不同的getBean的逻辑,之后调用的AbstractAutowireCapableBeanFactory的createBean方法,之后通过反射来获得对应的bean。注意看一下doCreateBean方法里面的populateBean()方法,这里能够完成对属性的注入。
上面这个方法,我们调用的时候发现就注册了一个ConfigurationClassPostProcessor,也不知道干嘛的。后来通过搜索了解到这个方法主要是用于处理spring的后置处理器的相关内容,参考https://www.cnblogs.com/sishang/p/6588542.html和https://www.cnblogs.com/sishang/p/6576665.html。