前言
关于Spring框架中的数据校验,常用的方式有两种,即JSR303标准的Bean Validation(通常底层采用Hibernate的Validator实现)和Spring框架的Validator接口。JSR303是基于一些注解而形成的规范,Hibernate Validator的实现中增加了部分注解,用起来快捷方便;Spring Validator需要自己去实现校验的过程,通常调用ValidationUtils(org.springframework.validation)的一些静态方法去完成校验,虽然需要自己实现,但是非常灵活。关于这两者的使用,国内常见的网站、博客讲得都比较详细了,在这里我只简单提一提。在某些时候,我们想让自己的校验符合某些需求,既利用Spring Validator接口的灵活,同时又想用上JSR303规范的一些注解让实现变得方便快捷,如何去做呢?这是本文关注的重点。
1.Spring Validation框架(org.springframework.validation)
Spring拥有自己独立的数据校验框架。Spring在进行数据绑定时,可同事调用校验框架来完成数据校验工作。
1.1 Validation重要的接口和类
- Validator(最重要的接口)
返回该实现类是否支持被校验的对象,也就是是否支持clazz的值。调用自实现的Validator实例时,这个方法返回true,才会继续调用Validator的validate方法。
boolean supports(Class<?> clazz);
对被@Valid或@Validated注解标记的对象target进行校验,遇到的异常将通过Errors接口的实例errors返回
void validate(Object target, Errors errors);
-
Errors(Spring存放错误信息接口)
-
ValidationUtils
校验工具类,提供了多个给Errors对象保存方法
- LocalValidatorFactoryBean
位于org.springframework.validation.beanvalidation包中,该类既实现利了Spring的Validator接口,也实现了JSR 303的Validation接口。只要在Spring容器中定义了一个LocationValidationFactoryBean,即可将其注入到需要数据校验的Bean中。
- xml配置
<bean class="org.springframework.validation.beanvalidation.LocalValidatorFactoryBean"/>
<mvc:annotation-driven/>会默认装配好一个LocalValidatorFactoryBean,所以在实际开发中,无须手动再配置xml节点。
现在我们实现一个简单的例子
实体类:
public class User {
    private String username;

    private String password;

    //getter and setter
}
校验类:
public class UserValidator implements Validator {

    public boolean supports(Class<?> clazz) {
       // TODO Auto-generated method stub
       return User.class.equals(clazz);
    }

    public void validate(Object obj, Errors errors) {
       // TODO Auto-generated method stub
       ValidationUtils.rejectIfEmpty(errors, "username", null, "Username is empty.");
       User user = (User) obj;
       if (null == user.getPassword() || "".equals(user.getPassword()))
           errors.rejectValue("password", null, "Password is empty.");
    }
}
调用注解进行校验:
@RestController
@RequestMapping(value = "/users")
public class UserController{

    @InitBinder

    public initBinder(WebDataBinder binder){

        binder.setValidator(new UserValidator());

    }

   @RequestMapping("login")
    public String login(@Valid User user, BindingResult result) {
       if (result.hasErrors())
           return "redirect:user/login";
       return "redirect:/";
    }
}
我们可以看到在上面代码中我们通过@InitBinder标记的方法initBinder设置了当前Controller需要使用的Validator是UserValidator。这样当我们请求处理器方法register时就会使用DataBinder设定的UserValidator来校验当前的表单对象User,首先会通过UserValidator的supports方法判断其是否支持User对象的校验,若支持则调用UserValidator的validate方法,并把相关的校验信息存放到当前的Errors对象中。接着我们就可以在我们的处理器方法中根据是否有校验异常信息来做不同的操作。在上面代码中我们定义了在有异常信息的时候就跳转到登陆页面。这样我们就可以在登陆页面上通过errors标签来展示这些错误信息了。
我们知道在Controller类中通过@InitBinder标记的方法只有在请求当前Controller的时候才会被执行,所以其中定义的Validator也只能在当前Controller中使用,如果我们希望一个Validator对所有的Controller都起作用的话,我们可以通过WebBindingInitializer的initBinder方法来设定了。另外,在SpringMVC的配置文件中通过mvc:annotation-driven的validator属性也可以指定全局的Validator。代码如下所示:
<?xml version="1.0" encoding="UTF-8"?>
<beans xmlns="http://www.springframework.org/schema/beans"
    xmlns:xsi="http://www.w3.org/2001/XMLSchema-instance" xmlns:context="http://www.springframework.org/schema/context"
    xmlns:mvc="http://www.springframework.org/schema/mvc"
    xsi:schemaLocation="http://www.springframework.org/schema/beans
     http://www.springframework.org/schema/beans/spring-beans-3.0.xsd
     http://www.springframework.org/schema/context
     http://www.springframework.org/schema/context/spring-context-3.0.xsd
     http://www.springframework.org/schema/mvc
     http://www.springframework.org/schema/mvc/spring-mvc-3.0.xsd">

    <mvc:annotation-driven validator="userValidator"/>

    <bean id="userValidator" class="com.xxx.xxx.UserValidator"/>

    ...
</beans>
2.使用JSR303 BeanValidation标准的注解进行校验
JSR-303只是一个规范,而Spring也没有对这一规范进行实现,那么当我们在SpringMVC中需要使用到JSR-303的时候就需要我们提供一个对JSR-303规范的实现,Hibernate Validator 是 Bean Validation 的参考实现 . Hibernate Validator 提供了 JSR 303 规范中所有内置 constraint 的实现,除此之外还有一些附加的 constraint。如果想了解更多有关 Hibernate Validator 的信息,请查看 http://www.hibernate.org/subprojects/validator.html,这里我将以它作为JSR-303的实现来讲解SpringMVC对JSR-303的支持。
@注:
目前Bean Validation最新版本是Bean Validation 1.1(JSR-349),新特性可以到官网查看,笔者最喜欢的两个特性是:跨参数验证(比如密码和确认密码的验证)和支持在消息中使用EL表达式,其他的还有如方法参数/返回值验证、CDI和依赖注入、分组转换等。对于方法参数/返回值验证,大家可以参阅 集成Bean Validation 1.1(JSR-349)到SpringMVC。
JSR-303的校验是基于注解的,它内部已经定义好了一系列的限制注解,我们只需要把这些注解标记在需要验证的实体类的属性上或是其对应的get方法上。
Bean Validation 中的 constraint
表 1. Bean Validation 中内置的 constraint
| Constraint | 详细信息 |
|---|---|
@Null |
被注释的元素必须为 null |
@NotNull |
被注释的元素必须不为 null |
@AssertTrue |
被注释的元素必须为 true |
@AssertFalse |
被注释的元素必须为 false |
@Min(value) |
被注释的元素必须是一个数字,其值必须大于等于指定的最小值 |
@Max(value) |
被注释的元素必须是一个数字,其值必须小于等于指定的最大值 |
@DecimalMin(value) |
被注释的元素必须是一个数字,其值必须大于等于指定的最小值 |
@DecimalMax(value) |
被注释的元素必须是一个数字,其值必须小于等于指定的最大值 |
@Size(max, min) |
被注释的元素的大小必须在指定的范围内 |
@Digits (integer, fraction) |
被注释的元素必须是一个数字,其值必须在可接受的范围内 |
@Past |
被注释的元素必须是一个过去的日期 |
@Future |
被注释的元素必须是一个将来的日期 |
@Pattern(value) |
被注释的元素必须符合指定的正则表达式 |
表 2. Hibernate Validator 附加的 constraint
| Constraint | 详细信息 |
|---|---|
@Email |
被注释的元素必须是电子邮箱地址 |
@Length |
被注释的字符串的大小必须在指定的范围内 |
@NotEmpty |
被注释的字符串的必须非空 |
@Range |
被注释的元素必须在合适的范围内 |
一个 constraint 通常由 annotation 和相应的 constraint validator 组成,它们是一对多的关系。也就是说可以有多个 constraint validator 对应一个 annotation。在运行时,Bean Validation 框架本身会根据被注释元素的类型来选择合适的 constraint validator 对数据进行验证。
有些时候,在用户的应用中需要一些更复杂的 constraint。Bean Validation 提供扩展 constraint 的机制。可以通过两种方法去实现,一种是组合现有的 constraint 来生成一个更复杂的 constraint,另外一种是开发一个全新的 constraint。
1、需要的jar包
hibernate-validator.5.1.3.Final.jar
validation-api.1.1.0.Final.jar
2、springsevlet-config.xml配置
在spring3之后,任何支持JSR303的validator(如Hibernate Validator)都可以通过简单配置引入,只需要在配置xml中加入,这时validatemessage的属性文件默认为classpath下的ValidationMessages.properties:
<!-- support JSR303 annotation if JSR 303 validation present on classpath -->
<mvc:annotation-driven />
如果不使用默认,可以使用下面配置:
<mvc:annotation-driven validator="validator" />

<bean id="validator" class="org.springframework.validation.beanvalidation.LocalValidatorFactoryBean">
    <property name="providerClass"  value="org.hibernate.validator.HibernateValidator"/>
    <!--不设置则默认为classpath下的ValidationMessages.properties -->
    <property name="validationMessageSource" ref="validatemessageSource"/>
</bean>
<bean id="validatemessageSource" class="org.springframework.context.support.ReloadableResourceBundleMessageSource">
    <property name="basename" value="classpath:validatemessages"/>
    <property name="fileEncodings" value="utf-8"/>
    <property name="cacheSeconds" value="120"/>
</bean>
3、hibernate validator constraint 注解
Bean Validation 中内置的 constraint
@Null   被注释的元素必须为 null
@NotNull    被注释的元素必须不为 null
@AssertTrue     被注释的元素必须为 true
@AssertFalse    被注释的元素必须为 false
@Min(value)     被注释的元素必须是一个数字,其值必须大于等于指定的最小值
@Max(value)     被注释的元素必须是一个数字,其值必须小于等于指定的最大值
@DecimalMin(value)  被注释的元素必须是一个数字,其值必须大于等于指定的最小值
@DecimalMax(value)  被注释的元素必须是一个数字,其值必须小于等于指定的最大值
@Size(max=, min=)   被注释的元素的大小必须在指定的范围内
@Digits (integer, fraction)     被注释的元素必须是一个数字,其值必须在可接受的范围内
@Past   被注释的元素必须是一个过去的日期
@Future     被注释的元素必须是一个将来的日期
@Pattern(regex=,flag=)  被注释的元素必须符合指定的正则表达式

Hibernate Validator 附加的 constraint
@NotBlank(message =)   验证字符串非null,且长度必须大于0
@Email  被注释的元素必须是电子邮箱地址
@Length(min=,max=)  被注释的字符串的大小必须在指定的范围内
@NotEmpty   被注释的字符串的必须非空
@Range(min=,max=,message=)  被注释的元素必须在合适的范围内
4、使用validator
在需要校验的对象前增加@Valid 注解(该注解位于javax.validation包中)来触发校验。这样就可以完成针对输入数据User对象的校验了,校验结果任然保存在BindingResult对象中。
package com.mkyong.common.model;

import org.hibernate.validator.constraints.NotEmpty;
import org.hibernate.validator.constraints.Range;

public class Customer {

    @NotEmpty //make sure name is not empty
    String name;

    @Range(min = 1, max = 150) //age need between 1 and 150
    int age;

    //getter and setter methods

}
package com.mkyong.common.controller;
import javax.validation.Valid;
import org.springframework.stereotype.Controller;
import org.springframework.ui.ModelMap;
import org.springframework.validation.BindingResult;
import org.springframework.web.bind.annotation.RequestMapping;
import org.springframework.web.bind.annotation.RequestMethod;
import com.mkyong.common.model.Customer;
@Controller
@RequestMapping("/customer")
public class SignUpController {
@RequestMapping(value = "/signup", method = RequestMethod.POST)
public String addCustomer(@Valid Customer customer, BindingResult result) {
if (result.hasErrors()) {
return "SignUpForm";
} else {
return "Done";
}
}
@RequestMapping(method = RequestMethod.GET)
public String displayCustomerForm(ModelMap model) {
model.addAttribute("customer", new Customer());
return "SignUpForm";
}
}<%@ taglib prefix="form" uri="http://www.springframework.org/tags/form"%>
<html>
<head>
<style>
.error {
color: #ff0000;
}
.errorblock {
color: #000;
background-color: #ffEEEE;
border: 3px solid #ff0000;
padding: 8px;
margin: 16px;
}
</style>
</head>
<body>
<h2>Customer SignUp Form - JSR303 @Valid example</h2>
<form:form method="POST" commandName="customer" action="customer/signup">
<form:errors path="*" cssClass="errorblock" element="div" />
<table>
<tr>
<td>Customer Name :</td>
<td><form:input path="name" /></td>
<td><form:errors path="name" cssClass="error" /></td>
</tr>
<tr>
<td>Customer Age :</td>
<td><form:input path="age" /></td>
<td><form:errors path="age" cssClass="error" /></td>
</tr>
<tr>
<td colspan="3"><input type="submit" /></td>
</tr>
</table>
</form:form>
</body>
</html>可以通过定义“validatemessage.properties”文件,覆盖定义在持久化对象上的错误提示,通常属性文件中属性key为“@Annotation Name.object.fieldname“的形式:
NotEmpty.customer.name = Name is required!
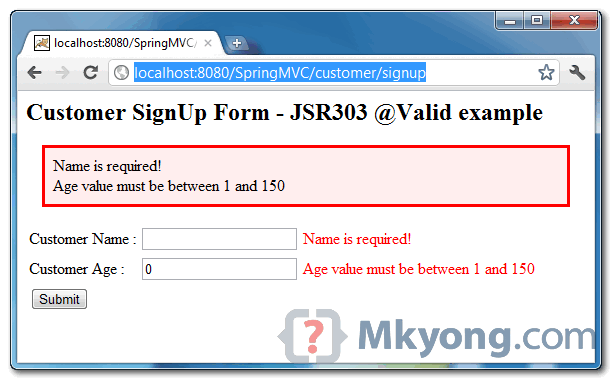
Range.customer.age = Age value must be between 1 and 150代码运行Demo:
SpringMVC-Bean-Validation-JSR303-Example-2.zip