LXC, 是Linux Containers的缩写, 是一种基于linux内核的虚拟解决方案, 它一般运行于操作系统之上,允许你同时运行多个被隔离开的发行版本.
LXC和KVM虚拟化的区别是LXC不去模拟硬件,而是共享相同的内核命名空间,这一点上非常类似于chroot应用.
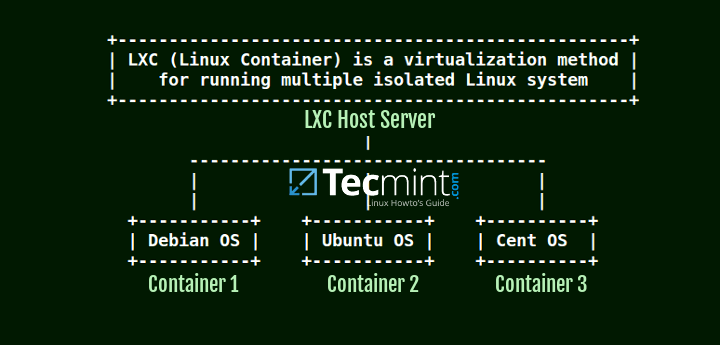
正是由于这一特点, 区别于其他诸如KVM,XEN或者VMWARE的虚拟化解决方案,LXC成为了一种更加快速的虚拟化解决方案.
这篇文章将会引导你如何在一个CentOS/RHEL的linux上安装部署以及运行LXC container.
前提事项
下列的最小化安装的linux操作系统
- CentOS 7 Linux
- RHEL 7
- Fedora 23 Server
Step 1: 在Linux上安装LXC Virtualization
1 . LXC virtualization是在yum的扩展package的epel中提供的,为了使用Epel, 你需要打开一个终端执行如下命令:
# yum install epel-release- 1
2 . 在安装LXC之前,需要确保Perl语言解释器和debootstrap包已经使用如下命令安装完毕.
# yum install debootstrap perl libvirt- 1
3 . 最后,终于可以使用如下命令安装LXC了.
# yum install lxc lxc-templates- 1
4 . 安装完毕之后,确认LXC和libvirt的后台进程是否在运行之中.
# systemctl status lxc.service
# systemctl start lxc.service
# systemctl start libvirtd
# systemctl status lxc.service- 1
- 2
- 3
- 4
示例输出
Check LXC Daemon Status
[root@tecmint ~]# systemctl status lxc.service
lxc.service - LXC Container Initialization and Autoboot Code
Loaded: loaded (/usr/lib/systemd/system/lxc.service; disabled)
Active: inactive (dead)
[root@tecmint ~]# systemctl start lxc.service
[root@tecmint ~]# systemctl status lxc.service
lxc.service - LXC Container Initialization and Autoboot Code
Loaded: loaded (/usr/lib/systemd/system/lxc.service; disabled)
Active: active (exited) since Fri 2016-04-01 02:33:36 EDT; 1min 37s ago
Process: 2250 ExecStart=/usr/libexec/lxc/lxc-autostart-helper start (code=exited, status=0/SUCCESS)
Process: 2244 ExecStartPre=/usr/libexec/lxc/lxc-devsetup (code=exited, status=0/SUCCESS)
Main PID: 2250 (code=exited, status=0/SUCCESS)
Apr 01 02:33:06 mail systemd[1]: Starting LXC Container Initialization and Autoboot Code...
Apr 01 02:33:06 mail lxc-devsetup[2244]: Creating /dev/.lxc
Apr 01 02:33:06 mail lxc-devsetup[2244]: /dev is devtmpfs
Apr 01 02:33:06 mail lxc-devsetup[2244]: Creating /dev/.lxc/user
Apr 01 02:33:36 mail lxc-autostart-helper[2250]: Starting LXC autoboot containers:  [  OK  ]
Apr 01 02:33:36 mail systemd[1]: Started LXC Container Initialization and Autoboot Code.- 1
- 2
- 3
- 4
- 5
- 6
- 7
- 8
- 9
- 10
- 11
- 12
- 13
- 14
- 15
- 16
- 17
- 18
- 19
使用如下命令检查LXC内核虚拟化状态.
# lxc-checkconfig- 1
示例输出
Check LXC Kernel Virtualization Configuration
[root@tecmint ~]# lxc-checkconfig
Kernel configuration not found at /proc/config.gz; searching...
Kernel configuration found at /boot/config-3.10.0-229.el7.x86_64
--- Namespaces ---
Namespaces: enabled
Utsname namespace: enabled
Ipc namespace: enabled
Pid namespace: enabled
User namespace: enabled
Network namespace: enabled
Multiple /dev/pts instances: enabled
--- Control groups ---
Cgroup: enabled
Cgroup clone_children flag: enabled
Cgroup device: enabled
Cgroup sched: enabled
Cgroup cpu account: enabled
Cgroup memory controller: enabled
Cgroup cpuset: enabled
--- Misc ---
Veth pair device: enabled
Macvlan: enabled
Vlan: enabled
Bridges: enabled
Advanced netfilter: enabled
CONFIG_NF_NAT_IPV4: enabled
CONFIG_NF_NAT_IPV6: enabled
CONFIG_IP_NF_TARGET_MASQUERADE: enabled
CONFIG_IP6_NF_TARGET_MASQUERADE: enabled
CONFIG_NETFILTER_XT_TARGET_CHECKSUM: enabled
--- Checkpoint/Restore ---
checkpoint restore: missing
CONFIG_FHANDLE: enabled
CONFIG_EVENTFD: enabled
CONFIG_EPOLL: enabled
CONFIG_UNIX_DIAG: enabled
CONFIG_INET_DIAG: enabled
CONFIG_PACKET_DIAG: enabled
CONFIG_NETLINK_DIAG: enabled
File capabilities: enabled
Note : Before booting a new kernel, you can check its configuration
usage : CONFIG=/path/to/config /usr/bin/lxc-checkconfig- 1
- 2
- 3
- 4
- 5
- 6
- 7
- 8
- 9
- 10
- 11
- 12
- 13
- 14
- 15
- 16
- 17
- 18
- 19
- 20
- 21
- 22
- 23
- 24
- 25
- 26
- 27
- 28
- 29
- 30
- 31
- 32
- 33
- 34
- 35
- 36
- 37
- 38
- 39
- 40
- 41
- 42
- 43
Step 2: 在Linux上创建和管理LXC容器
5 . 使用如下命令列出已经安装到你的系统之中可用的LXC模板容器.
# ls -alh /usr/share/lxc/templates/- 1
List LXC Templates Containers
total 344K
drwxr-xr-x. 2 root root 4.0K Apr  1 02:32 .
drwxr-xr-x. 6 root root  100 Apr  1 02:32 ..
-rwxr-xr-x. 1 root root  11K Nov 15 10:19 lxc-alpine
-rwxr-xr-x. 1 root root  14K Nov 15 10:19 lxc-altlinux
-rwxr-xr-x. 1 root root  11K Nov 15 10:19 lxc-archlinux
-rwxr-xr-x. 1 root root 9.7K Nov 15 10:19 lxc-busybox
-rwxr-xr-x. 1 root root  29K Nov 15 10:19 lxc-centos
-rwxr-xr-x. 1 root root  11K Nov 15 10:19 lxc-cirros
-rwxr-xr-x. 1 root root  17K Nov 15 10:19 lxc-debian
-rwxr-xr-x. 1 root root  18K Nov 15 10:19 lxc-download
-rwxr-xr-x. 1 root root  49K Nov 15 10:19 lxc-fedora
-rwxr-xr-x. 1 root root  28K Nov 15 10:19 lxc-gentoo
-rwxr-xr-x. 1 root root  14K Nov 15 10:19 lxc-openmandriva
-rwxr-xr-x. 1 root root  14K Nov 15 10:19 lxc-opensuse
-rwxr-xr-x. 1 root root  35K Nov 15 10:19 lxc-oracle
-rwxr-xr-x. 1 root root  12K Nov 15 10:19 lxc-plamo
-rwxr-xr-x. 1 root root 6.7K Nov 15 10:19 lxc-sshd
-rwxr-xr-x. 1 root root  23K Nov 15 10:19 lxc-ubuntu
-rwxr-xr-x. 1 root root 12K Nov 15 10:19 lxc-ubuntu-cloud- 1
- 2
- 3
- 4
- 5
- 6
- 7
- 8
- 9
- 10
- 11
- 12
- 13
- 14
- 15
- 16
- 17
- 18
- 19
- 20
- 21
6 . 创建一个LXC容器的过程非常简单. 下面这条语句就可用于创建一个新的容器.
# lxc-create -n container_name -t container_template- 1
就像下面的引用的摘要信息中看到的那样,我们将创建一个新的名为mydeb的容器,而这个容器基于从LXC仓库中pull下来的模板而创建的debain的。
Creating LXC Container
[root@tecmint ~]# lxc-create -n mydcb -t debian
debootstrap is /usr/sbin/debootstrap
Checking cache download in /var/cache/lxc/debian/rootfs-jessie-amd64 ...
Downloading debian minimal ...
W: Cannot check Release signature; keyring file not available /usr/share/keyrings/debian-archive-keyring.gpg
I: Retrieving Release
I: Retrieving Packages
I: Validating Packages
I: Resolving dependencies of required packages...
I: Resolving dependencies of base packages...
...
...- 1
- 2
- 3
- 4
- 5
- 6
- 7
- 8
- 9
- 10
- 11
- 12
- 13
7 . 当一系列基本的依赖组建和package都被下载和安装到你的系统之后,容器也会被创建出来。当创建过程结束,你的缺省的root的用户密码将会被显示。为了安全考虑,一旦登录到容器控制台之后请修改密码。
are supported and installed on your system.
perl: warning: Falling back to the standard locale ("C").
Failed to read /proc/cmdline. Ignoring: No such file or directory
invoke-rc.d: policy-rc.d denied execution of start.
Timezone in container is not configured. Adjust it manually.
Root password is 'root', please change !
Generating locales (this might take a while)...
en_IN.en_IN...character map file `en_IN' not found: No such file or directory
/usr/share/i18n/locales/en_IN:55: LC_MONETARY: unknown character in field `currency_symbol'
done
Generation complete.- 1
- 2
- 3
- 4
- 5
- 6
- 7
- 8
- 9
- 10
- 11
8 . 现在你可以使用lxc-ls去列出你的容器,以及使用lxc-info去获取启动中和停止了的容器信息了。
为了启动一个新的容器在后台 (指定-d选项运行) ,使用如下命令:
# lxc-start -n mydeb -d- 1
9 . 当容器被启动之后,你可以使用lxc-ls –active 命令列出正在运行的容器以及取得详细的正在运行的容器的信息。
# lxc-ls --active- 1
10 . 为了能够登陆到容器的控制台,需要指定一个正在运行的容器名使用lxc-console命令。使用root和密码进行登陆,密码缺省则是由lxc的超级用户所创建的。
一旦登陆到容器之中,你可以运行几条命令确认详细信息。通过察看/etc/issue.net文件内容确认详细信息,使用passwd命令改变root的密码,使用ifconfig来确认网络接口的详细信息。
# lxc-console -n mydeb
# cat /etc/issue.net
# ifconfig
# passwd- 1
- 2
- 3
- 4
示例输出
Connect to LXC Container
[root@tecmint~]# lxc-console -n mydcb
Connected to tty 1
Type <Ctrl+a q> to exit the console, <Ctrl+a Ctrl+a> to enter Ctrl+a itself
Debian GNU/Linux 8 mydcb tty1
mydcb login: root
Password:
Last login: Fri Apr 1 07:39:08 UTC 2016 on console
Linux mydcb 3.10.0-229.el7.x86_64 #1 SMP Fri Mar 6 11:36:42 UTC 2015 x86_64
The programs included with the Debian GNU/Linux system are free software;
the exact distribution terms for each program are described in the
individual files in /usr/share/doc/*/copyright.
Debian GNU/Linux comes with ABSOLUTELY NO WARRANTY, to the extent
permitted by applicable law.
root@mydcb:~# cat /etc/issue.net
Debian GNU/Linux 8
root@mydcb:~# ifconfig
eth0 Link encap:Ethernet HWaddr 00:16:3e:d9:21:d7
inet6 addr: fe80::216:3eff:fed9:21d7/64 Scope:Link
UP BROADCAST RUNNING MULTICAST MTU:1500 Metric:1
RX packets:107 errors:0 dropped:0 overruns:0 frame:0
TX packets:8 errors:0 dropped:0 overruns:0 carrier:0
collisions:0 txqueuelen:1000
RX bytes:5796 (5.6 KiB) TX bytes:648 (648.0 B)
lo Link encap:Local Loopback
inet addr:127.0.0.1 Mask:255.0.0.0
inet6 addr: ::1/128 Scope:Host
UP LOOPBACK RUNNING MTU:65536 Metric:1
RX packets:0 errors:0 dropped:0 overruns:0 frame:0
TX packets:0 errors:0 dropped:0 overruns:0 carrier:0
collisions:0 txqueuelen:0
RX bytes:0 (0.0 B) TX bytes:0 (0.0 B)
root@mydcb:~# passwd root
Enter new UNIX password:
Retype new UNIX password:
passwd: password updated successfully- 1
- 2
- 3
- 4
- 5
- 6
- 7
- 8
- 9
- 10
- 11
- 12
- 13
- 14
- 15
- 16
- 17
- 18
- 19
- 20
- 21
- 22
- 23
- 24
- 25
- 26
- 27
- 28
- 29
- 30
- 31
- 32
- 33
- 34
- 35
- 36
11 . 敲击Ctrl+a然后q,就可以从容器控制台中退出而回到宿主机控制台上。
而通过执行如下命令这可以停止一个正在运行中的容器。
# lxc-stop -n mydcb- 1
12 . 为了创建一个基于Ubuntu模板的LXC容器, 你需要进入到/usr/sbin/目录下并创建如下debootstrap链接.
# cd /usr/sbin
# ln -s debootstrap qemu-debootstrap- 1
- 2
13 . 使用vi编辑器编辑qemu-debootstrap文件并按照如下方式替换两行MIRROR的行的信息:
DEF_MIRROR=”http://mirrors.kernel.org/ubuntu”
DEF_HTTPS_MIRROR=”https://mirrors.kernel.org/ubuntu”- 1
- 2
详细信息可以参看如下:
....
MAKE_TARBALL=""
EXTRACTOR_OVERRIDE=""
UNPACK_TARBALL=""
ADDITIONAL=""
EXCLUDE=""
VERBOSE=""
CERTIFICATE=""
CHECKCERTIF=""
PRIVATEKEY=""
DEF_MIRROR=”http://mirrors.kernel.org/ubuntu”
DEF_HTTPS_MIRROR=”https://mirrors.kernel.org/ubuntu”- 1
- 2
- 3
- 4
- 5
- 6
- 7
- 8
- 9
- 10
- 11
- 12
14 . 最后,使用相同的lxc-create命令创建一个新的基于Ubuntu模板LXC容器。
一旦创建Ubuntu容器的过程结束,显示登陆信息的信心将会如被显示在屏幕上。
# lxc-create -n myubuntu -t ubuntu- 1
示例输出
Create LXC Ubuntu Container
Checking cache download in /var/cache/lxc/precise/rootfs-amd64 ...
Installing packages in template: ssh,vim,language-pack-en
Downloading ubuntu precise minimal ...- 1
- 2
- 3
- 4
15 . 为了创建一个特定的基于本地模板的容器,需要按照如下语法格式进行创建:
# lxc-create -n container_name -t container_template -- -r distro_release -a distro_architercture - 1
比如创建一个amd64系统的debian wheezy 容器可以使用如下命令:
# lxc-create -n mywheezy -t debian -- -r wheezy -a amd64- 1
示例输出
Create LXC Container Based on Distro Architecture
debootstrap is /sbin/debootstrap
Checking cache download in /var/cache/lxc/debian/rootfs-wheezy-amd64 ...
Downloading debian minimal ...
W: Cannot check Release signature; keyring file not available /usr/share/keyrings/debian-archive-keyring.gpg
I: Retrieving Release
I: Retrieving Packages
I: Validating Packages
I: Resolving dependencies of required packages...
I: Resolving dependencies of base packages...
I: Found additional required dependencies: insserv libbz2-1.0 libdb5.1 libsemanage-common libsemanage1 libslang2 libustr-1.0-1
I: Found additional base dependencies: adduser debian-archive-keyring gnupg gpgv isc-dhcp-common libapt-pkg4.12 libbsd0 libclass-isa-perl libedit2 libgdbm3 libgssapi-krb5-2 libk5crypto3 libkeyutils1 libkrb5-3 libkrb5support0 libncursesw5 libprocps0 libreadline6 libssl1.0.0 libstdc++6 libswitch-perl libusb-0.1-4 libwrap0 openssh-client perl perl-modules procps readline-common
I: Checking component main on http://http.debian.net/debian...
I: Retrieving libacl1 2.2.51-8
I: Validating libacl1 2.2.51-8
I: Retrieving adduser 3.113+nmu3
I: Validating adduser 3.113+nmu3
I: Retrieving apt 0.9.7.9+deb7u7
I: Validating apt 0.9.7.9+deb7u7
I: Retrieving libapt-pkg4.12 0.9.7.9+deb7u7
I: Validating libapt-pkg4.12 0.9.7.9+deb7u7
I: Retrieving libattr1 1:2.4.46-8
I: Validating libattr1 1:2.4.46-8
I: Retrieving base-files 7.1wheezy9
I: Validating base-files 7.1wheezy9
I: Retrieving base-passwd 3.5.26
...- 1
- 2
- 3
- 4
- 5
- 6
- 7
- 8
- 9
- 10
- 11
- 12
- 13
- 14
- 15
- 16
- 17
- 18
- 19
- 20
- 21
- 22
- 23
- 24
- 25
- 26
- 27
16 . 从LXC仓库中下载通用模板,然后基于此模板创建容器。
# lxc-create -n mycentos6 -t download -- -d centos -r 6 -a i386- 1
lxc-create 命令行的其他选项:
-n = name
-t = template
-d = distibution
-a = arch
-r = release- 1
- 2
- 3
- 4
- 5
17 . 指定容器名可以使用lxc-destroy命令删除容器。
# lxc-destroy -n mywheezy- 1
18 . 使用 lxc-clone 命令可以clone一个已经存在的容器:
# lxc-clone mydeb mydeb-clone- 1
19 . 所有创建的容器都存放在 /var/lib/lxc/ 目录. 如果因为某些特定原因,你需要手动地调整容器设定你需要编辑每个容器目录的设定文件。
# ls /var/lib/lxc- 1
这些就是你需要了解的关于LXC相关的最基础的信息。
原文: http://www.tecmint.com/install-create-run-lxc-linux-containers-on-centos/
再分享一下我老师大神的人工智能教程吧。零基础!通俗易懂!风趣幽默!还带黄段子!希望你也加入到我们人工智能的队伍中来!https://www.cnblogs.com/captainbed