NFS概念:
NFS(Network File System)即网络文件系统,是FreeBSD支持的文件系统中的一种,它允许网络中的计算机之间通过TCP/IP网络共享资源。在NFS的应用中,本地NFS的客户端应用可以透明地读写位于远端NFS服务器上的文件,就像访问本地文件一样。
NFS的优点:
(1)节省本地存储空间,将常用的数据存放在一台NFS服务器上且可以通过网络访问,那么本地终端将可以减少自身存储空间的使用。

(2)用户不需要在网络中的每个机器上都建有Home目录,Home目录可以放在NFS服务器上且可以在网络上被访问使用。

(3)一些存储设备CDROM和Zip(一种高储存密度的磁盘驱动器与磁盘)等都可以在网络上被别的机器使用。这可以减少整个网络上可移动介质设备的数量。
一、配置实验主机(客户端、服务端)
shareserver(ip=172.25.254.227)———服务端
client	   (ip=172.25.254.127)———客户端
下载nfs server服务
服务端:
[root@shareserver ~]# yum install nfs-ufils -y      # 下载安装nfs服务
[root@shareserver ~]# systemctl start nfs           # 开启nfs服务
客户端:
[root@client ~]# yum install nfs-utils -y        # 下载安装nfs服务
[root@client ~]# showmount -e 172.25.254.227     # 识别共享
Export list for 172.25.254.227:
二、相关命令介绍
(1)showmount 参数 nfs_server(IP)
    -e nfs_server(IP) 查看nfs提供共享的文件系统
    -a nfs_server 查看nfs服务器所有被挂载的文件系统及其挂载的客户端对应关系列表
    -d nfs_server 显示nfs服务器所有导出的文件系统
(2)exportfs 参数:
    -a:跟-r或-u同时使用,表示重新挂载所有文件系统或取消导出所有文件系统
    -r:重新导出
    -u:取消导出
    -v:显示详细信息
(3)关于NFS共享的常用参数:
ro                       # 只读访问
rw                       # 读写访问
sync                     # 所有数据在请求时写入共享
async                    # NFS在写入数据前可以相应请求
secure                   # NFS通过1024以下的安全TCP/IP端口发送
insecure                 # NFS通过1024以上的端口发送
wdelay                   # 如果多个用户要写入NFS目录,则归组写入(默认)
no_wdelay                # 如果多个用户要写入NFS目录,则立即写入,当使用async时,无需此设置。
hide                     # 在NFS共享目录中不共享其子目录
no_hide                  # 共享NFS目录的子目录
subtree_check            # 如果共享/usr/bin之类的子目录时,强制NFS检查父目录的权限(默认)
no_subtree_check         # 和上面相对,不检查父目录权限
all_squash               # 共享文件的UID和GID映射匿名用户
no_all_squash            # 保留共享文件的UID和GID(默认)
root_squash              # root用户的所有请求映射成如anonymous用户一样的权限(默认)
no_root_squash           # root用户具有根目录的完全管理访问权限
anonuid=xxx              # 指定NFS服务器/etc/passwd文件中匿名用户的UID
anongid=xxx              # 指定NFS服务器/etc/passwd文件中匿名用户的GID
三、实验实操
格式:
/共享目录 用户(共享参数,共享参数·····)
例如:/westos *(sync,rw) #westos目录对所有用户读写共享。
相关参数:
sync ——–> 同步目录
rw ———>读写
ro ———>只读
no_root_squash ——-> 将用户转换为root用户
anonuid=1000,anongid=1000 ——->将用户转换为特定组用
(1) ro ———>只读
服务端:
[root@shareserver ~]# vim /etc/exports     # 打开
[root@shareserver ~]# cat /etc/exports
/smbfile  *(sync,ro)               # 只读分享/mnt目录,sync表示同步目录内容,*表示所有用户。
[root@shareserver ~]# exportfs -rv   #刷新
exporting *:/smbfile
客户端:
[root@client mnt]# showmount -e 172.25.254.227
Export list for 172.25.254.227:
/smbfile * #此时同步/smbfile目录
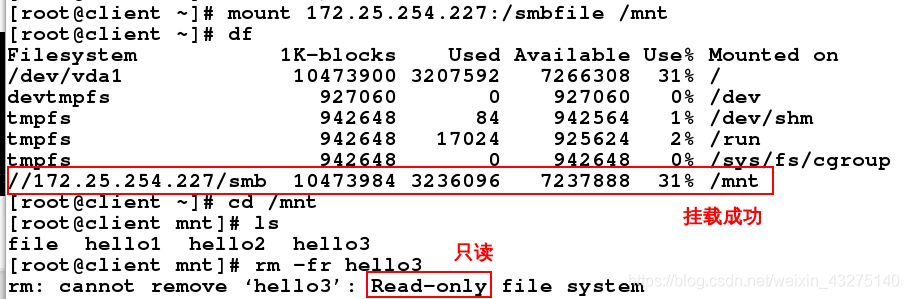
[root@client ~]# mount 172.25.254.227:/smbfile /mnt #挂载目录
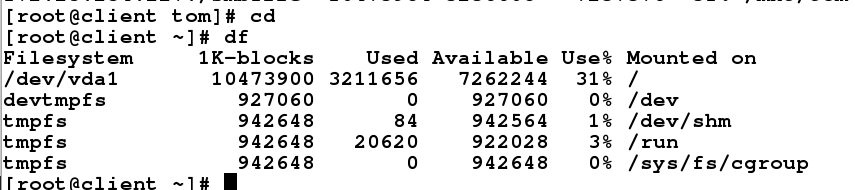
[root@client ~]# df
Filesystem 1K-blocks Used Available Use% Mounted on
/dev/vda1 10473900 3207592 7266308 31% /
devtmpfs 927060 0 927060 0% /dev
tmpfs 942648 84 942564 1% /dev/shm
tmpfs 942648 17024 925624 2% /run
tmpfs 942648 0 942648 0% /sys/fs/cgroup
//172.25.254.227/smb 10473984 3236096 7237888 31% /mnt #挂载成功
[root@client ~]# cd /mnt
[root@client mnt]# ls
file hello1 hello2 hello3
[root@client mnt]# rm -fr hello3 # 删除失败
rm: cannot remove ‘hello3’: Read-only file system
(2) rw ———>读写
服务端:
[root@shareserver ~]# vim /etc/exports # 打开
[root@shareserver ~]# cat /etc/exports
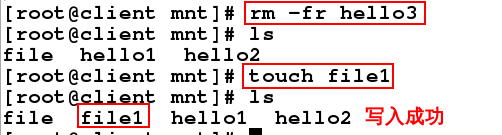
/smbfile *(sync,rw) # #允许读写
[root@shareserver ~]# systemctl restart nfs # 重启年nfs服务

客户端:
[root@client mnt]# ls
file  hello1  hello2  hello3
[root@client mnt]# rm -fr hello3   #删除成功
[root@client mnt]# ls
file  hello1  hello2
[root@client mnt]# touch file1
[root@client mnt]# ls
file  file1  hello1  hello2
!!!可能出现的错误:删除被阻止,是因为/smbfile目录本身权限,所以给该目录加权限写入权限 chmod +w /smbfile或者直接777
(3) no_root_squash ——-> 将用户转换为root用户
服务端:
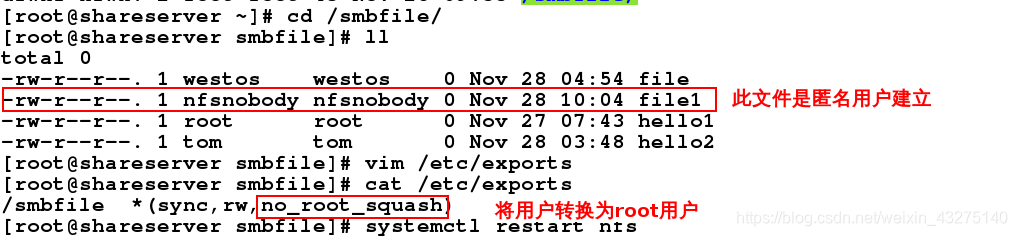
[root@shareserver ~]# cd /smbfile/
[root@shareserver smbfile]# ll
total 0
-rw-r–r--. 1 westos westos 0 Nov 28 04:54 file
-rw-r–r--. 1 nfsnobody nfsnobody 0 Nov 28 10:04 file1 #此时显示的是匿名用户建立
-rw-r–r--. 1 root root 0 Nov 27 07:43 hello1
-rw-r–r--. 1 tom tom 0 Nov 28 03:48 hello2
[root@shareserver smbfile]# vim /etc/exports
[root@shareserver smbfile]# cat /etc/exports
/smbfile *(sync,rw,no_root_squash)
[root@shareserver smbfile]# systemctl restart nfs
客户端:
[root@client mnt]# touch file2
[root@client mnt]# ll
total 0
-rw-r--r--. 1      1002      1002 0 Nov 28 04:54 file
-rw-r--r--. 1 nfsnobody nfsnobody 0 Nov 28 10:04 file1
-rw-r--r--. 1 root      root      0 Nov 28 10:23 file2        # 新建的file2将用户转换为root用户
-rw-r--r--. 1 root      root      0 Nov 27 07:43 hello1
-rw-r--r--. 1      1001      1001 0 Nov 28 03:48 hello2

服务端:

(4)anonuid=1000,anongid=1000 ——->将用户转换为特定组用户
服务端:
[root@shareserver smbfile]# id student
uid=1000(student) gid=1000(student) groups=1000(student),1001(tom)
[root@shareserver smbfile]# vim /etc/exports
[root@shareserver smbfile]# cat /etc/exports
/smbfile  *(sync,rw,anonuid=1000,anongid=1000)    #将用户转换为特定组用户(student)
将客户端的用户映射到指定的本地id为1000的用户,用户组映射到指定的本地id组为1000的用户
[root@shareserver smbfile]# systemctl restart nfs
客户端:
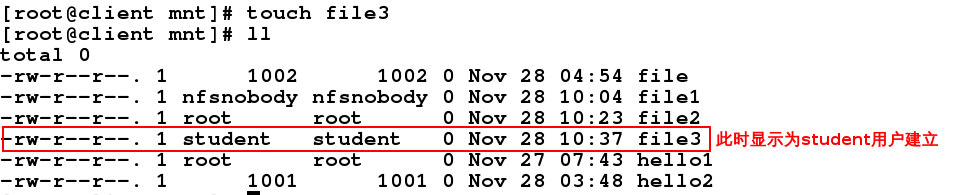
[root@client mnt]# touch file3
[root@client mnt]# ll
total 0
-rw-r--r--. 1      1002      1002 0 Nov 28 04:54 file
-rw-r--r--. 1 nfsnobody nfsnobody 0 Nov 28 10:04 file1
-rw-r--r--. 1 root      root      0 Nov 28 10:23 file2
-rw-r--r--. 1 student   student   0 Nov 28 10:37 file3  #此时显示为student用户建立
-rw-r--r--. 1 root      root      0 Nov 27 07:43 hello1
-rw-r--r--. 1      1001      1001 0 Nov 28 03:48 hello2
(5) 指定特定用户访问
服务端:
[root@shareserver smbfile]# vim /etc/exports
[root@shareserver smbfile]# cat /etc/exports
/smbfile  *(sync,rw,anonuid=1000,anongid=1000)
/mnt 172.25.254.0/24(sync) 172.25.254.127(sync,rw)
#允许所有172.25.254网段的用户访问目录,允许172.25.254.127主机进行读写操作
[root@shareserver smbfile]# chmod 777 /mnt
[root@shareserver smbfile]# systemctl restart nfs
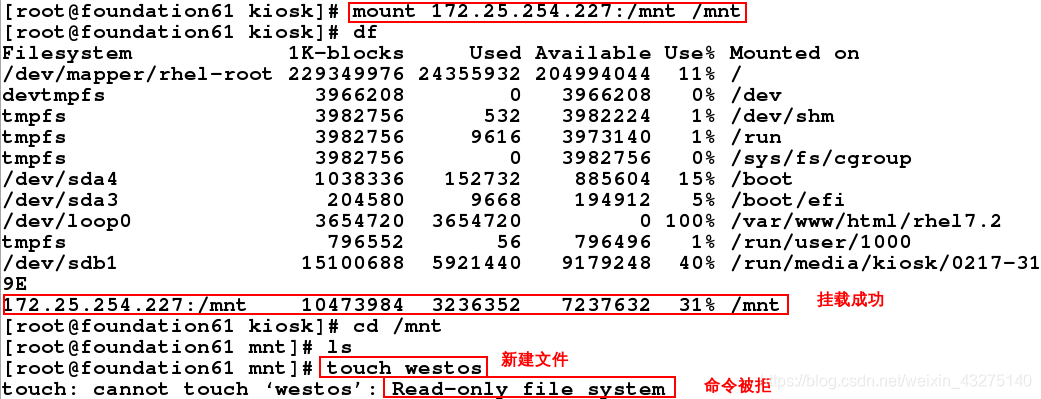
Ip为172.25.254.61的用户连接:
[root@foundation61 kiosk]# mount 172.25.254.227:/mnt /mnt
[root@foundation61 kiosk]# df
Filesystem            1K-blocks     Used Available Use% Mounted on
/dev/mapper/rhel-root 229349976 24355932 204994044  11% /
devtmpfs                3966208        0   3966208   0% /dev
tmpfs                   3982756      532   3982224   1% /dev/shm
tmpfs                   3982756     9616   3973140   1% /run
tmpfs                   3982756        0   3982756   0% /sys/fs/cgroup
/dev/sda4               1038336   152732    885604  15% /boot
/dev/sda3                204580     9668    194912   5% /boot/efi
/dev/loop0              3654720  3654720         0 100% /var/www/html/rhel7.2
tmpfs                    796552       56    796496   1% /run/user/1000
/dev/sdb1              15100688  5921440   9179248  40% /run/media/kiosk/0217-319E
172.25.254.227:/mnt    10473984  3236352   7237632  31% /mnt
[root@foundation61 kiosk]# cd /mnt
[root@foundation61 mnt]# touch westos
touch: cannot touch ‘westos’: Read-only file system       #  命令被阻止
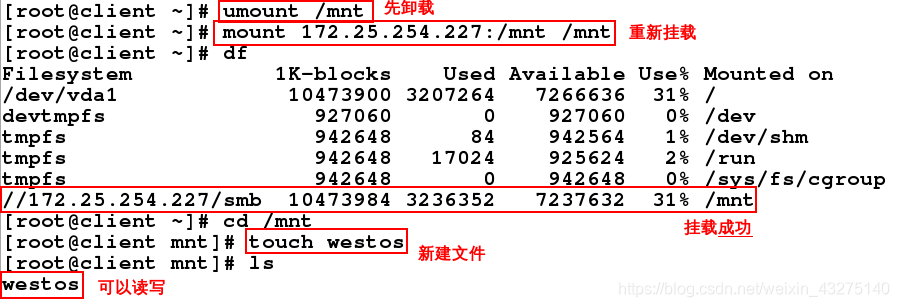
Ip为172.25.254.127的用户连接:
[root@client ~]# umount /mnt
[root@client ~]# mount 172.25.254.227:/mnt /mnt
[root@client ~]# df
Filesystem           1K-blocks    Used Available Use% Mounted on
/dev/vda1             10473900 3207264   7266636  31% /
devtmpfs                927060       0    927060   0% /dev
tmpfs                   942648      84    942564   1% /dev/shm
tmpfs                   942648   17024    925624   2% /run
tmpfs                   942648       0    942648   0% /sys/fs/cgroup
//172.25.254.227/smb  10473984 3236352   7237632  31% /mnt
[root@client ~]# cd /mnt
[root@client mnt]# touch westos
[root@client mnt]# ls
westos         #可以读写
四、AUTOFS(利用 autofs管理nfs服务)
1、自动挂载autofs服务
客户端远程访问nfs服务器端的文件,需要挂载使用,但是当我们在不需要使用的时候,依然挂载的文件系统就会造成资源的浪费,或者在不用的时候卸载,在用的时候挂载,这样也是非常麻烦的,为了解决上述问题,我们可以在客户端下载配置autofs工具。
在客户端:
[root@client mnt]# yum install -y autofs   #安装autofs
[root@client mnt]# ls -ld /net         # 服务没开启之前,这个目录不存在
ls: cannot access /net: No such file or directory
[root@client mnt]# systemctl start autofs  # 开启autofs服务
[root@client mnt]# ls -ld /net         # 服务开启之后,目录自动生成
drwxr-xr-x. 2 root root 0 Nov 28 11:10 /net
[root@client mnt]# cd /net/
[root@client net]# ls
[root@client net]# cd 172.25.254.227
[root@client 172.25.254.227]# ls
mnt  smbfile
[root@client 172.25.254.227]# cd smbfile/
[root@client smbfile]# ls
file  file1  file2  file3  hello1  hello2
[root@client smbfile]# pwd
/net/172.25.254.227/smbfile
[root@client smbfile]# df      # 进入到共享目录之后,可以看到自动挂载

[root@client smbfile]# cd   # 退出去之后,默认300秒之后自动卸载
[root@client ~]# vim /etc/sysconfig/autofs    # 该文件修改自动卸载时间
14       TIMEOUT=10
[root@client ~]# systemctl restart autofs.service
[root@client ~]# df    # 等待10秒,再次查看挂载情况

[root@client ~]# cd /net/172.25.254.227/smbfile/ # 再次测试

[root@client smbfile]# cd
[root@client ~]# df        # 等待10秒,再次查看挂载情况
10秒后自动卸载
2、设定自动挂载点的位置
[root@client ~]# vim /etc/auto.master # 编辑策略文件,自定义挂载点,写入最终挂载点的上层目录以及子文件
[root@client ~]# ls -l /etc/auto.pub         # 指定的子文件是不存在的,需要自己建立
ls: cannot access /etc/auto.pub: No such file or directory
[root@client ~]# vim /etc/auto.pub      # 子文件里写的是最终挂载点和挂载参数
[root@client ~]# ll /etc/auto.pub
-rw-r--r--. 1 root root 32 Nov 28 11:40 /etc/auto.pub
[root@client ~]# systemctl restart autofs.service
[root@client ~]# cd /mnt/tom  # 进入到共享目录
[root@client tom]# ls
file  file1  file2  file3  hello1  hello2
[root@client tom]# pwd
/mnt/tom
[root@client tom]# df    ## 自动挂载

[root@client tom]# cd
[root@client ~]# df     # 等待10秒,自动卸载