版权声明:本文为博主原创文章,未经博主允许不得转载。 https://blog.csdn.net/a519395243/article/details/80311947
python3 图片转化为字符,并转化成可视化操作工具。
然后生成EXE文件,发给妹子,又装逼成功~
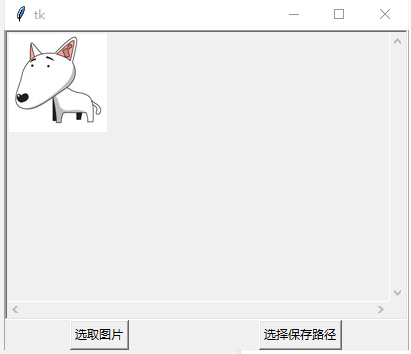
先上效果图
运行 python 文件,然后上传一张小图:
生成txt 的文件:

源码:
from tkinter import *
from tkinter import filedialog
from tkinter.filedialog import askdirectory
from PIL import Image, ImageTk
import tkinter.messagebox

if __name__ == "__main__":
    root = Tk()
    File=''

    frame = Frame(root, bd=2, relief=SUNKEN)
    frame.grid_rowconfigure(0, weight=1)
    frame.grid_columnconfigure(0, weight=1)
    xscroll = Scrollbar(frame, orient=HORIZONTAL)
    xscroll.grid(row=1, column=0, sticky=E+W)
    yscroll = Scrollbar(frame)
    yscroll.grid(row=0, column=1, sticky=N+S)
    canvas = Canvas(frame, bd=0, xscrollcommand=xscroll.set, yscrollcommand=yscroll.set)
    canvas.grid(row=0, column=0, sticky=N+S+E+W)
    xscroll.config(command=canvas.xview)
    yscroll.config(command=canvas.yview)
    frame.pack(fill=BOTH,expand=1)


    # 开始转化为字符串
    codeLib = '''@B%8&WM#*oahkbdpqwmZO0QLCJUYXzcvunxrjft/\|()1{}[]?-_+~<>i!lI;:,"^`'. '''#生成字符画所需的字符集
    count = len(codeLib)
    def printcoords():
        global File
        File = filedialog.askopenfilename(parent=root, initialdir="C:/",title='Choose an image.')
        filename = ImageTk.PhotoImage(Image.open(File))
        canvas.image = filename  # <--- keep reference of your image
        canvas.create_image(0,0,anchor='nw',image=filename)

    def check():
        if not File:
            tkinter.messagebox.showinfo('错误','还没上传图片')
        else:
            path = askdirectory()
            if path:
                fp = open(File,'rb')
                image_file = Image.open(fp)
                image_file=image_file.resize((int(image_file.size[0]*0.6), int(image_file.size[1]*0.4)))#调整图片大小
                tmp = open(path+'/image.txt','w')
                tmp.write(transform1(image_file))
                tmp.close()
                tkinter.messagebox.showinfo('成功','已成功保存为txt文件')


    def transform1(image_file):
        image_file = image_file.convert("L")#转换为黑白图片,参数"L"表示黑白模式
        codePic = ''
        for h in range(0,image_file.size[1]):  #size属性表示图片的分辨率,'0'为横向大小,'1'为纵向
            for w in range(0,image_file.size[0]):
                gray = image_file.getpixel((w,h)) #返回指定位置的像素,如果所打开的图像是多层次的图片,那这个方法就返回一个元组
                codePic = codePic + codeLib[int(((count-1)*gray)/256)]#建立灰度与字符集的映射
            codePic = codePic+'\r\n'
        return codePic

    def transform2(image_file):
        codePic = ''
        for h in range(0,image_file.size[1]):
            for w in range(0,image_file.size[0]):
                g,r,b = image_file.getpixel((w,h))
                gray = int(r* 0.299+g* 0.587+b* 0.114)
                codePic = codePic + codeLib[int(((count-1)*gray)/256)]
            codePic = codePic+'\r\n'
        return codePic


    Button(root,text='选取图片',command=printcoords).pack(side=LEFT,expand=YES,fill=Y)
    Button(root,text='选择保存路径',command=check).pack(side=LEFT,expand=YES,fill=Y)
    root.mainloop()
然后自己再转化成exe文件,发给妹子玩

github: https://github.com/a519395243/Python_Item/