邮箱报警
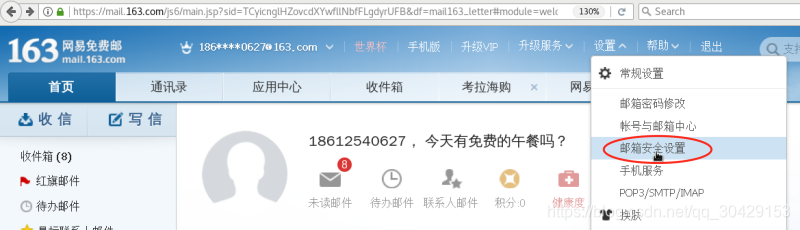
1.注册163邮箱
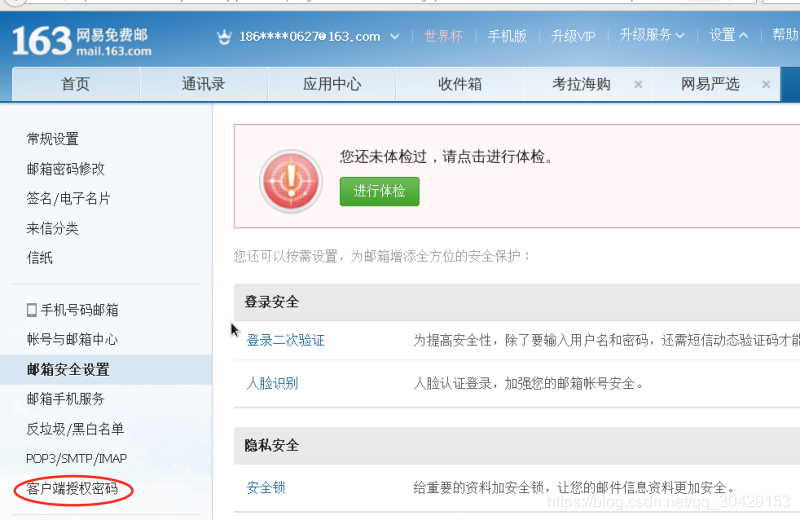
2.登陆网页邮箱设置客户端授权密码
服务端
安装MUA软件:mailx
# yum install mailx -y
# mail -V
12.5 7/5/10
# mailx -V
12.5 7/5/10
配置公网邮箱信息:
# vim /etc/mail.rc 追加以下内容
set [email protected](邮箱地址)
set smtp=smtp.163.com(smtp服务器)
set [email protected](用户名)
set smtp-auth-password=yanqiang20182018(邮箱密码-这里是授权码)
set smtp-auth=login
使用mailx发邮件的方式:
方式1:mailx -s "邮件标题" 收件箱Email < 包含正文的文件
方式2:cat 包含正文的文件 | mailx -s "邮件标题" 收件箱Email
方式3:echo "正文内容" | mailx -s "邮件标题" 收件箱Email
方式4:mailx -s "邮件标题" 收件箱Email,回车按CTRL+D发送
手动发送邮件测试:
# mailx -v -s 'hello' '收件人@163.com'
手写邮件内容 (回车,然后ctrl+d正常结束)
EOT
或者,将邮件内容放到一个文件中content.txt
# cat content.txt | mailx -v -s ‘hello’ ‘[email protected]’
zabbix添加邮件报警功能:
配置 zabbix 的邮件报警功能需要以下三个角色的参与。
1、 示警媒体(Media)
2、 触发器(Triggers)
3、 动作(Action)
示警媒体的配置:
点击 管理->报警媒介类型->创建媒体类型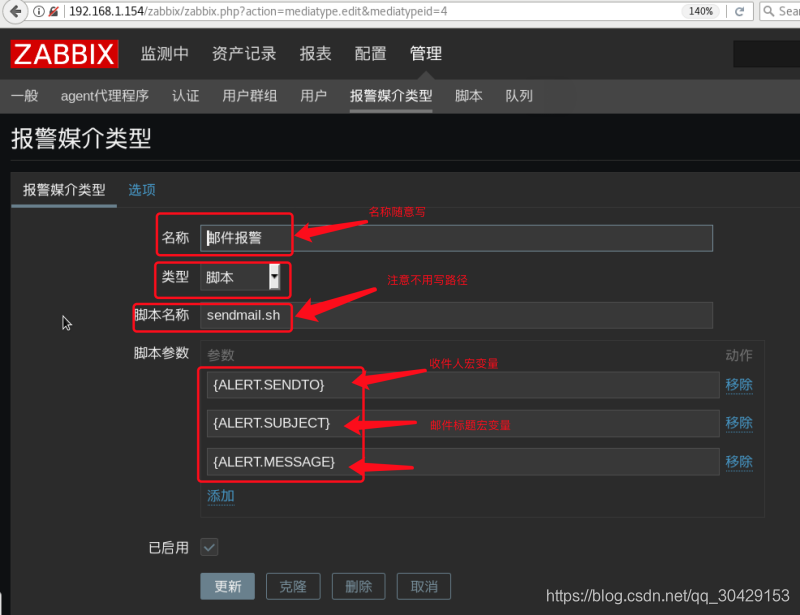
{ALERT.SENDTO} //照填,收件人变量
{ALERT.SUBJECT} //照填,邮件主题变量,变量值来源于‘动作’中的‘默认接收人’
{ALERT.MESSAGE} //照填,邮件正文变量,变量值来源于‘动作’中的‘默认信息’
修改zabbix服务端配置文件&编写脚本:
指定脚本的存储路径:
#vim /etc/zabbix/zabbix_server.conf
AlertScriptsPath=/usr/lib/zabbix/alertscripts
编写邮件脚本:
#cd /usr/lib/zabbix/alertscripts
#vim sendmail.sh
#!/bin/sh
#export.UTF-8
echo "$3" | sed s/'\r'//g | mailx -s "$2" $1
修改权限:
#chmod u+x sendmail.sh && chown zabbix.zabbix sendmail.sh
点击管理----->用户----->admin---->报警媒介----->添加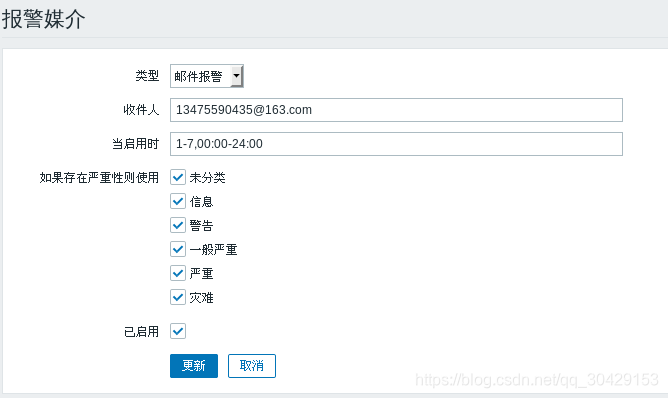
配置监控项触发器
动作的配置:
点击:配置->动作->创建动作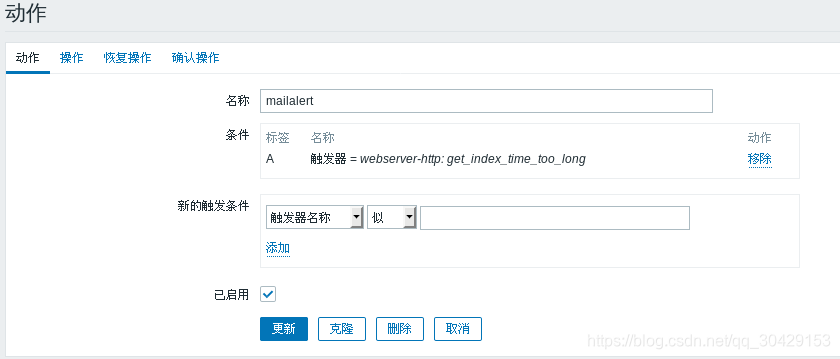
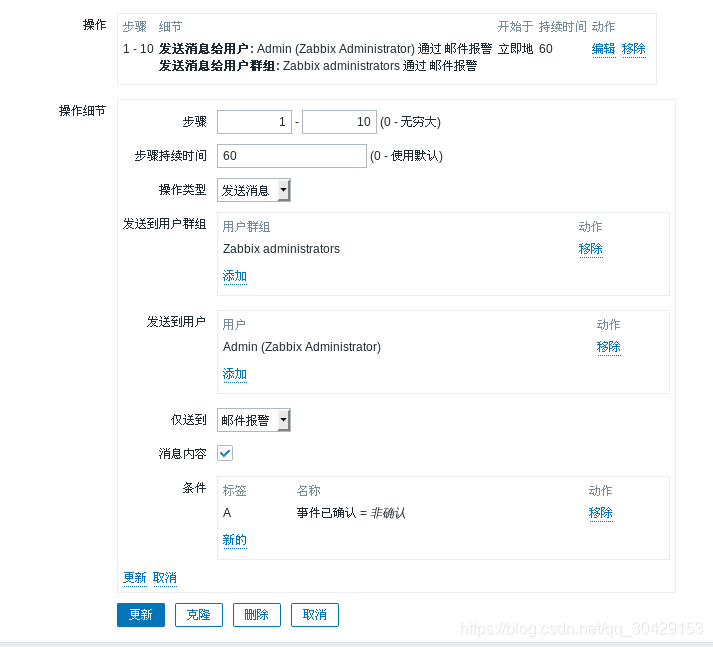
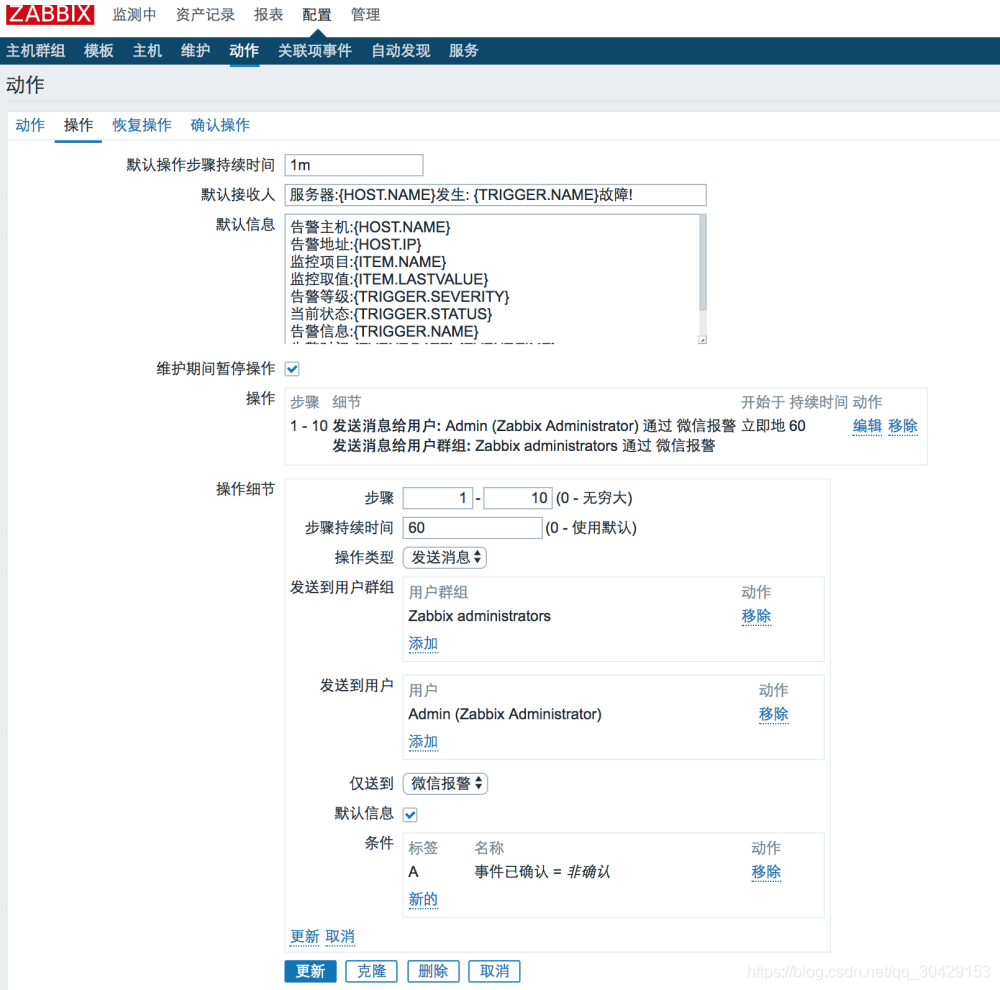
点击操作
默认信息:邮件的主题
告警主机:{HOSTNAME1}
告警时间:{EVENT.DATE} {EVENT.TIME}
告警等级:{TRIGGER.SEVERITY}
告警信息:{TRIGGER.NAME}
告警项目:{TRIGGER.KEY1}
问题详情:{ITEM.NAME}:{ITEM.VALUE}
当前状态:{TRIGGER.STATUS}:{ITEM.VALUE1}
事件ID:{EVENT.ID}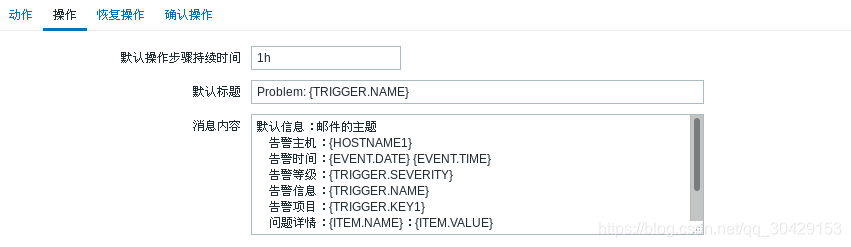
微信报警
下面所有准备操作是为了获取下面4个信息:
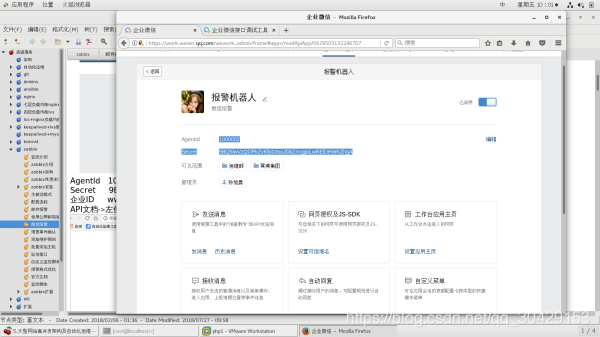
应用:报警机器人
AgentId:
1000002
Secret:
rIrN51FEjgW6T2bdmSaEoOIB5UbaBTgddQkuC8cca1w
企业CorpID:
wwa1da242f211cdf47
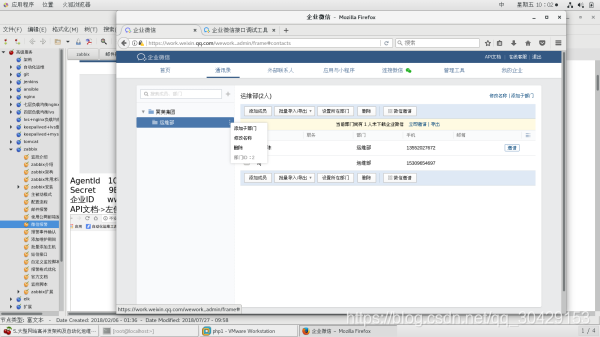
部门:运维部
部门ID:2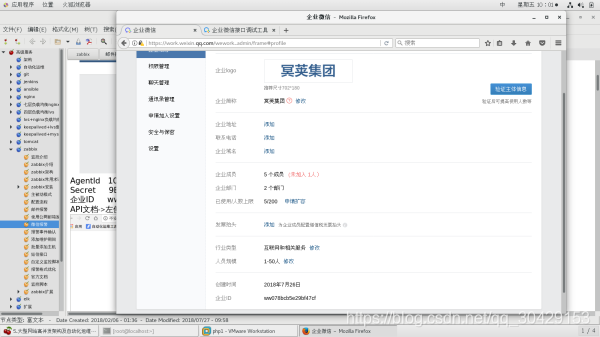
大部分操作在PC端后台完成(手机端不行)
1.下载企业微信
2.注册企业
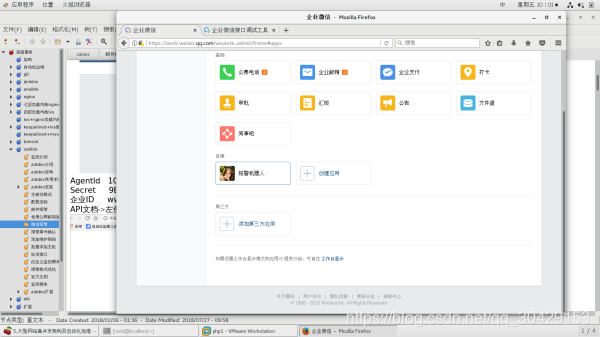
3.创建自己的应用
4.添加员工(可以不添加)
5.添加管理组
6.添加部门
7.测试企业微信接口调试工具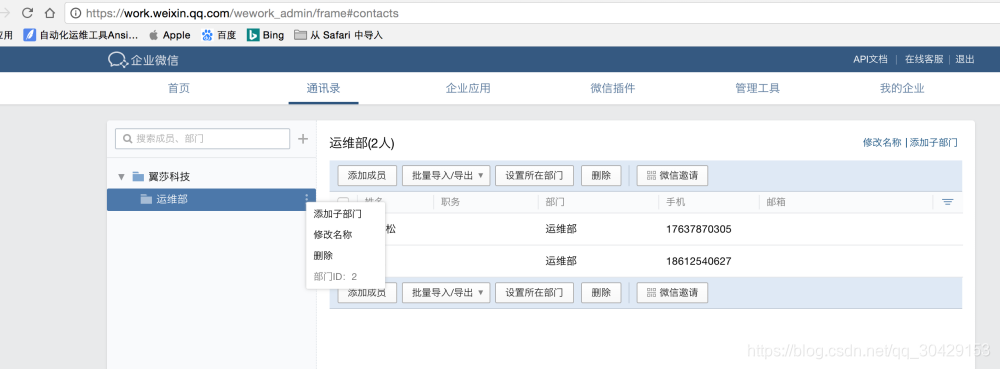
AgentId 1000002
Secret 9BQ5lwVzQOPkZvKfpOmuJDkZrrcgjoLwRElDHWKZhgA
企业ID ww078bcb5e29bf47cf
API文档->左侧 开发者工具->接口调试工具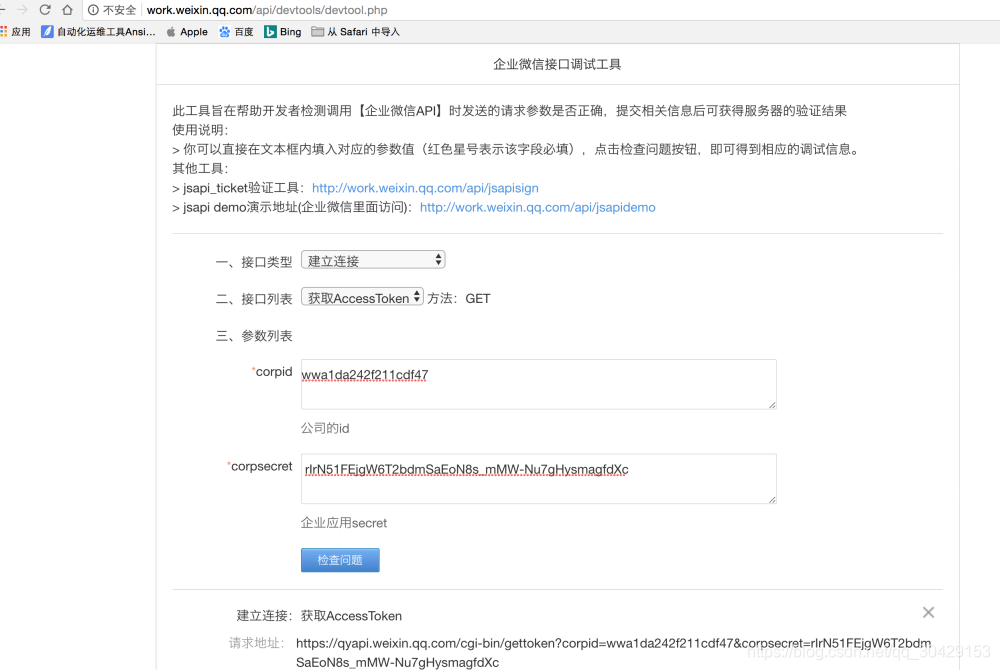
建立连接:获取AccessToken
请求地址: https://qyapi.weixin.qq.com/cgi-bin/gettoken?corpid=wwa1da242f211cdf47&corpsecret=rIrN51FEjgW6T2bdmSaEoN8s_mMW-Nu7gHysmagfdXc
返回结果: HTTP/1.1 200 OK
Connection: keep-alive
Error-Code: 0
Error-Msg: ok
Content-Type: application/json; charset=UTF-8
Content-Length: 277 {"errcode":0,"errmsg":"ok","access_token":"9O7DSEqnUsQ8MD2bRGfFs26cabY1XcGErPnnJF_mfBBnI5zsM2I3u9-9Sj0tAzW2TOuC27zHHUxaVH8dYRDneqqocmhRiGXP4zTkkg_GzqwPiVLZMAZzSKKFAD6x2nOKMNG1QBiBOkRz6KL04SB5xGyEnjL2iYzKY4Z-ggY6BahOByGZvzDNaFoJj3YTp5blSPkm9exizerPUpDZNiGXtw","expires_in":7200}
上面测试好之后可以配置监控脚本了
python监控脚本:
有4个地方需要修改,找到他们修改成之前获取的信息
self.__corpid = 'wwa1da242f211cdf47' //公司的corpid
self.__secret = 'rIrN51FEjgW6T2bdmSaEoOIB5UbaBTgddQkuC8cca1w' //应用的secret
'toparty':2, //部门id
'agentid':"1000002", //应用id
[root@ansible alertscripts]# cat wechat.py
#!/usr/bin/env python
# -*- coding: utf-8 -*-
import urllib,urllib2,json
import sys
reload(sys)
sys.setdefaultencoding( "utf-8" )
class WeChat(object):
__token_id = ''
# init attribute
def __init__(self,url):
self.__url = url.rstrip('/')
self.__corpid = 'wwa1da242f211cdf47'
self.__secret = 'rIrN51FEjgW6T2bdmSaEoOIB5UbaBTgddQkuC8cca1w'
# Get TokenID
def authID(self):
params = {'corpid':self.__corpid, 'corpsecret':self.__secret}
data = urllib.urlencode(params)
content = self.getToken(data)
try:
self.__token_id = content['access_token']
# print content['access_token']
except KeyError:
raise KeyError
# Establish a connection
def getToken(self,data,url_prefix='/'):
url = self.__url + url_prefix + 'gettoken?'
try:
response = urllib2.Request(url + data)
except KeyError:
raise KeyError
result = urllib2.urlopen(response)
content = json.loads(result.read())
return content
# Get sendmessage url
def postData(self,data,url_prefix='/'):
url = self.__url + url_prefix + 'message/send?access_token=%s' % self.__token_id
request = urllib2.Request(url,data)
try:
result = urllib2.urlopen(request)
except urllib2.HTTPError as e:
if hasattr(e,'reason'):
print 'reason',e.reason
elif hasattr(e,'code'):
print 'code',e.code
return 0
else:
content = json.loads(result.read())
result.close()
return content
# send message
def sendMessage(self,touser,message):
self.authID()
data = json.dumps({
'touser':touser,
'toparty':2,
'msgtype':"text",
'agentid':"1000002",
'text':{
'content':message
},
'safe':"0"
},ensure_ascii=False)
response = self.postData(data)
print response
if __name__ == '__main__':
a = WeChat('https://qyapi.weixin.qq.com/cgi-bin')
a.sendMessage(sys.argv[1],sys.argv[3])
修改权限:
[root@ansible alertscripts]# chown zabbix.zabbix /usr/lib/zabbix/alertscripts/wechat.py
[root@ansible alertscripts]# chmod 777 /usr/lib/zabbix/alertscripts/wechat.py
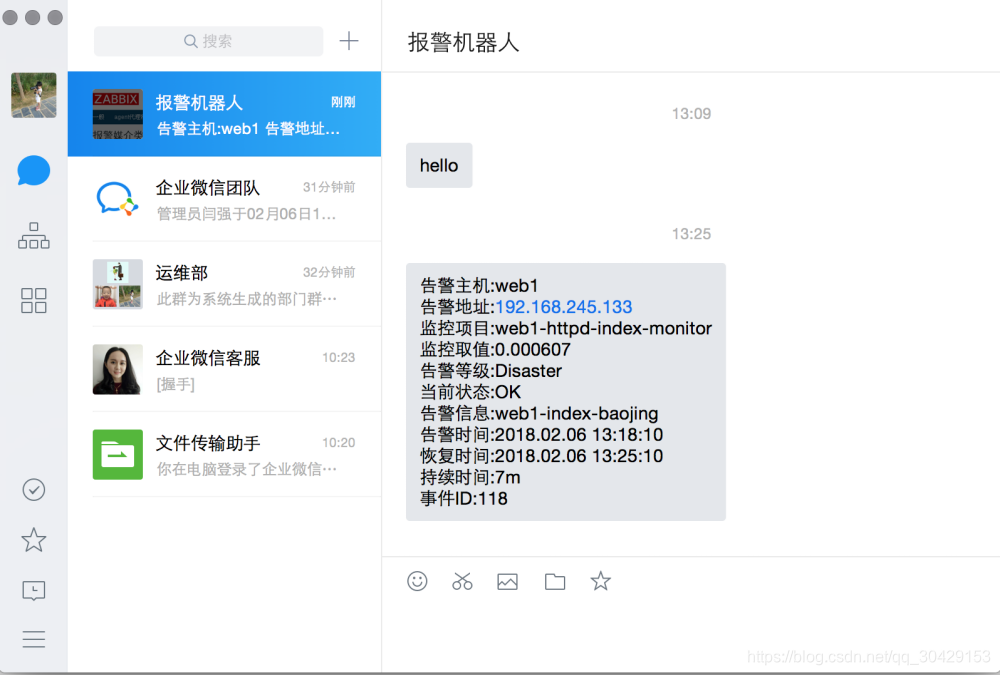
测试脚本:下面的invalidparty可以忽略 ,如果正常会收到消息如下图
[root@ansible alertscripts]# ./wechat.py wusong test test
{u'invalidparty': u'2', u'invaliduser': u'wusong', u'errcode': 0, u'errmsg': u'ok'}
[root@ansible alertscripts]# vim wechat.py
[root@ansible alertscripts]# ./wechat.py YanQiang test test
{u'invalidparty': u'2', u'invaliduser': u'', u'errcode': 0, u'errmsg': u'ok'}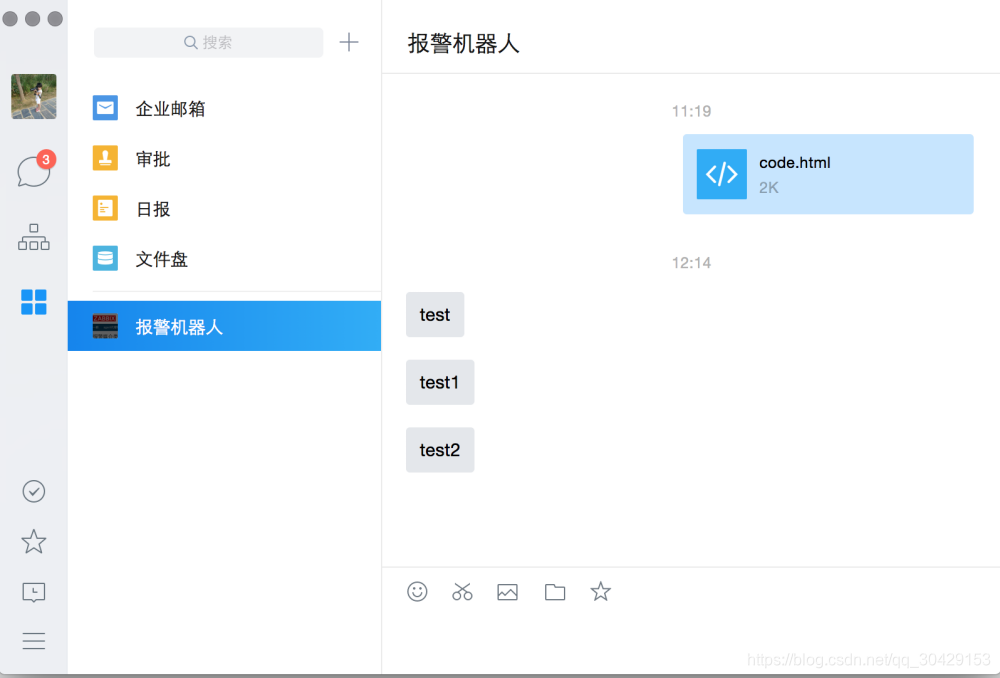
zabbix配置微信报警:
创建报警媒介:
管理->报警媒介类型->创建媒体类型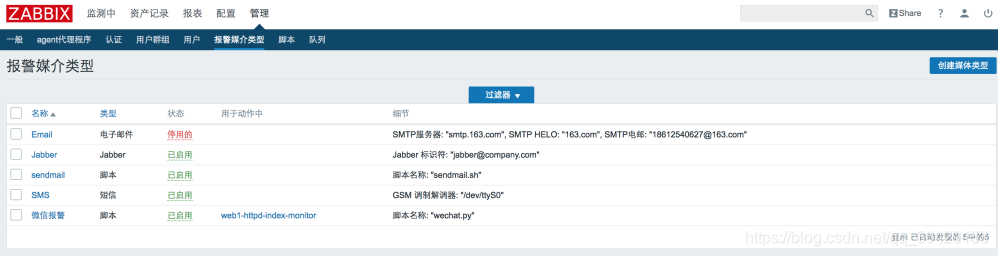
zabbix 3.0 需要在为alert脚本定义参数,以前的版本参数都固定的,现在用户可以自己定义命令行的参数了。添加的参数也就是脚本中的$1、$2、$3等。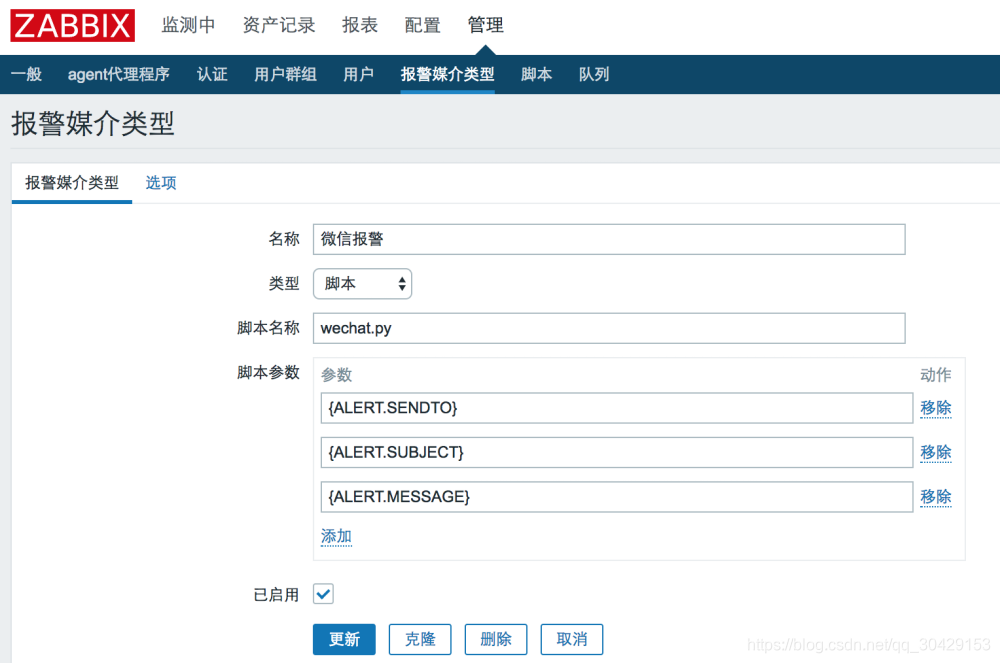
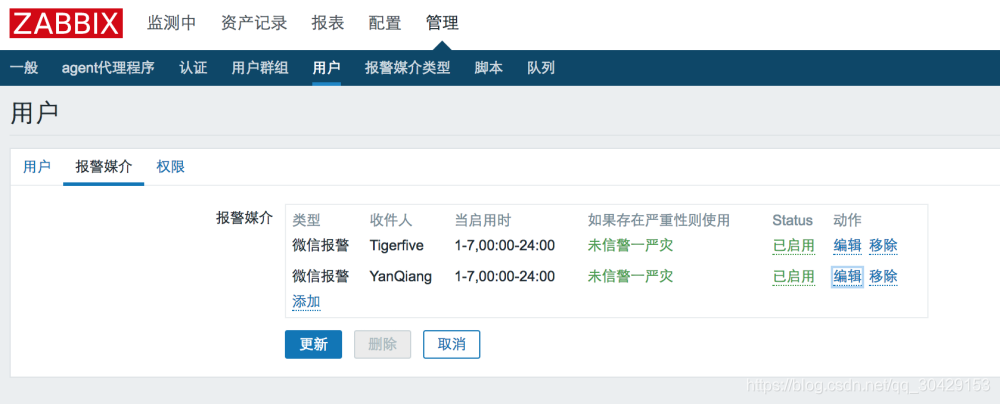
添加完成后,需要关联到报警用户Administration-->Users-->Media-->add
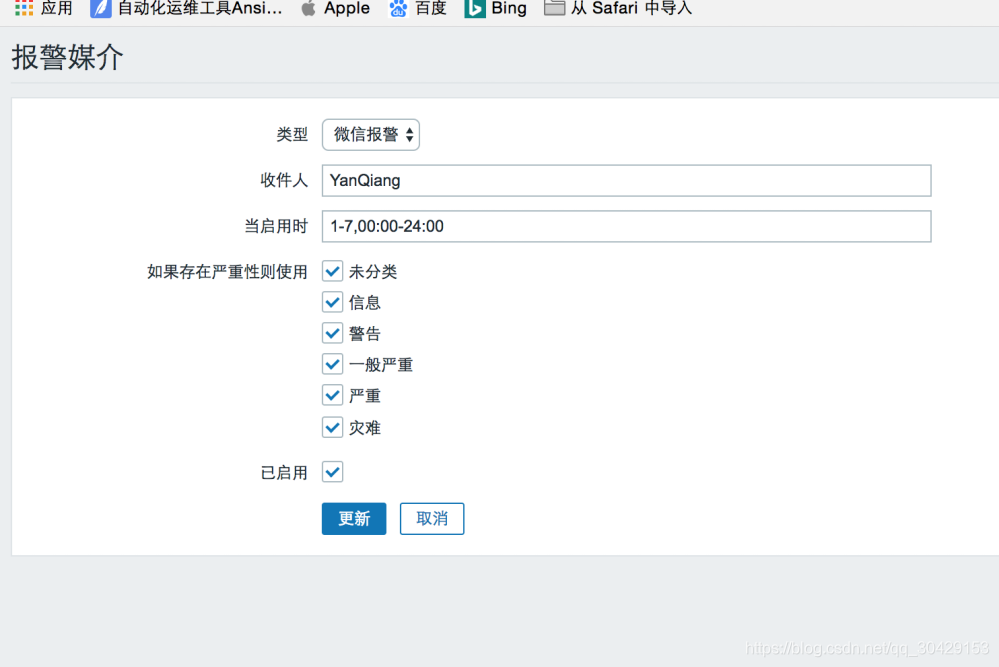
配置收件人:
注意填写的收件人是:企业微信内的员工帐号,比如下面童鞋的帐号为:Tigerfive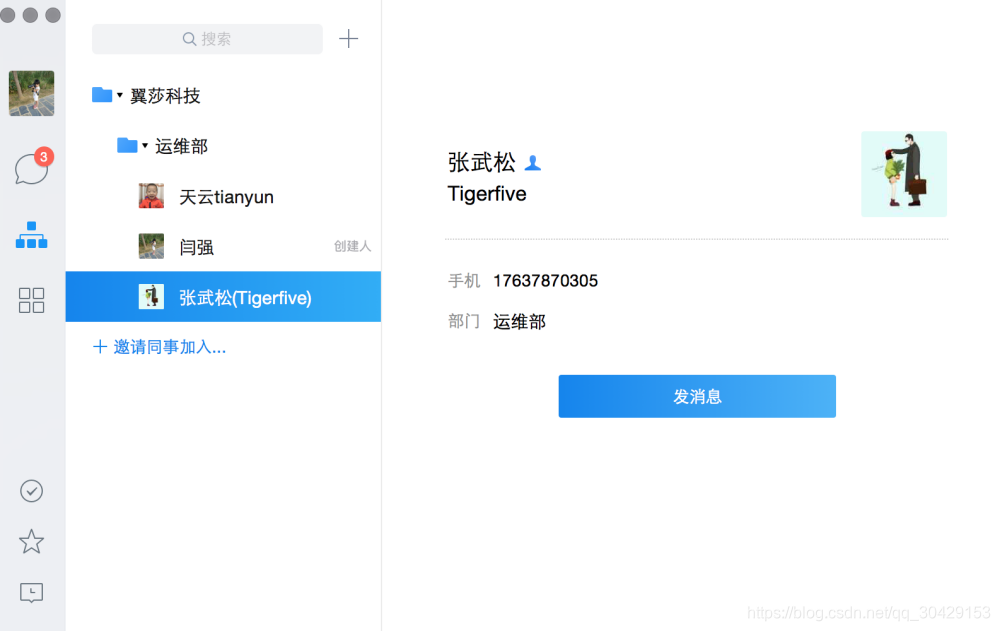
添加动作,触发条件后报警后发送微信消息。
Configuration-->Actions-Event source(Triggers)-Create action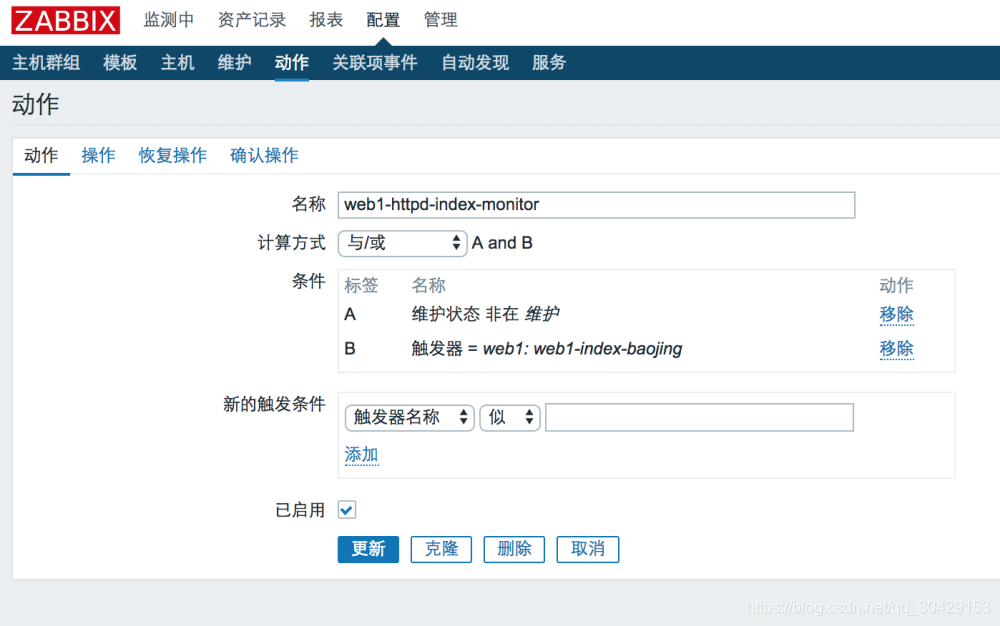
恢复操作和确认操作都可以配置,同上