Redis官方网站非常好记:https://redis.io/,安装也非常简单。请到官网下载最新发布的稳定版本:http://download.redis.io/releases/redis-3.2.5.tar.gz
-----------------------------------------单机--------------------------------------------
yum update
yum install -y gcc
cd /opt
wget http://download.redis.io/releases/redis-3.2.5.tar.gz
tar -zxvf redis-3.2.5.tar.gz
cd redis-3.2.5
make
cd src
make test
如果报如下错误:
You need tcl 8.5 or newer in order to run the Redis test
make: *** [test] Error 1
1、先去这里下载:
http://downloads.sourceforge.net/tcl/tcl8.6.1-src.tar.gz
cd /opt
wget http://downloads.sourceforge.net/tcl/tcl8.6.1-src.tar.gz
tar zxvf tcl8.6.1-src.tar.gz
cd tcl8.6.1/
cd unix
./configure
make
make install
cd /redis-3.2.5/src
make test
cd ../
make PREFIX=/usr/redis install
cp redis.conf /usr/redis/
如果要其它ip访问redis服务
iptables -F 关闭防火墙
vim redis.conf
bind 0.0.0.0(指定IP,0.0.0.0代表所有IP)
protected-mode no(或者设置requirepass 使用密码远程连接)
daemonize yes 服务最好以后台运行
dir /usr/redis/data (SNAPSHOTTING存储位置)
save "" (SNAPSHOTTING,rdb关闭周期性同步)
./redis-server redis.conf 指定配置启动redis服务
-------------------------------------主从模式+哨兵集群--------------------------------------
192.168.110.66 6379 master
192.168.110.88 6379 slave
....... slave
vim redis.conf
在要设置为slave的redis.conf找到REPLICATION下的slaveof 写入
slaveof <masterip> <masterport> (slaveof 192.168.110.66 6379)
cd /opt
cp sentinel.conf /usr/redis/bin
cd /usr/redis/bin
单哨兵
vim sentinel.conf
修改sentinel monitor master001 192.168.110.66 6379 1(1代表1个sentinel投票给某个redisslve,slave就变成master)
哨兵集群
假设3个,在每个下做如下配置修改
vim sentinel.conf
port 26379(36379,46479)
sentinel monitor master001 192.168.110.66 6379 2
./redis-sentinel sentinel.conf 启动服务
----------------------------redis集群---------------------------------------------------
如果使用集群,sentinel可以不用配置、启动
redis服务最好分别在不同的服务器上
192.168.110.66 6379
192.168.110.66 6380
192.168.110.66 6381
192.168.110.88 6379
192.168.110.88 6380
192.168.110.88 6381
前置
yum update
yum install -y ruby rubygems
gem install redis
报错 :Centos默认支持ruby到2.0.0,可gem 安装redis需要最低是2.2.2
========== 192.168.110.66:6379 ==========
######### NETWORK #########
bind 192.168.110.66
port 6379
######### GENERAL #########
daemonize yes
pidfile "/var/run/redis_6379.pid"
######### REDIS CLUSTER #########
cluster-enabled yes
cluster-config-file nodes.66_6379
cluster-node-timeout 15000
######### APPEND ONLY MODE #########
appendonly yes
========== 192.168.110.66:6380 ==========
######### NETWORK #########
bind 192.168.110.66
port 6380
######### GENERAL #########
daemonize yes
pidfile "/var/run/redis_6380.pid"
######### REDIS CLUSTER #########
cluster-enabled yes
cluster-config-file nodes.66_6380
cluster-node-timeout 15000
######### APPEND ONLY MODE #########
appendonly yes
========== 192.168.110.66:6381 ==========
######### NETWORK #########
bind 192.168.110.66
port 6381
######### GENERAL #########
daemonize yes
pidfile "/var/run/redis_6381.pid"
######### REDIS CLUSTER #########
cluster-enabled yes
cluster-config-file nodes.66_6381
cluster-node-timeout 15000
######### APPEND ONLY MODE #########
appendonly yes
========== 192.168.110.88:6379 ==========
######### NETWORK #########
bind 192.168.110.88
port 6379
######### GENERAL #########
daemonize yes
pidfile "/var/run/redis_6379.pid"
######### REDIS CLUSTER #########
cluster-enabled yes
cluster-config-file nodes.88_6379
cluster-node-timeout 15000
######### APPEND ONLY MODE #########
appendonly yes
========== 192.168.110.88:6380 ==========
######### NETWORK #########
bind 192.168.110.88
port 6380
######### GENERAL #########
daemonize yes
pidfile "/var/run/redis_6380.pid"
######### REDIS CLUSTER #########
cluster-enabled yes
cluster-config-file nodes.88_6380
cluster-node-timeout 15000
######### APPEND ONLY MODE #########
appendonly yes
========== 192.168.110.88:6381 ==========
######### NETWORK #########
bind 192.168.110.88
port 6381
######### GENERAL #########
daemonize yes
pidfile "/var/run/redis_6381.pid"
######### REDIS CLUSTER #########
cluster-enabled yes
cluster-config-file nodes.88_6381
cluster-node-timeout 15000
######### APPEND ONLY MODE #########
appendonly yes
分别先将rdb,aof,node日志删除(一般在dir指定的目录里,上面设置为/usr/redis/data)
将六个redis服务启动
yum install curl
curl -L get.rvm.io | bash -s stable
报错
Warning, RVM 1.26.0 introduces signed releases and automated check of signatures when GPG software found. Assuming you trust Michal Papis import the mpapis public key (downloading the signatures).

GPG signature verification failed for '/usr/local/rvm/archives/rvm-1.29.3.tgz' - 'https://github.com/rvm/rvm/releases/download/1.29.3/1.29.3.tar.gz.asc'! Try to install GPG v2 and then fetch the public key:

    gpg2 --recv-keys 409B6B1796C275462A1703113804BB82D39DC0E3

or if it fails:

    command curl -sSL https://rvm.io/mpapis.asc | gpg2 --import -

the key can be compared with:

    https://rvm.io/mpapis.asc
    https://keybase.io/mpapis

NOTE: GPG version 2.1.17 have a bug which cause failures during fetching keys from remote server. Please downgrade or upgrade to newer version (if available) or use the second method described above.
gpg --keyserver hkp://keys.gnupg.net --recv-keys 409B6B1796C275462A1703113804BB82D39DC0E3
curl -L get.rvm.io | bash -s stable
source /usr/local/rvm/scripts/rvm
rvm list known
rvm install 2.3.4
rvm use 2.3.4
rvm remove 2.0.0
gem install redis
ruby --version
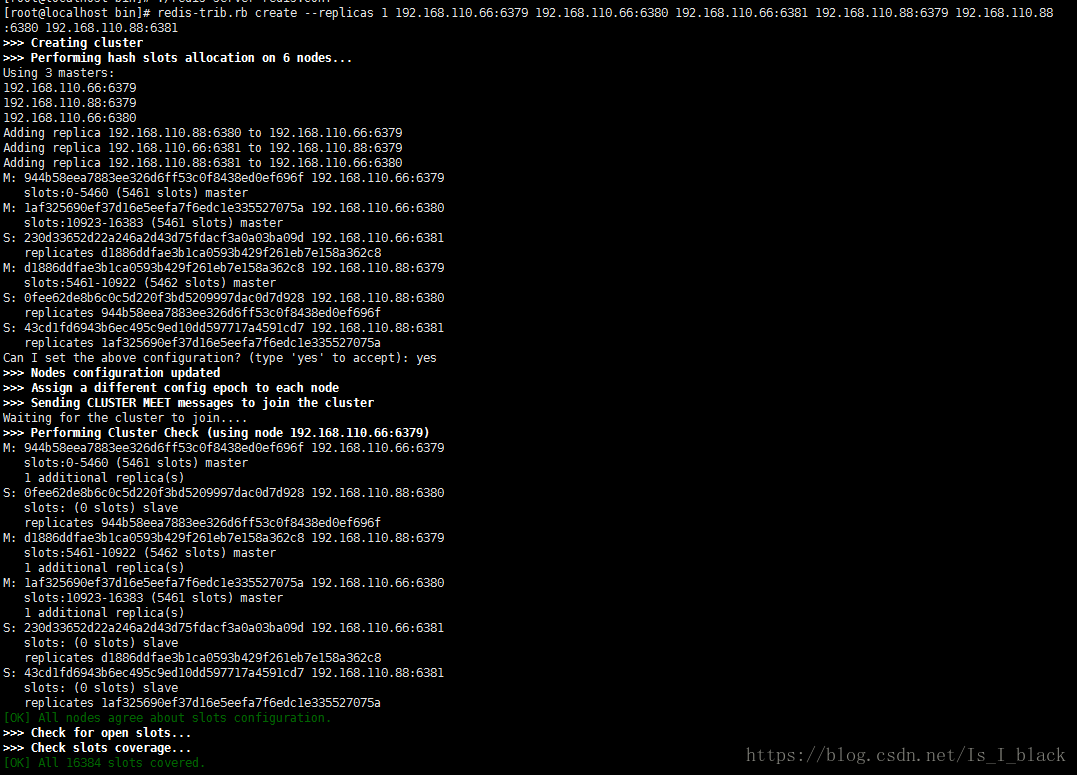
在Redis的源文件目录的src目录中,有一个Ruby脚本文件“redis-trib.rb”,通过运行这个脚本文件可以完成Redis Cluster的初始化和启动操作。如果各位读者希望以后都能方便的运行这个脚本文件,可以先将这个脚本文件Copy到Redis的执行目录下:
# cp 你的源码路径/redis-trib.rb /usr/local/bin/redis-trib.rb
//或者
# cp 你的源码路径/redis-trib.rb /usr/redis/bin/redis-trib.rb
redis-trib.rb create --replicas 1 192.168.110.66:6379 192.168.110.66:6380 192.168.110.66:6381 192.168.110.88:6379 192.168.110.88:6380 192.168.110.88:6381
客户端进行集群环境的连接,就是一个更简单的工作了。实际上Redis的客户端并不需要连接到Redis Cluster中的所有节点,就可以完整操作Redis Cluster中的数据。这是因为每个Redis Cluster中的节点都清楚整个集群的全局情况,特别是Slot存在的位置。以下示例代码展示了如何通过Java代码连接到Redis Cluster:
......
JedisPoolConfig config = new JedisPoolConfig();
config.setMaxTotal(10);
config.setMaxIdle(2);

// 这里添加集群节点。可以添加多个节点,但并不是需要添加Cluster的所有节点
HostAndPort node0 = new HostAndPort("192.168.110.66", 6379);
HostAndPort node1 = new HostAndPort("192.168.110.88", 6379);
Set<HostAndPort> nodes = new HashSet<HostAndPort>();
nodes.add(node0);
nodes.add(node1);

// 创建和连接到集群
JedisCluster jedisCluster = new JedisCluster(nodes, 5000, 10, config);

//==============================
// 做你要做的Redis操作吧,少年
//==============================

jedisCluster.close();
......
集群设置密码
方式一:修改所有Redis集群中的redis.conf配置文件:
masterauth passwd123
requirepass passwd123
说明:这种方式需要重新启动各节点
方式二:进入各个实例进行设置:
./redis-cli -c -p 7000
config set masterauth passwd123
config set requirepass passwd123
config rewrite
之后分别使用./redis-cli -c -p 7001,./redis-cli -c -p 7002…..命令给各节点设置上密码
注意:各个节点密码都必须一致,否则Redirected就会失败, 推荐这种方式,这种方式会把密码写入到redis.conf里面去,且不用重启
设置密码之后如果需要使用redis-trib.rb的各种命令
如:redis-trib.rb check 127.0.0.1,则会报错ERR] Sorry, can’t connect to node 127.0.0.1:7000
解决办法:
vim /usr/lib/gems/ruby/1.8/gems/redis-3.3.0/lib/redis/client.rb,然后修改passord